Page 2 - IMPORTANT SAFEGUARDS; READ ALL INSTRUCTIONS
2 IMPORTANT SAFEGUARDS READ ALL INSTRUCTIONS When using electrical appliances, basic safety precautions should always be followed, including those listed below: 1. To protect against electrical hazards, do not immerse oven in water or other liquids. 2. NEVER clean with water jets, which can result i...
Page 3 - CONTENTS
3 14. This appliance is not intended for use by persons (including children) with reduced physical, sensory or mental capabilities, or lack of experience and knowledge, unless they have been given supervision or instruction concerning use of the appliance by a person responsible for their safety. 15...
Page 6 - FEATURES AND BENEFITS
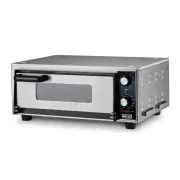
6 FEATURES AND BENEFITS 1. Temperature Control Knob Mechanical dial to select temperature settings (280 ° F - 600 ° F). 2. Manual Timer Timer range up to 15 minutes. An audible signal (single chime) indicates selected time has elapsed. NOTE: TIMER DOES NOT TURN OVEN ON OR OFF. 3. Power ON/OFF Switch...
Page 7 - PARTS AND ACCESSORIES
7 PARTS AND ACCESSORIES Single Oven 1. ON/OFF Switch 2. Temperature Control Knob 3. Timer (15 minutes) 4. Ready Light 5. Ceramic Pizza Deck (packed separately, not shown) 6. Door Handle 7. Tempered Glass Door 8. Interior Light (not shown) 9. Legs (not adjustable or removable) 10. Deck Cleaning Brush...
Page 9 - OVEN INSTALLATION
9 (fig. 2) SLOT (fig. 1) OVEN INSTALLATION 1. After removing the outer shipping carton and packaging material, place the oven on the floor or other flat surface. 2. Open oven and remove any instructions or packaging material shipped inside the unit. 3. For the Double Oven, lift up the front of the o...
Page 12 - INSTALLING AND REPLACING OVEN LIGHT; Be Sure Oven Is Completely Cool and Unplugged
12 6. To clean the glass door, use a glass cleaner or damp cloth and dry with a clean cloth. 7. When opening oven door, be sure to guide the door while lowering it. Doing so will prevent possible damage to the door jamb after an extended period of time. 8. For further information or to purchase addi...
Page 13 - Reattach Glass Bulb Cover; STACKING; Thermostat Overload Protection
13 5. Reattach Glass Bulb Cover Twist bulb cover clockwise to secure. STACKING INSTRUCTIONS The Single Pizza Oven can be stacked using the custom stacking kit. To purchase a stacking kit, please contact customer service or visit the website. Contact information is located on the back of this booklet...
Page 14 - LIMITED ONE YEAR WARRANTY
14 LIMITED ONE YEAR WARRANTY (U.S. AND CANADA ONLY) Waring warrants every new Waring ® Commercial Pizza Oven to be free from defects in materials and workmanship for a period of one year from the date of purchase when used with foodstuffs, nonabrasive liquids (other than detergents) and nonabrasive ...
Page 15 - LEA TODAS LAS INSTRUCCIONES
15 MEDIDAS DE SEGURIDAD IMPORTANTES LEA TODAS LAS INSTRUCCIONES Al usar aparatos eléctricos, siempre debe tomar precauciones básicas de seguridad, entre ellas las siguientes: 1. Para reducir el riesgo de electrocución, no coloque el aparato en agua ni en ningún otro líquido. 2. NUNCA lo lave a presi...
Page 16 - ÍNDICE
16 13. Nunca bloquee las aberturas de aire ni coloque el aparato sobre una superficie blanda, donde se puedan obstruir. 14. Los niños o las personas que carezcan de la experiencia o de los conocimientos necesarios para manipular el aparato, o aquellas cuyas capacidades físicas, sensoriales o mentale...
Page 19 - CARACTERÍSTICAS
19 CARACTERÍSTICAS 1. Perilla de control de temperatura Perilla mecánica que permite ajustar la temperatura desde 280 ° F (65 °C) hasta 600 ° F (425 °C). 2. Temporizador manual Hasta 15 minutos. Una señal sonora (un pitido) indica el final del tiempo. NOTA: EL TEMPORIZADOR NO ENCIENDE/APAGA EL HOR...
Page 20 - PIEZAS Y ACCESORIOS
20 PIEZAS Y ACCESORIOS Horno simple 1. Botón de encendido/apagado 2. Perilla de control de temperatura 3. Temporizador (15 minutos) 4. Luz de listo 5. Piedra para pizza de cerámica (empaquetada por separado, no ilustrada) 6. Asa de la puerta 7. Puerta de vidrio templado 8. Luz (no ilustrada) 9. Pata...
Page 22 - INSTALACIÓN DEL HORNO
22 (fig. 2) MUESCA (fig. 1) INSTALACIÓN DEL HORNO 1. Retire el material de embalaje y coloque el horno en el piso u otra superficie plana. 2. Abra el horno y retire el manual de instrucciones y el material de embalaje que se encuentran dentro de la unidad. 3. Para instalar el horno doble : con la ay...
Page 25 - INSTALACIÓN/REEMPLAZO DE LA BOMBILLA; Desenchufe el horno y permita que se enfríe completamente.
25 4. Limpie el interior del horno con un paño húmedo, teniendo cuidado de no tocar las resistencias. 5. Limpie el exterior del horno con un producto para el acero inoxidable, restregando en la dirección de la veta. 6. Limpie la puerta de vidrio con un paño humedecido con agua o con producto para li...
Page 26 - bombilla de vidrio; INSTRUCCIONES DE APILADO; Dispositivo de protección contra el sobrecalentamiento
26 5. Vuelva a colocar el cubre- bombilla de vidrio Gire en sentido horario para sujetar. INSTRUCCIONES DE APILADO Si lo desea, puede apilar varios hornos de pizza simples utilizando un kit de apilado diseñado para este fin. Para comprar un kit de apilado, póngase en contacto con nuestro servicio de...
Page 27 - GARANTÍA LIMITADA DE UN AÑO
27 GARANTÍA LIMITADA DE UN AÑO (VÁLIDA EN LOS EE.UU. Y EN CANADÁ SOLAMENTE) Waring garantiza todo nuevo horno para pizza Waring ® Commercial contra todo defecto de materiales o fabricación durante un año a partir de la fecha de compra, siempre que haya sido usada con alimentos, líquidos no abrasivos...
Page 28 - IMPORTANTES CONSIGNES DE SÉCURITÉ; LIRE TOUTES LES INSTRUCTIONS
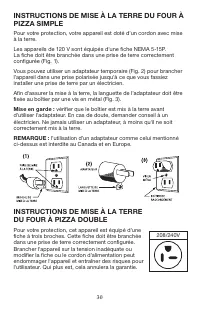
28 IMPORTANTES CONSIGNES DE SÉCURITÉ LIRE TOUTES LES INSTRUCTIONS L'utilisation d'appareils électriques requiert la prise de précautions élémentaires, parmi lesquelles les suivantes : 1. Afin d'éviter les risques de choc électrique, ne jamais placer l'appareil dans l’eau ou tout autre liquide. 2. Ne...
Page 29 - TABLE DES MATIÈRES
29 14. Cet appareil ne devrait pas être utilisé par des enfants ou des personnes atteintes de certains handicaps physiques, mentaux ou sensoriels, ou qui ne disposent pas des connaissances ou de l'expérience nécessaires, à moins qu'une personne responsable de leur sécurité leur en ait expliqué le fo...
Page 32 - CARACTÉRISTIQUES
32 CARACTÉRISTIQUES 1. Bouton de réglage de la température Cadran mécanique permettant de régler la température, de 280 ° F (65 °C) à 600 ° F (425 °C). 2. Minuteur manuel Jusqu'à 15 minutes. Un signal sonore (un bip) indique que le temps est écoulé. REMARQUE : LE MINUTEUR N'ALLUME/N'ÉTEINT PAS LE ...
Page 33 - PIÈCES ET ACCESSOIRES
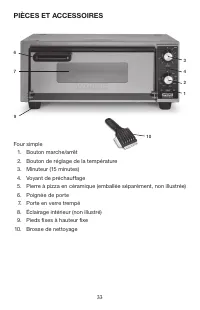
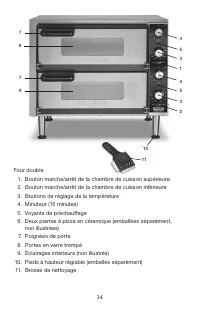
33 PIÈCES ET ACCESSOIRES Four simple 1. Bouton marche/arrêt 2. Bouton de réglage de la température 3. Minuteur (15 minutes) 4. Voyant de préchauffage 5. Pierre à pizza en céramique (emballée séparément, non illustrée) 6. Poignée de porte 7. Porte en verre trempé 8. Éclairage intérieur (non illustré)...
Page 35 - INSTALLATION DU FOUR
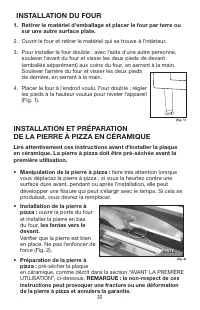
35 (fig. 2) FENTE (fig. 1) INSTALLATION DU FOUR 1. Retirer le matériel d'emballage et placer le four par terre ou sur une autre surface plate. 2. Ouvrir le four et retirer le matériel qui se trouve à l'intérieur. 3. Pour installer le four double : avec l'aide d'une autre personne, soulever l'avant d...
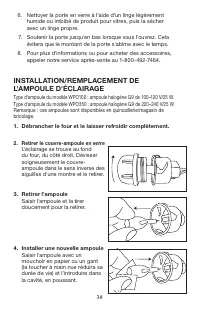
Page 38 - INSTALLATION/REMPLACEMENT DE; Débrancher le four et le laisser refroidir complètement.
38 6. Nettoyer la porte en verre à l’aide d’un linge légèrement humide ou imbibé de produit pour vitres, puis la sécher avec un linge propre. 7. Soutenir la porte jusqu'en bas lorsque vous l'ouvrez. Cela évitera que le montant de la porte s'abîme avec le temps. 8. Pour plus d'informations ou pour ac...
Page 39 - verre en place; INSTRUCTIONS D'EMPILAGE; Protection anti-surchauffe
39 5. Remettre le couvre-ampoule en verre en place Visser le couvre-ampoule dans le sens des aiguilles d'une montre pour le fixer. INSTRUCTIONS D'EMPILAGE Si vous le souhaitez, vous pouvez empiler plusieurs fours à pizza simples grâce à un kit d'empilage conçu à cet effet. Pour acheter un kit d’empi...
Page 40 - GARANTIE LIMITÉE D'UN AN
40 GARANTIE LIMITÉE D'UN AN (VALABLE AUX É.U. ET AU CANADA UNIQUEMENT) Waring garantit tout nouveau four à pizza Waring ® Commercial contre tout vice de matière ou de fabrication pendant une période d'un an suivant sa date d’achat, à condition qu’il ait été utilisé uniquement avec des produits alime...
Page 41 - NOTES