Page 2 - IMPORTANT SAFEGUARDS; READ ALL INSTRUCTIONS.; TO AVOID SERIOUS PERSONAL INJURY:
2 IMPORTANT SAFEGUARDS When using electrical appliances, basic safety precautions should always be taken, including the following: 1. READ ALL INSTRUCTIONS. 2. TO AVOID SERIOUS PERSONAL INJURY: Do not attempt to fry with this unit. This unit is not a fryer. 3. WARNING: During and after operation, th...
Page 3 - CAUTION
3 16. This appliance is not intended for use by persons (including children) with reduced physical, sensory or mental capabilities, or lack of experience and knowledge, unless they have been given supervision or instruction concerning use of the appliance by a person responsible for their safety. 17...
Page 4 - SAVE THESE INSTRUCTIONS; The pasta cooker does not contain any user-serviceable parts.; SPECIFICATIONS
4 heat-insulating material, and that the closest attention be paid to fire-prevention regulations. 32. Be cautious of boiling water. Boiling water will scald skin and cause severe burns. SAVE THESE INSTRUCTIONS APPROVED FOR COMMERCIAL USE The pasta cooker does not contain any user-serviceable parts....
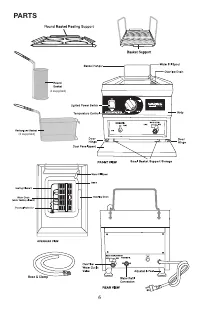
Page 6 - PARTS
Page 8 - BEFORE FIRST USE; Clean the Pasta Cooker; OPERATION; To Open Door
8 BEFORE FIRST USE Clean the Pasta Cooker 1. Use a non-corrosive, grease-dissolving commercial cleaner to clean the protective metal oils from all surface parts and the tank interior. 2. Follow the cleaner manufacturer’s directions. CAUTION: Be careful not to disturb the thermostat and high limit ca...
Page 9 - TO DRAIN WATER FROM BASIN; RETHERMALIZING INSTRUCTIONS
9 Plug in the socket, press switch into the ON position. The power switch will be illuminated and the element will start heating. Turn the temperature control knob to the BOIL position. When the water is boiling, add the pasta into the basket(s) and cook.When cooking is completed, unit can be kept i...
Page 10 - SAFETY; Reset; Draining Pasta – Round Baskets
10 basket, make sure there is enough space between food bags for water flow and that the bags do not overlap. 4. NOTE: Monitor internal food temperatures closely for food safety. Follow FDA and USDA guidelines for minimum food temperatures. Most foods should be cooked to a higher internal temperatur...
Page 11 - CLEANING & MAINTENANCE; ALWAYS DISCONNECT OR UNPLUG THE ELECTRICAL POWER; TO REMOVE DOOR
11 CLEANING & MAINTENANCE WARNING: In addition to what is listed here, refer to all Important Safeguards on page 2 of this manual. ALWAYS DISCONNECT OR UNPLUG THE ELECTRICAL POWER FROM THE PASTA COOKER BEFORE CLEANING. DO NOT use any cleaning fluids that can be harmful to you, others around you,...
Page 12 - DELIMING
12 DELIMING The pasta cooker MUST be delimed periodically (depending upon usage, every 3–4 weeks). Follow the deliming agent manufacturer’s instructions. Rinse thoroughly at least 3 times before using pasta cooker after deliming.The appliance is not to be cleaned with a water jet.The pasta cooker sh...
Page 13 - at the bottom of the basin, it is removable for; TROUBLESHOOTING; If the pasta cooker does not work, please check the following:
13 ISSUE CAUSE SOLUTION Pasta cooker is not working Power supply Check power source Power switch has not been turned on Check that the unit is correctly plugged in and turned on Plug/cord damaged Call for service Internal wiring fault Call for service Food debris stuck on or between heating element ...
Page 14 - LIMITED ONE YEAR WARRANTY
14 If problems persist and the assigned solution does not remedy the issue, please call Waring Customer Service at 860-496-3100. LIMITED ONE YEAR WARRANTY (U.S. AND CANADA ONLY) Waring warrants every new Waring ® Commercial Pasta Cooker to be free from defects in material and workmanship for a perio...
Page 15 - NOTES
Page 16 - LEA TODAS LAS INSTRUCCIONES.; PARA EVITAR EL RIESGO DE LESIONES GRAVES:
16 MEDIDAS DE SEGURIDAD IMPORTANTES Al usar aparatos eléctricos, siempre debe tomar precauciones básicas de seguridad, incluso las siguientes: 1. LEA TODAS LAS INSTRUCCIONES. 2. PARA EVITAR EL RIESGO DE LESIONES GRAVES: No utilice este aparato para freír; no es una freidora. 3. ADVERTENCIA: el apara...
Page 18 - ESPECIFICACIONES
18 27. Siempre averigüe el nivel del agua antes del uso y agregue agua si es necesario (el nivel del agua bajará con cada uso). 28. SIEMPRE ESTÉ LISTO en caso de incendio; asegúrese de tener un extinguidor de incendios correctamente clasificado cerca. 29. NO sumerja el aparato en agua; esto causará ...
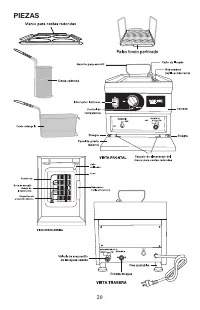
Page 20 - PIEZAS
Page 22 - ANTES DEL PRIMER USO; Limpie el aparato; FUNCIONAMIENTO; Cómo abrir el panel de puerta
22 ANTES DEL PRIMER USO Limpie el aparato 1. Use un limpiador de grasa comercial no corrosivo para eliminar los aceites usados para proteger las superficies metálicas (piezas y cuba) del aparato. 2. Siga las instrucciones del fabricante del limpiador. PRECAUCIÓN: tenga cuidado de no tocar los tubos ...
Page 23 - CÓMO VACIAR LA CUBA
23 Abra la válvula de llenado. CERCIÓRESE de llenar la cuba a su capacidad máxima, justo debajo del rebosadero. Nota: la capacidad máxima no está indicada. La cuba tiene una capacidad máxima de 12.4 L. PRECAUCIÓN: las resistencias deben permanecer plano en el fondo de la cuba. El agua debe cubrirlas...
Page 24 - INSTRUCCIONES DE CALENTAMIENTO
24 Si el aparato no está conectado al agua corriente, utilice la válvula de evacuación de las aguas usadas para vaciar la cuba. Para esto, conecte un tubo (no proveído) a la válvula de evacuación de las aguas usadas ubicada en la parte trasera del aparato. Abra (posición “OPEN”) la válvula y vacíe e...
Page 25 - RESET; Escurrimiento – Cestas redondas; LIMPIEZA Y MANTENIMIENTO; SIEMPRE APAGUE Y DESCONECTE EL APARATO ANTES DE LA
25 vuelva a conectar el cable y presione el botón RESET ubicado en la parte trasera del aparato. Si el cable está dañado, hacerlo cambiar por un técnico calificado solamente. Escurrimiento – Cestas redondas Sacar la cesta del agua, sacudirla ligeramente y colocarla sobre el marco para cestas redonda...
Page 26 - REMOCIÓN DEL PANEL DE PUERTA; DESCALCIFICACIÓN
26 REMOCIÓN DEL PANEL DE PUERTA Ubique la bisagra derecha del panel de puerta. Saque la barra de bloqueo y jale la parte derecha del panel. Luego, jalar el lado izquierdo del panel (Fig. 5). DESCALCIFICACIÓN El hervidor de pasta DEBE ser descalcificado regularmente (cada 3 a 4 meses, según la frecue...
Page 28 - RESOLUCIÓN DE PROBLEMAS; En caso de problema, siga las instrucciones a continuación.; PROBLEMA
28 RESOLUCIÓN DE PROBLEMAS En caso de problema, siga las instrucciones a continuación. PROBLEMA CAUSA SOLUCIÓN El aparato no se enciende Suministro eléctrico Averigüe la fuente de alimentación Interruptor apagado Cerciórese de que el cable está conectado y de que el interruptor está en “ON”. Cable/c...
Page 29 - GARANTÍA LIMITADA DE UN AÑO
29 Si el problema persiste y que las soluciones propuestas no lo resuelven, llame al servicio posventa de Waring al 860-496-3100. GARANTÍA LIMITADA DE UN AÑO (VÁLIDA EN LOS EE.UU. Y EN CANADÁ SOLAMENTE) Waring garantiza toda nuevo hervidor de pasta/calentador de alimentos Waring ® Commercial contra ...
Page 30 - IMPORTANTES CONSIGNES DE SÉCURITÉ; LIRE TOUTES LES INSTRUCTIONS.; POUR ÉVITER LES RISQUES DE BLESSURE GRAVE :
30 IMPORTANTES CONSIGNES DE SÉCURITÉ L'utilisation d'appareils électriques requiert la prise de précautions élémentaires, parmi lesquelles les suivantes : 1. LIRE TOUTES LES INSTRUCTIONS. 2. POUR ÉVITER LES RISQUES DE BLESSURE GRAVE : Ne pas utiliser cet appareil pour frire ; ce n'est pas une friteu...
Page 32 - SPÉCIFICATIONS
32 une surveillance étroite pendant l’utilisation. 27. Toujours vérifier le niveau d’eau avant l’utilisation et ajouter de l'eau au besoin (le niveau de l’eau baissera à chaque utilisation). 28. TOUJOURS ÊTRE PRÊT en cas d’incendie. Toujours garder un extincteur adéquat à proximité. 29. NE PAS subme...
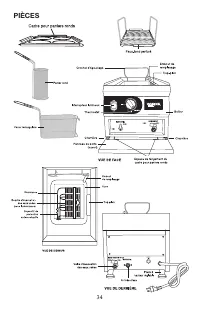
Page 34 - PIÈCES
Page 36 - AVANT LA PREMIÈRE UTILISATION; Nettoyer l’appareil; Suivre les consignes du fabricant du nettoyant.; FONCTIONNEMENT; Pour ouvrir le panneau de porte
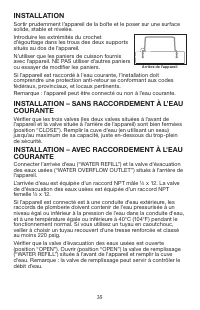
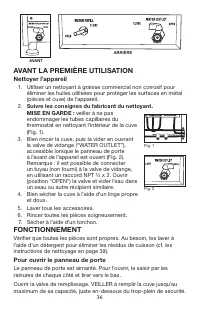
36 AVANT LA PREMIÈRE UTILISATION Nettoyer l’appareil 1. Utiliser un nettoyant à graisse commercial non corrosif pour éliminer les huiles utilisées pour protéger les surfaces en métal (pièces et cuve) de l’appareil. 2. Suivre les consignes du fabricant du nettoyant. MISE EN GARDE : veiller à ne pas e...
Page 37 - POUR VIDER LA CUVE
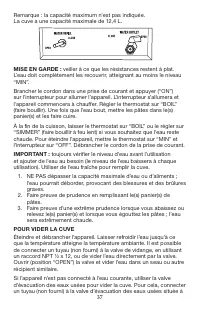
37 Remarque : la capacité maximum n'est pas indiquée. La cuve a une capacité maximale de 12,4 L. MISE EN GARDE : veiller à ce que les résistances restent à plat. L’eau doit complètement les recouvrir, atteignant au moins le niveau “MIN”.Brancher le cordon dans une prise de courant et appuyer (“ON”) ...
Page 38 - INSTRUCTIONS DE RÉCHAUFFAGE
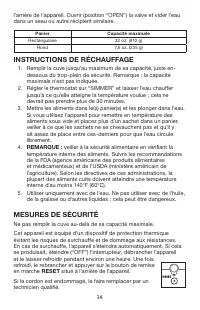
38 l’arrière de l’appareil. Ouvrir (position “OPEN”) la valve et vider l’eau dans un seau ou autre récipient similaire. Panier Capacité maximale Rectangulaire 32 oz. (910 g) Rond 7,5 oz. (225 g) INSTRUCTIONS DE RÉCHAUFFAGE 1. Remplir la cuve jusqu’au maximum de sa capacité, juste en- dessous du trop...
Page 39 - NETTOYAGE ET ENTRETIEN; TOUJOURS ÉTEINDRE ET DÉBRANCHER L’APPAREIL AVANT LE
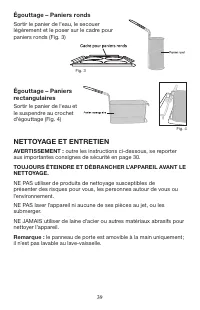
39 Égouttage – Paniers ronds Sortir le panier de l'eau, le secouer légèrement et le poser sur le cadre pour paniers ronds (Fig. 3) Égouttage – Paniers rectangulaires Sortir le panier de l'eau et le suspendre au crochet d’égouttage (Fig. 4) NETTOYAGE ET ENTRETIEN AVERTISSEMENT : outre les instruction...
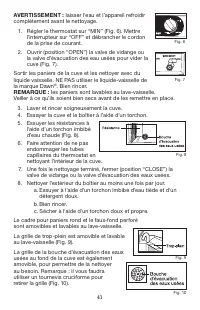
Page 40 - RETRAIT DU PANNEAU DE PORTE; blocage de la charnière et tirer sur le côté droit du panneau.; DÉTARTRAGE; Suivre les consignes du; Après le détartrage, rincer la cuve
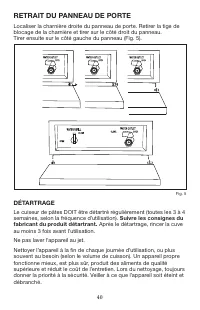
40 RETRAIT DU PANNEAU DE PORTE Localiser la charnière droite du panneau de porte. Retirer la tige de blocage de la charnière et tirer sur le côté droit du panneau. Tirer ensuite sur le côté gauche du panneau (Fig. 5). DÉTARTRAGE Le cuiseur de pâtes DOIT être détartré régulièrement (toutes les 3 à 4 ...
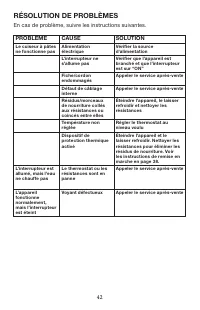
Page 42 - RÉSOLUTION DE PROBLÈMES; En cas de problème, suivre les instructions suivantes.; PROBLÈME
42 RÉSOLUTION DE PROBLÈMES En cas de problème, suivre les instructions suivantes. PROBLÈME CAUSE SOLUTION Le cuiseur à pâtes ne fonctionne pas Alimentation électrique Vérifier la source d'alimentation L’interrupteur ne s’allume pas Vérifier que l’appareil est branché et que l’interrupteur est sur “O...
Page 43 - GARANTIE LIMITÉE D'UN AN
43 Si le problème persiste malgré les solutions mises en œuvre, appeler notre service après-vente au 860-496-3100. GARANTIE LIMITÉE D'UN AN (VALABLE AUX É.-U. ET AU CANADA UNIQUEMENT) Waring garantit tout nouvel appareil Waring ® Commercial contre tout vice de matière ou de fabrication pendant une p...