Page 2 - IMPORTANT UNPACKING INSTRUCTIONS; CAUTION: THE SLICING BLADE HAS A VERY SHARP EDGE.; REPACKING INSTRUCTIONS; DELIVERY, PACKAGING AND STORAGE; TRANSPORT – HANDLING – STORAGE
2 IMPORTANT UNPACKING INSTRUCTIONS CAUTION: THE SLICING BLADE HAS A VERY SHARP EDGE. To avoid injury when unpacking the unit, please follow these instructions: 1. Put the box on a large, sturdy, flat surface. 2. Remove the instruction book and other literature. 3. Position the box on its side, and t...
Page 3 - IMPORTANT SAFEGUARDS; READ ALL INSTRUCTIONS.; Unplug power cord from outlet when not in use, before
3 IMPORTANT SAFEGUARDS When using electrical appliances, especially when children are present, basic safety precautions should always be taken, including the following: 1. READ ALL INSTRUCTIONS. 2. Unplug power cord from outlet when not in use, before putting on or taking off parts, before cleaning,...
Page 5 - GROUNDING INSTRUCTIONS
5 SAVE THESE INSTRUCTIONS. FOR COMMERCIAL USE ONLY GROUNDING INSTRUCTIONS This appliance must be grounded while in use to protect the operator from electric shock. The appliance is equipped with a 3-conductor cord and 3-prong grounding-type plug to fit the proper grounding- type receptacle. The appl...
Page 6 - PRESENTATION; SAFETY; MAIN VOLTAGE
6 CONTENTS 1. Unpacking Instructions ..................................................................22. Delivery, Packaging and Storage ...................................................23. Important Safeguards ....................................................................34. General Infor...
Page 7 - Sliding capacity of the food tray group carriage.; TECHNICAL DATA – DIMENSIONS; COMMON TECHNICAL CHARACTERISTICS
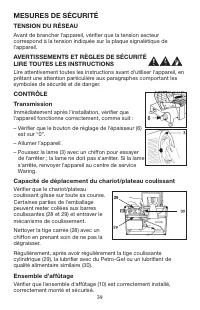
7 Read carefully all the instructions before using the machine, taking particular care of the paragraphs with the safety and danger symbols. CONTROLTransmission. Immediately after installation, check that the appliance is operating correctly as follows: – Ensure the thickness control knob (6) is in ...
Page 9 - INSTALLATION AND OPERATION; INSTALLATION; – Minimum temperature above; Leveling; Check that the movable bulkhead (2) with the thickness control knob; PARTS
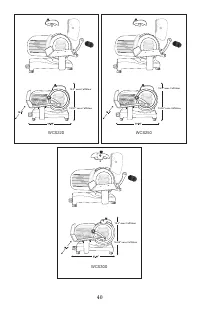
9 Slicer Info WCS220 WCS250 WCS300 Dimensions in Inches L x W 18.8 x 20.8 18.9 x 20.8 18.9 x 21.6 Height Less Sharpener 13.9 14.7 16.9 Height w/Sharpener 15.2 15.2 19.4 Blade Diameter 8.5 in. 10 in. 12 in. Power ¾ HP* ¾ HP* 1 HP* Capacity of Cut (approx) 8.2 x 5.7 8.6 x 6.2 7.8 x 8.0 Carriage Stroke...
Page 10 - OPERATION; With the slicer turned off, pull the slicing food tray (7) completely; NEVER ATTEMPT TO ADJUST LOAD OR UNLOAD FOOD TRAY; BLADE SHARPENING – for blade diameter:; NOTE: It should be noted that the blade is highly resistant; • Unplug slicer from electrical outlet.
10 5 – ON / OFF switch 6 – Thickness control knob 7 – Sliding carriage or sliding food tray 9 – Blade cover release knob 10 – Sharpener group 12 – Feet 13 – Sharpener group locking knob OPERATION With the slicer turned off, pull the slicing food tray (7) completely toward you and place the food prod...
Page 11 - CLEANING AND SANITIZING INSTRUCTIONS
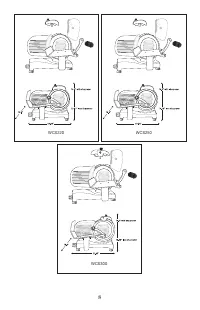
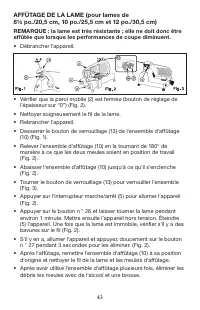
11 • Reinsert the plug.• Loosen the locking knob (13) of the sharpener group (10). See Fig. 1. • Raise the sharpener group (10), turning it by 180° so that both wheels are in working position. See Fig. 2. • Lower the sharpener group (10) until it locks. See Fig. 2.• Secure the group by turning the l...
Page 13 - CLEANING OF THE BLADE; BLADE IS SHARP. HANDLE
13 CLEANING OF THE BLADE BLADE IS SHARP. HANDLE CAREFULLY WHEN CLEANING. It is not necessary to disassemble the blade when cleaning it because all its parts are reachable. The blade is very sharp. WARNING: The replacement of the blade must be made by specialized personnel.• The blade has to be repla...
Page 15 - WARNING; REMOVABLE; Transmission
15 WHEEL CLEANING After many sharpening operations, clean the sharpening stones (10) of sharpening residue with a metallic brush. Wipe sharpening wheels with alcohol after cleaning. Any other servicing should be performed by an authorized service representative. GASKET INSPECTION The recommended int...
Page 16 - Sharpening stones of the sharpener; TROUBLESHOOTING GUIDE
16 Electric cord Periodically check its condition (there must not be any kinks). If the cord is damaged, it has to be replaced. Please return it to an authorized service center for replacement. Blade The blade has to be replaced when it is not possible to sharpen it or when the distance between the ...
Page 17 - LIMITED ONE-YEAR WARRANTY
17 LIMITED ONE-YEAR WARRANTY (U.S. AND CANADA ONLY) Waring warrants every new WARING COMMERCIAL PRODUCT to be free from defects in materials and workmanship for a period of one year from the date of purchase when used with foodstuffs, nonabrasive liquids (other than detergents) and nonabrasive semi-...
Page 18 - PRECAUCIÓN: LA CUCHILLA REBANADORA ES MUY FILOSA.; INSTRUCCIONES DE EMPAQUE; ALMACENAJE; TRANSPORTE – MANIPULACIÓN – ALMACENAJE
18 IMPORTANTES INSTRUCCIONES DE DESEMBALAJE PRECAUCIÓN: LA CUCHILLA REBANADORA ES MUY FILOSA. Para evitar las heridas, desembale el aparato cuidadosamente, siguiendo las instrucciones a continuación: 1. Ponga la caja sobre una superficie espaciosa, plana y segura. 2. Saque el libro de instrucciones ...
Page 19 - LEA TODAS LAS INSTRUCCIONES.; Desenchufe el aparato cuando no está en uso, antes de
19 El embalaje es adecuado para transportar el aparato por todos los medios de transporte.Puede apilar hasta tres cartones encima uno de otro.– La caja y material embalaje deben mantenerse secos.– La caja debe ser manejada por 2 personas.– Cuando la caja se encuentre en una paleta, manipúlela solame...
Page 21 - INSTRUCCIONES DE PUESTA A TIERRA
21 alimentos. Compruebe periódicamente el estado del cable; en caso de que esté dañado, debe ser sustituido por personal cualificado. 25. No sumerja el aparato en agua para limpiarlo. 26. No lave el aparato a presión o a chorro. 27. No utilice extensiones. 28. No jale el cable para desenchufar el ap...
Page 22 - PRESENTACIÓN; MEDIDAS DE SEGURIDAD; TENSIÓN DE LA RED
22 ÍNDICE 1. Instrucciones de desembalaje ...................................................... 182. Entrega/Transporte, embalaje y almacenaje ................................ 183. Medidas de seguridad importantes ............................................. 194. Información general .................
Page 25 - ESPECIFICACIONES TÉCNICAS/DIMENSIONES; CARACTERÍSTICAS TÉCNICAS; INSTALACIÓN Y OPERACIÓN
25 ESPECIFICACIONES TÉCNICAS/DIMENSIONES CARACTERÍSTICAS TÉCNICAS – Estructura de aluminio fundido– Protector de cuchilla, carro/bandeja móvil y pared móvil de aluminio– Eje de cuchilla montado en un rodamiento de bolas doble– Motor ventilado profesional– Cuchilla templada profesional– Protector de ...
Page 26 - Nivelación; Compruebe que la pared móvil (2) con la perilla de ajuste de espesor; PIEZAS; completamente hacia usted y coloque el alimento en la bandeja.
26 Nivelación Compruebe que la pared móvil (2) con la perilla de ajuste de espesor (6) (en la posición “0”) está alineado con la cuchilla (véase el dibujo arriba).Si no están alineadas, ajuste la altura del pie derecho (12) destornillando o atornillándolo. PIEZAS 1 – Brazo sujetador de alimento 2 – ...
Page 27 - AFILADO DE LA CUCHILLA (para cuchillas de; necesario afilarla cuando el rendimiento de corte disminuye.
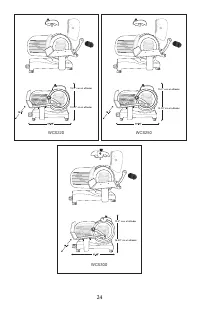
27 NUNCA INTENTE AJUSTAR LA CARGA O DESCARGAR EL CARRO/LA BANDEJA MÓVIL DURANTE EL FUNCIONAMIENTO. AFILADO DE LA CUCHILLA (para cuchillas de 8½ pulgadas/20.5 cm, 10 pulgadas/25.5 cm y 12 pulgadas/30.5 cm) NOTA: la cuchilla es muy resistente; por lo tanto, solo es necesario afilarla cuando el rendimi...
Page 28 - LIMPIEZA Y DESINFECCIÓN
28 LIMPIEZA Y DESINFECCIÓN LAVE, ENJUAGUE Y DESINFECTE CUIDADOSAMENTE EL APARATO DESPUÉS DE CADA USO, SEGÚN SE INDICA A CONTINUACIÓN.EL INCUMPLIMIENTO DE ESTAS INSTRUCCIONES PUEDE CAUSAR UNA ACUMULACIÓN DE RESIDUOS EN LA UNIDAD. Nunca limpie el aparato con productos o materiales abrasivos.• Desenchu...
Page 29 - SISTEMA FÁCIL DE LIMPIAR; Cerciórese de que la perilla de ajuste de espesor está en la; LIMPIEZA DE LA CUCHILLA; LA CUCHILLA ES MUY FILOSA
29 No lave el aparato a presión o a chorro.No lave el aparato con manguera, ni lo salpique excesivamente con agua.No ponga ninguna de las piezas del aparato en el lavavajillas.No use cepillos que puedan dañar la superficie del aparato.No limpie ninguna parte del aparato con lana de acero u otros mat...
Page 31 - LIMPIEZA DE LAS RUEDAS DE AFILAR; REMOVIBLES; Transmisión
31 Nota: para matar las bacterias, se aconseja dejar que las piezas se sequen al aire.NO exceda las concentraciones de detergente o desinfectante recomendadas por el fabricante. No use solución de cloro con una concentración superior a 200 partes por millón (1 cucharada de blanqueador de hipoclorito...
Page 32 - Piedras de afilar del afilador; RESOLUCIÓN DE PROBLEMAS
32 Cable eléctrico Compruebe regularmente el estado del cable (no debe ser torcido). Si está dañado, debe ser reemplazado; regréselo a un centro de servicio autorizado para su sustitución. Cuchilla Se debe cambiar la cuchilla de no ser posible afilarla, o si la distancia entre el filo de la cuchilla...
Page 33 - GARANTÍA LIMITADA DE UN AÑO; Waring garantiza todo nuevo PRODUCTO WARING COMMERCIAL contra
33 GARANTÍA LIMITADA DE UN AÑO (VÁLIDA EN LOS EE.UU. Y EN CANADÁ SOLAMENTE) Waring garantiza todo nuevo PRODUCTO WARING COMMERCIAL contra todo defecto de materiales o fabricación durante dos años a partir de la fecha de compra, siempre que haya sido usado con alimentos, líquidos no abrasivos (a exce...
Page 34 - INSTRUCTIONS DE DÉBALLAGE; MISE EN GARDE : LA LAME TRANCHEUSE EST TRÈS; INSTRUCTIONS DE RÉEMBALLAGE; ET RANGEMENT; TRANSPORT – MANUTENTION – RANGEMENT
34 INSTRUCTIONS DE DÉBALLAGE MISE EN GARDE : LA LAME TRANCHEUSE EST TRÈS TRANCHANTE. Pour éviter toute blessure lors du déballage de l'appareil, veuillez suivre ces instructions : 1. Placer la boîte sur une grande surface plate et stable. 2. Retirer le livret de directives et tout autre document de ...
Page 35 - LIRE TOUTES LES INSTRUCTIONS.; Débrancher l'appareil lorsque vous ne l’utilisez pas, avant
35 les moyens de transport.Vous pouvez empiler jusqu'à trois cartons les uns sur les autres.– La boîte et le matériel d'emballage doivent être conservés au sec.– La boîte doit être manipulée par 2 personnes.– Lorsque la boîte est sur une palette, ne la manipuler qu'avec des palans électriques. IMPOR...
Page 37 - INSTRUCTIONS DE MISE À LA TERRE
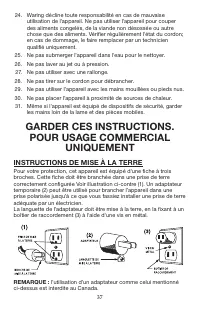
37 24. Waring décline toute responsabilité en cas de mauvaise utilisation de l’appareil. Ne pas utiliser l’appareil pour couper des aliments congelés, de la viande non désossée ou autre chose que des aliments. Vérifier régulièrement l'état du cordon; en cas de dommage, le faire remplacer par un tech...
Page 38 - PRÉSENTATION; Le but de ce manuel d'utilisation est de fournir au consommateur; IMPORTANCE DU MANUEL D’UTILISATION; informations importantes concernant la sécurité et les dangers,
38 TABLE DES MATIÈRES 1. Instructions de déballage .............................................................342. Livraison/Transport, emballage et rangement .............................343. Importantes consignes de sécurité ..............................................354. Information générale...
Page 39 - MESURES DE SÉCURITÉ; TENSION DU RÉSEAU
39 MESURES DE SÉCURITÉ TENSION DU RÉSEAU Avant de brancher l'appareil, vérifier que la tension secteur correspond à la tension indiquée sur la plaque signalétique de l'appareil. AVERTISSEMENTS ET RÈGLES DE SÉCURITÉ LIRE TOUTES LES INSTRUCTIONS Lire attentivement toutes les instructions avant d'utili...
Page 41 - SPÉCIFICATIONS TECHNIQUES/DIMENSIONS; CARACTÉRISTIQUES TECHNIQUES; INSTALLATION ET FONCTIONNEMENT
41 SPÉCIFICATIONS TECHNIQUES/DIMENSIONS CARACTÉRISTIQUES TECHNIQUES – Structure en fonte d'aluminium – Protège-lame, chariot/plateau coulissant et paroi mobile en aluminium. – Arbre porte-lame monté sur un double roulement à billes – Moteur ventilé professionnel – Lame trempée professionnelle – Prot...
Page 42 - Mise à niveau; PIÈCES; NE JAMAIS ESSAYER D'AJUSTER LA CHARGE OU DE
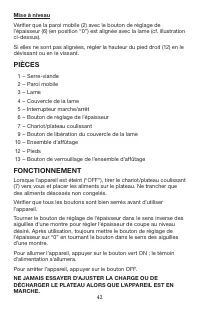
42 Mise à niveau Vérifier que la paroi mobile (2) avec le bouton de réglage de l'épaisseur (6) (en position “0”) est alignée avec la lame (cf. illustration ci-dessus).Si elles ne sont pas alignées, régler la hauteur du pied droit (12) en le dévissant ou en le vissant. PIÈCES 1 – Serre-viande 2 – Par...
Page 43 - AFFÛTAGE DE LA LAME (pour lames de; REMARQUE : la lame est très résistante elle ne doit donc être
43 AFFÛTAGE DE LA LAME (pour lames de 8½ po./20,5 cm, 10 po./25,5 cm et 12 po./30,5 cm) REMARQUE : la lame est très résistante ; elle ne doit donc être affûtée que lorsque les performances de coupe diminuent. • Débrancher l'appareil. • Vérifier que la paroi mobile (2) est fermée (bouton de réglage d...
Page 44 - NETTOYAGE ET DÉSINFECTION
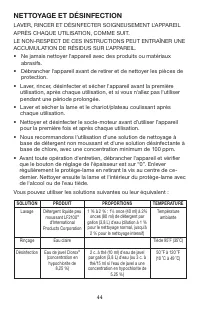
44 NETTOYAGE ET DÉSINFECTION LAVER, RINCER ET DÉSINFECTER SOIGNEUSEMENT L'APPAREIL APRÈS CHAQUE UTILISATION, COMME SUIT.LE NON-RESPECT DE CES INSTRUCTIONS PEUT ENTRAÎNER UNE ACCUMULATION DE RÉSIDUS SUR L'APPAREIL.• Ne jamais nettoyer l'appareil avec des produits ou matériaux abrasifs. • Débrancher l...
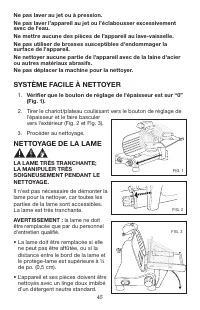
Page 45 - SYSTÈME FACILE À NETTOYER; Vérifier que le bouton de réglage de l'épaisseur est sur “0”; NETTOYAGE DE LA LAME; LA LAME TRÈS TRANCHANTE
45 Ne pas laver au jet ou à pression.Ne pas laver l’appareil au jet ou l’éclabousser excessivement avec de l'eau.Ne mettre aucune des pièces de l’appareil au lave-vaisselle.Ne pas utiliser de brosses susceptibles d'endommager la surface de l'appareil.Ne nettoyer aucune partie de l'appareil avec de l...
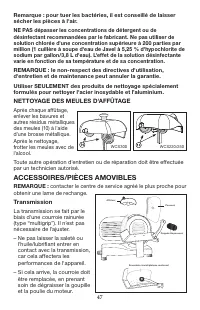
Page 47 - NETTOYAGE DES MEULES D'AFFÛTAGE; ACCESSOIRES/PIÈCES AMOVIBLES
47 Remarque : pour tuer les bactéries, il est conseillé de laisser sécher les pièces à l'air.NE PAS dépasser les concentrations de détergent ou de désinfectant recommandées par le fabricant. Ne pas utiliser de solution chlorée d'une concentration supérieure à 200 parties par million (1 cuillère à so...
Page 48 - Meules d’affûtage; RÉSOLUTION DE PROBLÈMES
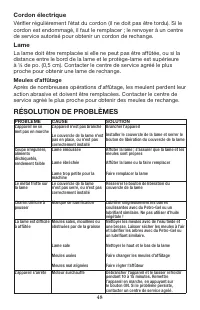
48 Cordon électrique Vérifier régulièrement l'état du cordon (il ne doit pas être tordu). Si le cordon est endommagé, il faut le remplacer ; le renvoyer à un centre de service autorisé pour obtenir un cordon de rechange. Lame La lame doit être remplacée si elle ne peut pas être affûtée, ou si la dis...
Page 49 - GARANTIE LIMITÉE D'UN AN
49 GARANTIE LIMITÉE D'UN AN (VALABLE AUX É.-U. ET AU CANADA UNIQUEMENT) Waring garantit tout nouvel appareil WARING COMMERCIAL contre tout vice de matière ou de fabrication pendant une période d'un an suivant sa date d’achat, à condition qu’il ait été utilisé uniquement avec des produits alimentaire...