Page 2 - IMPORTANT SAFEGUARDS; READ ALL INSTRUCTIONS.; UNPLUG FROM OUTLET WHEN NOT IN USE, BEFORE
2 IMPORTANT SAFEGUARDS When using electrical appliances, basic safety precautions should always be followed to reduce the risk of fire, electric shock and/or injury to persons, including the following: 1. READ ALL INSTRUCTIONS. 2. UNPLUG FROM OUTLET WHEN NOT IN USE, BEFORE PUTTING ON OR TAKING OFF P...
Page 4 - CONTENTS
4 APPROVED FOR COMMERCIAL USE SAVE THESE INSTRUCTIONS FOR COMMERCIAL USE ONLY CONTENTS Important Safeguards .................................................................. 2Grounding Instructions ................................................................. 5Extension Cords .....................
Page 6 - INTRODUCTION
INTRODUCTION The Waring ® Commercial Convection Oven takes countertop cooking to a whole new level. Convection baking uses a rear heating element with a fan to circulate heated air, maintaining the selected temperature throughout the oven cavity. This constant flow of air eliminates the hot and cold...
Page 7 - PARTS AND ACCESSORIES; Indicator Light – Green
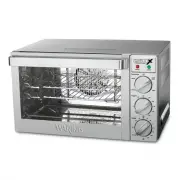
N O I T C E V N O C 6 12 11 9 1 2 3 5 4 14 13 10 14 8 7 PARTS AND ACCESSORIES (continues on page 8) 1. Timer 2. Power Indicator Light – Red 3. Oven Temperature “Ready” Indicator Light – Green 4. Function Control Knob 5. Temperature Control Knob 6. Wire Racks 7. Upper Heating Elements 8. Rack Support...
Page 9 - Broil can be used for beef sirloin, hamburgers, chicken
9 Broil Indicates that the upper heating elements are operating. Broil can be used for beef sirloin, hamburgers, chicken breasts, lamb chops, pork chops, fish fillets and steaks. 5. Temperature Control Knob This thermostatic switch controls the temperature inside the oven; it maintains the proper te...
Page 10 - Bake
10 BEFORE USING YOUR OVEN Before using your oven for the first time, be sure to: • Wash the wire racks and baking tray with soapy water, rinse with clean water and dry. These parts should be cleaned and thoroughly dried by hand only. • Use a damp cloth to lightly wipe the inner walls of the oven. Us...
Page 11 - Convection Bake
11 • If not using the timer, set timer to OVEN ON position. • Always use potholders or oven mitts when removing hot food from the oven. Convection Bake The general rule for using most regular baking recipes with a convection oven is to reduce the suggested temperature in the recipe by 25˚F. For roas...
Page 13 - OVEN RACK POSITIONS; The diagram below illustrates the three rack positions for this; BAKEWARE REFERENCE GUIDE; The following bakeware is suitable for the .9 cubic foot oven
N O I T C E V N O C POSITION 3 POSITION 2 POSITION 1 13 OVEN RACK POSITIONS The diagram below illustrates the three rack positions for this convection oven. BAKEWARE REFERENCE GUIDE The following bakeware is suitable for the .9 cubic foot oven when using one rack (dimensions given in inches): 13 x 9...
Page 14 - Always unplug the oven from the electrical outlet.
14 TIPS AND HINTS • It is important to rotate any item you are baking in the oven to ensure even cooking. • It is recommended to bake using one rack at a time. If you do bake with more than one rack, be sure to rotate both the baking trays and their rack positions halfway through bake time. • To ens...
Page 15 - INSTALLING & REPLACING THE OVEN LIGHT; without
15 INSTALLING & REPLACING THE OVEN LIGHT In the top right hand corner of your oven is a halogen light bulb, which offers a longer lifespan than standard light bulbs and is able to withstand high temperatures. Purchase a new 120V 25 watt G9 halogen light bulb at your local hardware store and inse...
Page 16 - SAFETY FEATURES; Thermostat Overload Protection
16 SAFETY FEATURES The Waring ® Commercial Convection Oven is equipped with the following feature to ensure safety: Thermostat Overload Protection If the unit heats up beyond the recommended temperature level, the oven will automatically turn off. To reset, unplug the unit from the wall outlet and a...
Page 17 - MEDIDAS DE SEGURIDAD IMPORTANTES; LEA TODAS LAS INSTRUCCIONES.; Desconecte el aparato cuando no esté en uso, antes
17 17 MEDIDAS DE SEGURIDAD IMPORTANTES Siempre que use aparatos eléctricos, debe tomar precauciones básicas de seguridad para reducir el riesgo de incendio, electrocución o heridas, entre las cuales las siguientes: 1. LEA TODAS LAS INSTRUCCIONES. 2. Desconecte el aparato cuando no esté en uso, antes...
Page 18 - Siempre desconecte el aparato antes de guardarlo en
18 18 15. Siempre apague el aparato (OFF) antes de desconectarlo. 16. Tenga mucho cuidado al poner en el horno envases de papel, cartón, plástico o materiales semejantes. 17. Tenga mucho cuidado al sacar la bandeja del horno o eliminar la grasa caliente. 18. No cubra ninguna parte del horno con pape...
Page 19 - ÍNDICE
19 19 APROBADO PARA USO COMERCIAL GUARDE ESTAS INSTRUCCIONES PARA USO COMERCIAL SOLAMENTE ÍNDICE Medidas de seguridad importantes ........................................... 17Instrucciones de puesta a tierra ................................................. 20Uso de extensiones .......................
Page 21 - INTRODUCCIÓN
21 INTRODUCCIÓN El horno de convección Waring ® Commercial toma la cocción sobre la encimera a un nivel completamente nuevo. La cocción por convección utiliza un elemento calefactor trasero junto con un ventilador que hace circular el aire caliente adentro del horno para mantener la temperatura cons...
Page 22 - PIEZAS Y ACCESORIOS
N O I T C E V N O C 6 12 11 9 1 2 3 5 4 14 13 10 14 8 7 22 PIEZAS Y ACCESORIOS (continúa en la página 24) 1. Temporizador 2. Luz de encendido (roja) 3. Luz de listo (verde) 4. Selector de función 5. Control de temperatura 6. Rejillas 7. Elementos calefactores superiores 8. Guías de las rejillas 9. E...
Page 23 - Selector de función; Este
23 23 1. Temporizador Permite programar el tiempo de cocción hasta 120 minutos o encender el horno sin temporizador (posición OVEN ON). Si el tiempo deseado es menos de 20 minutos, gire el temporizador hasta después de la marca "20" y luego póngalo en la posición deseada. Si el tiempo desead...
Page 25 - FUNCIONAMIENTO
25 25 • Limpie la superficie interior del horno con un paño humedecido. Si desea, puede utilizar un poco de detergente, pero no utilice productos abrasivos. No toque los elementos calefactores. No moje mucho el interior del horno. • Ponga las rejillas adentro del horno. • Precaliente el horno en la ...
Page 28 - POSICIONES DE LAS REJILLAS; Las rejillas pueden posicionarse de tres maneras diferentes,; CAPACIDADES DEL HORNO; acomodará las fuentes siguientes:
N O I T C E V N O C POSICIÓN 3 POSICIÓN 2 POSICIÓN 1 28 28 POSICIONES DE LAS REJILLAS Las rejillas pueden posicionarse de tres maneras diferentes, según se indica a continuación. CAPACIDADES DEL HORNO El horno tiene una capacidad de 0.9 pies cúbicos (25 L) y acomodará las fuentes siguientes: Fuente ...
Page 29 - Desconecte el cable de la toma de corriente.
29 29 CONSEJOS ÚTILES • Gire la fuente varias veces durante la cocción para garantizar un cocido uniforme. • Le aconsejamos que no utilice más de una rejilla a la vez. Si desea usar más de una rejilla, gire las fuentes y cámbielas de nivel durante la cocción. • No empuje la fuente/placa hasta el fon...
Page 30 - INSTALACIÓN/REEMPLAZO DE LA BOMBILLA
Abrir la cubierta, y luego retirar. Parte trasera de la cubierta Ranura del compartimiento de luz Tornillo cruciforme Cubierta de la bombilla 30 30 INSTALACIÓN/REEMPLAZO DE LA BOMBILLA El horno está equipado con una bombilla halógena que dura por más tiempo que las bombillas estándares y que soporta...
Page 31 - MECANISMOS DE SEGURIDAD; Protección anti-sobrecalentamiento
Parte trasera del horno BOTON DE REINICIO DEBAJO DE LA UNIDAD 31 MECANISMOS DE SEGURIDAD Para su tranquilidad, el horno de convección Waring ® Commercial viene equipado con los mecanismos de seguridad siguientes: Protección anti-sobrecalentamiento Apaga automáticamente el aparato en caso de sobrecal...
Page 32 - IMPORTANTES CONSIGNES DE SÉCURITÉ; LIRE TOUTES LES INSTRUCTIONS.; DÉBRANCHER L'APPAREIL APRÈS USAGE, AVANT
32 32 IMPORTANTES CONSIGNES DE SÉCURITÉ L'utilisation d'appareils électriques requiert la prise de précautions élémentaires afin de réduire le risque de brûlures, d’électrocution, d’incendie ou de blessures, parmi lesquelles les suivantes : 1. LIRE TOUTES LES INSTRUCTIONS. 2. DÉBRANCHER L'APPAREIL A...
Page 33 - Veiller à débrancher l'appareil avant de le ranger.
33 33 15. Toujours éteindre l'appareil (OFF) avant de le débrancher. 16. Faire preuve d'une extrême prudence lorsque vous mettez au four des contenants en papier, carton, matières plastiques ou matériaux similaires. 17. Faire preuve d’une extrême prudence lorsque vous sortez le plat de cuisson du fo...
Page 34 - CONTENU
34 34 USAGE COMMERCIAL AUTORISÉ GARDER CES INSTRUCTIONS POUR USAGE COMMERCIAL UNIQUEMENT CONTENU Importantes consignes de sécurité ............................................ 32Instructions de mise à la terre .................................................... 35Utilisation de rallonges électrique...
Page 37 - PIÈCES ET ACCESSOIRES; Bouton de réglage du temps
N O I T C E V N O C 6 12 11 9 1 2 3 5 4 14 13 10 14 8 7 37 PIÈCES ET ACCESSOIRES (suite en pages 38 – 39) 1. Bouton de réglage du temps de cuisson 2. Voyant de mise sous tension (rouge) 3. Voyant de mise à température (vert) 4. Bouton de sélection du mode de cuisson 5. Bouton de réglage de la tempér...
Page 38 - Il s'agit d'un mode de cuisson efficace et; ROAST (mode « Rôtisserie par convection »); C'est le mode de cuisson idéal pour rôtir du poulet, du
38 38 1. Bouton de réglage du temps de cuisson Permet de programmer le temps de cuisson jusqu’à 120 minutes ou bien de mettre le four en marche sans minuterie (position OVEN ON). Si le temps de cuisson est inférieur à 20 minutes, tourner le bouton dans le sens des aiguilles d’une montre jusqu’à la m...
Page 40 - Remarque : Cette odeur n’est pas dangereuse.; FONCTIONNEMENT; Mode « Cuisson traditionnelle »
40 40 AVANT D'UTILISER LE FOUR POUR LA PREMIÈRE FOIS Avant la première utilisation : • Laver les grilles et le plat de cuisson à la main dans de l’eau tiède savonneuse. Rincer et sécher toutes les pièces avant utilisation. Laver et sécher les pièces à la main uniquement. • Essuyer l’intérieure du fo...
Page 43 - POSITIONS DES GRILLES; comme l’indique le diagramme ci-dessous.; CAPACITÉS DU FOUR; Le four a une capacité de 25 litres. Il accommodera les plats et
N O I T C E V N O C POSITION 3 POSITION 2 POSITION 1 43 43 POSITIONS DES GRILLES Les grilles peuvent être positionnées à trois niveaux différents, comme l’indique le diagramme ci-dessous. CAPACITÉS DU FOUR Le four a une capacité de 25 litres. Il accommodera les plats et moules suivants : Plat rectan...
Page 44 - Débrancher l'appareil avant de le nettoyer.
44 44 CONSEILS UTILES • Tourner le plat plusieurs fois pendant la cuisson afin d’assurer une cuisson uniforme. • Il est conseillé de n'utiliser qu'un niveau à la fois. Si vous souhaitez utiliser plus d'une grille, tourner les plats et les changer de niveau en cours de cuisson. • Ne pas pousser le pl...
Page 46 - DISPOSITIFS DE SÉCURITÉ; Votre four à convection Waring; Protection anti-surchauffe; Avant de remettre l'appareil en marche, le débrancher et le
Arrière du four BOUTON DE REMISE EN MARCHE SOUS L’ APPAREIL 46 DISPOSITIFS DE SÉCURITÉ Votre four à convection Waring ® Commercial est équipé du dispositif de sécurité suivant: Protection anti-surchauffe L'appareil s'éteindra automatiquement en cas de surchauffe. Avant de remettre l'appareil en marc...