Page 2 - ENGLISH; Table of Contents; Safety Information; READ AND SAVE THESE INSTRUCTIONS
QR254S 2 ENGLISH Table of Contents Safety Information . . . . . . . . . . . . . . . . . . . . . . . . . . . . . . . . . . 2Warranty One Year Limited Warranty . . . . . . . . . . . . . . . . . . . . . . . . . . . 4Warranty Claim Procedure . . . . . . . . . . . . . . . . . . . . . . . . . . . 4 Pre-In...
Page 3 - COOKING SAFETY INFORMATION
3 Please contact [email protected] or 1-888-449-9197 between 8:30 am - 5 pm, EST, Monday - Friday for further assistance. ENGLISH Safety Information (continued) COOKING SAFETY INFORMATION 1 . Never leave the range hood unattended when in use . 2 . Never cook over open flames under the range hood. 3 ...
Page 4 - Warranty; ONE YEAR LIMITED WARRANTY; WARRANTY CLAIM PROCEDURE
QR254S 4 ENGLISH Warranty ONE YEAR LIMITED WARRANTY A thorough inspection must be made before installation and any damage must be promptly reported . We will not be liable for failures or damage that could have been discovered or avoided by proper inspection and testing prior to installation . Vissa...
Page 6 - PACKAGE CONTENTS; HARDWARE INCLUDED; AA
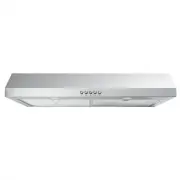
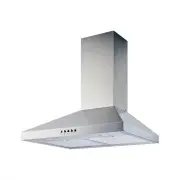
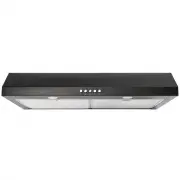
QR254S 6 ENGLISH Pre-Installation (continued) PACKAGE CONTENTS Carefully check the range hood for damage and for missing parts prior to installation . If there is any damage or if you are missing parts, do not proceed with the installation. Report damage and missing parts immediately. Do not dispose...
Page 7 - PLANNING INSTALLATION
7 Please contact [email protected] or 1-888-449-9197 between 8:30 am - 5 pm, EST, Monday - Friday for further assistance. ENGLISH Pre-Installation (continued) PLANNING INSTALLATION Number of people required: 1 1 . Before installation, measure all distances to ensure the proper position of the range ...
Page 8 - Horizontal Wall Venting
QR254S 8 ENGLISH Pre-Installation (continued) FOLLOW THESE GUIDELINES WHEN INSTALLING DUCT WORK: - Your venting system must vent to the outdoors either horizontally through the back wall (13) or vertically through the roof (14) (refer to Fig . 5/Fig . 6/Fig . 7) . - Use round metal duct work with a ...
Page 9 - WIRING CONNECTION REQUIREMENTS
9 Please contact [email protected] or 1-888-449-9197 between 8:30 am - 5 pm, EST, Monday - Friday for further assistance. ENGLISH Pre-Installation (continued) WIRING CONNECTION REQUIREMENTS Installation work and electrical wiring must be done by a qualified person(s) in accordance with all applicabl...
Page 10 - Installation; REMOVING THE ELECTRICAL KNOCK-OUT HOLE; REMOVING THE VENTING HOLE; INSTALLING THE DAMPER; (SKIP THIS STEP IF YOU ARE USING INTERIOR VENTING)
QR254S 10 ENGLISH Installation WARNING: FUEL (GAS) BURNING RANGES MUST BE VENTED OUTDOORS USING, AT MINIMUM, METAL DUCTWORK AND RANGE HOODS OF SUFFICIENT CAPACITY . Follow your fuel burning equipment manufacturer’s guidelines, as well as, all applicable safety standards published by the National Fir...
Page 11 - B . INSTALLATION USING 1 PERSON INSTALL BRACKETS
11 Please contact [email protected] or 1-888-449-9197 between 8:30 am - 5 pm, EST, Monday - Friday for further assistance. ENGLISH Installation (continued) NOTE: This range hood can be installed to the cabinet with or without the use of the supplied installation brackets. A . INSTALLATION WITHOUT MO...
Page 12 - EE
QR254S 12 ENGLISH Installation (continued) - Align the bracket against the side edge of the 30 in (762 mm) cabinet cabinet and the back wall . Draw a line along inner edge of the bracket as shown in fig. 17-1. - Slide the bracket inwards and align it against the marked line . Ensure the rear edge is...
Page 14 - SECURING THE RANGE HOOD TO THE BRACKETS
QR254S 14 ENGLISH Installation (continued) SECURING THE RANGE HOOD TO THE BRACKETS Fig . 20 F R R F NOTE: The following procedure applies to both frame or frameless cabinet bracket installations. - There are 2 pairs of recessed slots in the front and rear of the range hood . - Rear (R) slots can be ...
Page 15 - FINAL INSPECTION
15 Please contact [email protected] or 1-888-449-9197 between 8:30 am - 5 pm, EST, Monday - Friday for further assistance. ENGLISH Installation (continued) - Secure the range hood in place using the supplied fasteners . - Frameless cabinet installation requires four long tapping screws (AA) with was...
Page 16 - INSTALLING THE CHARCOAL FILTER; (SKIP THIS STEP IF YOU ARE USING EXTERIOR VENTING)
QR254S 16 ENGLISH Installation (continued) INSTALLING THE CHARCOAL FILTER (SKIP THIS STEP IF YOU ARE USING EXTERIOR VENTING) NOTE: The charcoal filter should only be installed if you are venting the range hood inside (recirculating the air). - Remove each cassette filter by lifting up the filter cli...
Page 17 - Operation; TURNING ON/OFF THE UNIT
17 Please contact [email protected] or 1-888-449-9197 between 8:30 am - 5 pm, EST, Monday - Friday for further assistance. ENGLISH Operation NOTE: The fan and lights operate independently of each other. TURNING ON/OFF THE UNIT - To turn on the fan, press the appropriate speed control switch [Low Spe...
Page 18 - REPLACING CASSETTE FILTER; REPLACING LIGHT BULBS
QR254S 18 ENGLISH Maintenance REPLACING CASSETTE FILTER Cassette filters should be cleaned regularly either by hand or in the dishwasher, using a warm and mild dish-washing detergent solution. Replace filters that are damaged with punctures, bends, or broken frames. When filters require replacement,...
Page 19 - Care and Cleaning; RANGE HOOD
19 Please contact [email protected] or 1-888-449-9197 between 8:30 am - 5 pm, EST, Monday - Friday for further assistance. ENGLISH Care and Cleaning RANGE HOOD WARNING: Failure to maintain basic standards of care and cleaning of the range hood will increase the risk of fire. The range hood should be...
Page 20 - Troubleshooting
QR254S 20 ENGLISH Troubleshooting DANGER: Turn off the power circuit breaker or the power switch on the junction box before performing maintenance . Touching circuitry inside the range hood while it is energized may result in serious injury or death . Problem Solution The range hood does not operate...
Page 21 - Specifications; WIRING DIAGRAM; ORANGE
21 Please contact [email protected] or 1-888-449-9197 between 8:30 am - 5 pm, EST, Monday - Friday for further assistance. ENGLISH Specifications Model Dimensions Rating Control Type CFM Speeds Light Bulb Wattage Venting Options QR254S 29 .8 in (758 mm) W 120V~60Hz 1 .0A Push Button 320 ± 10% MAX 3 ...
Page 22 - EXTERNAL DIAGRAM OF RANGE HOOD
QR254S 22 ENGLISH Specifications (continued) EXTERNAL DIAGRAM OF RANGE HOOD 29 .8 in (758 mm) 14 .88 in (378 mm) 0 .82 in (21 mm) 0 .47 in (12 mm) 3 .46 in (88 mm) 10 in (254 mm) 3 .66 in (93 mm) 6 .89 in (175 mm) 5 in (127 mm) 18 in (457 mm) 29 .8 in (758 mm) 18 in (457 mm) 13 .94 in (354 mm) 11 in...
Page 23 - Service Parts
23 Please contact [email protected] or 1-888-449-9197 between 8:30 am - 5 pm, EST, Monday - Friday for further assistance. ENGLISH Service Parts If you are missing parts or if you require replacement parts, please contact our customer service team at [email protected] or 1-888-449-9197 between 8:30 ...
Page 24 - Índice; Información de seguridad; LEA Y GUARDE ESTAS INSTRUCCIONES
ESP A Ñ OL QR254S 24 Índice OWNER’S MANUAL . . . . . . . . . . . . . . . . . . . . . . . . . . . . . . . . . . . . . . . . 2 Información de seguridad . . . . . . . . . . . . . . . . . . . . . . . . . . . . . . . . . 24Garantía Un año de garantía limitada . . . . . . . . . . . . . . . . . . . . . . ....
Page 25 - INFORMACIÓN DE SEGURIDAD AL COCINAR
ESP A Ñ OL 25 Escriba a [email protected] o llame al 1-888-449-9197 entre las 8:30 a . m . y las 5:00 p . m ., hora del Este, de lunes a viernes para solicitar más información . Información de seguridad (continuación) INFORMACIÓN DE SEGURIDAD AL COCINAR 1 . Nunca deje la campana de extracción sin su...
Page 26 - Garantía; UN AÑO DE GARANTÍA LIMITADA
ESP A Ñ OL QR254S 26 Garantía UN AÑO DE GARANTÍA LIMITADA Se debe realizar una inspección a conciencia antes de la instalación y reportar inmediatamente cualquier daño . No nos hacemos responsables por fallos o daños que pudieran haberse descubierto o evitado con una inspección y pruebas adecuadas a...
Page 28 - CONTENIDO DEL PAQUETE
ESP A Ñ OL QR254S 28 F G H B C D E Preinstalación (continuación) CONTENIDO DEL PAQUETE Verifique cuidadosamente que la campana de extracción no tenga daños y que no falten partes antes de la instalación. Si hay algún daño o faltan partes, no prosiga con la instalación . Reporte de inmediato los daño...
Page 29 - PLANIFICACIÓN DE LA INSTALACIÓN; OPCIONES DE VENTILACIÓN:
ESP A Ñ OL 29 Escriba a [email protected] o llame al 1-888-449-9197 entre las 8:30 a . m . y las 5:00 p . m ., hora del Este, de lunes a viernes para solicitar más información . 2.04 11.26 286 11.26 286 52 13.38 ( 340mm ) Opción para ventilación superior Línea central orificio de1.26’’ (32 mm)de diá...
Page 30 - SIGA ESTAS PAUTAS CUANDO INSTALE LOS DUCTOS:
ESP A Ñ OL QR254S 30 Gráfica de longitud equivalente Tipo de ducto Longitud añadida Codo de 45° 3 pies (0 .91 m) Codo de 90° 5 pies (1 .52 m) Codo plano de 90° 12 pies (3 .66 m) Tubo recto de 9 pies (2 .74 m) 9 pies (2 .74 m) Tapa de pared 0 pies (0 m) 17 Ventilación horizontal a través de la pared ...
Page 31 - REQUISITOS DE CONEXIÓN DE LOS CABLES
ESP A Ñ OL 31 Escriba a [email protected] o llame al 1-888-449-9197 entre las 8:30 a . m . y las 5:00 p . m ., hora del Este, de lunes a viernes para solicitar más información . CC CC CABLES NEGROS CABLES BLANCOS TORNILLO AMORTIGUADOR VERDE CC Preinstalación (continuación) REQUISITOS DE CONEXIÓN DE ...
Page 32 - Instalación; CÓMO RETIRAR EL ORIFICIO PARA VENTILACIÓN; INSTALACIÓN DEL REGULADOR; SI ESTÁ UTILIZANDO VENTILACIÓN EN INTERIORES)
ESP A Ñ OL QR254S 32 Instalación ADVERTENCIA: LAS HORNILLAS DE GAS DEBEN VENTILARSE EN EXTERIORES UTILIZANDO, POR LO MENOS, CONDUCTOS METÁLICOS Y CAMPANAS EXTRACTORAS DE CAPACIDAD SUFICIENTE. Siga las especificaciones del fabricante del equipo quemador de combustible y las normas de seguridad corres...
Page 33 - A . INSTALACIÓN SIN SOPORTES DE MONTAJE; B . INSTALACIÓN UTILIZANDO SOPORTES DE INSTALACIÓN
ESP A Ñ OL 33 Escriba a [email protected] o llame al 1-888-449-9197 entre las 8:30 a . m . y las 5:00 p . m ., hora del Este, de lunes a viernes para solicitar más información . Instalación (continuación) NOTA: Esta campana extractora puede instalarse en la alacena utilizando los soportes de instala...
Page 37 - REVISIÓN FINAL
ESP A Ñ OL 37 Escriba a [email protected] o llame al 1-888-449-9197 entre las 8:30 a . m . y las 5:00 p . m ., hora del Este, de lunes a viernes para solicitar más información . Instalación (continuación) - Fije la campana extractora en su lugar con los sujetadores suministrados . - La instalación d...
Page 38 - INSTALACIÓN DEL FILTRO DE CARBÓN; (OMITA ESTE PASO SI ESTÁ UTILIZANDO VENTILACIÓN EXTERIOR)
ESP A Ñ OL QR254S 38 Instalación (continuación) INSTALACIÓN DEL FILTRO DE CARBÓN (OMITA ESTE PASO SI ESTÁ UTILIZANDO VENTILACIÓN EXTERIOR) NOTA: El filtro de carbón activado solo debe instalarse si la ventilación de la campana de extracción es interior (se está recirculando el aire). - Retire cada f...
Page 39 - Funcionamiento; ENCENDIDO Y APAGADO DE LA UNIDAD
ESP A Ñ OL 39 Escriba a [email protected] o llame al 1-888-449-9197 entre las 8:30 a . m . y las 5:00 p . m ., hora del Este, de lunes a viernes para solicitar más información . Funcionamiento NOTA: El ventilador y las luces funcionan de forma independiente. ENCENDIDO Y APAGADO DE LA UNIDAD - Para e...
Page 40 - Mantenimiento; CAMBIO DE FILTRO DE CASSETTE; CAMBIO DE BOMBILLAS
ESP A Ñ OL QR254S 40 Mantenimiento CAMBIO DE FILTRO DE CASSETTE Los filtros de cassette deben limpiarse regularmente ya sea a mano o en el lavavajillas, utilizando una solución de detergente para platos tibia y suave. Cambie los filtros que estén dañados, perforados, doblados o tengan armazones roto...
Page 41 - Cuidado y limpieza; CAMPANA EXTRACTORA; FILTROS
ESP A Ñ OL 41 Escriba a [email protected] o llame al 1-888-449-9197 entre las 8:30 a . m . y las 5:00 p . m ., hora del Este, de lunes a viernes para solicitar más información . Cuidado y limpieza CAMPANA EXTRACTORA ADVERTENCIA: Si no se mantienen los estándares de cuidado y de limpieza básicos de l...
Page 42 - Solución de problemas
ESP A Ñ OL QR254S 42 Solución de problemas PELIGRO: Desconecte el disyuntor de alimentación o apague el interruptor de la caja de derivación antes de realizar el mantenimiento . No toque los circuitos que se encuentran dentro de la campana extractora mientras está conectada, pues esto puede ocasiona...
Page 43 - Especificaciones; DIAGRAMA DE CABLEADO; NARANJA; ROJO
ESP A Ñ OL 43 Escriba a [email protected] o llame al 1-888-449-9197 entre las 8:30 a . m . y las 5:00 p . m ., hora del Este, de lunes a viernes para solicitar más información . Especificaciones DIAGRAMA DE CABLEADO 120 V/60 Hz NEGRO NEGRO NEGRO 8 uF/250 V MOTOR GRIS NARANJA AZUL AMARILLO AMARILLO R...
Page 44 - DIAGRAMA EXTERNO DE LA CAMPANA EXTRACTORA; SUPERIOR
ESP A Ñ OL QR254S 44 DIAGRAMA EXTERNO DE LA CAMPANA EXTRACTORA 29 .8 pulg . (758 mm) 14 .88 pulg . (378 mm) 0 .82 pulg .(21 mm) 0 .47 pulg .(12 mm) 3 .46 pulg (88 mm) 10 pulg . (254 mm) 3 .66 pulg . (93 mm) 6 .89 pulg . (175 mm) 5 pulg . (127 mm) 18 pulg . (457 mm) SUPERIOR INFERIOR 18 pulg (457 mm)...
Page 45 - Piezas de refacción
ESP A Ñ OL 45 Escriba a [email protected] o llame al 1-888-449-9197 entre las 8:30 a . m . y las 5:00 p . m ., hora del Este, de lunes a viernes para solicitar más información . Piezas de refacción Si le faltan piezas o requiere refacciones, escríbale a nuestro equipo de servicio al cliente a [email...