Page 2 - Commercial
- 1 - MODEL:HB6089-UL Have product questions? Need technical support? Please feel free tocontact us: [email protected] NEED HELP? CONTACT US! This is the original instruction, please read all manual instructions carefully before operating. VEVOR reserves a clear interpretation of our user manual. Th...
Page 3 - IMPORTANT SAFEGUARDS
- 2 - Warning-To reduce the risk of injury, user must read instructions manual carefully. IMPORTANT SAFEGUARDS Before using the electrical appliance, the following basic precautions shouldalways be followed including the following: 1. Read all instructions.Before using it, check that the voltage of ...
Page 4 - SAVE THESE INSTRUCTIONS; KNOW YOUR COMMERICAL HAND BLENDER
- 3 - 8. Do not operate the appliance for other than its intended use. 9. Avoid splashing the food into the vent holes of unit body during blending. 10. The blender must be used in a working environment that is far away fromcorrosive materials or oil pollution, and must be kept away from explosive a...
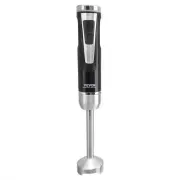
Page 6 - TECHNICAL PARAMETER
- 5 - TECHNICAL PARAMETER Model Input Rated Power Tool length Rotating speed ( Min ) Rotating speed ( Max ) Working noise HB6089 120V~ 60Hz 500W 12 inch 4000 RPM/Min 18000 RPM/Min ≤85dB ( A ) HB6089 AC220- 240V ; 50Hz 500W 12 inch 4000 RPM/Min 18000 RPM/Min ≤85dB ( A ) HB6089 120V~ 60Hz 500W 20 inch...
Page 7 - ATTACHING AND DETACHING OF BLENDING ROD; appliance stops working and its mains plug is unplugged.
- 6 - ATTACHING AND DETACHING OF BLENDING ROD Before attaching and detaching operation, it must be ensured that the appliance stops working and its mains plug is unplugged. How to attach: 1. Insert the blending rod into the threaded inner hole of the unit body. Wheninserting, Align the slot of the c...
Page 8 - OPERATION METHOD; GETTING STARTED AND STOPPED
- 7 - IMPORTANT: Blades are very sharp ; handle them with care. Ensure that the hand-held blender is unplugged from the power outlet before installing or removing attachments. OPERATION METHOD GETTING STARTED AND STOPPED 1. Check that the power button (3) is released.2. Install the blending rod.3. C...
Page 9 - Continuous operation instruction; Speed adjusting instruction; NOTE; CLEANING AND MAINTENANCE METHODS; QUICK CLEANING
- 8 - Continuous operation instruction After completing steps 1-5 above, proceed to the following steps: 1. Press the lock button (4) when the power button (3) is pressed down, and the red indicator lights up. 2. Release the power button (3) at this time, the hand blender will continue to work. 3. P...
Page 10 - REMOVAL/INSTALLATION OF BLADE ASSEMBLY; FAULT ANALYSI
- 9 - REMOVAL/INSTALLATION OF BLADE ASSEMBLY 1. Align the blade assembly with wrench 1 and insert into it.2. Align the blending head slot with wrench 2 and insert into it. 3. Unscrew clockwise to remove the blending rod. FAULT ANALYSI FaultPhenomenon Cause Analysis Exclusion Methods Indicator light ...