Page 3 - Table of contents
3 Table of contents 1 Safety precautions 5 1.1 Symbols used......................................................... 5 1.2 General safety precautions .................................. 5 1.3 Appliance-specific safety precautions .............. 5 1.4 Instructions for use ............................
Page 5 - Safety precautions; Symbols used; General safety precautions
5 1 Safety precautions 1.1 Symbols used Denotes important safety precau-tions.Failure to observe said precautionscan result in injury or in damage tothe appliance or fittings! Information and precautions thatshould be observed. Information on disposal Information about the Operating In-structions ▸ ...
Page 6 - Instructions for use; Before using for the first time
1 Safety precautions 6 to touch the heating ele-ments. Children under 8years of age must be keptaway from the appliance un-less they are constantly su-pervised. ▪ WARNING: Accessible partscan get hot during use. Keepyoung children away from theappliance. ▪ This appliance is intended foruse in the ho...
Page 7 - Note on use
1 Safety precautions 7 ▪ Do not use the appliance as a roomheater. ▪ The appliance should only be installedand operated at an ambient temperat-ure of 5 °C to 35 °C. If frost develops,residual water left in the pumps couldfreeze and cause damage. ▪ Any repairs, modifications or manipula-tions to the ...
Page 8 - How to avoid damaging the appliance
1 Safety precautions 8 How to avoid damaging the appliance ▪ Close the appliance door carefully. ▪ For appliances with a visible bottomheating element: Do not place any ob-jects directly on the bottom heating ele-ment. ▪ Do not place any protective insert oraluminium foil on the floor of the cook-in...
Page 9 - Using for the first time; Completing the initial set-up
2 Using for the first time Before operating the newly installed appliance for the first time, the following stepsshould be taken:▸ Remove packaging and transport materials as well as any protective blue film from out of the cooking space. ▸ Clean the cooking space and the accessories.▸ Press the pow...
Page 10 - Appliance description; Construction; Overview of touch buttons
3 Appliance description 3 Appliance description 3.1 Construction 1 3 4 2 1 Operating and display elements 2 Ventilation opening 3 Door handle 4 Appliance door 3.2 Operating and display elements 12:00 곋2SHUDWLQJPRGHV 6WHDP 3 2 4 1 5 6 1 Display 4 Action buttons 2 Menu buttons 5 Adjusting knob / Switc...
Page 11 - Stainless steel tray
3 Appliance description 3.3 Cooking space Using protective inserts or aluminium foil can damage the appliance. Do not place any protective insert or aluminium foil on the floor of the cookingspace. 10 7 5 11 13 1 2 3 4 8 3 2 4 1 6 9 12 1 Appliance door 8 Steam vent 2 Door seal 9 Temperature sensor 3...
Page 13 - Operating modes; Overview of operating modes; Hot air; Uses; Hot air with steaming
4 Operating modes 4 Operating modes 4.1 Overview of operating modes Follow the advice given in «Tips and tricks» (see page 54) and in «EasyCook». 4.2 Steam Temperature range 30–100 °C Recommended value 100 °C Level 1 to 4 The cooking space is heated simultaneously by steam and hot air. The food is h...
Page 14 - Regeneration; Hot air humid
4 Operating modes A heating element behind the back wall of the cooking space heats up the air inside thecooking space, which is circulated evenly. With condensing steam, the energy is trans-ferred more efficiently to the food than when cooking with hot air, which accelerates thecooking process.Stea...
Page 15 - Using the appliance; Adjusting knob functions; Filling the water tank; Refilling the water tank
5 Using the appliance Uses ▪ Roasting, braising 5 Using the appliance The different main menus and functions are selected by pressing the correspondingtouch button. Selected touch buttons and functions are illuminated in white; other select-able functions are illuminated in orange.Settings and funct...
Page 16 - Selecting and starting the operating mode; Press and go; Checking and changing the settings
5 Using the appliance 5.2 Selecting and starting the operating mode ▸ If the appliance is switched off: first press the adjusting knob.▸ If the appliance is in another menu: press the touch button. – The selection of operating modes appears in the display. ▸ Select the operating mode. – The operatin...
Page 17 - Before setting the delayed start
5 Using the appliance 5.4 Setting a duration The operating mode selected ends automatically when the operating time is up.▸ Select the desired operating mode.▸ Select in the operating mode settings. ▸ Set the desired duration – max. 9 hours and 59 minutes – and confirm. – The duration is displayed i...
Page 18 - Food probe temperature; Setting; Cancelling/ending the operating mode before time
5 Using the appliance 5.6 Food probe temperature Only use the supplied food probe.Do not clean the food probe in the dishwasher. Always keep the plug clean. The food probe is used to measure the temperature inside the food (referred to as the food probe temperature ). As soon as the food reaches the...
Page 19 - Setting and starting the timer
5 Using the appliance ▸ If a new operating mode is to be started: Press the touch button. ▸ If the appliance is to be switched off: Press the touch button. 5.8 Changing the operating mode If no operating mode is running:▸ Select in the settings of the current operating mode. – The operating modes me...
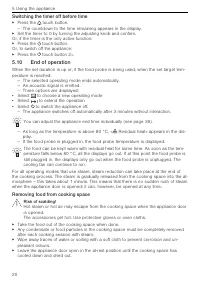
Page 20 - Switching the timer off before time; End of operation; Removing food from cooking space
5 Using the appliance Switching the timer off before time ▸ Press the touch button. – The countdown to the time remaining appears in the display. ▸ Set the timer to 0 by turning the adjusting knob and confirm.Or, if the timer is the only active function:▸ Press the touch button.Or, to switch off the...
Page 22 - GourmetGuide; Recipe book; Unlocking a recipe book
6 GourmetGuide 6 GourmetGuide The GourmetGuide encompasses several programmes which make preparing mealsas easy as possible for you. The following programmes can be called up: Recipes Vacuisine BakeOmatic Wellness Professional baking Hygiene Soft roasting Keep warm RegenerateOmatic 6.1 Recipe book R...
Page 23 - In the course of the recipe; Cancelling the recipe; Own recipes; Creating your own recipe
6 GourmetGuide When cooking recipes from recipe books, a delayed start is only possible if thecooking space does not need to be preheated and the food does not need to bestirred or turned partway through, for example. ▸ To start the recipe, select . – The recipe starts. – The display shows the curre...
Page 24 - Step duration; Cancelling recipe entry/change
6 GourmetGuide For the intermediate step «Hold», the heating continues to run and the cooking space temperature remains constant. For the intermediate step «Pause», thecooking space is not heated any more and the temperature drops. After a hold or pause step, a preheating stage can be set. ▸ To save...
Page 26 - Vacuisine; Tips for an optimal result
6 GourmetGuide 6.3 Vacuisine With Vacuisine, meat, fish, vegetables and fruit can be prepared sous vide. The va-cuum-packed food is gently steamed. The food probe temperature can be monitoredwith the food probe. The food probe temperature is the set cooking space temperature.This ensures that the fo...
Page 27 - BakeOmatic
6 GourmetGuide ▸ Plug the food probe into the appliance, if necessary.▸ If the appliance is switched off: first press the adjusting knob.▸ Press the touch button.▸ Select .▸ Make the desired settings.▸ If a cooking time of 10–48 hours is required, use the timer (see page 19) only to check the cookin...
Page 28 - Degree of browning; Duration
6 GourmetGuide Degree of browning For certain food categories, the degree of browning can be adjusted by selecting the «lightly browned», «medium browned» or «well browned» setting. When used for frozen products, the approximate duration indicated on the pack-aging must be selected instead of the d...
Page 29 - Professional baking; Tips
6 GourmetGuide 6.5 Professional baking With professional baking, the cold cooking space is heated by a steam phase (about 10 minutes) and a hot air phase, which follows automatically. This makes yeast and puffpastries light and airy while also forming a nice, shiny crust. «Proofing» allows you topro...
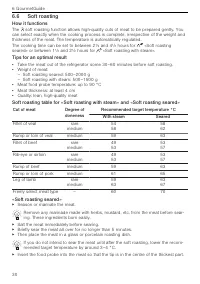
Page 30 - Soft roasting; How it functions; «Soft roasting seared»
6 GourmetGuide 6.6 Soft roasting How it functions The soft roasting function allows high-quality cuts of meat to be prepared gently. Youcan select exactly when the cooking process is complete, irrespective of the weight andthickness of the meat. The temperature is automatically regulated.The cooking...
Page 32 - RegenerateOmatic; Regeneration time
6 GourmetGuide ▸ Adjust the recommended value if necessary and set a delayed start if you wish.▸ To start soft roasting, select . The food probe must be plugged in. – Soft roasting starts. – The set target temperature, the current food probe temperature and the remainingtime are displayed. – The rem...
Page 33 - Selecting and starting RegenerateOmatic; Wellness; Hot towels
6 GourmetGuide Selecting and starting RegenerateOmatic Before starting, the cooking space should have cooled down and be dry in orderto determine the optimum duration. The appliance door should not be opened during operation. Fill the water tank with fresh water and slot into position in the water t...
Page 34 - Hygiene; Feeding bottles; Keep warm; EasyCook
7 EasyCook Hot massage stones Before starting the application:▸ Put the clean, smooth massage stones in a suitable container and place it directly on the floor of the cooking space. Cherry stone or grape seed cushions Before starting the application:▸ Put the cherry stone or grape seed cushions in a...
Page 36 - Favourites; Creating favourites
8 Favourites 8 Favourites Up to 24 operating modes, GourmetGuide and EasyCook applications together with thesettings made can be saved as favourites. 8.1 Creating favourites ▸ Select an operating mode, GourmetGuide or EasyCook application.▸ Make the settings.▸ Press the touch button. – The favourite...
Page 37 - Installing the app; Enabling the V-ZUG-Home mode on the appliance; User settings; Overview of user settings
10 User settings Google Play TM is a trademark of Google Inc. Apple and the Apple logo are trademarks of Apple Inc., registeredin the U.S. and other countries. App Store ® is a service mark of Apple Inc. 9.2 Initial set-up When establishing a connection, stay close to your household appliance and ha...
Page 38 - Adjusting user settings; 괫8VHUVHWWLQJV; Language; Contrast; Date
10 User settings 10.2 Adjusting user settings ▸ If the appliance is switched off: first press the adjusting knob. ▸ Press the touch button. ▪ The user settings main menu appearsin the display: 괫8VHUVHWWLQJV 6HWODQJXDJH ▸ Select the desired user setting or submenu.▸ Adjust the desired setting and pre...
Page 39 - Clock; Time format; Notifications
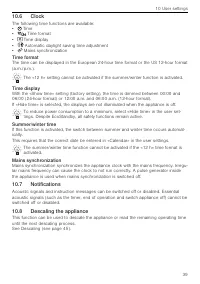
10 User settings 10.6 Clock The following time functions are available: ▪ Time ▪ Time format ▪ Time display ▪ Automatic daylight saving time adjustment ▪ Mains synchronization Time format The time can be displayed in the European 24-hour time format or the US 12‑hour format(a.m./p.m.). The «12 h» se...
Page 40 - Water hardness; Loudness; Illumination; Temperature; Temperature unit
10 User settings 10.9 Water hardness The appliance is equipped with a system that automatically indicates when it is time todescale. The system can be optimized for households with soft water (also through usinga water softening appliance) and medium water hardness by changing the user settingsto th...
Page 41 - Default value for soft roasting; Childproof lock; Appliance information; Demo mode
10 User settings Default value for soft roasting The default value is the target temperature that is automatically set when soft roasting.With this user setting, it can be increased or decreased by up to 4 °C; the setting thenapplies for all cuts of meat.Example: When using «Soft roasting seared» wi...
Page 42 - Care and maintenance; Cleaning the exterior
11 Care and maintenance 11 Care and maintenance Risk of burns from hot surfaces! You should allow the appliance and the accessories to cool before cleaning.Do not reach into the water tank compartment if the following appears in the dis-play: «Please do not remove the water tank». Improper use can r...
Page 43 - Cleaning the appliance door; Removing the appliance door; Reinstalling the appliance door; Cleaning the door seal
11 Care and maintenance 11.3 Cleaning the appliance door ▸ Clean the appliance door with a soft cloth dampened with water and a little washing- up liquid. ▸ Dry with a soft cloth. Removing the appliance door Risk of injury from moving parts! Be careful not to put fingers in the door hinges. The appl...
Page 44 - Replacing the halogen light bulb; Lateral illumination; Cleaning the accessories and shelf guides
11 Care and maintenance 11.6 Replacing the halogen light bulb WARNING: Risk of electric shock!Disconnect the appliance from the mains power supply before replacing the halo-gen light bulb. Risk of burns from hot surfaces!Allow the halogen light bulb and the appliance to cool down before replacing th...
Page 45 - Descaling; Reading the remaining operating time
11 Care and maintenance Removing the shelf guides ▸ Unscrew the knurled nuts 1 in the front of the shelf guides in an anti-clockwise direction. ▸ Pull the shelf guides 2 to the side of the screws and remove from thefront. 2 1 Reassembling the shelf guides ▸ Insert the shelf guides into the openings ...
Page 46 - Starting the descaling process
11 Care and maintenance Descaler durgol swiss steamer Using the wrong descaler can damage the appliance! Only use «durgol swiss steamer» to descale your appliance. The descaler containshighly effective acid. Immediately rinse away any splashes with water. Follow themanufacturer's instructions. See «...
Page 47 - What to do if ...; ... the appliance is not working
12 Trouble-shooting Replacing the rinsing solution ▸ As soon as the corresponding message appears in the display: remove the water tank, pour the rinsing solution away and fill it with 1 l warm water. ▸ Put the water tank back. – The rinsing phase starts automatically. – In the display appears: «Rin...
Page 50 - ... the following appears in the display; After a power failure; Brief power failure during operation; Accessories and spare parts
13 Accessories and spare parts … the following appears in the display Descaling failedAppliance was not descaled. Possible cause Solution ▪ Used unsuitable descaler. ▸ Descale again using the recommended descaler. ▪ Descaling was not carried outcorrectly. ▸ If the message does not disappear after re...
Page 51 - Accessories; Special accessories; Technical data
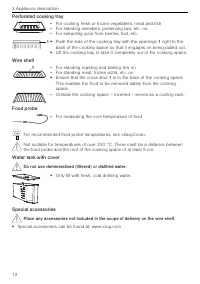
14 Technical data 13.1 Accessories Stainless steel tray ⅔ Gast- ronorm Perforated cooking tray ⅔ Gastronorm Wire shelf Food probe with straight handle EasyCook brochure Recipe book Bedienungsanleitung … Einstelltipps Gastronorm (GN) is a sizing system used in commercial kitchens. The full size 1 1 /...
Page 52 - General note; Temperature measurement; Saving energy while cooking
14 Technical data 14.1 Light sources This product contains a light source of energy efficiency class G. 14.2 Note for testing institutes The energy efficiency class according to EN 50304/EN 60350 is determined using the operating mode. Placing thermocouples between the appliance door and the seal ca...
Page 53 - EcoStandby
14 Technical data 14.5 EcoStandby To prevent unnecessary energy consumption, the appliance is equipped with the auto-matic energy-saving «EcoStandby» function. To reduce power consumption to a minimum, select «Hide time» in the user set-tings. Despite EcoStandby, all safety functions remain active. ...
Page 54 - Tips and tricks; ... when baking and roasting
15 Tips and tricks 15 Tips and tricks 15.1 Unsatisfactory cooking result... … when baking and roasting Result Solution ▪ The baking or roastlooks good on theoutside but is stilldoughy or raw on theinside. ▸ Next time, set a lower temperature and lengthen the operat- ing time. ▪ The cake collapses. ▸...
Page 55 - Disposal; Packaging
16 Disposal 15.2 General tips ▪ Several foods can be cooked simultaneously to save energy, e.g. rice or pulses to-gether with vegetables with similar cooking times. ▪ With the appropriate amount of liquid, grains, e.g. rice or millet, and pulses, e.g. len-tils, cook directly in suitable tableware. ▪...
Page 56 - Index
17 Index A Accessories ........................................ 11, 50, 51 Cleaning ........................................................ 44 Acoustic signals ............................................... 39Activating/Deactivating steam supply.......... 14Appliance Disposal........................
Page 59 - Your repair order
18 Service & Support 18 Service & Support The «Trouble-shooting» section gives you valuable tips on how to deal with minormalfunctions yourself, saving you the time and trouble of calling out a service tech-nician and any cost that goes along with it. Information on the V-ZUG warranty can be...
Page 60 - Quick instructions; Active menu; Menu and action buttons
Quick instructions Here you will find an overview of key operating information. Active menu Action buttons Menu buttons 12:00 곋2SHUDWLQJPRGHV 6WHDP Press to switch on the appliance or to select/confirm Turn to set the temperature and time or to navigate within the menu Adjusting knob as a central op...