Page 2 - DE
2 2 INHALTSVERZEICHNIS EMPFEHLUNGEN UND HINWEISE ..................................................................................................................................... 3 CHARAKTERISTIKEN .....................................................................................................
Page 3 - EMPFEHLUNGEN UND HINWEISE; MONTAGE; BEDIENUNG; WARTUNG
DE 3 3 EMPFEHLUNGEN UND HINWEISE Diese Gebrauchsanleitung gilt für mehrere Geräte-Ausführungen. Es ist möglich, dass einzelne Ausstat- tungsmerkmale beschrieben sind, die nicht auf Ihr Gerät zutreffen. MONTAGE • Der Hersteller haftet nicht für Schäden, die auf eine fehlerhafte oder unsachgemäße Mont...
Page 4 - CHARAKTERISTIKEN; Platzbedarf
DE 4 4 CHARAKTERISTIKEN Platzbedarf Komponenten Bez. Menge Produktkomponenten 1 1 Haubenkörper komplett mit: Bedienelemente, Beleuch- tung, Filter, Absaugeinheit 8 1 Luftstromrichtungsgitter 9 1 Reduzierflansch ø 150-120 mm 10 1 Flansch mit Rückstauklappe ø 150 mm Bez. Menge Produktkomponenten 12a 1...
Page 5 - Montage des Haubenkörpers; BEVOR DIE HAUBE AM HÄNGESCHRANK MONTIERT WIRD, WIE FOLGT VORGEHEN:
DE 5 5 MONTAGE Montage des Haubenkörpers BEVOR DIE HAUBE AM HÄNGESCHRANK MONTIERT WIRD, WIE FOLGT VORGEHEN: • Das Absaugpaneel herausziehen. • Das Paneel vom Haubenkörper lösen, in dem der spezielle Hebel des Befestigungszapfens verschoben wird. • Die Fettfilter entfernen. • Die elektrische Steckver...
Page 6 - Anschlüsse; ANSCHLUSS IN ABLUFTVERSION
DE 6 6 Anschlüsse ANSCHLUSS IN ABLUFTVERSION Bei Abluftbetrieb kann die Haube vom Installateur wahlweise mittels Rohr oder Schlauch (ø150 oder 120mm) an die Außenrohrleitung angeschlossen wer-den. • Den Flansch mit Rückstauklappe 10 anbringen. • Das Rohr mit geeigneten Rohrschellen fixieren. Das hie...
Page 7 - Schalttafel
DE 7 7 BEDIENUNG A B C D E F G H Schalttafel Taste Funktion Display A Schaltet den Absaugmotor bei der ersten Geschwindig-keitsstufe ein und bei allen Betriebsgeschwindigkeiten aus. Zeigt die eingestellte Geschwindigkeit an B Vermindert die Betriebsgeschwindigkeit. Zeigt die eingestellte Geschwindig...
Page 8 - Öffnen des Paneels; FG
DE 8 8 WARTUNG FERNBEDIENUNG (OPTION) Dieses Gerät kann mit einer Fernbedienung gesteuert werden, welche mit alkalischen Zink-Kohle-Batterien 1,5 V des Standardtyps LR03-AAA versorgt wird (nicht mitgeliefert). • Die Fernbedienung nicht in die Nähe von Hitzequellen legen. • Batterien müssen vorschrif...
Page 9 - Aktivierung des Alarmsignals; Beleuchtung
DE 9 9 Aktivkohle-Geruchsfilter (Filterversion) Die Aktivkohle-Geruchsfilter sind spülmaschinengeeignet und müssen gewaschen werden, sobald am Display die Led S1 blinkt, oder mindestens alle 4 Monate, oder auch öfter, je nach Intensität des Gebrauchs. Nach max. 5 Wäschen müssen die Filter erneuert w...
Page 10 - FR; CONSEILS ET SUGGESTIONS; INSTALLATION; UTILISATION; ENTRETIEN
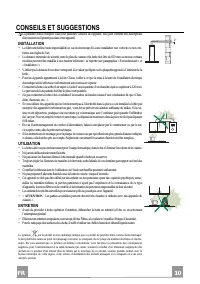
FR 1 10 CONSEILS ET SUGGESTIONS La présente notice d'emploi vaut pour plusieurs versions de l'appareil. Elle peut contenir des descriptions d'accessoires ne figurant pas dans votre appareil. INSTALLATION • Le fabricant décline toute responsabilité en cas de dommage dû à une installation non correcte...
Page 11 - CARACTERISTIQUES; Encombrement; Composants
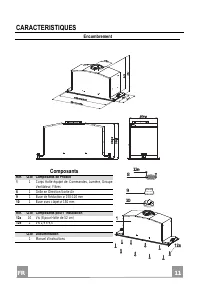
FR 1 11 CARACTERISTIQUES Encombrement Composants Réf. Q.té Composants de Produit 1 1 Corps Hotte équipé de: Commandes, Lumière, Groupe Ventilateur, Filtres 8 1 Grille en Direction Sortie Air 9 1 Buse de Réduction ø 150-120 mm 10 1 Buse avec clapet ø 150 mm Réf. Q.té Composants pour l ’installation 1...
Page 12 - Montage du corps de hotte; Vf
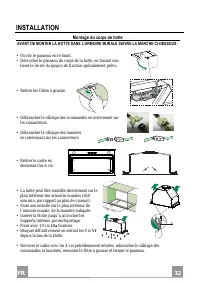
FR 1 12 INSTALLATION Montage du corps de hotte AVANT DE MONTER LA HOTTE DANS L’ARMOIRE MURALE SUIVRE LA MARCHE CI-DESSOUS : • Ouvrir le panneau en le tirant. • Décrocher le panneau du corps de la hotte, en faisant cou- lisser le levier du goujon de fixation spécialement prévu. • Retirer les filtres ...
Page 13 - Branchements; SORTIE AIR VERSION ASPIRANTE
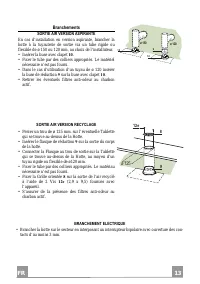
FR 1 13 Branchements SORTIE AIR VERSION ASPIRANTE En cas d’installation en version aspirante, brancher la hotte à la tuyauterie de sortie via un tube rigide ou flexible de ø 150 ou 120 mm, au choix de l’installateur. • Insérer la buse avec clapet 10 . • Fixer le tube par des colliers appropriés. Le ...
Page 14 - Tableau de commande
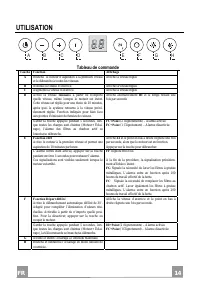
FR 1 14 UTILISATION A B C D E F G H Tableau de commande Touche Fonction Affichage A Branche le moteur d’aspiration à la première vitesse et le débranche à toutes les vitesses. Affiche la vitesse réglée B Diminue la vitesse d’exercice. Affiche la vitesse réglée C Augmente la vitesse d’exercice. Affic...
Page 15 - Ouverture panneau
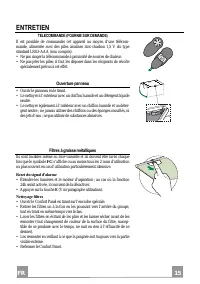
FR 1 15 ENTRETIEN TELECOMMANDE (FOURNIE SUR DEMANDE) Il est possible de commander cet appareil au moyen d’une télécom-mande, alimentée avec des piles alcalines zinc-charbon 1,5 V du type standard LR03-AAA (non compris). • Ne pas ranger la télécommande à proximité de sources de chaleur. • Ne pas jete...
Page 16 - Activation du signal d’alarme; Éclairage
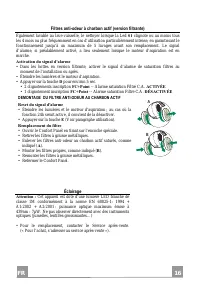
FR 1 16 Filtres anti-odeur à charbon actif (version filtrante) Également lavable au lave-vaisselle, le nettoyer lorsque la Led S1 clignote ou au moins tous les 4 mois ou plus fréquemment en cas d’utilisation particulièrement intense, en garantissant le fonctionnement jusqu’à un maximum de 5 lavages ...
Page 17 - IT; CONSIGLI E SUGGERIMENTI; INSTALLAZIONE; USO; MANUTENZIONE
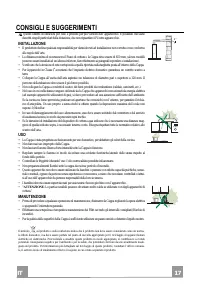
IT 1 17 CONSIGLI E SUGGERIMENTI Questo libretto di istruzioni per l'uso è previsto per più versioni dell' apparecchio. É possibile che siano descritti singoli particolari della dotazione, che non riguardano il Vostro apparecchio. INSTALLAZIONE • Il produttore declina qualsiasi responsabilità per dan...
Page 18 - CARATTERISTICHE; Ingombro
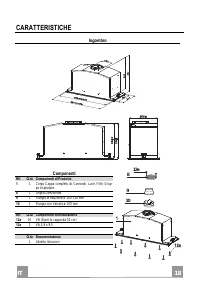
IT 1 18 CARATTERISTICHE Ingombro Componenti Rif. Q.tà Componenti di Prodotto 1 1 Corpo Cappa completo di: Comandi, Luce, Filtri, Grup- po Aspiratore. 8 1 Griglia Direzionata 9 1 Flangia di riduzione ø 150-120 mm 10 1 Flangia con Valvola ø 150 mm Rif. Q.tà Componenti di Installazione 12a 10 Viti (8 p...
Page 19 - Montaggio Corpo Cappa; PRIMA DI MONTARE LA CAPPA AL PENSILE AGIRE COME SEGUE:
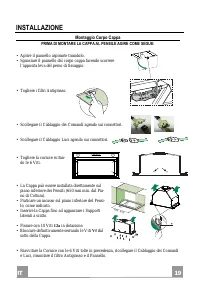
IT 1 19 INSTALLAZIONE Montaggio Corpo Cappa PRIMA DI MONTARE LA CAPPA AL PENSILE AGIRE COME SEGUE: • Aprire il pannello aspirante tirandolo. • Sganciare il pannello dal corpo cappa facendo scorrere l’apposita leva del perno di fissaggio. • Togliere i filtri Antigrasso. • Scollegare il Cablaggio dei ...
Page 20 - Connessioni; USCITA ARIA VERSIONE ASPIRANTE
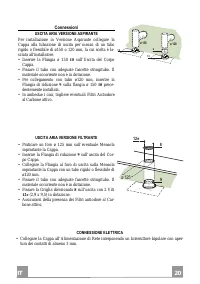
IT 2 20 Connessioni USCITA ARIA VERSIONE ASPIRANTE Per installazione in Versione Aspirante collegare la Cappa alla tubazione di uscita per mezzo di un tubo rigido o flessibile di ø150 o 120 mm, la cui scelta è la-sciata all'installatore. • Inserire la Flangia ø 150 10 sull’Uscita del Corpo Cappa. • ...
Page 21 - Quadro comandi
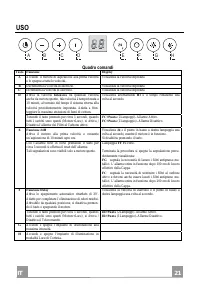
IT 2 21 USO A B C D E F G H Quadro comandi Tasto Funzione Display A Accende il motore di aspirazione alla prima velocità e lo spegne a tutte le velocità.. Visualizza la velocità impostata B Decrementa la velocità di esercizio. Visualizza la velocità impostata C Incrementa la velocità di esercizio. V...
Page 22 - Apertura Pannello
IT 2 22 MANUTENZIONE TELECOMANDO (OPZIONALE) Questo apparecchio può essere comandato per mezzo di un tele-comando, alimentato con pile alcaline zinco-carbone da 1,5 V del tipo standard LR03-AAA (non incluse). • Non riporre il telecomando in prossimità di fonti di calore. • Non disperdere le pile nel...
Page 23 - Filtri antiodore al Carbone attivo (Versione Filtrante); SMONTAGGIO FILTRO ANTIODORE AL CARBONE ATTIVO; Illuminazione
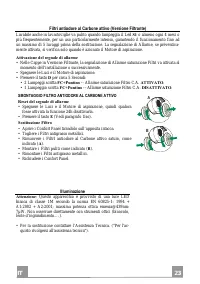
IT 2 23 Filtri antiodore al Carbone attivo (Versione Filtrante) Lavabile anche in lavastoviglie va pulito quando lampeggia il Led S1 o almeno ogni 4 mesi o più frequentemente, per un uso particolarmente intenso, garantendo il funzionamento fino ad un massimo di 5 lavaggi prima della sostituzione. La...
Page 24 - EN; RECOMMENDATIONS AND SUGGESTIONS; USE
EN 2 24 RECOMMENDATIONS AND SUGGESTIONS The Instructions for Use apply to several versions of this appliance. Accordingly, you may find de- scriptions of individual features that do not apply to your specific appliance. INSTALLATION • The manufacturer will not be held liable for any damages resultin...
Page 25 - CHARACTERISTICS; Dimensions
EN 2 25 CHARACTERISTICS Dimensions Components Ref. Q.ty Product Components 1 1 Hood Body, complete with :Controls, Light, Blower, Filters 8 1 Directioned grid 9 1 Reducer Flange ø 150-120 mm 10 1 Damper ø 150 mm Ref. Q.ty Installation Components 12a 10 Screws (8 for 52 cm Hood) 12e 2 Screws 2,9 x 9,...
Page 26 - Fitting the Hood canopy; BEFORE FITTING THE HOOD TO THE WALL UNIT, PROCEED AS FOLLOWS:
EN 2 26 INSTALLATION Fitting the Hood canopy BEFORE FITTING THE HOOD TO THE WALL UNIT, PROCEED AS FOLLOWS: • Open the suction panel by turning the specific knob. • Disconnect the panel from the hood canopy by sliding the fixing pin lever. • Remove grease filters. • Disconnect the wires to the Comman...
Page 27 - Connections; DUCTED VERSION AIR EXHAUST SYSTEM
EN 2 27 Connections DUCTED VERSION AIR EXHAUST SYSTEM When installing the ducted version, connect the hood to the chimney using either a flexible or rigid pipe ø 150 or 120mm, the choice of which is left to the installer. • Install the dumper 10 • Fix the pipe in position using adequate pipe clamps ...
Page 28 - Control panel
EN 2 28 USE A B C D E F G H Control panel Button Function Display A Turns the suction motor on at speed one and off at any speed. Displays the set speed B Decreases the working speed. Displays the set speed C Increases the working speed. Displays the set speed D Activate intensive speed from any oth...
Page 29 - MAINTENANCE; Opening Panel; sign appears on the display or at least once; Resetting the alarm signal; • Turn the Lights and the Suction motor off, then disable the 24h; Cleaning the Filters; back of the unit and at the same time pulling downward.
EN 2 29 MAINTENANCE REMOTE CONTROL (OPTIONAL) The appliance can be controlled using a remote control powered by a 1.5 V carbon-zinc alkaline batteries of the standard LR03-AAA type (not included). • Do not place the remote control near to heat sources. • Used batteries must be disposed of in the pro...
Page 30 - Activated Charcoal Filter (Recirculation Version); REMOVING THE ACTIVATED CHARCOAL FILTER; Lighting unit
EN 3 30 Activated Charcoal Filter (Recirculation Version) Can be washed in the dishwasher. It must be washed when Led S1 flashes or at least once eve- ry 4 months, or more frequently if use is particularly intense. Guaranteed to operate after washing for up to a maximum of 5 times before requiring r...