Page 2 - Introduction; Use ONLY pelletized fuel formulated for cooking; RADIANT HEAT CAN IGNITE THE FUEL.
Introduction Use only wood cooking pellets specified by the manufacturer. It is important to use only cooking pellets that is dry and free from dirt or other impurities. The cooking pellet industry has established standards for wood pellet manufacturers. We recommend that cooking pellets used in all...
Page 3 - Safety Information; READ ALL INSTRUCTIONS BEFORE
Safety Information • IMPORTANT: READ ALL INSTRUCTIONS BEFORE INSTALLING AND USING THE APPLIANCE. Failure to do so may result in property damage, bodily injury, or even death. Proper utilization of this grill is crucial for safe and efficient operation. • Warning: do not operate this grill under a ce...
Page 4 - Warning: Do not operate
Clearance To Combustibles Overall Dimensions This pellet grill must be installed with the clearance to combustibles as shown in this manual. Warning: Do not operate this grill under a ceiling or overhang. 24” REAR WALL SIDE WALL SIDE WALL 12” 12” USG350 USG730 USG890 61-11/16” 45-5/16” 28-7/16” 28-7...
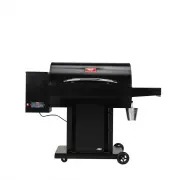
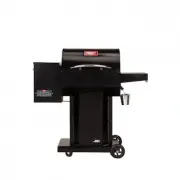
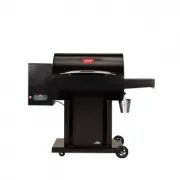
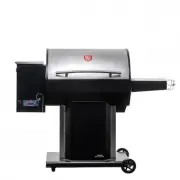
Page 5 - READ ALL INSTRUCTIONS BEFORE INSTALLING AND USING THE APPLIANCE; TOOLS AND MATERIALS NEEDED FOR INSTALLATION; Remove the grill contents for assembly.; STEP 1 BASE AND PEDESTAL ASSEMBLY; Assembly Instructions
READ ALL INSTRUCTIONS BEFORE INSTALLING AND USING THE APPLIANCE TOOLS AND MATERIALS NEEDED FOR INSTALLATION • #3 phillip screwdriver (use of a drill with a phillips bit will speed up the assembly process) Use proper assembly technique when installing bolts, start all bolts first and then tighten app...
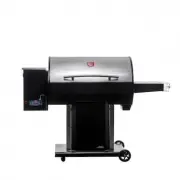
Page 6 - ATTENTION: The assistance of a second person is; STEP 2 SIDE TABLE ASSEMBLY & INITIAL FIRING; IMPORTANT: DO NOT put any pellets into the hopper
5. Attaching the Main Body ATTENTION: The assistance of a second person is strongly recommended for this step. • Attach the main grill body to the assembled pedestal with the provided washers and bolts. Note: The three cushioned pads installed between the lid and the body of the unit are for shippin...
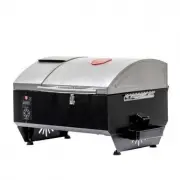
Page 7 - STEP 3 GRILL SURFACE, DRIP PAN, AND FLAME; WARNING: If the flame plate is installed incorrectly
• Plug the grill into a three-wire, grounded wall outlet. • Press the power button to turn the unit on. DO NOT TOUCH THE AUGER OR THE IGNITOR! Open the hopper lid and check to see that the auger is turning freely - approximately 2 rpm. LOOK TO SEE THAT THE AUGER IS TURNING. DO NOT TOUCH. • Place you...
Page 8 - IMPORTANT: THE GRILL MUST BE SEASONED BEFORE; SAVE THESE INSTRUCTIONS
STEP 4 SPICE RACK ASSEMBLY Attach the spice rack to the side table. The provided predrilled holes allow the spice rack to be attached to the front, side, or rear of the side table. STEP 5 PREPARING THE GRILL FOR USE 1. Seasoning The Grill IMPORTANT: THE GRILL MUST BE SEASONED BEFORE COOKING ANY FOOD...
Page 9 - Standard Use And Operation; STANDARD STARTUP SEQUENCE; STANDARD SHUTDOWN SEQUENCE
Standard Use And Operation Make sure the grill is always sitting level or is slightly tilted towards the drip bucket. STANDARD STARTUP SEQUENCE 1. Fill the hopper with pellet fuel. Never leave pellets in the hopper and only use the minimum amount of pellets needed for cooking. Be sure to close and l...
Page 10 - Operating Tips
Operating Tips • When the grill is plugged in, the control board will flash through a sequence of letters and numbers before going to a blank display screen. • When the grill is turned on, there will be three flashing lights found between the numbers of the display. The three lights will continue to...
Page 11 - MEAT PROBE; CLEAN DRIP PAN; INSPECT AND CLEAN BURN POT; ASH REMOVAL; Maintenance
MEAT PROBE The grills meat probe will track the temperature of the food as it cooks without having open the grill lid several times to test the food with an instant-read thermometer. The correct placement of the meat probe is especially important when cooking at a higher heat as opposed to low and s...
Page 12 - Troubleshooting
DISPOSAL OF ASHES Ashes should be placed in a steel metal container with a tight-fitting lid. The closed container of ashes should be placed on a non-combustible floor or on the ground well away from all combustible materials, pending final disposal. If the ashes are disposed of by burial in soil or...
Page 14 - Replacement Parts
8 7 11 10 9 13 2 3 1 14 15 4 5 12 6 Replacement Parts IN ORDER TO MAINTAIN WARRANTY, COMPONENTS MUST BE REPLACED USING ORIGINAL USSC PARTS PURCHASED THROUGH YOUR DEALER OR DIRECTLY FROM USSC. USE OF THIRD PARTY COMPONENTS WILL VOID THE WARRANTY. Key Description Model # Part # Qty 1 Grilling Grate US...
Page 15 - Wiring Diagram
Wiring Diagram WHITE WHITE FUSE IGN FA N AU G IGNIT OR AUGER MO TOR INDUC TION FA N M M RED YELL OW PURPLE POWER SUPPL Y 115 VOL TS AC WHITE BLA CK TEMPER ATURE PR OBE GND CONTR OL BO ARD YELL OW WHITE BLACK HOT WHITE GRILL WHITE PURPLE RED COM 853642 -15-
Page 16 - How to Order Repair Parts
This manual will help to obtain efficient, dependable service from this grill, and enable repair parts to be ordered correctly. Keep this manual in a safe place for future reference. The full model number is located on the nameplate attached to the grill. When ordering repair parts, always give the ...