Page 2 - CONTENTS
[email protected] www.turbro.com SAFETY GUIDE GETTING TO KNOW YOUR HUMIDIFIER SPECIFICATIONS GETTING STARTED USING YOUR HUMIDIFIER MAINTENANCE AND CLEANING TROUBLESHOOTING FCC STATEMENT FCC RADIATION EXPOSURE STATEMENT ATTRIBUTIONS Warranty ····················································02 ····...
Page 3 - SAFETY GUIDE
[email protected] www.turbro.com SAFETY GUIDE 02 Turn off the machine before moving it.When the machine is working, do not separate the water tank from the base.Do not block the outlet or add water to the mist outlet which may cause water leakage, deformation, or failure and void the warranty.This m...
Page 4 - CAUTION
[email protected] www.turbro.com 03 1. Do not disassemble or modify the machine as this will void the warranty. 3. If there is any fault happen, please unplug it immediately and contact us via [email protected]. 5. Power cord with damage or product fall or drop, please call the professional guy to r...
Page 5 - GETTING TO KNOW YOUR HUMIDIFIER; PRODUCT DETAIL
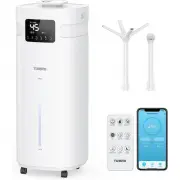
[email protected] www.turbro.com GETTING TO KNOW YOUR HUMIDIFIER 04 NozzleHandle 3 Different Nozzles Remote Control Body 2 Ways Extension Tube 4 Ways Water Tank PRODUCT DETAIL Humidity Timer Sleep Display On/Off UV Water Level Light Mist Auto Light
Page 6 - PRODUCT STRUCTURE
[email protected] www.turbro.com 05 A. Sink B. Atomizer C. Remote Control Holder D. UV Lamp E. Power Cord F. Air Outlet G. Water Filter H. Water Tank I. Wheels J. Nozzle K. Cover L. Mist Cover PRODUCT STRUCTURE C D F G H J K L I A E B
Page 7 - SPECIFICATIONS; PLACEMENT
[email protected] www.turbro.com SPECIFICATIONS GETTING STARTED 06 This humidifier should be placed on a firm floor and at least 19 inches of space away from walls, furniture, furnace, household appliances, etc.Please do not use it on the following occasions to avoid water leakage, signal interferen...
Page 8 - TWO WAYS TO ADD WATER; Attention
[email protected] www.turbro.com 07 TWO WAYS TO ADD WATER Note: We recommend using purified or distilled water to fill the tank to prevent white mineral buildup. Take out the body and add water into the tank. This is the recommended way. Direct sunlight.On an unstable platform.With high temperatures...
Page 9 - REMOTE CONTROL
[email protected] www.turbro.com 08 REMOTE CONTROL The battery is included in the remote control. 1. Replace the battery: Press and pull out the battery ring. Put a lithium battery CR2025+ on the top. 1 1 2 2. Operation: Use the remote control within 13 feet of the humidifier. Within 13 feet
Page 10 - USING YOUR HUMIDIFIER; PANEL
USING YOUR HUMIDIFIER [email protected] www.turbro.com 09 PANEL F Touch this button to turn on the machine. The LED display shows the current humidity and temperature (the display switches every minute). Touch this button to select the mist spray level from 1 to 3. The humidity setting range is betw...
Page 11 - UV Lamp Sterilization
[email protected] www.turbro.com 10 Touch the UV button to turn on/off the sterilization feature. Long press this button on the panel for 3 seconds or press the sleep button on the remote to enter sleep mode. The display and atmosphere light will be off. Press any button to wake the panel. UV-C LED ...
Page 13 - CONNECTION
[email protected] www.turbro.com 12 CONNECTION F Entering the Wi-Fi connection mode Preparation before connecting preparation: Make sure your Wi-Fi router supports 2.4GHz (NOT 5GHz) and 802.11b/g/n bands. Step1 Long press the on the control panel, and the on the screen will blink quickly. Make sure ...
Page 16 - CONTROL
[email protected] www.turbro.com 15 CONTROL APP 1 2 3 6 7 4 5 8 9 10 On/Off Auto mode Other setting Mist spray level Atmosphere light Time setting UV light In the "ON" mode, the humidifier will constant to humidify, the app will display as "ON". Water level indicator light Sleep mode...
Page 17 - MAINTENANCE AND CLEANING; Filter Impurities in Water
MAINTENANCE AND CLEANING [email protected] www.turbro.com 16 Before cleaning, please be sure the machine is powered off and unplugged.Clean all the parts with a soft cloth. Never use any hard objects or abrasives to avoid any damage.Change the water in the tank and the sink every day to prevent bact...
Page 18 - Descaling
[email protected] www.turbro.com 17 Do not put essential oil into the main body/water tank, which may cause water leakage deformation or damage.If accidents happen, such as the machine falling down, or water going inside the unit, please unplug the machine and let it dry, then contact our after-sale...
Page 19 - TROUBLESHOOTING
TROUBLESHOOTING [email protected] www.turbro.com 18 Fault Reasons and Solutions Issues Analysis Power is not connected Check the power connection The new machine is closed tightlyThe water in the water tank has been inside for too long timeThe water contains high mineral content The atomizing sheet ...
Page 20 - FCC STATEMENT
[email protected] www.turbro.com 19 FCC STATEMENT This device complies with Part 15 of the FCC Rules. Operation is subject tothe following two conditions:1. This device may not cause harmful interference, and2. This device must accept any interference received, including interference that may cause ...
Page 21 - FCC RADIATION EXPOSURE STATEMENT
[email protected] www.turbro.com 20 FCC RADIATION EXPOSURE STATEMENT This equipment complies with FCC radiation exposure limits set forth for an uncontrolled environment. End users must follow the specific operating instructions for satisfying RF exposure compliance. To maintain compliance with FCC ...
Page 22 - WARRANTY & CUSTOMER SUPPORT; WARRANTY; How to request warranty services?
[email protected] www.turbro.com 21 WARRANTY & CUSTOMER SUPPORT WARRANTY TURBRO provides a 1-year limited warranty for TURBRO products from the date of purchase, subject to the following conditions and limitations outlined below. What is covered? This warranty is limited to the repair or replace...
Page 23 - CUSTOMER SUPPORT
[email protected] www.turbro.com 22 CUSTOMER SUPPORT We are here to help anytime! Any problems, write to us via [email protected] . We will get back to you within 1 business day.