Page 2 - Read This Manual; User Manual; CAUTION
Page 2 User Manual Read This Manual Inside you’ll find many helpful hints on how to use and maintain your dehumidifier properly. Just a little preventive care on your part can save you a great deal of time and money over the life of your dehumidifier. You’ll find many answers to common problems in t...
Page 3 - SAFETY PRECAUTIONS; WARNING
User Manual Page 3 SAFETY PRECAUTIONS WARNING: This symbol indicates the possibility of death or serious injury. CAUTION: This symbol indicates the possibility of injury or damage to property. Sa fe ty Precautions To prevent injur y to the user or other people and proper ty damage, the following ins...
Page 5 - WARNING - Electrical Information; WARNING - For your safety
User Manual Page 5 Sa fe ty Precautions WARNING - Electrical Information • The manufacturer’s nameplate is located on the rear panel of the unit and containselectrical and other technical data specifi c to this unit. • Be sure the unit is properly grounded. To minimize shock and fi re hazards, prope...
Page 6 - Product Overview; NOTE; OPERATING INSTRUCTIONS
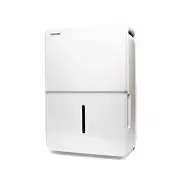
Page 6 User Manual Product Overview Acessories Control panel Panel Handle (both sides) Air intake Air filter (behind the grill) Water bucketWater level window Caster Power cord Power plug Air outlet Continuous drain hose outlet Power cord buckle (placed in the water bucket, used only when storing th...
Page 7 - COMFORT Button; FILTER Button
User Manual Page 7 Key Pad Features Control Pads Oper ating Instruc tions Comfort dehumidifying operation on indicator light Bucket full indicator light Timer on/ indicator light High fan indicator light Continuous operation on indicator light Auto defrost operation on indicator light lter indicator...
Page 8 - AS; Other Features
Page 8 User Manual TURBO Button Control the Turbo speed. Press to select either Turbo or normal fan speed. Set the Turbo control to high for maximum moisture removal. When room humidity is at your preferred level, it is advised to turn off Turbo speed. TIMER Button Starts the Timer ON and Timer OFF ...
Page 9 - Removing Collected Water; Hold both sides of the; Setting the Timer ON and Timer OFF
User Manual Page 9 Removing Collected Water NOTES • When first using the dehumidifier, operate the unit continuously 24 hours. Make sure the plastic cover on the continuous drain hose outlet install stightly properly so thereare no leaks. • This unit is designed to operate with a working environment...
Page 10 - Continuous draining; Remove the
Page 10 User Manual 3. Pour the water out. Fig. 6 NOTES • When you remove the bucket, do not touch any parts inside the unit. Doing so may damage the product. • Be sure to push the bucket gently all the way into the unit.• When the unit is on, if the bucket is removed, the compressor , then the unit...
Page 12 - INSTALLATION INSTRUCTIONS; Positioning the Unit; Air outlet
INSTALLATION INSTRUCTIONS Installa tion Instruc tions Positioning the Unit more than 16” Air outlet more than more than 8” more than 8” more than 16” A operating in a basement will have little or no e ect in drying an adjacent enclosed storage area, such as a closet, unless there is adequate circula...
Page 13 - CARE AND CLEANING; Clean the Grill and Case
CARE AND CLEANING Car e and Cleaning CAUTION Turn the dehumidifier off and disconnect the plug from the wall before cleaning. DO NOT operate the dehumidifi er without a fi lter to avoid loss of performance and damage to the unit. 1. Clean the Grill and Case • Use water and a mild detergent. Do not u...
Page 14 - TROUBLESHOOTING TIPS; Problem
TROUBLESHOOTING TIPS Troubleshooting T ips Before calling for service, review this list. It may save you time and money. This list includes common occurrences that are not the result of defective workmanship or materials in this appliance. Problem Solution Unit does not start Make sure the dehumidif...