Page 4 - WARNING; Introduction
For assistance, please seewww.Toro.com/supportfor instructional videosor contact 1-888-384-9939before returning thisproduct. WARNING CALIFORNIA Proposition 65 Warning The power cord on this product contains lead, a chemical known to the State of California to cause birth defects or other reproductiv...
Page 5 - Safety; II. Electrical safety
Safety WARNING Read all safety warnings, instructions,illustrations and specifications provided withthis power tool. Failure to follow the warnings and instructionsmay result in electric shock, fire and/or seriousinjury. Save all warnings and instructions for futurereference. The term "power too...
Page 6 - V. Battery tool use and care
2. Do not use the power tool if the switchdoes not turn it on and off. Any power tool that cannot be controlled with the switch isdangerous and must be repaired. 3. Disconnect the plug from the power sourceand/or remove the battery pack, if detachable,from the power tool before making anyadjustments...
Page 7 - VII. Hedge trimmer safety warnings
VII. Hedge trimmer safety warnings 1. Keep all parts of the body away from theblade. Do not remove cut material or holdmaterial to be cut when blades are moving. Blades continue to move after the switch isturned off. A moment of inattention whileoperating the hedge trimmer may result inserious perso...
Page 8 - Safety and Instructional Decals
Safety and Instructional Decals Safety decals and instructions are easily visible to the operator and are located near any areaof potential danger. Replace any decal that is damaged or missing. Model 51840 decal139-5251 139-5251 1. Warning—read the Operator’s Manual ; wear eye protection; do notexpo...
Page 10 - Setup; Product Overview
Setup Important: The battery pack is not fully charged when it is purchased. Before using the machinefor the first time, refer to Charging the Battery Pack (page 11) . Mounting the BatteryCharger (Optional) If desired, mount the battery charger securely on awall using the wall-mount key holes on the...
Page 11 - Specifications; Appropriate Temperature Ranges; Operation; Starting the Hedge Trimmer
Specifications Model 51840/T CuttingLength 610 mm (24 inches) RatedVoltage 60V DC maximum, 54 VDC nominal usage No-loadSpeed 3200 spm at 60 VDC max Cuttingwidth 19 mm (3/4 inch) ChargerType 88602 (included with 51840), 88605, or 88610 Battery Type 88625 (included with 51840), 88620, 88640,88650, 886...
Page 12 - Removing the Battery Pack
5. Press the lock switch and then squeezethe trigger switch while engaging theauxiliary-handle switch to turn on the hedgetrimmer ( Figure 7 ). The trimmer stays on as long as theauxiliary-handle switch is engaged and thetrigger is squeezed. You may release thelock switch once the hedge trimmer is r...
Page 13 - Charging the Battery Pack; Operating Tips
Charging the Battery Pack Important: The battery pack is not fully charged when you purchase it. Before using the tool forthe first time, place the battery pack in the chargerand charge it until the LED display indicates thebattery pack is fully charged. Read all safetyprecautions. Important: Charge...
Page 14 - Maintenance; Storage
Maintenance Remove the battery pack before maintenance orcleaning work. Use only the manufacturer’s recommendedreplacement parts and accessories. Inspect and maintain the product regularly. Havethe product repaired only by an Authorized ServiceDealer. Preparing the Battery Packfor Recycling Importan...
Page 15 - Troubleshooting
Troubleshooting Perform only the steps described in these instructions. All further inspection, maintenance, and repair workmust be performed by an authorized service center or a similarly qualified specialist if you cannot solve theproblem yourself. Problem Possible Cause Corrective Action 1. The b...
Page 16 - California Proposition 65 Warning Information
California Proposition 65 Warning Information What is this warning? You may see a product for sale that has a warning label like the following: WARNING: Cancer and Reproductive Harm—www.p65Warnings.ca.gov. What is Prop 65? Prop 65 applies to any company operating in California, selling products in C...
Page 18 - ADVERTENCIA; Introducción
Si necesita ayuda, consultelos vídeos instruccionalesen www.Toro.com/supporto llame al 1-888-384-9939antes de devolver esteproducto. ADVERTENCIA CALIFORNIA Advertencia de la Propuesta 65 El cable eléctrico de este producto contiene plomo, que el Estado de California sabe que causa defectoscongénitos...
Page 19 - Seguridad; INSTRUCCIONES DE; I. Seguridad de la zona de trabajo
Seguridad ADVERTENCIA Lea todas las instrucciones, ilustraciones,especificaciones y advertencias de seguridadproporcionadas con esta herramientaeléctrica. El hacer caso omiso de las advertencias einstrucciones puede dar lugar a descargaseléctricas, incendios y/o lesiones graves. Guarde todas las adv...
Page 21 - V. Uso y cuidado de las herramientas a batería
V. Uso y cuidado de las herramientas a batería 1. Recargar únicamente con el cargadorespecificado por el fabricante. Un cargador diseñado para un tipo de batería puede crear unriesgo de incendio si se utiliza con otra batería. 2. Utilice las herramientas eléctricasúnicamente con las baterías específ...
Page 22 - Pegatinas de seguridad e instrucciones
Pegatinas de seguridad e instrucciones Las pegatinas de seguridad e instrucciones están a la vista del operador y están ubicadascerca de cualquier zona de peligro potencial. Sustituya cualquier pegatina que esté dañada oque falte. Modelo 51840 decal139-5251 139-5251 1. Advertencia — lea el Manual de...
Page 24 - Montaje; El producto
Montaje Importante: En el momento de la compra la batería no está totalmente cargada. Antes deutilizar la máquina por primera vez, consulte Carga de la batería (página 11) . Cómo montar el cargadorde la batería (opcional) Si lo desea, monte el cargador de la bateríafirmemente en la pared utilizando ...
Page 25 - Especificaciones; Intervalos de temperatura adecuados; Operación
Especificaciones Modelo 51840/T Longitud decorte 610 mm (24") Voltajenominal Máximo 60 VCC , uso nominal 54 VCC Velocidadsin carga 3200 cpm a 60 Vcc máx Anchura decorte 19 mm (¾") Tipo decargador 88602 (incluido con el modelo 51840), 88605o 88610 Tipo debatería 88625 (incluida con el modelo ...
Page 26 - Cómo parar el cortasetos; Cómo retirar la batería
4. Coloque una mano en la empuñadura congatillo. Coloque la otra mano en la empuñaduraauxiliar ( Figura 7 ). 5. Presione el interruptor de bloqueo y aprieteel interruptor del gatillo mientras activa elinterruptor de la empuñadura auxiliar paraencender el cortasetos ( Figura 7 ). El cortasetos seguir...
Page 27 - Carga de la batería; Consejos de operación
Carga de la batería Importante: En el momento de la compra la batería no está totalmente cargada. Antes de usarla herramienta por primera vez, coloque la bateríaen el cargador y cárguela hasta que el indicadorLED indique que la batería está completamentecargada. Lea todas las precauciones desegurida...
Page 28 - Mantenimiento; Almacenamiento
Mantenimiento Retire la batería antes de realizar tareas demantenimiento o limpieza. Utilice únicamente piezas de repuesto y accesoriosrecomendados por el fabricante. Inspeccione y haga el mantenimiento del productoperiódicamente. El producto solo lo debe reparar unServicio Técnico Autorizado. Prepa...
Page 29 - Solución de problemas
Solución de problemas Realice solo los pasos descritos en estas instrucciones. Cualquier otro trabajo de inspección, mantenimiento oreparación debe ser realizado por un Servicio Técnico Autorizado o por un especialista autorizado si nopuede solucionar el problema usted mismo. Problema Posible causa ...
Page 32 - ATTENTION
Si vous avez besoind'aide, visionnez lesvidéos d'instruction surwww.Toro.com/support ouappelez le 1-888-384-9939avant de renvoyer ceproduit. ATTENTION CALIFORNIE Proposition 65 - Avertissement Le cordon d'alimentation de cette machine contient du plomb, une substance chimique considérée par l'état d...
Page 33 - Sécurité; I. Sécurité sur la zone de travail
Sécurité ATTENTION Prenez connaissance de toutes les consignesde sécurité, instructions, illustrations etspécifications qui accompagnent cet outilélectrique. Le non respect des avertissements etconsignes peut entraîner des chocsélectriques, un incendie et/ou des blessuresgraves. Conservez précieusem...
Page 35 - V. Utilisation et entretien des outils à batterie
V. Utilisation et entretien des outils à batterie 1. Ne les rechargez qu'avec le chargeur spécifiépar le fabricant. Un chargeur convenant à un type de batterie peut créer un risque d'incendies'il est utilisé avec une autre batterie. 2. Utilisez les outils électriques uniquementavec les batteries spé...
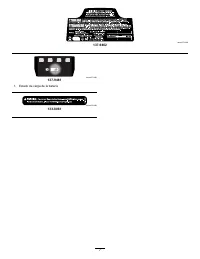
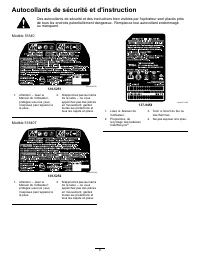
Page 36 - Autocollants de sécurité et d'instruction
Autocollants de sécurité et d'instruction Des autocollants de sécurité et des instructions bien visibles par l'opérateur sont placés prèsde tous les endroits potentiellement dangereux. Remplacez tout autocollant endommagéou manquant. Modèle 51840 decal139-5251 139-5251 1. Attention – lisez le Manuel...
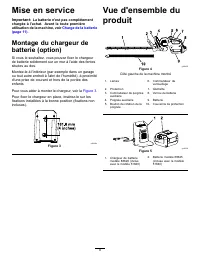
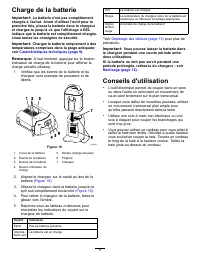
Page 38 - Mise en service
Mise en service Important: La batterie n'est pas complètement chargée à l'achat. Avant la toute premièreutilisation de la machine, voir Charge de la batterie (page 11) . Montage du chargeur debatterie (option) Si vous le souhaitez, vous pouvez fixer le chargeurde batterie solidement sur un mur à l'a...
Page 39 - Plages de température adéquates; Utilisation; Démarrage du taille-haie
Caractéristiquestechniques Modèle 51840/T Longueur decoupe 610 mm (24 po) Tensionnominale 60 V c.c. maximum, 54 V c.c. utilisationnominale Vitesse àvide 3200 c/min à 60 V c.c. max. Largeur decoupe 19 mm (¾ po) Type dechargeur 88602 (inclus avec le modèle 51840), 88605ou 88610 Type debatterie 88625 (...
Page 40 - Retrait de la batterie
4. Placez une main sur la poignée d'actionnement.Placez l'autre main sur la poignée auxiliaire( Figure 7 ). 5. Appuyez sur le commutateur de verrouillagepuis serrez la poignée d'actionnement tout enactionnant le commutateur de poignée auxiliairepour mettre le taille-haie en marche ( Figure 7 ). Le t...
Page 41 - Charge de la batterie; Conseils d'utilisation
Charge de la batterie Important: La batterie n'est pas complètement chargée à l'achat. Avant d'utiliser l'outil pour lapremière fois, placez la batterie dans le chargeuret chargez-la jusqu'à ce que l'affichage à DELindique que la batterie est complètement chargée.Lisez toutes les consignes de sécuri...
Page 42 - Entretien; Remisage
Entretien Retirez la batterie avant de procéder à tout entretienou nettoyage. Utilisez exclusivement les pièces et accessoires derechange recommandés par le constructeur. Inspectez et entretenez régulièrement le produit.Ne confiez la réparation du produit qu'à undépositaire-réparateur agréé. Prépara...
Page 43 - Dépistage des défauts
Dépistage des défauts Effectuez uniquement les opérations décrites dans cette notice. Tout autre contrôle, entretien ou réparationdoit être réalisé par un centre d'entretien agréé ou un spécialiste qualifié si vous n'arrivez pas à résoudre leproblème vous-même. Problème Cause possible Mesure correct...
Page 44 - Cancer et troubles de la reproduction –
Proposition 65 de Californie – Informations concernant cet avertissement En quoi consiste cet avertissement? Certains produits commercialisés présentent une étiquette d'avertissement semblable à ce qui suit : AVERTISSEMENT : Cancer et troubles de la reproduction – www.p65Warnings.ca.gov. Qu’est-ce q...