Page 4 - WARNING; Introduction
For assistance, please seewww.Toro.com/supportfor instructional videosor contact 1-888-384-9939before returning thisproduct. WARNING CALIFORNIA Proposition 65 Warning The power cord on this product contains lead, a chemical known to the State of California to cause birth defects or other reproductiv...
Page 5 - Safety
Safety WARNING—When using electric gardeningappliances, always follow basic safety precautions toreduce the risk of fire, electric shock, and personalinjury, including the following: IMPORTANT SAFETYINSTRUCTIONS I. Training 1. The operator of the appliance is responsible forany accidents or hazards ...
Page 6 - IV. Maintenance and Storage
Do not use the appliance while ill, tired, or underthe influence of alcohol or drugs. 12. Ensure that the ventilation openings are keptclear of debris. 13. Do not insert any object into the opening or usethe appliance with a blocked opening. Keep theopening free from dust, lint, hair, or anythingels...
Page 7 - Safety and Instructional Decals
Safety and Instructional Decals Safety decals and instructions are easily visible to the operator and are located near any areaof potential danger. Replace any decal that is damaged or missing. decal144-3094 144-3094 1. The battery pack ischarging. 3. The battery pack is overor under the appropriate...
Page 9 - Setup; Assembling the Blower; Product Overview
Setup Important: The battery pack is not fully charged when you purchase it. Before using the tool forthe first time, refer to Charging the Battery Pack (page 10) . Assembling the Blower Slide the blower tube onto the blower housing. Youmay need to press down on the tube latch for theblower tube to ...
Page 10 - Specifications; Appropriate Temperature Ranges; Operation; Starting the Blower
Specifications Model 51821/51821T Rated Voltage 60V DC maximum, 54 VDCnominal usage Charger Type 88602 or 88610 (included with51821) Battery Type 88620 (included with 51821),88625, 88640, 88660, or88675 Appropriate Temperature Ranges Charge/ store the battery packat 5°C (41°F) to 40°C (104°F)* Use t...
Page 11 - Shutting Off the Blower; Removing the Blower Tube
g267241 Figure 7 1. Speed lock 4. Battery latch 2. Turbo boost button 5. Blower venting areas 3. Variable-speed trigger Adjusting the Air Speed ofthe Blower To achieve maximum performance (air speed) , pressand hold the turbo boost button for the desired amountof time ( Figure 7 ). To adjust the air...
Page 12 - Charging the Battery Pack
g267488 Figure 9 1. Battery latch Charging the Battery Pack Important: The battery pack is not fully charged when you purchase it. Before using the tool forthe first time, place the battery pack in the chargerand charge it until the LED display indicates thebattery pack is fully charged. Read all sa...
Page 13 - Storage
Storage Important: Store the tool, battery pack, and charger only in temperatures that are within theappropriate range; refer to Specifications (page 8) . Important: If you are storing the battery pack for the off-season, remove the battery pack from thetool and charge the battery pack until 2 or 3 ...
Page 14 - Troubleshooting
Troubleshooting Perform only the steps described in these instructions. All further inspection, maintenance, and repair workmust be performed by an authorized service center or a similarly qualified specialist if you cannot solve theproblem yourself. Problem Possible Cause Corrective Action 1. The b...
Page 17 - California Proposition 65 Warning Information
California Proposition 65 Warning Information What is this warning? You may see a product for sale that has a warning label like the following: WARNING: Cancer and Reproductive Harm—www.p65Warnings.ca.gov. What is Prop 65? Prop 65 applies to any company operating in California, selling products in C...
Page 20 - ADVERTENCIA; Introducción
Si necesita ayuda, consultelos vídeos instruccionalesen www.Toro.com/supporto llame al 1-888-384-9939antes de devolver esteproducto. ADVERTENCIA CALIFORNIA Advertencia de la Propuesta 65 El cable eléctrico de este producto contiene plomo, que el Estado de California sabe que causa defectoscongénitos...
Page 21 - Seguridad; INSTRUCCIONES DE
Seguridad ADVERTENCIA – cuando se utilizan aparatos dejardinería eléctricos, es necesario observar unasnormas básicas de seguridad, incluyendo lassiguientes, a fin de reducir el riesgo de incendio,descarga eléctrica y lesiones personales: INSTRUCCIONES DE SEGURIDADIMPORTANTES I. Formación 1. El oper...
Page 22 - IV. Mantenimiento y almacenamiento
antes de ajustar, revisar, limpiar o almacenarel aparato. 8. Retire siempre la batería del aparato antes dedejarlo desatendido. 9. No fuerce el aparato – deje que el aparato hagael trabajo mejor y con mayor seguridad a lavelocidad para la que fue diseñado. 10. No intente alcanzar zonas demasiado ale...
Page 23 - Pegatinas de seguridad e instrucciones
Pegatinas de seguridad e instrucciones Las pegatinas de seguridad e instrucciones están a la vista del operador y están ubicadascerca de cualquier zona de peligro potencial. Sustituya cualquier pegatina que esté dañada oque falte. decal144-3094 144-3094 1. La batería se estácargando. 3. La temperatu...
Page 26 - Montaje; Montaje del soplador; El producto; Especificaciones; Intervalos de temperatura adecuados
Montaje Importante: En el momento de la compra la batería no está totalmente cargada. Antes de usarla herramienta por primera vez, consulte Carga de la batería (página 10) . Montaje del soplador Deslice el tubo del soplador sobre la carcasa delsoplador. Puede ser necesario presionar hacia abajosobre...
Page 27 - Operación; Cómo arrancar el soplador
Intervalos de temperatura adecuados (cont'd.) Cargue/guarde la batería a 5 °C a 40 °C (41 °F a 104 °F)* Utilice la batería a Entre -30 °C y 49 °C (-22 °Fy 120 °F) Utilice el soplador a 0 °C a 49 °C (32 °F a 120 °F) * El tiempo de carga será mayor si la temperatura noestá en este intervalo durante la...
Page 28 - Cómo apagar el soplador; Carga de la batería
g267241 Figura 7 1. Bloqueo de velocidad 4. Cierre de la batería 2. Botón de potencia turbo 5. Zonas de ventilación delsoplador 3. Gatillo de velocidadvariable Cómo ajustar la velocidaddel aire del soplador Para obtener el máximo rendimiento (velocidad deaire), mantenga pulsado el botón de potencia ...
Page 29 - Almacenamiento
g330066 Figura 10 1. Hueco de la batería 5. Indicadores LED (cargaactual) 2. Zonas de ventilación de labatería 6. Empuñadura 3. Terminales de la batería 7. Cargador 4. Botón del indicador decarga de la batería 2. Alinee el cargador con el hueco de la partetrasera de la batería ( Figura 10 ). 3. Intr...
Page 31 - Solución de problemas
Solución de problemas Realice solo los pasos descritos en estas instrucciones. Cualquier otro trabajo de inspección, mantenimiento oreparación debe ser realizado por un Servicio Técnico Autorizado o por un especialista autorizado si nopuede solucionar el problema usted mismo. Problema Posible causa ...
Page 36 - ATTENTION
Si vous avez besoind'aide, visionnez lesvidéos d'instruction surwww.Toro.com/support ouappelez le 1-888-384-9939avant de renvoyer ceproduit. ATTENTION CALIFORNIE Proposition 65 - Avertissement Le cordon d'alimentation de cette machine contient du plomb, une substance chimique considérée par l'état d...
Page 37 - Sécurité; IMPORTANTES
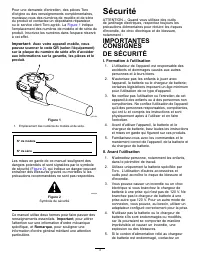
Pour une demande d'entretien, des pièces Torod'origine ou des renseignements complémentaires,munissez-vous des numéros de modèle et de sériedu produit et contactez un dépositaire-réparateurou le service client Toro agréé. La Figure 1 indique l'emplacement des numéros de modèle et de série duproduit....
Page 38 - IV. Entretien et remisage
dépositaire-réparateur agréé pour le faireremplacer. 6. N'utilisez pas de batteries non rechargeables. 7. Ne chargez la batterie qu'avec le chargeurspécifié par Toro. Un chargeur convenant à uncertain type de batterie peut créer un risqued'incendie s'il est utilisé avec une autre batterie. 8. Ne cha...
Page 39 - Autocollants de sécurité et d'instruction
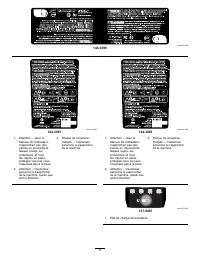
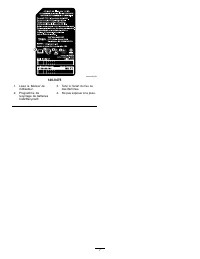
remplacement des accessoires. Gardez lespoignées sèches et propres, et exemptes d'huileet de graisse. 2. Lorsque la batterie ne sert pas, rangez-la àl'écart d'objets métalliques tels que trombones,pièces de monnaie, clés, clous et vis quipourraient relier les bornes entre elles. Uncourt-circuit aux ...
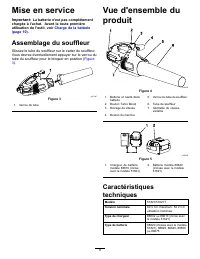
Page 42 - Mise en service; Assemblage du souffleur
Mise en service Important: La batterie n'est pas complètement chargée à l'achat. Avant la toute premièreutilisation de l'outil, voir Charge de la batterie (page 10) . Assemblage du souffleur Glissez le tube du souffleur sur le carter du souffleur.Vous devrez éventuellement appuyer sur le verrou dutu...
Page 43 - Plages de température adéquates; Utilisation; Démarrage du souffleur
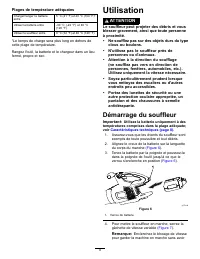
Plages de température adéquates Charger/ranger la batterieentre 5 °C (41 °F) et 40 °C (104 °F)* Utiliser la batterie entre -30 °C (-22 °F) et 49 °C(120 °F) Utiliser le souffleur entre 0 °C (32 °F) et 49 °C (120 °F) *Le temps de charge sera plus long en dehors decette plage de température. Rangez l'o...
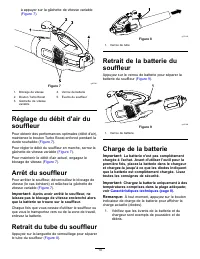
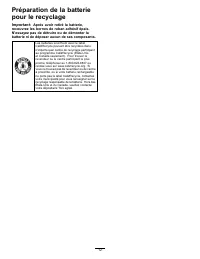
Page 44 - Arrêt du souffleur; Retrait du tube du souffleur; Charge de la batterie
à appuyer sur la gâchette de vitesse variable( Figure 7 ). g267241 Figure 7 1. Blocage de vitesse 4. Verrou de batterie 2. Bouton Turbo Boost 5. Évents du souffleur 3. Gâchette de vitessevariable Réglage du débit d'air dusouffleur Pour obtenir des performances optimales (débit d'air),maintenez le bo...
Page 45 - Remisage
g330066 Figure 10 1. Creux de la batterie 5. Diodes (charge actuelle) 2. Évents de la batterie 6. Poignée 3. Bornes de la batterie 7. Chargeur 4. Bouton indicateur decharge 2. Alignez le chargeur sur la cavité au dos de labatterie ( Figure 10 ). 3. Glissez le chargeur dans la batterie jusqu'à cequ'i...
Page 47 - Dépistage des défauts
Dépistage des défauts Effectuez uniquement les opérations décrites dans cette notice. Tout autre contrôle, entretien ou réparationdoit être réalisé par un centre d'entretien agréé ou un spécialiste qualifié si vous n'arrivez pas à résoudre leproblème vous-même. Problème Cause possible Mesure correct...
Page 48 - Cancer et troubles de la reproduction –
Proposition 65 de Californie – Information concernant cet avertissement En quoi consiste cet avertissement? Certains produits commercialisés présentent une étiquette d'avertissement semblable à ce qui suit : AVERTISSEMENT : Cancer et troubles de la reproduction – www.p65Warnings.ca.gov. Qu’est-ce qu...