Page 3 - YOUR SAFETY AND THE SAFETY OF OTHERS; ● Do not try to light any appliance.; Important Safety Instructions
– YOUR SAFETY AND THE SAFETY OF OTHERS ARE VERY IMPORTATNT. Before use, please read and follow all safety rules and operating instructions. And save for local gas and electrical inspector’s use. WARNING If the information in this manual is not followed exactly, a fire or explosion may result causing...
Page 4 - cannot; Installation
● Injuries may result from the misuse of the cooktop such as stepping, leaning, or sitting on the top surface. ● Maintenance – Keep cooktop area clear and free from combustible materi- als, gasoline, and other flammable vapors and liquids. ● Not obstructing the flow of combustion and ventilation air...
Page 5 - ● The unit overhead cabinet maximum depth: 13′′.; Countertop Cutout Dimension; tions or requirements.
● Minimum horizontal distance(S) from sides and back of appliance to adja cent vertical combustible walls extending above the top panel, 6″ from the left side, 6″ from right side, 2″ from rear wall. ● Minimum clearance to combustible construction centered above cooking surface: Vertical 30″, Horizon...
Page 6 - received the unit & measure its cut out size.; Cooktop Installation; cooktop must be removable if service is required.
A cardboard with cut out hole size is packed in each box. Please use it to outline & cut hole in the counter top. Do not attempt to cut the hole before you received the unit & measure its cut out size. Cooktop Installation Foam Tape-A foam tape is provided to seal the cooktop edges to the co...
Page 7 - Installation In Kitchen Cabinet With Door; to heat damage or discoloration at temperatures below 185°F.; Connect The Cooktop To Gas; the pilot on other gas appliances when you turn the gas back on.
Installation In Kitchen Cabinet With Door It is recommended that a 1.2″ clearance be left between the cooker top and the fixture surface (Fig. 4). NOTE: The adjacent furniture and all materials used in installation must be able to withstand a minimum of 185°F above the ambient temperature. How- ever...
Page 8 - Instruction For Gas Regulator; The performance parameters of the following table:; if user want to convert to LPG use.
Instruction For Gas Regulator 1. Product Features: the fixture surface(Fig. 4). This product is a low-pressure pipeline regulator valve, built-in regulator for gas products. THIS REGULATOR IS SET TO Natural Gas(NG) USE. If user wants to set to LIQUEFIED PETROLEUM GAS(LPG) use, it needs to be set man...
Page 9 - the installation; Start Up Test; Leak test; where and how to shut off the gas supply to the cooktop. See Fig. 5
5. Warning: Regulator valve outlet pressure is set at the factory, please do not temper its setting/structure. Under all circumstances please have licensed plumber/technician to support the installation If you find an abnormality of the regulator valve, stop use it and contact thermomate. Do not att...
Page 11 - ● Check to see that all controls are in the off position.; How To Use The Cooktop Gas Burners; on the panel achieves the following functions:
Install Burner Heads ● Being sure that the tabs on burner head are aligned and inserted into notch of burner base on cooktop. Assemble center burner, when used, as shown in Fig. 6. Install Grate ● Grate is located by positioning locating fingers on burner base holder. Control Test ● Check to see tha...
Page 13 - Burner Ignition; the designated burner.
● When the range is not being used, set the gas knobs to their OFF positions and also close the gas shut-off valve placed on the main gas supply line. Burner Ignition ● Any film or stickers on the cooktop surface should be removed before use. ● All operations are performed by means of all control kn...
Page 14 - unlocked; ● The burner flames
WARNING Lighting gas burners with a match is dangerous. You should match light the cooktop burners only in an emergency. On models so equipped, check to be sure the cooktop is in the unlocked position. 1. Light a match and hold the flame near the burner you want to light. Wooden matches work best. 2...
Page 15 - Ø Pan diameter inch
Chose Of The Burners And Pans For greater efficiency and lesser gas consumption, use the pots and pans with the right diameters of the burners. Avoid having flames extending out from underneath the pans(refer to the table). A smaller diameter pot or pan placed on a larger burner does not necessarily...
Page 16 - Cleaning And Maintenance; Cleaning
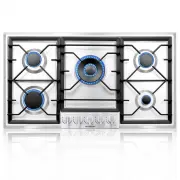
1 . Panel 3. Knob for Rapid Burner 5. Knob for Semi-Rapid Burner(LR) 7. Auxiliary Burner 9. Semi-Rapid Burner Cleaning And Maintenance Cleaning IMPORTANT: Before any operation of cleaning and maintenance disconnect the appliance from the electrical supply. It’s advisable to clean when the appliance ...
Page 17 - ● The gas holes on the burner are not clogged.
Correct Replacement Of The Burners All burner caps and burner bases should be properly installed before operating the cooktop, Check that each burner has the right size head and cap. ● Burner caps and heads are included with your cooktop. ● Always match the burner head size to the cap size. ● Always...