Page 2 - Use and care; G U I D E; Professional Series Pro Harmony
THERMADOR.COM Use and care G U I D E Table of contents (English) ................................................................ 4 Table de matières (Français) ............................................................ 58 Models |Modèles : PRD304WHC/UPRD305WHC/UPRD364WDHC/UPRD364WLHC/UPRD366WHC/U...
Page 3 - Home Connect; TM; user’s information; module
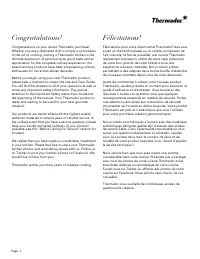
Page. 2 Home Connect TM user’s information Wi-Fi ® module FCC/IC statements Model: COM2 FCC ID: 2AHES-COM2 IC: 21152-COM2 The Home Connect module is a communication device designed to provide communication between appliances and smart devices. This module is integrated at the factory, under direct c...
Page 5 - Table of; CONTENTS; Safety; DEFINITIONS
Page. 4 This Thermador ® appliance is made by BSH Home Appliances Corporation 1901 Main Street, Suite 600 Irvine, CA 92614 Questions? 1-800-735-4328 www.thermador.com We look forward to hearing from you! Table of CONTENTS Safety ..........................................................................
Page 6 - IMPORTANT SAFETY INSTRUCTIONS; Please read carefully
Page. 5 Safety 9 IMPORTANT SAFETY INSTRUCTIONS READ AND SAVE THESE INSTRUCTIONS Please read carefully Installer: Please leave this guide with this unit for the owner. Owner: Please retain this guide for future reference. Use the appliance only for its intended purpose as described in this manual. WA...
Page 7 - Gas type verification
Page. 6 9 IMPORTANT SAFETY INSTRUCTIONS READ AND SAVE THESE INSTRUCTIONS WARNING Before servicing or cleaning the unit, switch power off at service panel and lock service panel. This will prevent power from being switched on accidentally. When the service panel cannot be locked, securely fasten a pr...
Page 8 - Child safety; Proposition 65 Warning
Page. 7 9 IMPORTANT SAFETY INSTRUCTIONS READ AND SAVE THESE INSTRUCTIONS It is the personal responsibility and obligation of you, the user, to have this appliance connected to the electrical power supply by a qualified electrician, in accordance with the National Electrical Code and/or applicable lo...
Page 9 - General safety
Page. 8 9 IMPORTANT SAFETY INSTRUCTIONS READ AND SAVE THESE INSTRUCTIONS General safety WARNINGTo reduce the risk of injury to persons, in the event of a range top grease fire, observe the following: • Smother flames with a close-fitting lid, cookie sheet, or other metal tray, then turn off the gas ...
Page 12 - Description; Appliance identification
Page. 11 Description Appliance identification Model shown is 48'' with griddle option (features will vary). 1 Island trim included or low backguard ordered separately (See the Installation Instructions concerning spacing behind the range when using the range with the island trim.) 2 Oven vent ( DO N...
Page 13 - Control panel identification
Page. 12 Control panel identification NOTE: Not all knobs, modes, and features are available to all models. ExtraLow ® Standard Griddle Grill Oven temp selector Light switch Oven mode selector Oven mode selector Oven digital display 1 Digital display screen 2 Left navigation buttons 3 Access multipl...
Page 14 - Top surface identification
Page. 13 Top surface identification Model 304 1 ExtraLow ® burner Natural 15000, LP 12000 BTU 2 ExtraLow burner Natural 18000, LP 15000 BTU 3 Standard burner Natural 15000, LP 12000 BTU 4 Standard burner Natural 18000, LP 15000 BTU Model 305 1 ExtraLow burner Natural 8000, LP 6000 BTU 2 ExtraLow bur...
Page 16 - Oven interior identification
Page. 15 Oven interior identification Dual fuel oven(s) interior Gas oven(s) interior 1 Oven interior light 2 Broil element 3 Oven thermostat 4 Rack guides 5 Oven racks 6 Bake element (hidden) 7 Convection fan cover 8 Meat probe outlet 9 Rack positions 1 2 3 5 4 6 7 5 6 8 1 2 3 4 1 9 1 Oven interior...
Page 17 - Before you begin; Getting started; Data rating label
Page. 16 Before you begin Getting started Due to our continuous improvement activities in design and quality improvements, some images may not be representative of the final product. Data rating label • Record the model and serial number. • The model and serial number must be provided when calling c...
Page 18 - Oven operation
Page. 17 To install flat racks 1. Grasp rack firmly on both sides and insert rack.2. Tilt rack up to allow stop into rack guide. Oven operation 9 WARNING To help prevent burns, never remove or reposition the oven racks while the oven is ON or while the oven is cooling. Positioning the oven racks • T...
Page 19 - Using the rangetop; Sealed STAR; Burner cap placement; Burner grate placement
Page. 18 Using the rangetop Sealed STAR ® burners 9 WARNING To prevent flare-ups and avoid the creation of harmful by-products, do not use the rangetop without all burner caps and all burner grates properly positioned. 9 WARNING To prevent burns, do not touch burner caps or grates while hot. Turn th...
Page 20 - ExtraLow
Page. 19 Control knobs The control knobs for two sealed gas burners, one in front and one in the rear, are located directly in front of and below the pair of burners on the control panel. Operation of the burners To turn on the burners 1. Press in on the knob and turn it counter-clockwise HI . – The...
Page 21 - Automatic re-ignition; Power failure; Flame height; Flame description
Page. 20 Automatic re-ignition 9 CAUTION DO NOT touch the burners when the igniters are sparking. Each burner has its own electronic igniter that sparks when the burner is turned on. Each burner should light in four seconds or less. If a burner does not light, check to see that the cap is positioned...
Page 22 - Cookware recommendations
Page. 21 Cookware recommendations 9 WARNING To avoid risk of serious injury, damage to appliance or cookware, please observe the following: • Bakeware, such as large casserole pans, cookie sheets, etc. should never be used on the rangetop. • Placement of large stock pots should be staggered when use...
Page 23 - Specialty cookware
Page. 22 Specialty cookware Woks • Either flat-based or round-bottom woks with the accessory ring can be used on all models. Round bottom woks must be used with a support ring. • The wok pan and the porcelain-coated cast iron wok support ring must be purchased separately. Canners and stock pots • Se...
Page 24 - Surface burner cooking recommendations
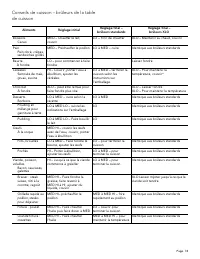
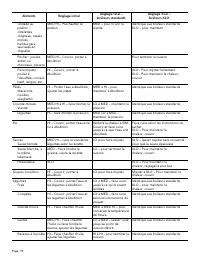
Page. 23 Surface burner cooking recommendations Food Start setting Finish setting standard burners Finish setting XLO ® burners Beverages Cocoa MED – heat milk, cover LO – finish heating XLO – keep warm, cover Breads French toast, pancakes, grilled sandwiches MED – preheat skillet LO to MED – cook S...
Page 26 - Electric griddle
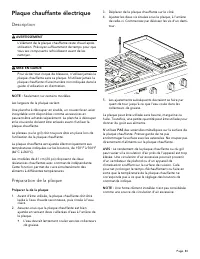
Page. 25 Electric griddle Description 9 CAUTION The griddle element is hot after use. Allow sufficient time for griddle components to cool before cleaning. 9 WARNING To avoid risk of injury, never operate the griddle without the griddle plate installed. Never use the griddle in a manner that is not ...
Page 28 - Seasoning the griddle plate
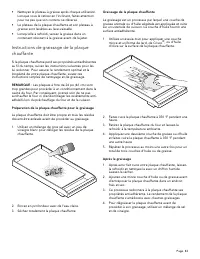
Page. 27 Seasoning the griddle plate If the griddle plate seems to lose its non-stick abilities over time, the following instructions should help regain the griddle’s non-stick properties. For optimal performance and long life of your griddle plate, follow these simple cleaning and seasoning instruc...
Page 29 - Electric grill
Page. 28 Electric grill Description 9 WARNING • To avoid risk of injury, NEVER operate grill without the grates or griddle plate accessory installed. • NEVER leave grill unattended while cooking. • Observe caution with oils and fats. Overheated oils and fats can easily cause fires. • DO NOT use wood...
Page 30 - Operating the grill
Page. 29 5. Fold both grill heating elements (5) down. The grill heating elements must lie flat. Supports should rest inside of side notches. 6. Install the grill grates (6). Ensure grates are seated level inside the grill housing (1). Operating the grill 9 WARNING TO AVOID RISK OF BURNS: • Use prop...
Page 31 - Grill cooking recommendations
Page. 30 Grill cooking recommendations IMPORTANT: • GRILL SHOULD NOT BE OPERATED WITHOUT PROPER VENTILATION. • Foods with excessive fat or grease should not be prepared on an indoor grill. Grilling foods with high fat content (certain types of ground beef, sausage, etc) increases the chances of smok...
Page 32 - Using the oven; Symbols and descriptions
Page. 31 Using the oven Symbols and descriptions Symbol/mode Definitions and recommendations Electric main Gas main Electric aux. Gas aux. Bake Cooks with dry, heated air. Variety of foods, such as cakes, cookies, pastries, quick breads, quiche and casseroles. Conv bake Similar to bake, but ...
Page 34 - assistant; Kitchen timer
Page. 33 Home Connect TM assistant About Home Connect The Home Connect wizard is a part of the initial installation of the appliance on certain models. If the Home Connect is not installed during the first start-up of the appliance it may be accessed in the settings menu. The Home Connect app must f...
Page 37 - Sabbath
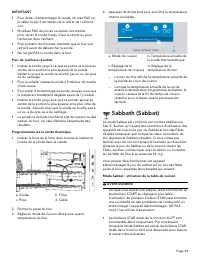
Page. 36 To program the meat probe 1. Insert the plug end into the probe outlet in the oven wall and insert probe end into the meat. 2. Close the oven door. 3. Turn the MODE and TEMPERATURE knobs to your desired settings. 4. Press the right ( or ) to the desired internal temperature. – The oven disp...
Page 38 - Sabbath – extended bake
Page. 37 About Sabbath mode – using the oven(s) • The oven maintains a constant temperature between 150°F and 475°F (66°C and 246°C) with the bake mode. • Cooked dishes are kept warm for a minimum time of 30 minutes up to a maximum time of 74 hours without needing to switch the appliance on or off. ...
Page 39 - Remote start
Page. 38 Remote start 9 WARNING REMOTE OPERATIONSome models allow remote operation at any time. Do not store any flammable materials or temperature sensitive items inside, on top or near surface units of the appliance. About remote start If you want to start an oven operation using your mobile devic...
Page 40 - Getting the most out of your appliance; Oven rack positions; Getting the best results
Page. 39 Getting the most out of your appliance Oven rack positions Rack level positions in the oven are numbered on the front frame like an elevator. Number one level is the lowest and number five level is at the top. NOTE: Rack positions are general recommendations for baking; however, if a recipe...
Page 41 - Broil; Getting the best broil results
Page. 40 Pan placement • Allow at least 1'' (25.4 mm) of space between the pans and the oven walls so heat can circulate around each pan. • Stagger bakeware so that one is not directly above another. Allow 1½'' (38 mm) above and below each pan. High altitude baking When cooking at high altitudes, re...
Page 42 - Convection broil; Convection bake
Page. 41 Utensils • Your appliance comes with a large two-piece broiler pan. The slotted grid allows drippings to flow into the lower pan, away from the intense heat of the broil element, minimizing spattering, smoking, and the chance of a grease fire. DO NOT cover the slotted grid (top) with alumin...
Page 43 - Dehydrating foods with convection bake
Page. 42 One rack convection baking Two rack convection baking Three rack convection baking Dehydrating foods with convection bake Use the convection bake to dry and preserve fruits and vegetables. Tips: • Drying times vary depending on the moisture and sugar content of the food, the size of the pie...
Page 46 - Setting up Home ConnectTM; Setup
Page. 45 Setting up Home Connect™ With Home Connect™, the appliance is Wi-Fi capable and can be remotely controlled using a mobile device (e.g. tablet or smartphone). The Home Connect app offers additional functions which are a perfect complement to the networked appliance. Home Connect does not wor...
Page 47 - Software update
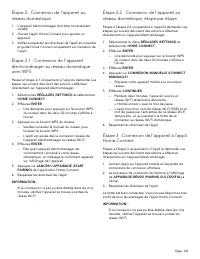
Page. 46 Step 2.1: Connect your appliance to your home network with WPS Please enter step 2.1 only when prompted to by the app. The following steps describe operations at the appliance itself. 1. Press SETTINGS and select HOME CONNECT . 2. Press ENTER . -- A request to press the WPS button on the ro...
Page 48 - Care and maintenance; Brand names
Page. 47 Care and maintenance 9 WARNING • Children should not be left alone or unattended in an area where appliances are in use. • During the self-clean cycle, exterior surfaces may become hotter than usual. Parts of the appliance may become potentially harmful to children, and to persons who lack ...
Page 49 - Appliance cleaning tips
Page. 48 3. Press the right ) to set the desired clean level and press ENTER . 4. After the information text, press ENTER . NOTE: The door closing process takes approximately 20 seconds to complete, at which time the door becomes locked. Check to make certain the door is locked. At the end of the cl...
Page 50 - Cleaning recommendations
Page. 49 Cleaning recommendations Part/material Cleaning notes Burner base / brassBurner cap / cast iron • A stiff nylon bristle tooth brush can be used to clean port openings. • After cleaning, make sure that the burner cap is correctly seated on the burner base. • DO NOT scratch or gouge the port ...
Page 54 - Oven light bulb replacement
Page. 53 Do-it-yourself maintenance Oven light bulb replacement 9 CAUTION • Make sure the appliance and lights are cool and power to the appliance has been turned off before replacing the light bulb(s). Failure to do so could result in electrical shock or burns. • The covers must be in place when us...
Page 55 - Before calling for service; Troubleshooting
Page. 54 Before calling for service Before calling for service, check the following to avoid unnecessary service charges. Troubleshooting Symptom Possible cause Remedy Intermittent igniter sparking • Ceramic igniter is wet or dirty. • Carefully dry or clean igniter. • Burner ports are clogged. • Cle...
Page 56 - Service information; Remote customer service; Product registration
Page. 55 Service information 9 CAUTION Before removing the toe kick panel, disconnect the range from the electrical power supply. Reinstall the toe kick panel before reconnecting the range to the power supply and operating the range. Electric wiring diagrams and schematics The electric wiring diagra...
Page 57 - Statement of limited product warranty; How long the warranty lasts; Repair/replace as your exclusive remedy
Page. 56 Statement of limited product warranty What this warranty covers and who it applies to The limited warranty provided by BSH Home Appliances ("Thermador") in this Statement of Limited Product Warranty applies only to the Thermador appliance sold to you, the first using purchaser, prov...
Page 59 - Table des; MATIÈRES; Définitions de; SÉCURITÉ
Page. 58 Cet appareil électroménager de THERMADOR TM est fait par BSH Home Appliances LtD 6696 Financial Drive, Unit 3 Mississauga, ON L5N 7J6 Des questions? 1-800-735-4328 www.thermador.ca Nous attendons de vos nouvelles! Table des MATIÈRES Sécurité ....................................................
Page 60 - Sécurité; INSTRUCTIONS IMPORTANTS DE SÉCURITÉ; LIRE TOUTES LES INSTRUCTIONS AVANT DE PROCÉDER; Lisez attentivement
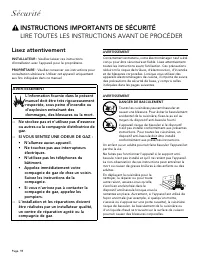
Page. 59 Sécurité 9 INSTRUCTIONS IMPORTANTS DE SÉCURITÉ LIRE TOUTES LES INSTRUCTIONS AVANT DE PROCÉDER Lisez attentivement INSTALLATEUR : Veuillez laisser ces instructions d’installation avec l’appareil pour le propriétaire. PROPRIÉTAIRE : Veuillez conserver ces instructions pour consultation ultéri...
Page 61 - Vérification du type de gaz
Page. 60 9 INSTRUCTIONS IMPORTANTS DE SÉCURITÉ LIRE TOUTES LES INSTRUCTIONS AVANT DE PROCÉDER AVERTISSEMENT Tout installation, ajustement, modification, entretien ou nettoyage inadéquat peut causer des blessures ou des dommages matériels. Consultez le présent manuel. Pour obtenir de l’assistance ou ...
Page 62 - Exigences électriques; Sécurité des enfants
Page. 61 9 INSTRUCTIONS IMPORTANTS DE SÉCURITÉ LIRE TOUTES LES INSTRUCTIONS AVANT DE PROCÉDER Exigences électriques AVERTISSEMENT EN CAS DE PANNE ÉLECTRIQUE Si, pour une raison quelconque, un bouton de commande de gaz est allumé et qu’il n’y a pas d’électricité pour actionner les allumeurs électroni...
Page 63 - Générales de sécurité
Page. 62 9 INSTRUCTIONS IMPORTANTS DE SÉCURITÉ LIRE TOUTES LES INSTRUCTIONS AVANT DE PROCÉDER NE permettez PAS que quiconque grimpe, se mette debout, s’assoit ou se pende à une pièce de l’appareil. Cela pourrait endommager l’appareil et il pourrait basculer, infligeant possiblement de graves blessur...
Page 67 - Identification de la cuisinière
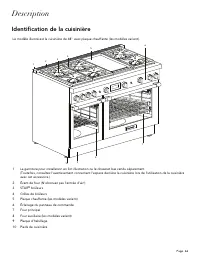
Page. 66 Description Identification de la cuisinière Le modèle illustré est la cuisinière de 48" avec plaque chauffante (les modèles varient). 1 La garniture pour installation en îlot illustration ou le dosseret bas vendu séparément (Toutefois, consultez l’avertissement concernant l’espace derri...
Page 68 - Description des tableaux de commande
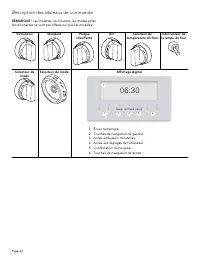
Page. 67 Description des tableaux de commande REMARQUE : Les molettes, les boutons, les modes et les fonctionnalités ne sont pas offerts sur tous les modèles. ExtraLow ® Standard Plaque chauffante Gril Sélecteur de température du four Interrupteur de la lampe du four Sélecteur de mode Sélecteur de m...
Page 69 - Identification de la surface supérieure
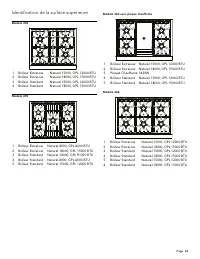
Page. 68 Identification de la surface supérieure Modèle 304 1 Brûleur ExtraLow Naturel 15000, GPL 12000 BTU 2 Brûleur ExtraLow Naturel 18000, GPL 15000 BTU 3 Brûleur Standard Naturel 15000, GPL 12000 BTU 4 Brûleur Standard Naturel 18000, GPL 15000 BTU Modèle 305 1 Brûleur ExtraLow Naturel 8000, GPL ...
Page 71 - Description de l’intérieur des fours
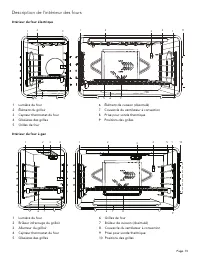
Page. 70 Description de l’intérieur des fours Intérieur du four électrique Intérieur du four à gaz 1 Lumière du four 2 Élément du grilloir 3 Capteur thermostat du four 4 Glissières des grilles 5 Grilles de four 6 Élément de cuisson (dissimulé) 7 Couvercle du ventilateur à convection 8 Prise pour son...
Page 72 - Avant de commencer; Mise en route; Plaque signalétique
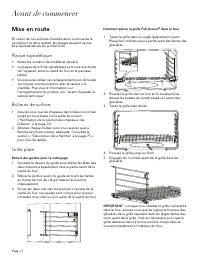
Page. 71 Avant de commencer Mise en route En raison de nos activités d'amélioration continue de la conception et de la qualité, les images peuvent ne pas être représentatives du produit final. Plaque signalétique • Notez les numéros de modèle et de série. • La plaque de la fiche signalétique se trou...
Page 73 - Utilisation du four
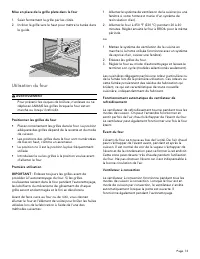
Page. 72 Mise en place de la grille plate dans le four 1. Saisir fermement la grille par les côtés.2. Incliner la grille vers le haut pour mettre la butée dans le guide. Utilisation du four 9 AVERTISSEMENT Pour prévenir les risques de brûlure, n’enlevez ou ne déplacez JAMAIS les grilles lorsque le f...
Page 74 - Utilisation de la table de cuisson; Brûleurs STAR; Mise en place des capuchons de brûleur; Positionnement des grilles des brûleurs
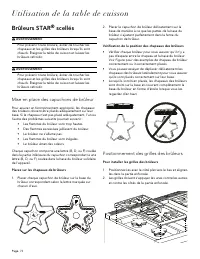
Page. 73 Utilisation de la table de cuisson Brûleurs STAR ® scellés 9 AVERTISSEMENT Pour prévenir toute brûlure, éviter de toucher les chapeaux et les grilles des brûleurs lorsqu’ils sont chauds. Éteignez la table de cuisson et laissez les brûleurs refroidir. 9 AVERTISSEMENT Pour prévenir toute brûl...
Page 75 - Brûleurs ExtraLow; POWERBOOST; Rallumage automatique
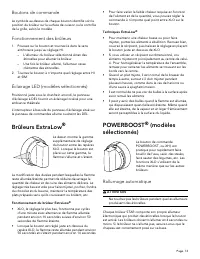
Page. 74 Boutons de commande Le symbole au-dessus de chaque bouton identifie soit la position du brûleur sur la surface de cuisson ou le contrôle de la grille, selon le modèle. Fonctionnement des brûleurs 1. Poussez sur le bouton et tournez-le dans le sens antihoraire jusqu’au réglage HI. – L’allume...
Page 76 - Panne de courant; Hauteur de la flamme
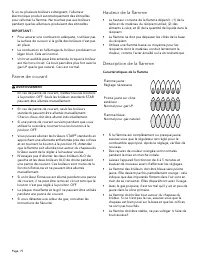
Page. 75 Si un ou plusieurs brûleurs s’éteignent, l’allumeur électronique produit automatiquement des étincelles pour rallumer la flamme. Ne touchez pas aux brûleurs pendant que les allumeurs produisent des étincelles. IMPORTANT : • Pour assurer une combustion adéquate, n'utilisez pas la surface de ...
Page 77 - Récipients recommandés
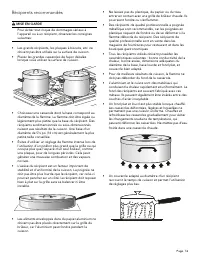
Page. 76 Récipients recommandés 9 MISE EN GARDE Pour éviter tout risque de dommages sérieux à l’appareil ou à un récipient, observez les consignes suivantes: • Les grands récipients, les plaques à biscuits, etc. ne doivent pas être utilisés sur la surface de cuisson. • Placez les grandes casseroles ...
Page 78 - Récipients pour spécialités; Conseils de cuisson
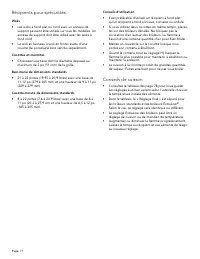
Page. 77 Récipients pour spécialités Woks • Les woks à fond plat ou rond avec un anneau de support peuvent être utilisés sur tous les modèles. Un anneau de support doit être utilisé avec les woks à fond rond. • Le wok et l’anneau à wok en fonte revêtu d’une couche de porcelaine sont vendus séparémen...
Page 81 - Plaque chauffante électrique; Préparation de la plaque
Page. 80 Plaque chauffante électrique Description 9 AVERTISSEMENT L’élément de la plaque chauffante reste chaud après utilisation. Prévoyez suffisamment de temps pour que tous ses composants refroidissent avant de les nettoyer. 9 MISE EN GARDE Pour éviter tout risque de blessure, n’utilisez jamais l...
Page 84 - Gril électrique; Assemblage du gril
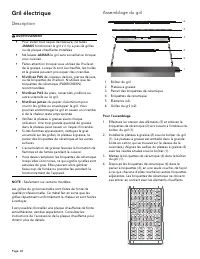
Page. 83 Gril électrique Description 9 AVERTISSEMENT • Pour éviter tout risque de blessure, ne faites JAMAIS fonctionner le gril s'il n'y a pas de grilles ou de plaque chauffante installées. • Ne laissez JAMAIS le gril sans surveillance lorsque vous cuisinez. • Faites attention lorsque vous utilisez...
Page 85 - Fonctionnement du gril
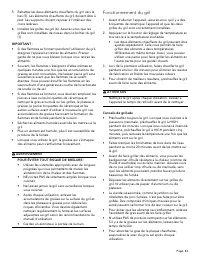
Page. 84 5. Rabattez les deux éléments chauffants du gril vers le bas (5). Les éléments chauffants du gril doivent être à plat. Les supports doivent reposer à l'intérieur des crans latéraux. 6. Installez les grilles du gril (6). Assurez-vous que les grilles sont installées de niveau dans le boîtier ...
Page 86 - Recommandations pour la cuisson sur le gril
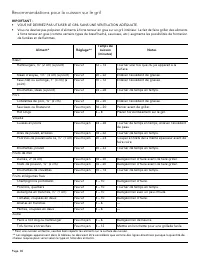
Page. 85 Recommandations pour la cuisson sur le gril IMPORTANT : • VOUS NE DEVRIEZ PAS UTILISER LE GRIL SANS UNE VENTILATION ADÉQUATE. • Vous ne devriez pas préparer d’aliments à forte teneur en gras sur un gril intérieur. Le fait de faire griller des aliments à forte teneur en gras (comme certains ...
Page 87 - Symboles et descriptions du
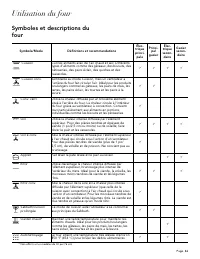
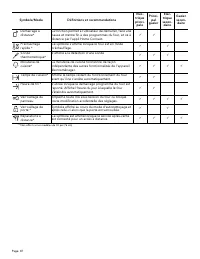
Page. 86 Utilisation du four Symboles et descriptions du four Symbole/Mode Définitions et recommandations Élec- trique princi- pale Princi- pal gazier Élec- trique secon- daire Gazier secon- daire Cuisson Cuit les aliments avec de l’air chaud et sec. Différents types d’aliments comme des gâteaux, de...
Page 89 - Configuration initiale; Assistant Home Connect
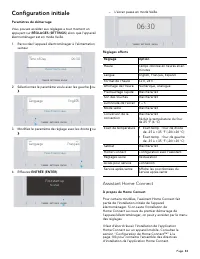
Page. 88 Configuration initiale Paramètres de démarrage Vous pouvez accéder aux réglages à tout moment un appuyant sur RÉGLAGES ( SETTINGS ) alors que l’appareil électroménager est en mode Veille. 1. Raccordez l’appareil électroménager à l’alimentation secteur. 2. Sélectionnez le paramètre voulu ave...
Page 97 - Tirer le meilleur parti de l’appareil; Position des grilles pour la; Optimisation des résultats
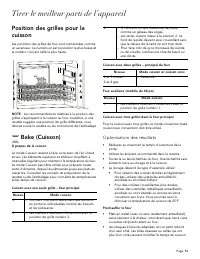
Page. 96 Tirer le meilleur parti de l’appareil Position des grilles pour la cuisson Les positions des grilles de four sont numérotées comme un ascenseur. Le numéro un est la position la plus basse et le numéro cinq est celle la plus haute. NOTE : Les recommandations relatives à la position des grill...
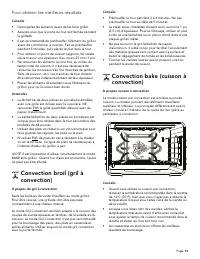
Page 99 - Pour obtenir les meilleurs résultats; Convection broil (gril à; Convection bake (cuisson à
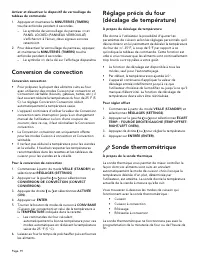
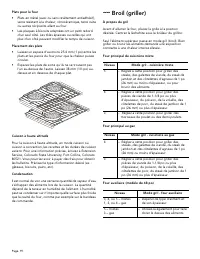
Page. 98 Pour obtenir les meilleurs résultats Conseils : • Décongelez les aliments avant de les faire griller. • Assurez-vous que la porte du four est fermée pendant la grillade. • Il est recommandé de préchauffer l’élément du grilloir avant de commencer à cuisiner. Fait es préchauffer pendant 5 min...
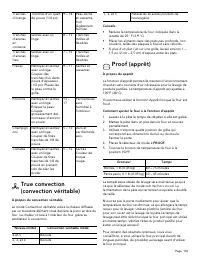
Page 101 - True convection
Page. 100 True convection (convection véritable) À propos du convection véritable Le mode Convection véritable utilise la chaleur diffusée par un troisième élément situé derrière la paroi arrière du four. La chaleur circule à l'intérieur du four grâce au ventilateur à convection. Conseils : • Réduir...
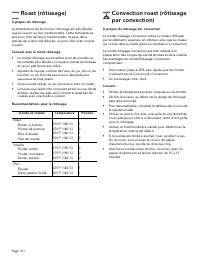
Page 102 - Convection roast (rôtissage
Page. 101 Roast (rôtissage) À propos du rôtissage La température de la fonction rôtissage est plus élevée que la cuisson au four traditionnelle. Cette température sert pour rôtir de façon traditionnelle, lorsque de la graisse de cuisson est désirée, ou pour rôtir avec un plat couvert. Conseils avec ...
Page 104 - Configuration de Home ConnectTM; Configuration
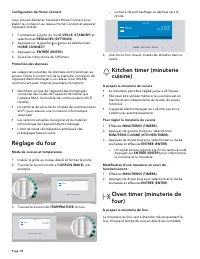
Page. 103 Configuration de Home Connect™ L'appareil électroménager est entièrement automatique et prend en charge le Wi-Fi. Il peut être télécommandé au moyen d'un appareil mobile (par exemple, une tablette, un téléphone intelligent). L'appli Home Connect™ offre des fonctions supplémentaires qui com...
Page 106 - Mise à jour du logiciel
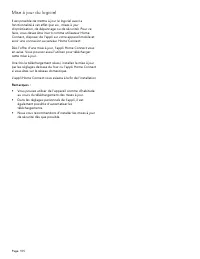
Page. 105 Mise à jour du logiciel Il est possible de mettre à jour le logiciel avec la fonctionnalité à cet effet (par ex., mises à jour d’optimisation, de dépannage ou de sécurité). Pour ce faire, vous devez être inscrit comme utilisateur Home Connect, disposer de l’appli sur votre appareil mobile ...
Page 107 - Entretien et nettoyage; Marques de produits
Page. 106 Entretien et nettoyage 9 AVERTISSEMENT • Ne laissez pas d’enfants seuls ou sans surveillance dans un endroit où des électroménagers sont en cours d’utilisation. • Durant le cycle d’autonettoyage, les surfaces extérieures de l’appareil peuvent devenir plus chaudes que d’habitude. Certaines ...
Page 109 - Conseils de nettoyage
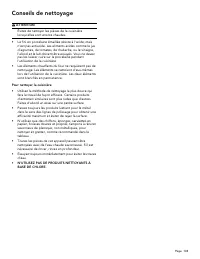
Page. 108 Conseils de nettoyage 9 ATTENTION Évitez de nettoyer les pièces de la cuisinière lorsqu'elles sont encore chaudes. • Le fini en porcelaine émaillée résiste à l'acide, mais n'est pas antiacide. Les aliments acides comme le jus d'agrumes, de tomates, de rhubarbe, ou le vinaigre, l'alcool et ...
Page 110 - Suggestions de nettoyage
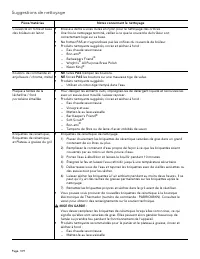
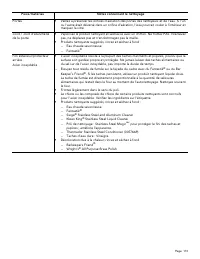
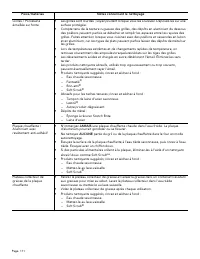
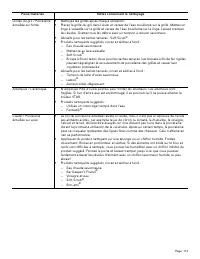
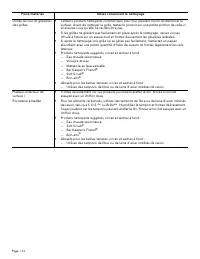
Page. 109 Suggestions de nettoyage Pièce/matériau Notes concernant le nettoyage Couvercle en fonte et base des brûleurs en laiton • Brosse à dents à soies dures en nylon pour le nettoyage des orifices. • Une fois le nettoyage terminé, veillez à ce que le couvercle du brûleur soit correctement logé s...
Page 115 - Entretien à faire soi-même; Remplacement de l’ampoule
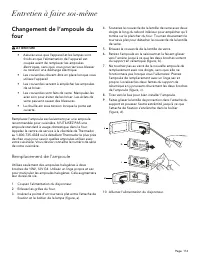
Page. 114 Entretien à faire soi-même Changement de l’ampoule du four 9 ATTENTION • Assurez-vous que l’appareil et les lampes sont froids et que l’alimentation de l’appareil est coupée avant de remplacer les ampoules électriques, sans quoi vous pourriez vous blesser ou recevoir une décharge électriqu...
Page 116 - Avant d’appeler le service technique; Dépannage
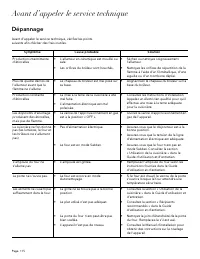
Page. 115 Avant d’appeler le service technique Dépannage Avant d’appeler le service technique, vérifiez les points suivants afin d’éviter des frais inutiles. Symptôme Cause probable Solution Production intermittente d’étincelles • L’allumeur en céramique est mouillé ou sale. • Séchez ou nettoyez soi...
Page 117 - Enregistrement de produit
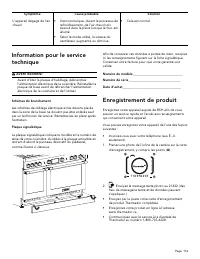
Page. 116 Information pour le service technique 9 AVERTISSEMENT Avant d’ôter la plaque d’habillage, débranchez l’alimentation électrique de la cuisinière. Réinstallez la plaque de base avant de rébrancher l’alimentation électrique de la cuisinière et de l’utiliser. Schémas de branchement Les schémas...
Page 119 - Énoncé de garantie limitée du produit; Durée de la garantie
Page. 118 Énoncé de garantie limitée du produit Couverture de la garantie et à qui elle s’applique La garantie limitée offerte par BSH Home Appliances Corporation ("Thermador") dans cet énoncé de garantie limitée du produit ne s’applique qu’à l’appareil Thermador qui vous a été vendu, à titr...
Page 122 - Support; Accessories and parts
1901 MAIN STREET, SUITE 600, IR VINE, CA 92614 // 800-735-4328 // WWW.THERMADOR.COM © 2019 BSH Home Appliances Corporation 8001146033, Rev. B Support Thank you for being a Thermador customer! Thermador is dedicated to supporting you and your appliance so you have many years of creative cooking. Plea...