Page 3 - Preface; Conventions
V1.0 i Preface Thank you for choosing Tenda! This user guide walks you through all functions on the Dual - Band Gigabit Wi - Fi 6 Router. All the screenshots and product figures herein, unless otherwise specified, are taken from RX2 Pro. The web UI of different models may differ. The web UI actually...
Page 4 - For more documents; Technical Support
V1.0 ii For more documents If you want to get more documents of the device, visit www.tendacn.com and search for the corresponding product model. The related documents are listed as below. Document Description Datasheet It introduces the basic information of the device, including product overview, s...
Page 5 - Contents; Get to know your device
V1.0 iii Contents 1 Get to know your device ...................................................................................................... 1 1.1 Product overview .................................................................................................................... 2 1.2 Appeara...
Page 6 - Wi
V1.0 iv 5.5 Set up dual access connection .............................................................................................. 35 6 Wi - Fi Settings .................................................................................................................... 36 6.1 Basic settings .....
Page 7 - FAQ
V1.0 v 9.4.1 DHCPv6 ......................................................................................................................... 71 9.4.2 PPPoEv6 ........................................................................................................................ 73 9.4.3 Static IPv6...
Page 8 - Appendixes
V1.0 vi 10.2 Internet detection failed upon the first setup .................................................................. 123 10.3 Failed to find or connect my wireless network ................................................................. 124 10.4 Forgot my password ...........................
Page 10 - Product overview
V1.0 2 1.1 Product overview The dual band gigabit Wi - Fi 6 router adopts the Wi - Fi 6 (802.11ax) standard on 5 GHz bandwidth, bringing a fast Wi - Fi 6 network with low latency. Equipped with 5 external 6dBi antennas and a high - performance signal enhancement module, the router features high - qu...
Page 11 - Appearance; LED indicator
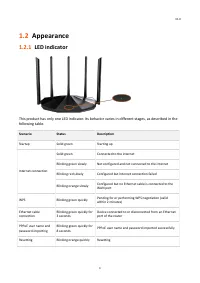
V1.0 3 1.2 Appearance 1.2.1 LED indicator This product has only one LED indicator. Its behavior varies in different stages, as described in the following table. Scenario Status Description Startup Solid green Starting up Internet connection Solid green Connected to the internet Blinking green slowly...
Page 12 - Buttons and Ports; Label
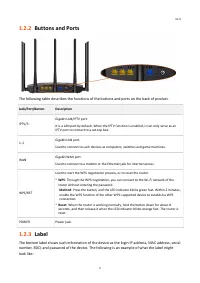
V1.0 4 1.2.2 Buttons and Ports The following table describes the functions of the buttons and ports on the back of product. Jack/Port/Button Description IPTV/3 Gigabit LAN/IPTV port. It is a LAN port by default. When the IPTV function is enabled, it can only serve as an IPTV port to connect to a set...
Page 14 - Quick setup
V1.0 6 2 Quick setup This chapter describes how to connect the devices and enable internet access through the quick setup wizard. It contains the following sections: ⚫ Connect the router ⚫ Connect the router to the internet
Page 15 - End
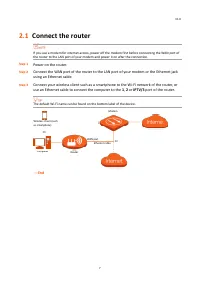
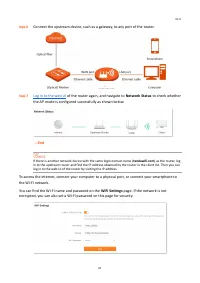
V1.0 7 2.1 Connect the router If you use a modem for internet access, power off the modem first before connecting the WAN port of the router to the LAN port of your modem and power it on after the connection. Step 1 Power on the router. Step 2 Connect the WAN port of the router to the LAN port of yo...
Page 16 - Connect the router to the internet; Start Now
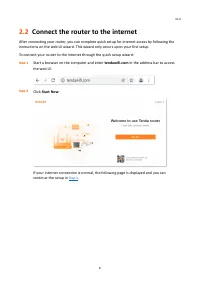
V1.0 8 2.2 Connect the router to the internet After connecting your router, you can complete quick setup for internet access by following the instructions on the web UI wizard. This wizard only occurs upon your first setup. To connect your router to the internet through the quick setup wizard: Step ...
Page 17 - Detect Again; Next
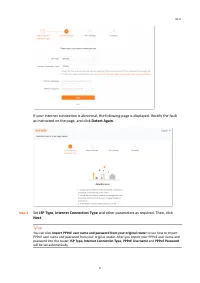
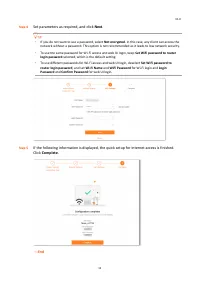
V1.0 9 If your internet connection is abnormal, the following page is displayed. Rectify the fault as instructed on the page, and click Detect Again . Step 3 Set ISP Type , Internet Connection Type and other parameters as required. Then, click Next . You can click Import PPPoE user name and password...
Page 18 - Parameter description
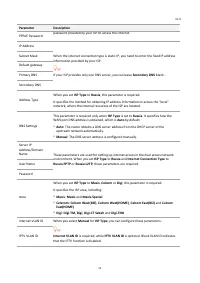
V1.0 10 The following table describes the parameters displayed on this page. Parameter description Parameter Description ISP Type Specifies the type of your ISP, such as Normal , Russia , Unifi , Maxis , Celcom , Digi and Manual . Parameters required for each option may differ. Refer to the followin...
Page 22 - Web UI
V1.0 14 3 Web UI This chapter introduces basic information of the web UI in the following sections: ⚫ Log in to the web UI ⚫ Log out of the web UI ⚫ Change the language ⚫ Web UI layout
Page 23 - Login
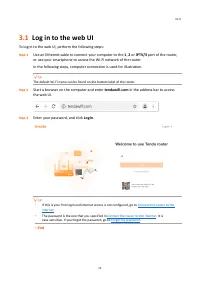
V1.0 15 3.1 Log in to the web UI To log in to the web UI, perform the following steps: Step 1 Use an Ethernet cable to connect your computer to the 1 , 2 or IPTV/3 port of the router, or use your smartphone to access the Wi - Fi network of the router. In the following steps, computer connection is u...
Page 24 - Log out of the web UI; Exit; Change the language; English
V1.0 16 3.2 Log out of the web UI If you log in to the web UI of the router and perform no operation within 5 minutes, the router logs you out automatically. You can also log out by clicking Exit at the top right corner of the web UI. 3.3 Change the language The default language displayed is English...
Page 25 - Web UI layout
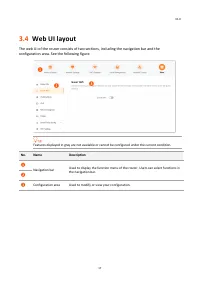
V1.0 17 3.4 Web UI layout The web UI of the router consists of two sections, including the navigation bar and the configuration area. See the following figure. Features displayed in gray are not available or cannot be configured under the current condition. No. Name Description ❶ Navigation bar Used...
Page 26 - Network status
V1.0 18 4 Network status This module allows you to view basic network information and perform quick setup on the router, such as one - click optimization, rebooting, and turning on/off all indicators. This chapter includes the following sections: ⚫ Network status ⚫ Network topology
Page 27 - Network Status
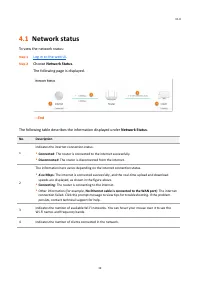
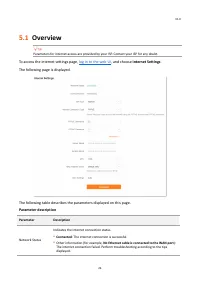
V1.0 19 4.1 Network status To view the network status: Step 1 Log in to the web UI . Step 2 Choose Network Status . The following page is displayed. --- End The following table describes the information displayed under Network Status . No. Description 1 Indicates the internet connection status. ⚫ Co...
Page 28 - Network topology; Basic router information
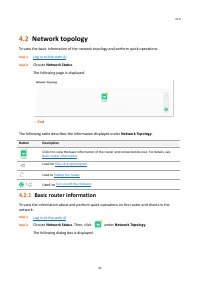
V1.0 20 4.2 Network topology To view the basic information of the network topology and perform quick operations: Step 1 Log in to the web UI . Step 2 Choose Network Status . The following page is displayed. --- End The following table describes the information displayed under Network Topology . Butt...
Page 31 - One-click optimization; Reboot the router
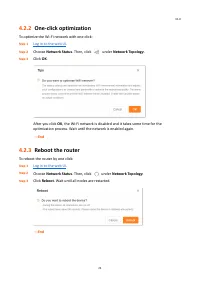
V1.0 23 4.2.2 One-click optimization To optimize the Wi - Fi network with one click: Step 1 Log in to the web UI . Step 2 Choose Network Status . Then, click under Network Topology . Step 3 Click OK . After you click OK , the Wi - Fi network is disabled and it takes some time for the optimization pr...
Page 32 - Network Topology
V1.0 24 4.2.4 Turn on/off the indicator To turn on/off the indicators of the router by one click: Step 1 Log in to the web UI . Step 2 Choose Network Status . Then, click or under Network Topology . The indicator turns on/off immediately. --- End
Page 33 - Internet settings
V1.0 25 5 Internet settings By configuring the internet settings, you can achieve shared internet access (IPv4) for multiple users within the LAN. If you are configuring the router for the first time or after restoring it to factory settings, refer to Connect the router to the internet to configure ...
Page 34 - Overview; Internet Settings
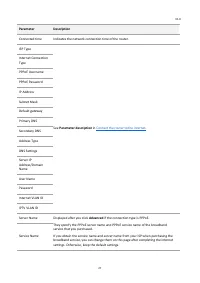
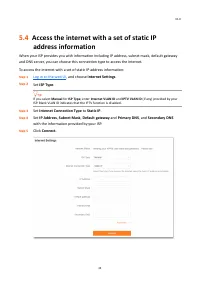
V1.0 26 5.1 Overview Parameters for internet access are provided by your ISP. Contact your ISP for any doubt. To access the internet settings page, log in to the web UI , and choose Internet Settings . The following page is displayed. The following table describes the parameters displayed on this pa...
Page 37 - Access the internet with a PPPoE account
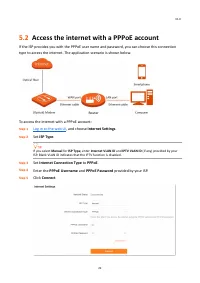
V1.0 29 5.2 Access the internet with a PPPoE account If the ISP provides you with the PPPoE user name and password, you can choose this connection type to access the internet. The application scenario is shown below. To access the internet with a PPPoE account: Step 1 Log in to the web UI , and choo...
Page 39 - Internet Connection Type; Dynamic IP
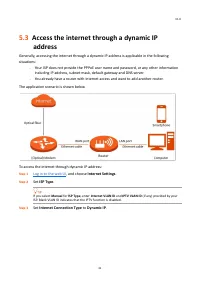
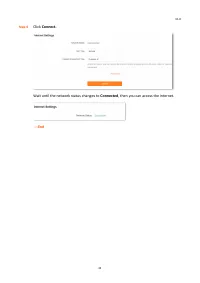
V1.0 31 5.3 Access the internet through a dynamic IP address Generally, accessing the internet through a dynamic IP address is applicable in the following situations: − Your ISP does not provide the PPPoE user name and password, or any other information including IP address, subnet mask, default gat...
Page 43 - Set up dual access connection
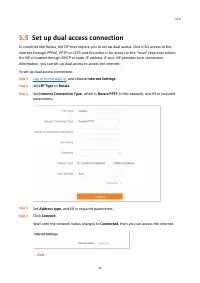
V1.0 35 5.5 Set up dual access connection In countries like Russia, the ISP may require you to set up dual access. One is for access to the internet through PPPoE, PPTP or L2TP, and the other is for access to the “local” resources where the ISP is located through DHCP or static IP address. If your I...
Page 45 - Basic settings; WiFi Settings
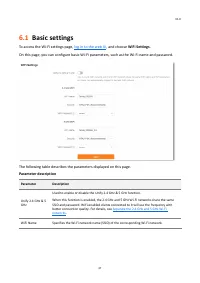
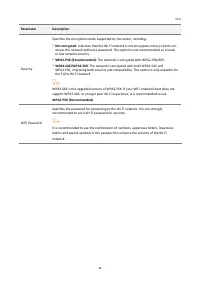
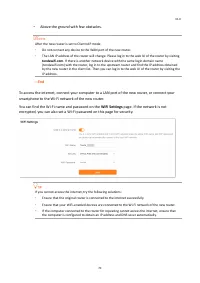
V1.0 37 6.1 Basic settings To access the Wi - Fi settings page, log in to the web UI , and choose WiFi Settings . On this page, you can configure basic Wi - Fi parameters, such as the Wi - Fi name and password. The following table describes the parameters displayed on this page. Parameter descriptio...
Page 47 - Unify the 2.4 GHz and 5 GHz Wi-Fi networks
V1.0 39 6.2 Unify the 2.4 GHz and 5 GHz Wi-Fi networks The router supports 2.4 GHz and 5 GHz Wi - Fi networks, which are separated by default. You can unify their Wi - Fi names and passwords as required. To separate the Wi - Fi names of the networks: Step 1 Log in to the web UI , and choose WiFi Set...
Page 48 - Separate the 2.4 GHz and 5 GHz Wi-Fi networks
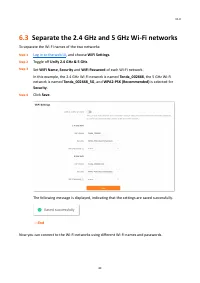
V1.0 40 6.3 Separate the 2.4 GHz and 5 GHz Wi-Fi networks To separate the Wi - Fi names of the two networks: Step 1 Log in to the web UI , and choose WiFi Settings . Step 2 Toggle off Unify 2.4 GHz & 5 GHz . Step 3 Set WiFi Name , Security and WiFi Password of each Wi - Fi network . In this exam...
Page 49 - Client management
V1.0 41 7 Client management This chapter describes how to manage your clients, including: ⚫ View client information ⚫ Change a client name ⚫ Add a client to the blacklist ⚫ Remove a client from the blacklist ⚫ Delete an offline client
Page 50 - View client information; Client Management
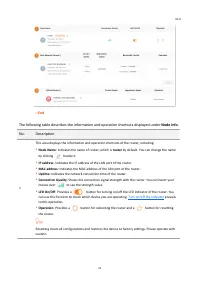
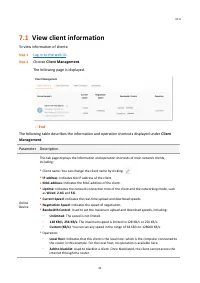
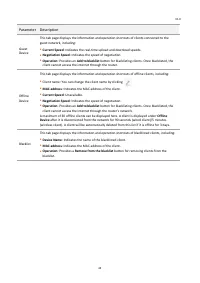
V1.0 42 7.1 View client information To view information of clients: Step 1 Log in to the web UI . Step 2 Choose Client Management . The following page is displayed. --- End The following table describes the information and operation shortcuts displayed under Client Management . Parameter Description...
Page 52 - Change a client name
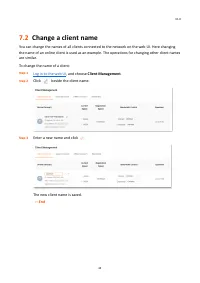
V1.0 44 7.2 Change a client name You can change the names of all clients connected to the network on the web UI. Here changing the name of an online client is used as an example. The operations for changing other client names are similar. To change the name of a client: Step 1 Log in to the web UI ,...
Page 53 - Add a client to the blacklist; Add to blacklist; Operation; OK
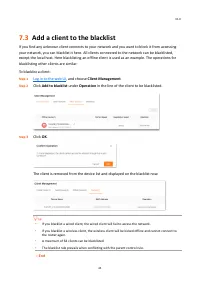
V1.0 45 7.3 Add a client to the blacklist If you find any unknown client connects to your network and you want to block it from accessing your network, you can blacklist it here. All clients connected to the network can be blacklisted, except the local host. Here blacklisting an offline client is us...
Page 54 - Remove a client from the blacklist
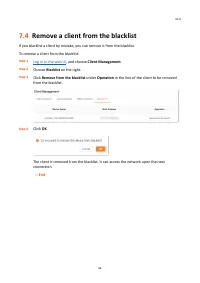
V1.0 46 7.4 Remove a client from the blacklist If you blacklist a client by mistake, you can remove it from the blacklist. To remove a client from the blacklist: Step 1 Log in to the web UI , and choose Client Management . Step 2 Choose Blacklist on the right. Step 3 Click Remove from the blacklist ...
Page 55 - Delete an offline client
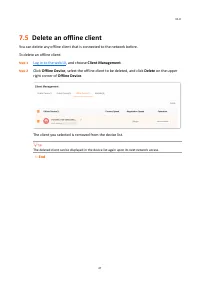
V1.0 47 7.5 Delete an offline client You can delete any offline client that is connected to the network before. To delete an offline client: Step 1 Log in to the web UI , and choose Client Management . Step 2 Click Offline Device , select the offline client to be deleted, and click Delete on the upp...
Page 56 - Parental control
V1.0 48 8 Parental control This function allows you to configure various parental control rules to control access to certain websites or block certain clients from accessing the internet. This chapter includes the following sections: ⚫ Create a parental control rule ⚫ Other operations on the parenta...
Page 57 - Create a parental control rule; Add a parental control rule; Parental Control; Add Parental Control Rule
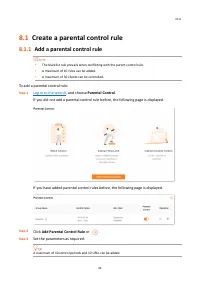
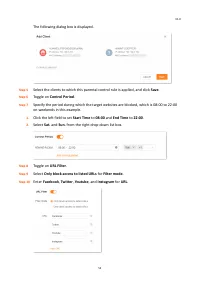
V1.0 49 8.1 Create a parental control rule 8.1.1 Add a parental control rule The blacklist rule prevails when conflicting with the parent control rule. A maximum of 10 rules can be added. A maximum of 30 clients can be controlled. To add a parental control rule: Step 1 Log in to the web UI , a...
Page 58 - Save
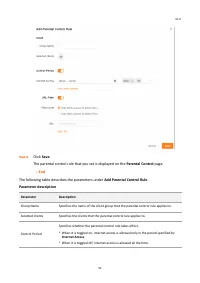
V1.0 50 Step 4 Click Save . The parental control rule that you set is displayed on the Parental Control page. --- End The following table describes the parameters under Add Parental Control Rule . Parameter description Parameter Description Group Name Specifies the name of the client group that the ...
Page 59 - Example of adding parental control rules
V1.0 51 Parameter Description Internet Access Required when Control Period is toggled on. It specifies the period during which the client can access the internet. Add control period Available when Control Period is toggled on. If you want to set multiple periods, click this button. URL Filter Specif...
Page 62 - Other operations on the parental control rules
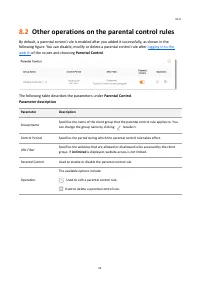
V1.0 54 8.2 Other operations on the parental control rules By default, a parental control rule is enabled after you added it successfully, as shown in the following figure. You can disable, modify or delete a parental control rule after logging in to the web UI of the router and choosing Parental Co...
Page 63 - More
V1.0 55 9 More This chapter describes other settings you may need when using the router, including: ⚫ Overall router information ⚫ Guest Wi - Fi ⚫ Working mode ⚫ IPv6 ⚫ Smart power saving ⚫ Advanced Wi - Fi settings ⚫ Network settings ⚫ Other advanced settings ⚫ System settings
Page 64 - Overall router information; Basic information
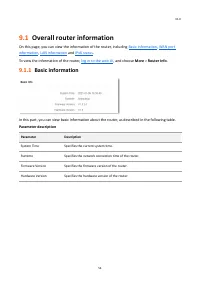
V1.0 56 9.1 Overall router information On this page, you can view the information of the router, including Basic information , WAN port information , LAN information and IPv6 status . To view the information of the router, log in to the web UI , and choose More > Router Info . 9.1.1 Basic informa...
Page 65 - WAN port information
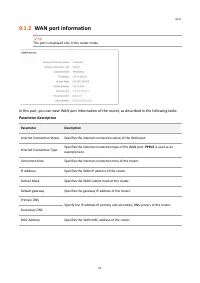
V1.0 57 9.1.2 WAN port information This part is displayed only in the router mode. In this part, you can view WAN port information of the router, as described in the following table. Parameter description Parameter Description Internet Connection Status Specifies the internet connection status of th...
Page 66 - LAN information
V1.0 58 9.1.3 LAN information In this part, you can view LAN information of the router, as described in the following table. Parameter description Parameter Description IP Address Specifies the LAN IP address of the router, which is also the IP address for logging in to the web UI of the router. Sub...
Page 67 - IPv6 status
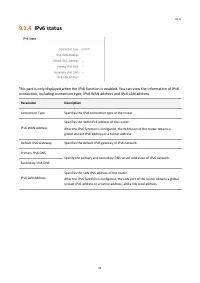
V1.0 59 9.1.4 IPv6 status This part is only displayed when the IPv6 function is enabled. You can view the information of IPv6 connection, including connection type, IPv6 WAN address and IPv6 LAN address. Parameter Description Connection Type Specifies the IPv6 connection type of the router. IPv6 WAN...
Page 69 - Example of configuring the guest network
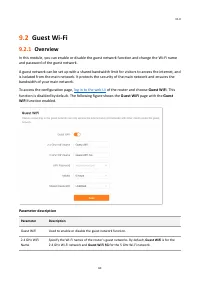
V1.0 61 Parameter Description 5 GHz WiFi Name You can change the Wi-Fi names (SSIDs) as required. To distinguish the guest network from the main network, you are recommended to set different Wi-Fi network names. WiFi Password Specifies the password for the router's two guest networks. It is optional...
Page 71 - Working mode; Current Mode
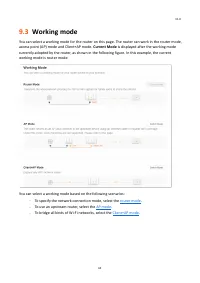
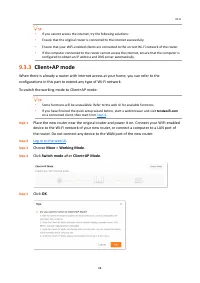
V1.0 63 9.3 Working mode You can select a working mode for the router on this page. The router can work in the router mode, access point (AP) mode and Client+AP mode. Current Mode is displayed after the working mode currently adopted by the router, as shown in the following figure. In this example, ...
Page 72 - Router mode; Switch mode
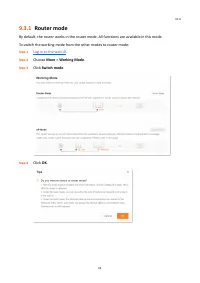
V1.0 64 9.3.1 Router mode By default, the router works in the router mode. All functions are available in this mode. To switch the working mode from the other modes to router mode: Step 1 Log in to the web UI . Step 2 Choose More > Working Mode . Step 3 Click Switch mode . Step 4 Click OK .
Page 73 - AP mode
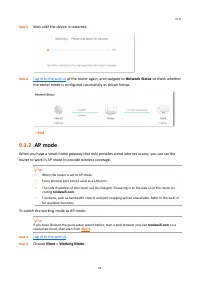
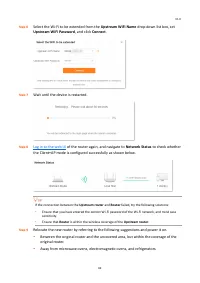
V1.0 65 Step 5 Wait until the device is restarted. Step 6 Log in to the web UI of the router again, and navigate to Network Status to check whether the router mode is configured successfully as shown below. --- End 9.3.2 AP mode When you have a smart home gateway that only provides wired internet ac...
Page 74 - AP Mode
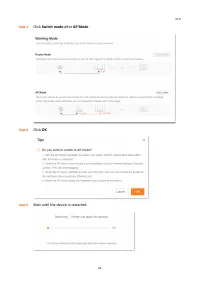
V1.0 66 Step 3 Click Switch mode after AP Mode . Step 4 Click OK . Step 5 Wait until the device is restarted.
Page 79 - DHCPv6
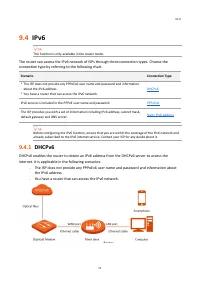
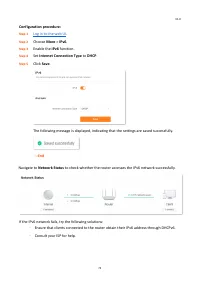
V1.0 71 9.4 IPv6 This function is only available in the router mode. The router can access the IPv6 network of ISPs through three connection types. Choose the connection type by referring to the following chart. Scenario Connection Type ⚫ The ISP does not provide any PPPoEv6 user name and password a...
Page 81 - PPPoEv6
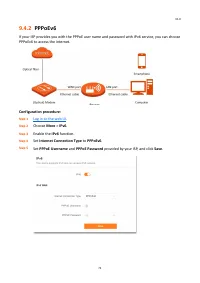
V1.0 73 9.4.2 PPPoEv6 If your ISP provides you with the PPPoE user name and password with IPv6 service, you can choose PPPoEv6 to access the internet. Configuration procedure: Step 1 Log in to the web UI . Step 2 Choose More > IPv6 . Step 3 Enable the IPv6 function. Step 4 Set Internet Connection...
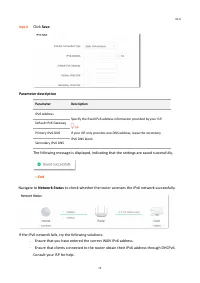
Page 82 - Static IPv6 address
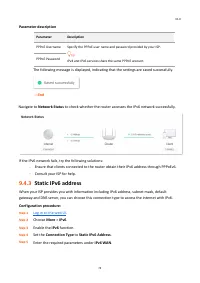
V1.0 74 Parameter description Parameter Description PPPoE Username Specify the PPPoE user name and password provided by your ISP. IPv4 and IPv6 services share the same PPPoE account. PPPoE Password The following message is displayed, indicating that the settings are saved successfully. --- End Navig...
Page 84 - Smart power saving
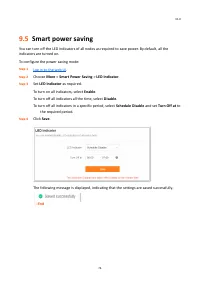
V1.0 76 9.5 Smart power saving You can turn off the LED indicators of all nodes as required to save power. By default, all the indicators are turned on. To configure the power saving mode: Step 1 Log in to the web UI . Step 2 Choose More > Smart Power Saving > LED Indicator . Step 3 Set LED In...
Page 85 - Advanced Wi-Fi settings
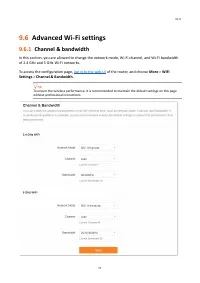
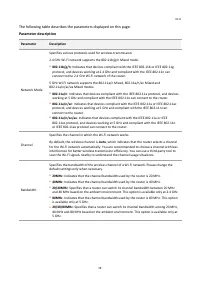
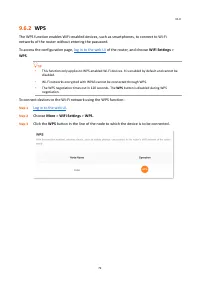
V1.0 77 9.6 Advanced Wi-Fi settings 9.6.1 Channel & bandwidth In this section, you are allowed to change the network mode, Wi - Fi channel, and Wi - Fi bandwidth of 2.4 GHz and 5 GHz Wi - Fi networks. To access the configuration page, log in to the web UI of the router, and choose More > WiFi...
Page 88 - within 2 minutes; WLAN; WLAN settings
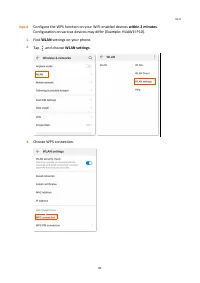
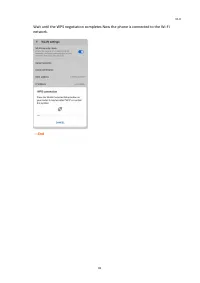
V1.0 80 Step 4 Configure the WPS function on your WiFi - enabled devices within 2 minutes . Configuration on various devices may differ (Example: HUAWEI P10). 1. Find WLAN settings on your phone. 2. Tap , and choose WLAN settings . 3. Choose WPS connection.
Page 90 - Network settings; LAN Settings
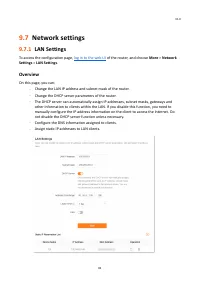
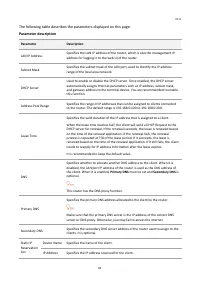
V1.0 82 9.7 Network settings 9.7.1 LAN Settings To access the configuration page, log in to the web UI of the router, and choose More > Network Settings > LAN Settings . Overview On this page, you can: − Change the LAN IP address and subnet mask of the router. − Change the DHCP server paramete...
Page 92 - Assign a static IP address to a LAN client:
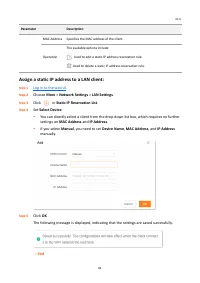
V1.0 84 Parameter Description MAC Address Specifies the MAC address of the client. Operation The available options include: : Used to edit a static IP address reservation rule. : Used to delete a static IP address reservation rule. Assign a static IP address to a LAN client: Step 1 Log in to the web...
Page 93 - IPTV
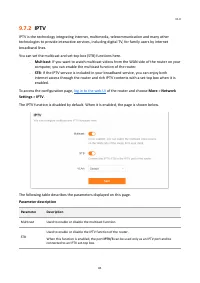
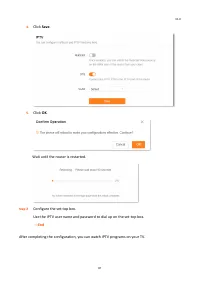
V1.0 85 9.7.2 IPTV IPTV is the technology integrating internet, multimedia, telecommunication and many other technologies to provide interactive services, including digital TV, for family users by internet broadband lines. You can set the multicast and set - top box (STB) functions here. − Multicast...
Page 94 - Watch IPTV programs through the router; Goal; Solution; Configuration procedure:; STB
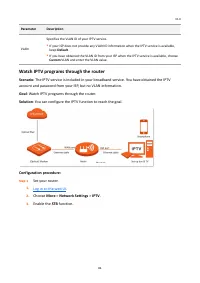
V1.0 86 Parameter Description VLAN Specifies the VLAN ID of your IPTV service. ⚫ If your ISP does not provide any VLAN ID information when the IPTV service is available, keep Default . ⚫ If you have obtained the VLAN ID from your ISP when the IPTV service is available, choose Custom VLAN and enter t...
Page 96 - Watch multicast videos through the router
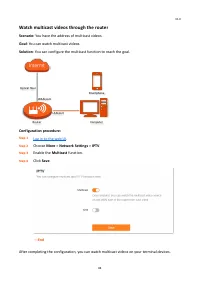
V1.0 88 Watch multicast videos through the router Scenario: You have the address of multicast videos. Goal : You can watch multicast videos. Solution : You can configure the multicast function to reach the goal. Configuration procedure: Step 1 Log in to the web UI . Step 2 Choose More > Network S...
Page 97 - WAN parameters
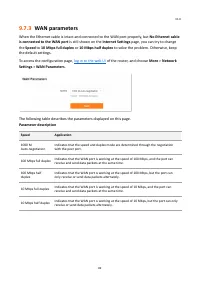
V1.0 89 9.7.3 WAN parameters When the Ethernet cable is intact and connected to the WAN port properly, but No Ethernet cable is connected to the WAN port is still shown on the Internet Settings page, you can try to change the Speed to 10 Mbps full duplex or 10 Mbps half duplex to solve the problem. ...
Page 98 - Other advanced settings; App remote management
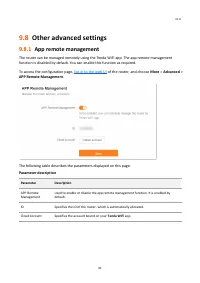
V1.0 90 9.8 Other advanced settings 9.8.1 App remote management The router can be managed remotely using the Tenda WiFi app. The app remote management function is disabled by default. You can enable this function as required. To access the configuration page, log in to the web UI of the router, and ...
Page 99 - MAC address filter
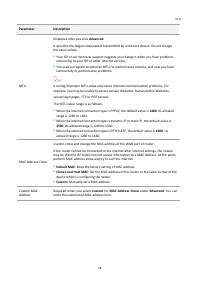
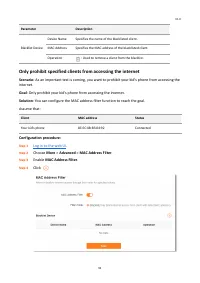
V1.0 91 9.8.2 MAC address filter Overview With this function, you can blacklist clients by MAC addresses to prohibit them from accessing the internet through the router. If you blacklist a wired client, the client will fail to access the network, but it can still connect to the router. If you bl...
Page 100 - Only prohibit specified clients from accessing the internet
V1.0 92 Parameter Description Blacklist Device Device Name Specifies the name of the blacklisted client. MAC Address Specifies the MAC address of the blacklisted client. Operation : Used to remove a client from the blacklist. Only prohibit specified clients from accessing the internet Scenario: As a...
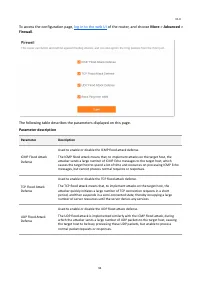
Page 101 - Firewall
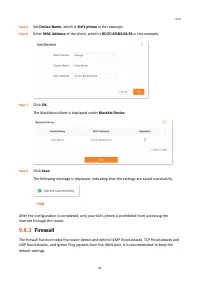
V1.0 93 Step 5 Set Device Name , which is Kid’s phone in this example. Step 6 Enter MAC Address of the client, which is 8C:EC:4B:B3:04:92 in this example . Step 7 Click OK . The blacklisted client is displayed under Blacklist Device . Step 8 Click Save . The following message is displayed, indicatin...
Page 103 - DMZ host
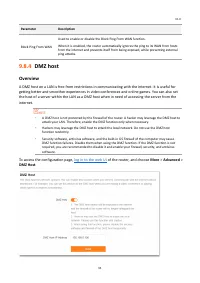
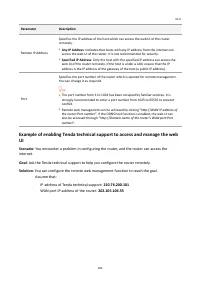
V1.0 95 Parameter Description Block Ping From WAN Used to enable or disable the Block Ping From WAN function. When it is enabled, the router automatically ignores the ping to its WAN from hosts from the internet and prevents itself from being exposed, while preventing external ping attacks. 9.8.4 DM...
Page 104 - Example of enabling internet users to access LAN resources
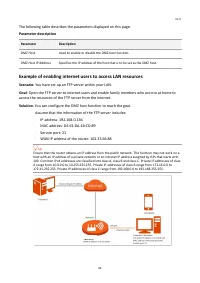
V1.0 96 The following table describes the parameters displayed on this page. Parameter description Parameter Description DMZ Host Used to enable or disable the DMZ host function. DMZ Host IP Address Specifies the IP address of the host that is to be set as the DMZ host. Example of enabling internet ...
Page 105 - Static IP Reservation List
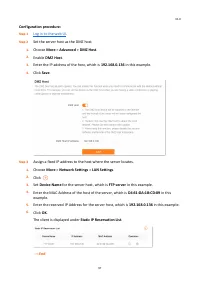
V1.0 97 Configuration procedure: Step 1 Log in to the web UI . Step 2 Set the server host as the DMZ host. 1. Choose More > Advanced > DMZ Host . 2. Enable DMZ Host . 3. Enter the IP address of the host, which is 192.168.0.136 in this example. 4. Click Save . Step 3 Assign a fixed IP address t...
Page 107 - Remote web management
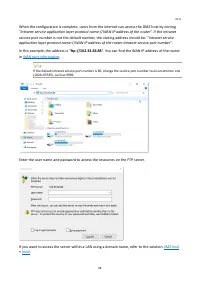
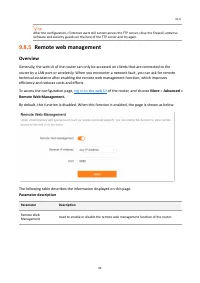
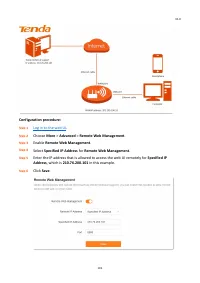
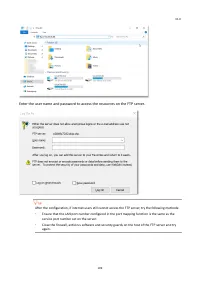
V1.0 99 After the configuration, if internet users still cannot access the FTP server, close the firewall, antivirus software and security guards on the host of the FTP server and try again. 9.8.5 Remote web management Overview Generally, the web UI of the router can only be accessed on clients that...
Page 110 - Static routing
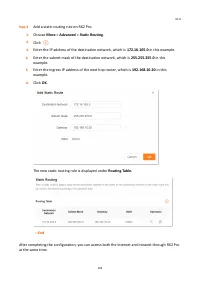
V1.0 102 The following message is displayed, indicating that the settings are saved successfully. --- End When the configuration is complete, the Tenda technical support can access and manage the web UI of the router by visiting “ http://202.105.106.55:8888 ” on the computer. 9.8.6 Static routing Ov...
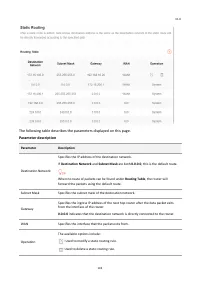
Page 112 - Example of adding a static routing rule
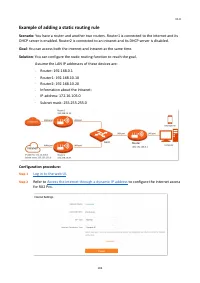
V1.0 104 Example of adding a static routing rule Scenario: You have a router and another two routers. Router1 is connected to the internet and its DHCP server is enabled. Router2 is connected to an intranet and its DHCP server is disabled. Goal : You can access both the internet and intranet at the ...
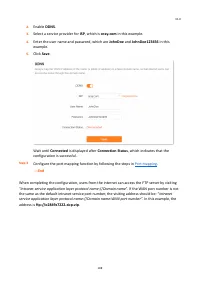
Page 115 - JohnDoe
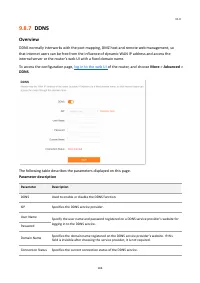
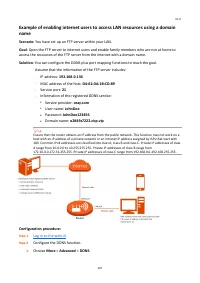
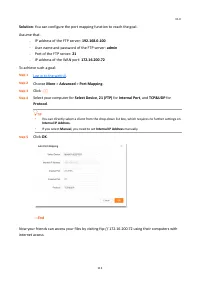
V1.0 107 Example of enabling internet users to access LAN resources using a domain name Scenario: You have set up an FTP server within your LAN. Goal : Open the FTP server to internet users and enable family members who are not at home to access the resources of the FTP server from the internet with...
Page 118 - UPnP
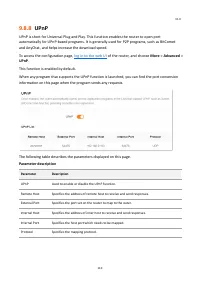
V1.0 110 9.8.8 UPnP UPnP is short for Universal Plug and Play. This function enables the router to open port automatically for UPnP - based programs. It is generally used for P2P programs, such as BitComet and AnyChat, and helps increase the download speed. To access the configuration page, log in t...
Page 119 - Example of configuring port mapping
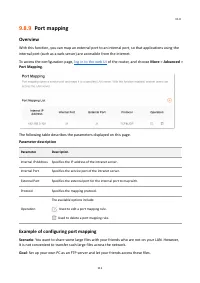
V1.0 111 9.8.9 Port mapping Overview With this function, you can map an external port to an internal port, so that applications using the internal port (such as a web server) are accessible from the internet. To access the configuration page, log in to the web UI of the router, and choose More > ...
Page 121 - Login password
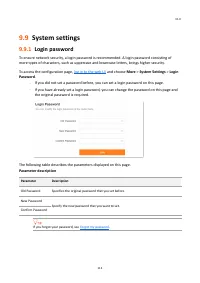
V1.0 113 9.9 System settings 9.9.1 Login password To ensure network security, a login password is recommended. A login password consisting of more types of characters, such as uppercase and lowercase letters, brings higher security. To access the configuration page, log in to the web UI and choose M...
Page 122 - System time
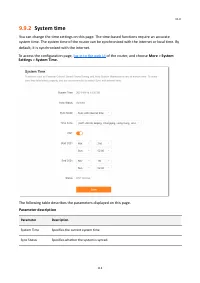
V1.0 114 9.9.2 System time You can change the time settings on this page. The time - based functions require an accurate system time. The system time of the router can be synchronized with the internet or local time. By default, it is synchronized with the internet. To access the configuration page,...
Page 123 - Firmware upgrade
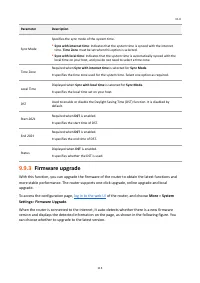
V1.0 115 Parameter Description Sync Mode Specifies the sync mode of the system time. ⚫ Sync with internet time : Indicates that the system time is synced with the internet time. Time Zone must be set when this option is selected. ⚫ Sync with local time : Indicates that the system time is automatical...
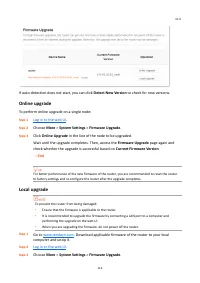
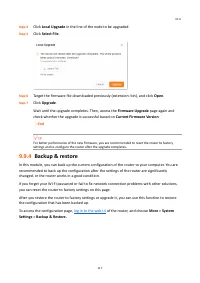
Page 124 - Online upgrade; Local upgrade
V1.0 116 If auto - detection does not start, you can click Detect New Version to check for new versions. Online upgrade To perform online upgrade on a single node: Step 1 Log in to the web UI . Step 2 Choose More > System Settings > Firmware Upgrade . Step 3 Click Online Upgrade in the line of...
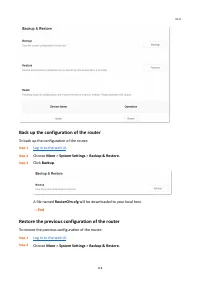
Page 126 - Back up the configuration of the router; Restore the previous configuration of the router
V1.0 118 Back up the configuration of the router To back up the configuration of the router: Step 1 Log in to the web UI . Step 2 Choose More > System Settings > Backup & Restore. Step 3 Click Backup . A file named RouterCfm.cfg will be downloaded to your local host. --- End Restore the pr...
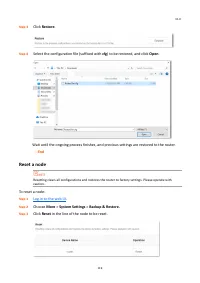
Page 127 - Reset a node
V1.0 119 Step 3 Click Restore . Step 4 Select the configuration file (suffixed with cfg ) to be restored, and click Open . Wait until the ongoing process finishes, and previous settings are restored to the router. --- End Reset a node Resetting clears all configurations and restores the router to fa...
Page 128 - Reset; Auto system maintenance
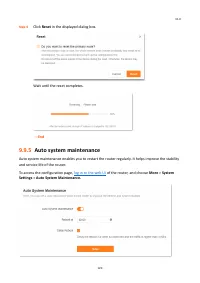
V1.0 120 Step 4 Click Reset in the displayed dialog box. Wait until the reset completes. --- End 9.9.5 Auto system maintenance Auto system maintenance enables you to restart the router regularly. It helps improve the stability and service life of the router. To access the configuration page, log in ...
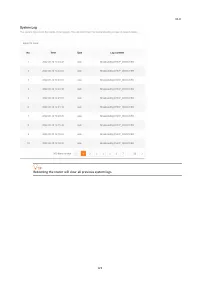
Page 129 - System log
V1.0 121 The following table describes the parameters displayed on this page. Parameter description Parameter Description Auto System Maintenance Used to enable or disable the auto system maintenance function. Reboot at Specifies the time when the router reboots automatically every day. Delay Reboot...
Page 131 - Failed to access the web UI; Obtain an IP address automatically; Internet detection failed upon the first setup
V1.0 123 10 FAQ 10.1 Failed to access the web UI Use the following method to troubleshoot the fault, and then try again. ◼ If you are using a wireless device, such as a smartphone: − Ensure that it is connected to the Wi - Fi network of the router. − Ensure that the cellular network (mobile data) of...
Page 133 - Factory settings
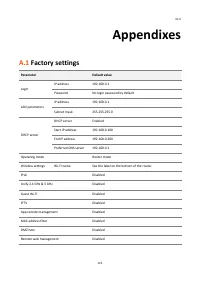
V1.0 125 Appendixes A.1 Factory settings Parameter Default value Login IP address 192.168.0.1 Password No login password by default LAN parameters IP address 192.168.0.1 Subnet mask 255.255.255.0 DHCP server DHCP server Enabled Start IP address 192.168.0.100 End IP address 192.168.0.200 Preferred DN...
Page 135 - Acronyms and Abbreviations
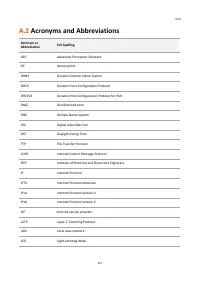
V1.0 127 A.2 Acronyms and Abbreviations Acronym or Abbreviation Full Spelling AES Advanced Encryption Standard AP Access point DDNS Dynamic Domain Name System DHCP Dynamic Host Configuration Protocol DHCPv6 Dynamic Host Configuration Protocol for IPv6 DMZ Demilitarized zone DNS Domain Name System DS...