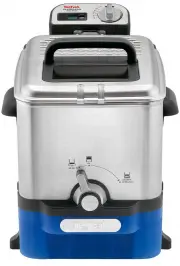
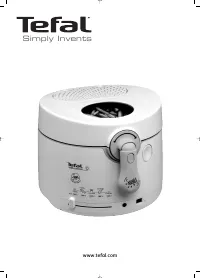
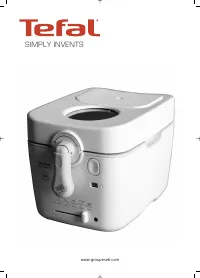
Page 4 - DESCRIPTION
1 DESCRIPTION Fonction RESET : • Votre appareil est doté d’une fonction de sécurité en cas de surchauffe sans huile. Si la fonction se déclenche, l’appareil s’éteindra automatiquement. Attendez le refroidissement complet de l’élément chauffant (au moins 30 min). • Pour remettre l’appareil en marche,...
Page 5 - Position Automatic Oil Filtration:; AVANT LA PREMIÈRE UTILISATION; IMPORTANT
2 FR Filtration, vidange et stockage automatique de l’huile Votre friteuse est équipée d’un système exclusif et breveté de filtration et de vidange automatique, adapté à tous les types de matières grasses alimentaires. • La vidange de l’huile est automatique et totalement sécuritaire. • Grâce au sys...
Page 6 - PRÉPARATION
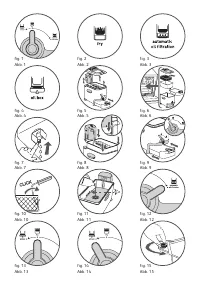
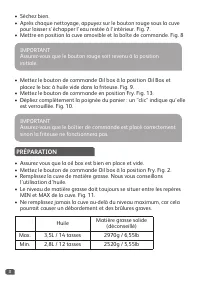
3 PRÉPARATION • Séchez bien. • Après chaque nettoyage, appuyez sur le bouton rouge sous la cuve pour laisser s’échapper l’eau restée à l’intérieur. Fig. 7. • Mettre en position la cuve amovible et la boîte de commande. Fig. 8 • Mettez le bouton de commande Oil box à la position Oil Box et placez le ...
Page 7 - CUISSON; déconseillé
4 FR IMPORTANT Ne faites jamais fondre la matière grasse solide sur l’élément chauffant ou dans le panier. Cependant, nous vous déconseillons l’utilisation de matière grasse solide. Si cela se produit, la friteuse se mettra en mode sécurité et la fonction Reset devra être activée. CUISSON • Utilisez...
Page 8 - lentement
5 • Mettez les aliments dans le panier sans le surcharger. • Ne dépassez pas le niveau maximum indiqué sur le panier « MAX ». Réduisez les quantités pour les surgelés. • Attendez que s’éteigne le voyant de température pour mettre en place le panier et descendez-le lentement dans le bain de matière g...
Page 9 - TABLEAU DE CUISSON
6 FR • Une fois que les aliments sont frits, mettez l’interrupteur à la position O. • Débranchez l’appareil et laissez-le refroidir environ 3 heures. • Pour filtrer et vidanger la matière grasse, reportez vous au chapitre Entretien. IMPORTANT La minuterie (selon le modèle) signale la fin du temps de...
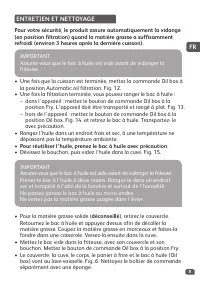
Page 11 - ENTRETIEN ET NETTOYAGE; (en position filtration) quand la matière grasse a suffisamment
8 FR ENTRETIEN ET NETTOYAGE Pour votre sécurité, le produit assure automatiquement la vidange (en position filtration) quand la matière grasse a suffisamment refroidi (environ 3 heures après la dernière cuisson). • Une fois que la cuisson est terminée, mettez la commande Oil box à la position Automa...
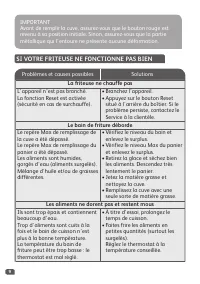
Page 12 - SI VOTRE FRITEUSE NE FONCTIONNE PAS BIEN; La friteuse ne chauffe pas
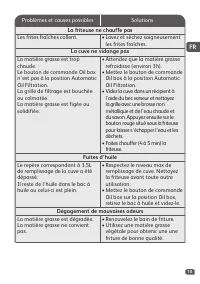
9 IMPORTANT Avant de remplir la cuve, assurez-vous que le bouton rouge est revenu à sa position initiale. Sinon, assurez-vous que la partie métallique qui l’entoure ne présente aucune déformation. SI VOTRE FRITEUSE NE FONCTIONNE PAS BIEN Problèmes et causes possibles Solutions La friteuse ne chauffe...
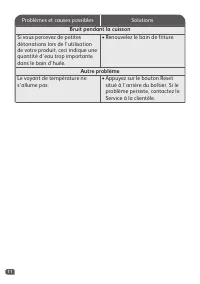
Page 14 - Bruit pendant la cuisson
11 Problèmes et causes possibles Solutions Bruit pendant la cuisson Si vous percevez de petites détonations lors de l’utilisation de votre produit, ceci indique une quantité d’eau trop importante dans le bain d’huile. • Renouvelez le bain de friture. Autre problème Le voyant de température ne s’allu...
Page 15 - RESET function
12 EN DESCRIPTION 1. Lid a. Permanent filter b. Handle c. Viewing window 2. Removable control unit and heating element 3. Frying basket a. Handle b. MAX food level marker 4. Removable bowl 5. MIN and MAX oil level markers 6. Hook to maintain basket in drainage position 7. Fixed oil filter grid 8. Sa...
Page 16 - Automatic Oil Filtration Position:; BEFORE FIRST USE
13 Filtration, drainage and automatic storage of oil/shortening Your fryer is fitted with an exclusive and patented system for filtration and automatic drainage, suitable for most types of oils and shortenings used for cooking. • The drainage of oil is completely automatic and safe. • The automatic ...
Page 17 - PREPARING THE FRYER
14 EN PREPARING THE FRYER • Dry thoroughly. • After cleaning, press on the red button under the fryer to release any water in the bowl. Fig. 7 • Position the bowl and the control unit. Fig. 8 • Place the Oil box control button on the Oil box position and insert the empty Oil box into the fryer. Fig....
Page 18 - FRYING PROCESS
15 IMPORTANT Never melt the shortening on the heating element or in the frying basket. However, we do not recommend the use of solid vegetable fat. If you melt the shortening on the heating element or in the frying basket, the safety cut-out would be activated. Press the “reset” button, which is loc...
Page 20 - COOKING TABLES
17 COOKING TABLES The cooking times are a guide only. They could vary depending on quantity, taste, electricity supply etc... • It is important to fry hand made French fries twice for best results and to prevent the oil from overflowing: − a first cycle at 320 °F/160 °C − a second cycle at 374 °F/19...
Page 21 - CLEANING AND MAINTENANCE
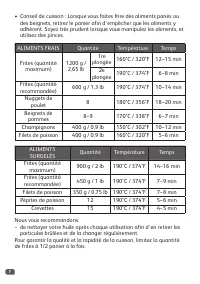
18 EN FRESH FOODS Quantity Temperature Time French fries (MAX capacity) 2.65 lbs / 1200 g 1st frying 160°C / 320°F 12~15 min 2nd frying 190°C / 374°F 6~8 min French fries (recommended capacity) 1.3 lb / 600 g 190°C / 374°F 10~14 min Chicken nuggets 8 180°C / 356°F 18~20 min Apple fritters 8~9 170°C ...
Page 23 - IF YOUR FRYER DOES NOT WORK PROPERLY; Problems and possible causes; The fryer is not heating
20 EN IF YOUR FRYER DOES NOT WORK PROPERLY Problems and possible causes Solutions The fryer is not heating The appliance is not plugged in. The Reset function is activated (overheating security). • Plug in the appliance. • Press the “reset” button, which is located at the back of the fryer. If the p...
Page 24 - The bowl does not drain
21 Problems and possible causes Solutions The bowl does not drain The oil is still too hot. The Oil box control button is not on the Automatic Oil Filtration position. The filter grid is blocked or clogged. The shortening has solidified. • Wait for the temperature to go down (approximately 3 hours)....
Page 25 - Others problems; The indicator light does not come
22 EN Problems and possible causes Solutions Others problems The indicator light does not come on. • Press the “reset” button, which is located at the back of the fryer. If the problem persits, please contact our Consumer Service Department.
Page 26 - OMSCHRIJVING; RESET functie
23 OMSCHRIJVING 1. Deksel a. Permanente filter b. Handvat c. Kijkvenster 2. Afneembare regeleenheid en verwarmingselement 3. Frituurmand a. Handvat b. MAX vulniveau voor etenswaren 4. Afneembare pan 5. MIN en MAX vulniveau voor olie 6. Haak om mand in afdruippositie te houden 7. Vast oliefilterroost...
Page 27 - Automatische oliefiltratiepositie:; VOOR INGEBRUIKNAME; BELANGRIJK
24 NL Filtratie, afvoer en automatische opslag van olie/vet Uw friteuse is voorzien van een exclusief en gepatenteerd systeem voor filtratie en automatische afvoer dat voor de meeste types van frituuroliën en vetten geschikt is. • Het afvoeren van de olie gebeurt volledig automatisch en is veilig. •...
Page 28 - DE FRITEUSE VOORBEREIDEN
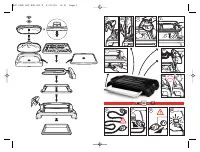
25 DE FRITEUSE VOORBEREIDEN De friteuse kan volledig (uitgezonderd de regeleenheid) uit elkaar worden gehaald. • Verwijder het deksel. Verwijder de frituurmand, regeleenheid en de pan. Verwijder de oliebak door de regelknop voor oliebak op de oliebakpositie in te stellen. Fig. 5 • Reinig het deksel,...
Page 29 - HET FRITUURPROCES
26 NL BELANGRIJK Smelt het vet nooit op het verwarmingselement of in de frituurmand. We bevelen echter aan om geen vast plantaardig vet te gebruiken. De veiligheidsuitschakeling treedt in werking wanneer u vet op het verwarmingselement of in de frituurmand smelt. Druk op de "reset" knop op d...
Page 31 - KOOKTABELLEN
28 NL KOOKTABELLEN De kooktijden dienen alleen ter referentie. Deze kunnen verschillen naar gelang de hoeveelheid, smaak, elektriciteitsvoorziening, etc. • Het is belangrijk om handgemaakte friet tweemaal te frituren voor het beste resultaat en om overstroming van de olie te vermijden: − een eerste ...
Page 33 - Om de olie opnieuw te gebruiken, verwijder het reservoir; REINIGING EN ONDERHOUD; Voor uw veiligheid voert het apparaat automatisch alle soorten
30 NL Na het frituren, draai de regelknop voor oliebak naar de Automatische oliefiltratiepositie. Fig. 12 • Als de filtratie is voltooid kunt u het reservoir opbergen: − In het apparaat: Stel de regelknop voor oliebak in op de frituurpositie. Het apparaat moet horizontaal worden gedragen en vervoerd...
Page 34 - ALS UW FRITEUSE NIET JUIST WERKT; De friteuse warmt niet op
31 ALS UW FRITEUSE NIET JUIST WERKT BELANGRIJK Voordat u de frituurpan vult, controleer altijd of de rode knop op zijn oorspronkelijke positie is teruggezet. Als dit niet het geval is, controleer of de metalen behuizing niet beschadigd is. • Het deksel, pan, behuizing, frituurmand en de oliebak zijn...
Page 35 - De etenswaren bakken niet bruingeel en worden niet knapperig.
32 NL Problemen en mogelijke oorzaken Oplossingen De etenswaren bakken niet bruingeel en worden niet knapperig. De etenswaren zijn te dik en bevatten te veel water. Er worden te veel etenswaren in één beurt gebakken en de olie heeft niet de juiste temperatuur. De temperatuur van de olie is onvoldoen...
Page 36 - Geeft een onaangename geur af
33 Problemen en mogelijke oorzaken Oplossingen Geeft een onaangename geur af De olie is verbruikt. De olie is niet geschikt. • Gebruik nieuwe olie. • Gebruik een hoogwaardige plantaardige olie. Maakt lawaai tijdens de werking Als u tijdens de werking een licht ploffend geluid hoort, betekent dit dat...
Page 37 - BESCHREIBUNG
34 DE BESCHREIBUNG 1. Deckel a. Permanentfilter b. Griff c. Sichtfenster 2. Entnehmbare Steuereinheit und Heizelement 3. Frittierkorb a. Griff b. MAX-Markierung (Frittiergut) 4. Entnehmbare Schüssel 5. MIN- und MAX-Markierungen (Ölstand) 6. Haken zum Befestigen des Korbs in Abtropfposition 7. Festes...
Page 39 - VOR DEM ERSTEN GEBRAUCH
36 DE Die Fritteuse kann komplett auseinandergebaut werden (mit Ausnahme der Steuereinheit). • Nehmen Sie den Deckel ab. Entnehmen Sie den Frittierkorb, die Steuereinheit und die Schüssel. Entnehmen Sie den Ölbehälter, indem Sie den Ölbehälter-Kontrollknopf auf die Ölbehälter-Position stellen. Abb. ...
Page 40 - VORBEREITUNG DER FRITTEUSE
37 WICHTIG Schmelzen Sie das Fett niemals auf dem Heizelement oder im Frittierkorb. Wir empfehlen allerdings nicht die Verwendung von festem Pflanzenfett. Wenn Sie Fett auf dem Heizelement oder im Frittierkorb schmelzen, würde die Sicherheitsabschaltung ausgelöst werden. Drücken Sie den „Reset“-Knop...
Page 41 - FRITTIERVORGANG
38 DE WICHTIG Unabhängig vom Rezept müssen die Lebensmittel vor dem Frittieren gründlich abgetrocknet werden. Dies verhindert, dass das Öl überläuft und verlängert die Gebrauchszeit des Öls. Es ist normal, dass während des Frittierens die Temperaturanzeige aufleuchtet und erlischt. Berühren Sie die ...
Page 44 - REINIGUNG UND INSTANDHALTUNG; ausreichend abgekühlt hat (ungefähr 3 Stunden nach dem letzten
41 TIEFKÜHLKOST Menge Temperatur Zeit Pommes frites (sichere Höchstmenge) 2 lbs/900 g 190°C/374°F 14~16 min Pommes frites (empfohlene Höchstmenge) 1 lb/450 g 190°C/374°F 7~9 min Fischfilets 0,75 lb/350 g 190°C/374°F 7~8 min Fischstäbchen 12 190°C/374°F 5~6 min Tiefkühlgarnelen 15 190°C/374°F 4~5 min...
Page 45 - Um das Öl erneut zu benutzen, entnehmen Sie vorsichtig den
42 DE WICHTIG Stellen Sie vor dem Befüllen der Frittierschüssel immer sicher, dass der rote Knopf in seine Ursprungsposition zurückgestellt wurde: Falls nicht, prüfen Sie, ob sein Metallgehäuse vielleicht auf irgendeine Weise beschädigt wurde. − Außerhalb des Gerätes: Stellen Sie den Ölbehälter-Kont...
Page 46 - WENN IHRE FRITTEUSE NICHT KORREKT FUNKTIONIERT; Probleme und mögliche; Die Fritteuse erhitzt sich nicht
43 WENN IHRE FRITTEUSE NICHT KORREKT FUNKTIONIERT Probleme und mögliche Ursachen Lösungen Die Fritteuse erhitzt sich nicht Das Gerät ist nicht mit einer Steckdose verbunden. Die Reset-Funktion ist aktiviert (Überhitzungsschutz). • Stecken Sie den Netzstecker des Geräts in eine Steckdose. • Drücken S...
Page 47 - Die Pommes frites kleben zusammen
44 DE Probleme und mögliche Ursachen Lösungen Die Pommes frites kleben zusammen Die Pommes frites kleben zusammen. • Waschen Sie die Kartoffeln gründlich und trocknen Sie sie gut ab. Die Schüssel entleert sich nicht Das Öl ist noch zu heiß. Der Ölbehälter-Kontrollknopf ist nicht auf die automatische...
Page 48 - Weitere Probleme
45 Probleme und mögliche Ursachen Lösungen Weitere Probleme Die Kontrolllampe leuchtet nicht auf. • Drücken Sie den „Reset“-Knopf an der Rückseite der Fritteuse. Falls das Problem weiterbesteht, wenden Sie sich bitte an unsere Kundendienstabteilung. Lärm beim Frittieren Falls Sie beim Gebrauch Ihres...
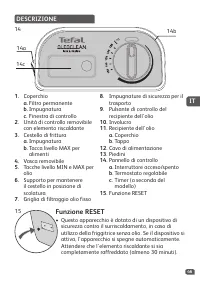
Page 49 - DESCRIZIONE; Funzione RESET
46 IT DESCRIZIONE 1. Coperchio a. Filtro permanente b. Impugnatura c. Finestra di controllo 2. Unità di controllo removibile con elemento riscaldante 3. Cestello di frittura a. Impugnatura b. Tacca livello MAX per alimenti 4. Vasca removibile 5. Tacche livello MIN e MAX per olio 6. Supporto per mant...
Page 50 - Posizione Filtraggio automatico dell'olio:
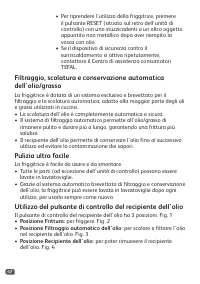
47 Filtraggio, scolatura e conservazione automatica dell'olio/grasso La friggitrice è dotata di un sistema esclusivo e brevettato per il filtraggio e la scolatura automatica, adatto alla maggior parte degli oli e grassi utilizzati in cucina. • La scolatura dell'olio è completamente automatica e sicu...
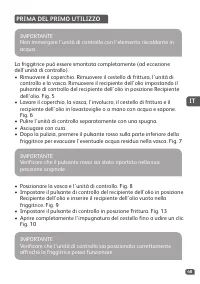
Page 51 - PRIMA DEL PRIMO UTILIZZO
48 IT La friggitrice può essere smontata completamente (ad eccezione dell'unità di controllo). • Rimuovere il coperchio. Rimuovere il cestello di frittura, l'unità di controllo e la vasca. Rimuovere il recipiente dell'olio impostando il pulsante di controllo del recipiente dell'olio in posizione Rec...
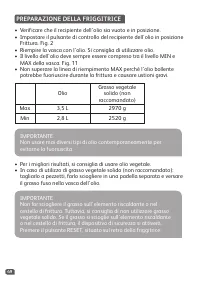
Page 52 - PREPARAZIONE DELLA FRIGGITRICE
49 IMPORTANTE Non far sciogliere il grasso sull'elemento riscaldante o nel cestello di frittura. Tuttavia, si consiglia di non utilizzare grasso vegetale solido. Se il grasso si scioglie sull'elemento riscaldante o nel cestello di frittura, il dispositivo di sicurezza si attiverà. Premere il pulsant...
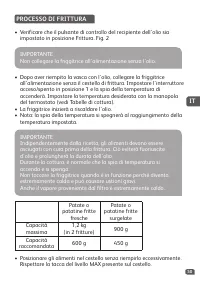
Page 53 - PROCESSO DI FRITTURA
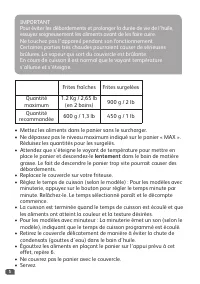
50 IT • Posizionare gli alimenti nel cestello senza riempirlo eccessivamente. Rispettare la tacca del livello MAX presente sul cestello. Patate o patatine fritte fresche Patate o patatine fritte surgelate Capacità massima 1,2 kg (in 2 fritture) 900 g Capacità raccomandata 600 g 450 g • Dopo aver rie...
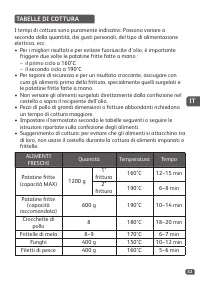
Page 55 - TABELLE DI COTTURA; ALIMENTI
52 IT TABELLE DI COTTURA I tempi di cottura sono puramente indicativi. Possono variare a seconda della quantità, dei gusti personali, del tipo di alimentazione elettrica, ecc. • Per i migliori risultati e per evitare fuoriuscite d'olio, è importante friggere due volte le patatine fritte fatte a mano...
Page 56 - PULIZIA E MANUTENZIONE; Per ragioni di sicurezza, l'apparecchio scola tutti i tipi di olio (o
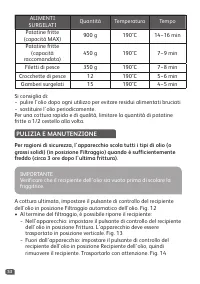
53 ALIMENTI SURGELATI Quantità Temperatura Tempo Patatine fritte (capacità MAX) 900 g 190°C 14~16 min Patatine fritte (capacità raccomandata) 450 g 190°C 7~9 min Filetti di pesce 350 g 190°C 7~8 min Crocchette di pesce 12 190°C 5~6 min Gamberi surgelati 15 190°C 4~5 min Si consiglia di: − pulire l'o...
Page 57 - Per riutilizzare l'olio, rimuovere il recipiente con attenzione.; Per il grasso solido (non raccomandato), rimuovere il coperchio dal
54 IT IMPORTANTE Prima di riempire la vasca di frittura, verificare sempre che il pulsante rosso sia stato riportato nella sua posizione originale; in caso contrario, verificare che l'involucro di metallo non sia stato danneggiato in alcun modo. • Conservare l'olio in un luogo fresco e asciutto, ide...
Page 58 - SE LA FRIGGITRICE NON FUNZIONA CORRETTAMENTE; Problemi e possibili soluzioni; La friggitrice non si riscalda
55 SE LA FRIGGITRICE NON FUNZIONA CORRETTAMENTE Problemi e possibili soluzioni Soluzioni La friggitrice non si riscalda L'apparecchio non è collegato all'alimentazione. La funzione RESET si è attivata (dispositivo di sicurezza contro il surriscaldamento). • Collegare l'apparecchio. • Premere il puls...
Page 59 - Le patatine fritte si attaccano tra di loro
56 IT Problemi e possibili soluzioni Soluzioni Le patatine fritte si attaccano tra di loro Le patatine fritte si attaccano tra di loro. • Lavare le patate e asciugarle con cura. La vasca non scola L'olio è ancora troppo caldo. Il pulsante di controllo del recipiente dell'olio non è in posizione Filt...
Page 60 - Rumore durante la frittura
57 Problemi e possibili soluzioni Soluzioni Rumore durante la frittura Se l’apparecchio emette piccoli scoppiettii durante l’uso, ciò significa che nell’olio di frittura è presente troppa acqua. Il pericolo è che l’acqua filtri nel recipiente dell’olio all’interno della vasca removibile (come conseg...
Page 61 - TEFAL INTERNATIONAL GUARANTEE : COUNTRY LIST; البحرين
TEFAL INTERNATIONAL GUARANTEE : COUNTRY LIST ﺭﺋﺍﺯﺟﻟﺍ ALGERIA (0)41 28 18 53 ﺔﻧﺳ ﺓﺩﺣﺍﻭ 1 year www.tefal-me.com ARGENTINA 0800-122-2732 2 años 2 years GROUPE SEB ARGENTINA S.A. Billinghurst 1833 3° C1425DTK Capital Federal Buenos Aires ՀԱՅԱՍՏԱՆ ARMENIA (010) 55-76-07 2 տարի 2 years ՓԲԸ " Գրո...
Page 62 - رصم; طخلا; 香港; الأردن
COLOMBIA 18000919288 2 años 2 years GROUPE SEB COLOMBIA Apartado Aereo 172, Kilometro 1 Via Zipaquira, Cajica Cundinamarca HRVATSKA CROATIA 01 30 15 294 2 godine 2 years SEB mku & p d.o.o. Vodnjanska 26, 10000 Zagreb ČESKÁ REPUBLIK CZECH REPUBLIC 731 010 111 2 roky 2 years Groupe SEB ČR s.r.o . ...
Page 63 - الكويت
ҚАЗАҚСТАН KAZAKHSTAN 727 378 39 39 2 жыл 2 years ЖАҚ «Группа СЕБ - Восток» 125171, Мәскеу, Ленинградское шоссесі,16А, 3 үйі 한국어 KOREA 1588-1588 1 year ( 유 ) 그룹 세브 코리아 서울시 종로구 청계천로 35 서린빌딩 2 층 110-790 ﺍلكويت KUWAIT 24831000 ﺔﻧﺳ ﺓﺩﺣﺍﻭ 1 year www.tefal-me.com LATVJA LATVIA 6 616 3403 2 gadi 2 years GRO...
Page 65 - ประเทศไทย
SUISSE SCHWEIZ SWITZERLAND 044 837 18 40 2 ans 2 Jahre 2 years GROUPE SEB SCHWEIZ GmbH Thurgauerstrasse 105 8152 Glattbrugg ประเทศไทย THAILAND 02 769 7477 2 years GROUPE SEB THAILAND 2034/66 Italthai Tower, 14th Floor, n° 14-02, New Phetchburi Road, Bangkapi, Huaykwang, Bangkok, 10320 TÜRKIYE TURKEY...


 Tefal 506x (part 2)
User Manual
Tefal 506x (part 2)
User Manual
 Tefal FA4000
User Manual
Tefal FA4000
User Manual
 Tefal FA7001 part 2
User Manual
Tefal FA7001 part 2
User Manual
 Tefal FA7004 Family Oleoclean
User Manual
Tefal FA7004 Family Oleoclean
User Manual
 Tefal FF1006 (part 2)
User Manual
Tefal FF1006 (part 2)
User Manual
 Tefal FF1028
User Manual
Tefal FF1028
User Manual
 Tefal FF2200
User Manual
Tefal FF2200
User Manual
 Tefal FF245E
User Manual
Tefal FF245E
User Manual
 Tefal FR4021
User Manual
Tefal FR4021
User Manual
 Tefal FR4068
User Manual
Tefal FR4068
User Manual
 Tefal TG5330
User Manual
Tefal TG5330
User Manual