Page 2 - Contents
For your safety Installation . . . . . . . . . . . . . . . . . . . . . . . . . . . . . . . . . . . . . . . . . 3 During use . . . . . . . . . . . . . . . . . . . . . . . . . . . . . . . . . . . . . . . . . 4 Safety of children and the infirm . . . . . . . . . . . . . . . . . . . . . . . . 5 Service ...
Page 3 - For Your Safety; Installation
For Your Safety 3 These instructions have been drawn up for your safety and that of others. You are therefore requested to read them carefully before installing and using the appliance. Keep this instruction manual for future reference as necessary. If the appliance is sold or moved, make sure that ...
Page 4 - During use
During use · This product is designed to cook foods inside private homes and for non-commercial purposes. It should not be used for any other purpose. · After using the appliance, make sure that all controls are in 'CLOSED' or 'OFF' position. · If you use an electrical socket close to this appliance...
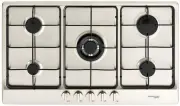
Page 6 - Use and Care; Instructions for use; The symbols on the control knobs mean the following:; Description of the hob
Use and Care Instructions for use The symbols on the control knobs mean the following: No gas flow or 'Off' Maximum gas flow or 'high' flame and lighting position Minimum gas flow or 'low' flame All operating positions must be set between the maximum and minimum flow settings, and never between the ...
Page 7 - To light the burners; symbol). Before removing pots or pans from the; For correct use of the hob; Burner
To light the burners To light the burner, press the control knob fully down and hold the knob down before rotating anti-clockwise to the High Flame position. The ignition device is integrated into the control knob and is automatically activated by pushing down on the control knob. After lighting the...
Page 8 - Abrasive or harsh household detergents or bleaches; Ignition plug
Cleaning and maintenance Before cleaning, disconnect the appliance from the electrical mains, make sure all burners are 'off' and allow the hotplate to cool down. General cleaning Wash enameled parts with lukewarm water and detergent: do not use abrasive products which might damage them. Wash the bu...
Page 9 - Yellow tipping of the burner flame.; Service and parts
Routine maintenance Have the condition and efficiency of the gas pipe and the pressure regulator (if installed) checked periodically. If anomalies are found, do not repair components but have the faulty component replaced. To ensure good performance and safety, the gas regulator taps must be greased...
Page 10 - Technical data; Instructions for installation
Technical data · Gas intake connection 1/2" BSP · Electricity supply 220-240V AC (50Hz) Auxiliary Semi Rapid Rapid Wok Injector (mm) 0.90 1.18 1.55 1.70 Nominal Gas Consumption 3.9 MJ/h 7.1 MJ/h 11.7 MJ/h 13.6 MJ/h Natural Gas 1.0 kPa Injector (mm) 0.53 0.70 0.90 1.00 Nominal Gas Consumption 3.3...
Page 14 - Connection to the gas supply; There are two ways to make the connection to the main gas line:; Electrical connection; ) The power supply system has an earth connection in good
Connection to the gas supply There are two ways to make the connection to the main gas line: A. The hotplate can be connected with rigid pipe as specified in AS5601 table 3.1. B. The hotplate can be connected with a Flexible Hose, which complies with AS/NZS 1869 (AGA Approved), 10mm ID, class B or D...
Page 15 - Replacing the power supply lead
Electrical connection (continued) 3) The general purpose outlet is easily accessible with the appliance installed. In all cases, the power supply lead must be positioned so that it does not reach a temperature 50°C above the room temperature. An ideal route is shown in the 'Correct Installation' bel...