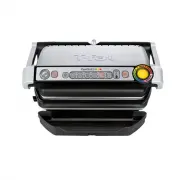
Page 2 - IMPORTANT SAFEGUARDS; SAVE THESE INSTRUCTIONS.; Safety instructions
2 IMPORTANT SAFEGUARDS Operation, maintenance and product installation: for your safety, please refer to the different sections of this manual or the corresponding icons. When using electric appliances, basic safety precautions should always be followed, including the following: 1. Read all instruct...
Page 3 - Short Cord instructions; THIS APPLIANCE IS INTENDED FOR HOUSEHOLD USE ONLY.
3 Short Cord instructions A short power-supply cord (or detachable power-supply cord) is to be provided to reduce the risk resulting from becoming entangled in or tripping over a longer cord. Longer detachable power-supply cords or extension cords are available and may be used if care is exercised i...
Page 4 - Prevention of accidents at home
4 • When using for the first time, wash the plate(s), pour a little cooking oil on the plate then wipe it with an absorbent kitchen towel. • To avoid damaging the non-stick coating of the cooking plate, always use plastic or wooden utensils. • Dot not use aluminum foil or other objects between the p...
Page 6 - Guide of automatic cooking programs
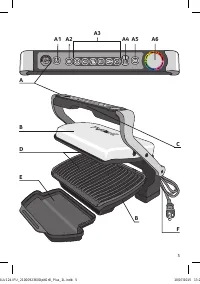
6 Description A Control panel A4 Manual mode “4 temperature settings” See specific manual quick start guide. C Handle A1 On/off button A5 OK button D Cooking plates A2 Frozen food mode A6 Cooking level indicator E Drip tray A3 Cooking programs B Body F Power cord Guide of LED colors preheating start...
Page 7 - Setting; OK
7 1 Setting 1 Remove all packaging materials, stickers and accessories from the inside and the outside of the appliance. The colour sticker on the cooking level indicator can be changed, according to the language. You can replace it with the one on the inside of the packaging. 2 Before using for the...
Page 9 - Cooking
9 3 Cooking 14-15 After pre-heating, the appliance is ready for use. Open the grill and place the food on the cooking plate. Comments: if the appliance remains open for too long, the safety system will turn off the appliance automatically. 16-17 The appliance automatically adjusts the cooking cycle ...
Page 11 - Comments
11 4 Comments Remember to always have the grill closed and no food inside in order for the pre-heating to effectively function. - Then wait for the pre-heating to be complete before opening the grill and place the food inside. N.B.: if the new pre-heating cycle is carried out immediately after the e...
Page 12 - Cleaning and maintenance
12 5 Cleaning and maintenance 26 Press the on/off button to turn off the appliance. 27 Unplug grill from wall outlet. 28 Allow to cool for at least 2 hours. To avoid accidental burns, allow grill to cool thoroughly before cleaning. 26 27 2 H 28 TFALU124-IFU_2100092360OpitGrill_Plus_2L.indb 12 10/07/...
Page 13 - Cleaning
13 6 Cleaning 29 Before cleaning, unlock and remove the plates to avoid damaging the cooking surface. The drip tray and the cooking plates are dishwasher safe. 30 The appliance and its cord cannot be placed in the dishwasher. The heating elements, visible and accessible parts, should not be cleaned ...
Page 14 - Troubleshooting guide
14 Troubleshooting guide Problem Cause Solution Button lit + Solid green indicator light + Button flashing • S w i t c h i n g o n t h e appliance or starting an automatic cooking cycle with food between p l a t e s a n d w i t h o u t p r e h e a t i n g ( m a n u a l mode is automatically activate...
Page 16 - MANUFACTURER’s WARRANTY; The Warranty
16 MANUFACTURER’s WARRANTY : www.t-falusa.com / www.t-fal.ca With a strong commitment to the environment, most of T-fal products are repairable during and after the warranty period. Before returning any defective products to the point of purchase, please call T-fal consumer service directly at the p...
Page 18 - Consignes de sécurité; Instructions concernant le cordon d’alimentation; CET APPAREIL EST CONÇU POUR UN USAGE DOMESTIQUE
18 Consignes de sécurité • Ne laissez jamais l’appareil sans surveillance si vous l’utilisez. • Pour empêcher l’appareil de surchauffer, ne le mettez pas dans un coin ou près d’un mur. • Ne laissez jamais l’appareil branché lorsqu’il n’est pas utilisé. • Ne passez pas la plaque chaude sous l’eau et ...
Page 19 - Prévention des accidents à la maison
19 – dans les fermes ; – par les clients des hôtels, motels et autres environnements à caractère résidentiel ; – dans les environnements de type chambres d’hôtes. • Cet appareil n’est pas destiné à être mis en marche au moyen d’une minuterie exté- rieure ou par un système de commande à distance. • E...
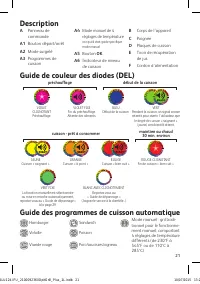
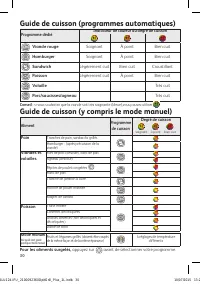
Page 21 - Description; Guide des programmes de cuisson automatique
21 Description A Panneau de commande A1 Bouton départ/arrêt A2 Mode surgelé A3 Programmes de cuisson A4 Mode manuel de 4 réglages de température voir quick start guide specifique mode manuel A5 Bouton OK A6 Indicateur de niveau de cuisson B Corps de l'appareil C Poignée D Plaques de cuisson E Tiroir...
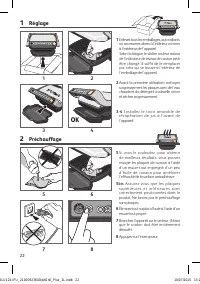
Page 22 - Réglage; Préchauffage
22 1 Réglage 1 Enlevez tous les emballages, autocollants ou accessoires divers à l’intérieur comme à l’extérieur de l’appareil. Selon la langue, le sticker couleur autour de l’indicateur de niveau de cuisson peut être changé. Il suffit de le remplacer par celui qui se trouve à l’intérieur de l’embal...
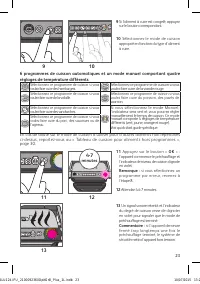
Page 24 - Cuisson
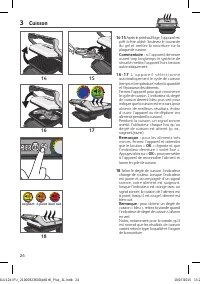
24 3 Cuisson 14-15 Après le préchauffage, l’appareil est prêt à être utilisé. Soulevez le couvercle du gril et mettez la nourriture sur la plaque de cuisson. Commentaire : si l’appareil demeure ouvert trop longtemps, le système de sécurité mettra l’appareil hors tension automatiquement 1 6 - 1 7 L ’...
Page 26 - Commentaires
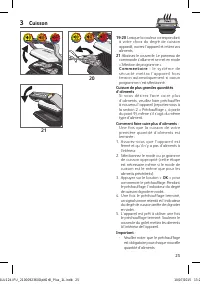
26 4 Commentaires R a p p e l : a v a n t d e l a n c e r l e préchauffage, assurez-vous que l’appareil est fermé et qu’il n’y a pas d’aliments à l’intérieur. - A t t e n d e z e n s u i t e q u e l e préchauffage soit terminé avant d’ouvrir le gril et de mettre des aliments à l’intérieur. Remarque ...
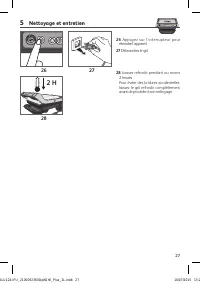
Page 27 - Nettoyage et entretien
27 5 Nettoyage et entretien 26 Appuyez sur l’interrupteur pour éteindre l’appareil. 27 Débranchez le gril. 28 Laissez refroidir pendant au moins 2 heures. Pour éviter des brûlures accidentelles, laissez le gril refroidir complètement avant de procéder à son nettoyage. 26 27 2 H 28 TFALU124-IFU_21000...
Page 28 - Nettoyage
28 6 Nettoyage 29 Avant le nettoyage, débloquez et retirez les plaques pour éviter d’endommager la surface de cuisson. 30 Le tiroir de récupération de jus et les plaques de cuisson peuvent aller au lave-vaisselle. L’appareil et son cordon ne doivent jamais être mis au lave-vaisselle. Les éléments ch...
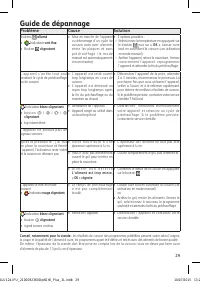
Page 29 - Guide de dépannage
29 Guide de dépannage Problème Cause Solution Boutons allumé + Indicateur vert fixe + Bouton clignotant • Mise en marche de l’appareil ou démarrage d’un cycle de cuisson auto avec aliments e n t r e l e s p l a q u e s e t s a n s p r é c h a u f fa g e ( l e m o d e manuel est automatiquement mis e...
Page 31 - GARANTIE T-FAL DU FABRICANT; La garantie
31 GARANTIE T-FAL DU FABRICANT : www.t-fal.ca Conformément à l’engagement ferme de T-fal à l’égard de l’environnement, tous ses produits sont réparables pendant et après la période de garantie. Avant de retourner un produit défectueux au point d’achat, veuillez joindre le service à la clientèle de T...
Page 32 - EN
32 Ref. 2100092360 Subject to modifications EN 2 - 16 FR 17 - 31 TFALU124-IFU_2100092360OpitGrill_Plus_2L.indb 32 10/07/2015 13:22