Page 2 - Table of Contents
1 Table of Contents Chapter 1 Before You Start 2 1.1 Package contents 2 1.2 Synology DS223j at a glance 3 1.3 System modes and LED indicators 4 1.4 Other LED definitions 6 1.5 Hardware Specification 7 1.6 Spare Parts 8 1.7 Optional Accessories 9 Chapter 2 Hardware Components Installation 10 2.1 Reco...
Page 3 - Chapter 1 Before You Start
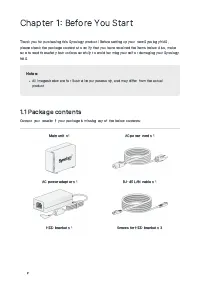
2 Chapter 1 Before You Start Thank you for purchasing this Synology product! Before setting up your new Synology NAS,please check the package contents to verify that you have received the items below. Also, makesure to read the safety instructions carefully to avoid harming yourself or damaging your...
Page 5 - System modes and LED indicators; System modes definitions
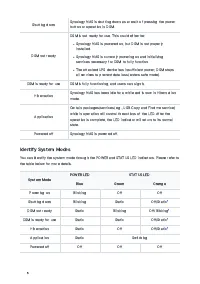
4 3 Drive StatusIndicator Displays the status of drive. For more information, see " Other LED indicators ". 4 POWER Buttonand Indicator Press to power on your Synology NAS. To power off your Synology NAS, press and hold until you hear a beep sound and the Power LED starts blinking. 5 F...
Page 6 - Identify System Modes
5 Shutting down Synology NAS is shutting down as a result of pressing the powerbutton or operation in DSM. DSM not ready DSM is not ready for use. This could either be: Synology NAS is powered on, but DSM is not properlyinstalled. Synology NAS is currently powering on and initializingservices necess...
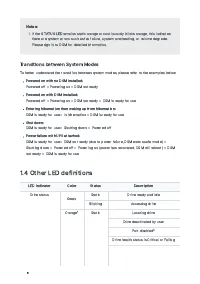
Page 7 - Transitions between System Modes; Other LED definitions
6 Notes: If the STATUS LED remains static orange or continuously blinks orange, this indicates there are system errors such as fan failure, system overheating, or volume degrade.Please sign in to DSM for detailed information. Transitions between System Modes To better understand the transition be...
Page 8 - Hardware Specification
7 Removing this drive will cause system damage; this is the only drive with DSM installed Off No internal Drive LAN Green Static Network connected Blinking Network active Off No network Notes: When the drive LED indicator is orange, we recommend you sign in to DSM and go to Storage Manager > H...
Page 9 - Optional Accessories
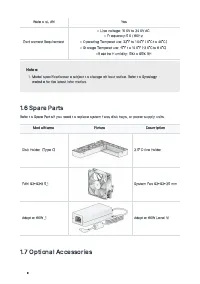
8 Wake on LAN Yes Environment Requirement • Line voltage: 100V to 240V AC • Frequency: 50 / 60Hz • Operating Temperature: 32˚F to 104˚F 0˚C to 40˚C • Storage Temperature: 5˚F to 140˚F 20˚C to 60˚C • Relative Humidity: 5% to 95% RH Notes: Model specifications are subject to change without notice. ...
Page 11 - Recommended tools
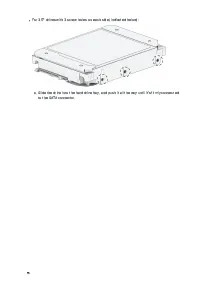
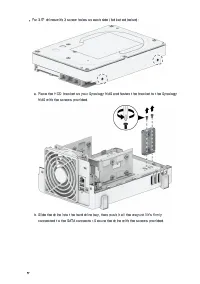
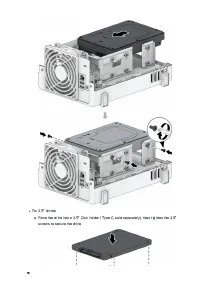
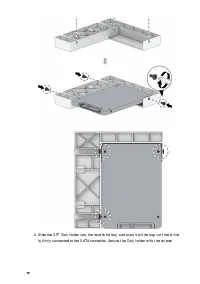
10 Chapter 2 Hardware ComponentsInstallation 2.1 Recommended tools This section lists the required and optional tools used in the installation procedures. A screwdriver At least one 3.5" or 2.5" SATA drive (See here for compatible models) Caution: If you install a drive that contains d...
Page 12 - Before working inside your Synology NAS; After working inside your Synology NAS
11 Caution: Leaving stray or loose screws inside your Synology NAS may severely damage itscomponents. Avoid dropping any metallic objects into the NAS, such as paper clipsand hairpins. Do not pull a cable by its connector or its pull tab when disconnecting it. Certaincables have connectors wit...
Page 13 - Safety instructions
12 Prevent exposure to static electricity by doing the following: Avoid hand contact by transporting and storing hardware components in static-safecontainers. Keep electrostatic-sensitive hardware components in their containers until they arrive atstatic-free workstations. Place hardware co...
Page 14 - System reliability guidelines
13 There is a risk of explosion if the battery is replaced with an incorrect type.Dispose of used batteries appropriately. Power cord(s) must be plugged into a socket-outlet with earthing connection. Keep your body parts away from a moving fan. This product must be installed by qualified personnel i...
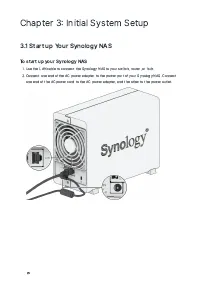
Page 24 - Chapter 3 Initial System Setup; Start up Your Synology NAS; To start up your Synology NAS
23 Chapter 3 Initial System Setup 3.1 Start up Your Synology NAS To start up your Synology NAS Use the LAN cable to connect the Synology NAS to your switch, router, or hub. Connect one end of the AC power adapter to the power port of your Synology NAS. Connect one end of the AC power cord to t...
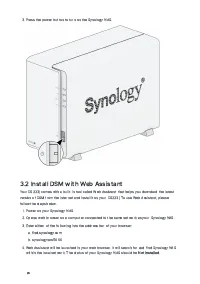
Page 25 - Install DSM with Web Assistant
24 Press the power button to turn on the Synology NAS. 3.2 Install DSM with Web Assistant Your DS223j comes with a built-in tool called Web Assistant that helps you download the latestversion of DSM from the Internet and install it on your DS223j. To use Web Assistant, pleasefollow the steps belo...
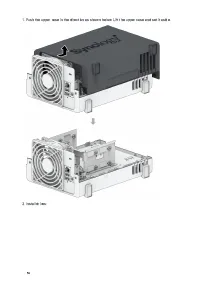
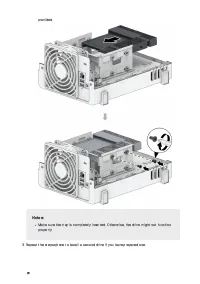
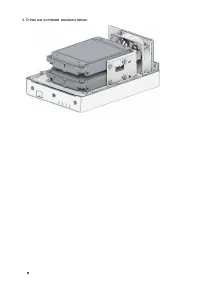
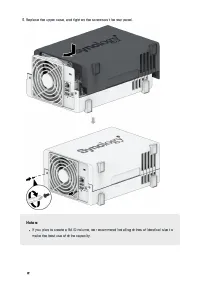
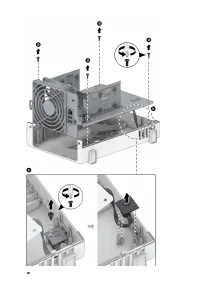
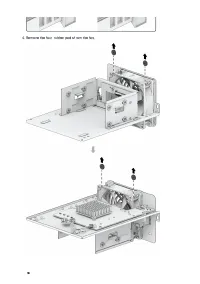
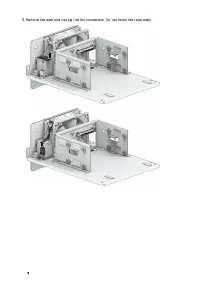
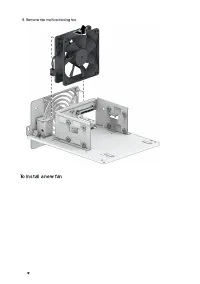
Page 27 - Chapter 4 System Maintenance; Replace the Malfunctioning Fan; To remove the malfunctioning fan
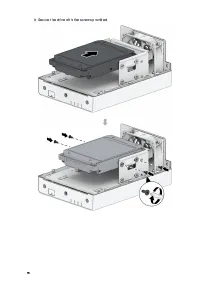
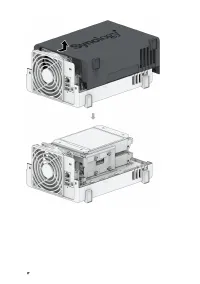
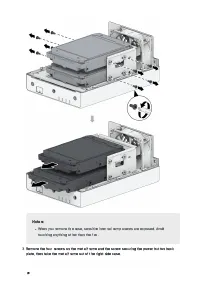
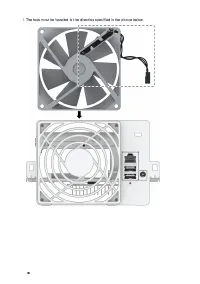
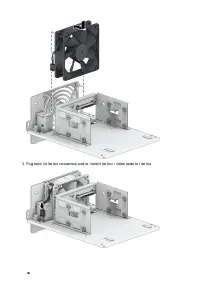
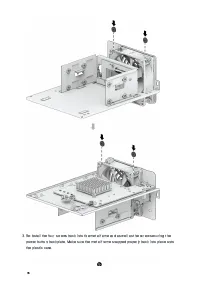
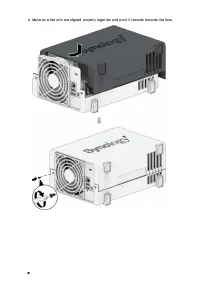
26 Chapter 4 System Maintenance 4.1 Replace the Malfunctioning Fan If the cooling fan located on the back of the Synology NAS malfunctions, please follow the stepsbelow to remove the malfunctioning fan and replace it with a new one. Caution: We recommend that you wear work gloves and operate with ca...
Page 33 - To install a new fan
32 Remove the malfunctioning fan. To install a new fan
Page 40 - Chapter 5 Troubleshooting; Troubleshooting checklist
39 Chapter 5 Troubleshooting CAUTION You should only perform troubleshooting and repairs as authorized or directed by theSynology Technical Support team. Notes: This chapter describes possible issues that may occur. Not every issue will occur onyour Synology NAS. Please refer to the corresponding se...
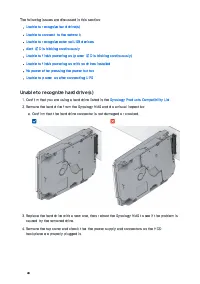
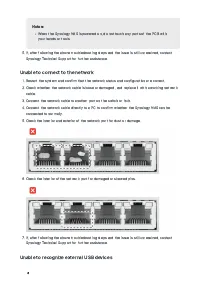
Page 42 - Unable to connect to the network; Unable to recognize external USB devices
41 Notes: When the Synology NAS is powered on, do not touch any parts of the PCB withyour hands or tools. If, after following the above troubleshooting steps and the issue is still unresolved, contact Synology Technical Support for further assistance. Unable to connect to the network Restart t...
Page 43 - Alert LED is blinking continuously; Unable to finish powering on (power LED is blinking continuously)
42 Do a visual inspection and check whether the USB port is rusted, which may cause a bad connection. Check that the external USB device is compatible with your Synology NAS. Do a visual inspection and check whether there is foreign matter inside the port. Check that the power supply fo...
Page 44 - Unable to finish powering on with no drives installed; No power after pressing the power button
43 Notes: If the power LED turns static, the ALERT light will likely be blinking orange, and theSynology NAS will start beeping — this is normal and expected behavior. Once youfinish testing all of the drives, it should stop doing this unless one or more of yourdrives are faulty. Being able to ping ...
Page 45 - Unable to power on after connecting UPS; Before you contact Synology Technical Support
44 Confirm that PSU connectors are properly plugged in. Check that there is no dust buildup on internal components; if there are, it needs to be cleaned. Reconnect the power cord(s) and try to power on the Synology NAS again. If, after following the above troubleshooting steps and the is...
Page 47 - END USER LICENSE AGREEMENT
SYNOLOGY, INC. END USER LICENSE AGREEMENT IMPORTANT–READ CAREFULLY: THIS END USER LICENSE AGREEMENT ("EULA") IS A LEGAL AGREEMENT BETWEEN YOU (EITHER AN INDIVIDUAL OR A LEGAL ENTITY) AND SYNOLOGY, INC. ("SYNOLOGY") FOR THE SYNOLOGY SOFTWARE INSTALLED ONTO THE SYNOLOGY PRODUCT PURCHAS...
Page 53 - FCC Declaration of Conformity
FCC Declaration of Conformity This device complies with Part 15 of the FCC Rules. Operation is subject to the following two conditions: (1) this device may not cause harmful interference, and (2) this device must accept any interference received, including interference that may cause undesired opera...