Section 1 IMPORTANT SAFETY INSTRUCTIONS Dear Customer, Please read through these operating instructions carefully. Please study and observe the safety instructions on the first few pages of this booklet. Please observe all cautionary markings in this manual, on the vacuum bags and on the Sweepovac v...
Page 4 - Section 2; INSTRUCTIONS FOR USE
Section 2 Sweep dirt to a point in front of the Sweepovac. Sweep in the dirt. 1 - Tap the switch and the Sweepovac will turn on for 10 seconds. 2 - Hold the switch in for 3 seconds and the Sweepovac will come on for 5 minutes – The five minute function is for when the Sweepovac is being used with th...
Page 5 - CHANGING THE BAG AND FILTER; HOW DO YOU KNOW THE BAG IS FULL?; If the light flashes on when in use.
Section 2 Slide out the bag drawer. Hold the bag upright when removing to prevent dirt spilling out. Disposable bags should be changed every 12 weeks. Re-usable bags should be emp-tied every 12 weeks. The entire drawer can be carried to the garbage when emp-tying or changing bags. When re-inserting ...
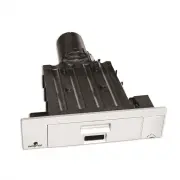
Page 6 - FITTING INSTRUCTIONS; Contents – What’s in the box
Section 2 FITTING INSTRUCTIONS Contents – What’s in the box Tools required l Pencil or fine point marker l 1/2” to 1” drill bit l Jigsaw or sawzall l Cut out template (included) l Philips head screwdriver No 2 The Sweepovac unit Template for marking the cut out A Jigsaw OR a Sawsall can be used to c...
Page 7 - How to fit the unit; IF YOUR KITCHEN CABINETRY HAS BEING SUPPLIED WITH
Section 2 FITTING INSTRUCTIONS How to fit the unit Place template against the surface and mark with a fine tipped pen. A jigsaw can be used when the Sweepovac is being fitted in a removable toe- kick.A Sawsall can be used when fitting in a fixed toekick or fixed end panel. The Sweepovac can be fitte...
Page 9 - Section 3; DIMENSIONAL INFORMATION; can be ordered separately.; Accessories
9 Section 3 DIMENSIONAL INFORMATION SPECIFICATIONS Switch: The switch is on a 10 second timer and will turn off automatically after 10 seconds. Gently kick or tap the bottom part of the switch. Kick once for on. Kick once for off. Note: When using the Sweepovac with the extendable hose. Hold the swi...
Page 10 - Section 4; TROUBLESHOOTING
Section 4 TROUBLESHOOTING If suction reduces or the Sweepovac does not vacuum up the sweepings. Open the drawer and check if the bag is full. When changing the bag, make sure to hold the bag tray with the front pointing upwards. This will prevent any dirt falling back out through the opening. Replac...
Page 11 - WARRANTY; General Terms and Conditions
Section 4 WARRANTY Dear Customer,Thank you for purchasing a Sweepovac unit. The Sweepovac unit and associated products are designed and manufactured to a high standard and with normal use should last many years. The warranty period on your Sweepovac unit is 2 years from the date of purchase. To gain...
Page 12 - To purchase disposable bags, filters or
www.sweepovac.com To purchase disposable bags, filters or re-usable bags please go to: www.sweepovac.com Sweepovac_2017 manual.indd 12 14/11/2017 21:41