Page 2 - IMPORTANT SAFETY INSTRUCTIONS; DANGER; READ ALL INSTRUCTIONS BEFORE USE
2 | ENGLISH IMPORTANT SAFETY INSTRUCTIONS DANGER Any appliance is electrically live even when switched off. To reduce risk of electrical shock: 1. Always disconnect appliance from electrical outlet when filling with water or emptying, and when not in use. 2. Do not place or store unit where it can f...
Page 3 - SAVE THESE INSTRUCTIONS!; FOR HOUSEHOLD USE ONLY; Questions or comments?; Speak your mind! You are invited to review this product online:
ENGLISH | 3 SAVE THESE INSTRUCTIONS! FOR HOUSEHOLD USE ONLY Questions or comments? • steamfast.com • [email protected] • 1-800-711-6617 Speak your mind! You are invited to review this product online: steamfast.com/reviews instruction concerning use of the unit by a person responsible for their safet...
Page 4 - Product Information; Product Support; UNIT FEATURES & ACCESSORIES
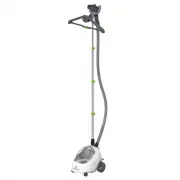
4 | ENGLISH Product Information The following features and accessories are included with your Full Size Fabric Steamer. Carefully inspect the packing material for all parts listed below. To obtain possible missing parts, refer to Product Support on Page 14 of this manual for Consumer Service contact...
Page 6 - Assembling Your
6 | ENGLISH TELESCOPIC POLE The Telescopic Pole is made up of four sections (FIGURE 1): • TOP (SECTION 1) • MIDDLE-TOP (SECTION 2) • MIDDLE-BOTTOM (SECTION 3) • BOTTOM (SECTION 4) SECTIONS 1, 2 & 3 are adjustable in length. By using the three extension locks, these sections may be extended or re...
Page 7 - CONNECTING POLE TOP; NOTE: It is recommended to orient Pole Top so Nozzle Cradle; CONNECTING HANGER; NOTE: It is recommended to extend Telescopic Pole to its full
ENGLISH | 7 CONNECTING POLE TOP 1. Look at underside of Pole Top to locate two guide ridges (FIGURE 3-A). 2. Align Pole Top guide ridges with guide grooves on SECTION 1 of Telescopic Pole. NOTE: It is recommended to orient Pole Top so Nozzle Cradle faces backwards towards rear of the unit. 3. Slide ...
Page 8 - cause burns and injury.
8 | ENGLISH CONNECTING HOSE 1. Place end of Hose onto threaded Hose Base (FIGURE 6-A). 2. Rotate coupling in clockwise direction until Hose is tightly secured onto Hose Base (FIGURE 6-B). Hand tighten only. Do not over-tighten. 3. Hang Steam Nozzle on specially designed Steam Nozzle Cradle (FIGURE 6...
Page 9 - FILLING WITH WATER; designed for use with this unit.; unit with an empty Water Tank.; Using Your
ENGLISH | 9 FILLING WITH WATER 1. Remove Water Tank from main unit. 2. Holding Water Tank upside-down, unscrew and remove Valve Cap by rotating it in a counter- clockwise direction (FIGURE 8-A). 3. Fill Water Tank with water through Valve Cap hole. At full capacity, the Water Tank holds 70oz (2,070 ...
Page 10 - GENERAL OPERATION; nected before following these steps.
10 | ENGLISH GENERAL OPERATION NOTE: Be sure that Water Tank has been filled and, if desired, the Fabric Brush is con- nected before following these steps. 1. For first-time use, remove protective plastic cover that is shipped on electrical plug. Plug power cord into a convenient electrical outlet. ...
Page 11 - FABRIC STEAMING; CAUTION: Use care when handling garments hanging on; GENERAL STEAMING TIPS:
ENGLISH | 11 FABRIC STEAMING STEAMING GARMENTS: 1. To expand Hanger for use, fold the two arms upward until the lower support arms line up straight (FIGURE 9-A). Slide lock to secure arms in place (FIGURE 9-B). A garment may now be placed on the Hanger. 2. Alternatively, place garment on a clean, ru...
Page 12 - PROPER STORAGE; Proper Storage
12 | ENGLISH Storage & Care PROPER STORAGE Preparing your Full Size Fabric Steamer for storage is quick and simple. When you have finished your steaming tasks, follow the steps listed below. 1. Set Lighted On/Off Switch to “ O ” (off) position, and unplug power cord from electrical outlet. 2. Al...
Page 13 - PROBLEM; • Purchase information (where and when you purchased this product); TROUBLESHOOTING
ENGLISH | 13 Product Support Unit fails to heat up. Lighted On/Off Switch DOES NOT illuminate when set to “ I ” (on) position. Unit fails to heat up. Lighted On/Off Switch DOES illuminate when set to “ I ” (on) position. NOTE: Always allow sufficient time for unit to heat up and begin producing stea...
Page 14 - PRODUCT SPECIFICATIONS; REPLACEMENT ACCESSORIES
14 | ENGLISH Product Support PRODUCT SPECIFICATIONS SF-520 120V 1500W 12.5A 70 OZ (2,070 ML) 45 SEC (APPROXIMATE) 63 MIN (APPROXIMATE) 9.49 LBS (4.3 KG) 12.0” (30.5 CM) x 10.4” (25.52 CM) x 63.4” (165.9 CM) 6’ (183.0 CM) MODEL VOLTAGE WATTAGE AMPERAGE WATER CAPACITY HEATING TIME CONTINUOUS STEAM TIM...
Page 15 - Warranty Information; YEAR LIMITED WARRANTY
ENGLISH | 15 Warranty Information 1 YEAR LIMITED WARRANTY Steamfast, a division of Vornado Air LLC, (“Steamfast”) warrants to the original consumer or purchaser this Steamfast Full Size Fabric Steamer SF-520 (“Product”) is free from defects in material or workmanship for a period of one (1) year fro...
Page 16 - Steamfast
T520-005 T520-005 R-, V00 review this product online evalúe este producto en línea évaluer ce produit en ligne www.steamfast.com/reviews Steamfast 415 East 13th Street, Andover, KS 67002 1-800-711-6617 www.steamfast.com [email protected]