Page 2 - SUGGESTED APPLICATIONS; CONTENTS
2 3 SUGGESTED APPLICATIONS You may use some light duty air tools with this compressor. Some examples of light duty tools are:• Ball Inflator• Toy Inflator• Tyre Inflator• Mini Air Brush• Touch Up Spray Can• Stapler• Combo Nailer• C-Bradder• T-Nailer This light duty air compressor is NOT recommended ...
Page 3 - How to claim under this warranty.
2 3 INTRODUCTION Dear Customer,Thank you for purchasing this compressor which has passed through our extensive quality assurance processes. Every care has been taken to ensure that it reaches you in perfect condition. However, in the unlikely event that you should experience a problem, or if you req...
Page 8 - ELECTRICAL DATA
8 9 SPECIFIC SAFETY INSTRUCTIONS Warning! Do not use the air compressor in areas where there is a risk of explosion or fire from combustible materials. The sparks generated from certain tools attached to air compressor can ignite combustible materials as well as flammable liquids, paint, varnish, pe...
Page 9 - COMPONENTS AND CONTROLS
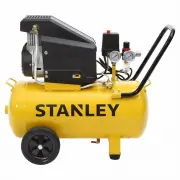
8 9 COMPONENTS AND CONTROLS 1. Rear handle2. Tank3. Wheels4. Tank drain tap5. Rubber stopper6. Safety Valve (not shown)7. Tank pressure gauge8. Front handle9. Pressure switch10. On / Off button – red colour11. Outlet pressure gauge12. Air outlet - nitto style socket13. Outlet pressure regulator14. W...
Page 10 - OPERATING INSTRUCTIONS; Unpacking; RUBBER STOPPER; WARNING
10 11 PIC. 1 PIC. 2 OPERATING INSTRUCTIONS Unpacking Carefully unpack your air compressor. This air compressor is bulky and heavy, two (2) person lift required. Dispose of all packing material in an environmentally responsible manner. Assembly Your air compressor requires minor assembly before initi...
Page 11 - AIR FILTER
10 11 PIC. 5 STARTING AND STOPPING YOUR AIR COMPRESSOR Pic. 5 NOTE: Always ensure that you plug your air compressor into a standard 240V AC power point. Never use an extension cord as this can lead to a voltage drop which may cause power loss and over heating. Use a longer air hose if you need to ge...
Page 12 - USING THE AIR COMPRESSOR; Before starting run through this simple list; IMPORTANT; To drain any fluid from the filer regulator
12 13 USING THE AIR COMPRESSOR Your compressor does not require running in. Before use ensure you have read and understood these instructions.Before use ensure this compressor is fully assembled as per pages 10 and 11. Before starting run through this simple list; 1. Fully assembled.2. Drain tap – o...
Page 15 - To remove
14 15 PIC. 11 DRAIN TAP Pic. 11 After use open the drain tap to drain excess air and any moisture. The excess air will also help purge the moisture. Leave the drain tap open when air compressor is not in use, so any moisture can continue to drainTo open the drain tap pull the lever down to vertical....
Page 16 - If your compressor does not start; MAINTENANCE; After Use; TROUBLE SHOOTING
16 17 If your compressor does not start • Check that you have plugged the power lead into a standard 240V 10Amp power point and turned the switch ON. • Check that you have turned the air compressor ON /OFF switch ON. • The air tank may be full. Use your air tool and the air compressor should start w...
Page 17 - PARTS DIAGRAM
16 17 Part Description Qty SMG Part No. 1 Air Filter 1 95 BRC95AF 3 Exhaust Elbow 1 95 BRC95EE 4 Exhaust Tube Set 1 95 STDDET 7 Wheel Set 2 95 STWH 8 One Way Valve 1 95 BRC95OWV 9 Drain Tap 1 95 BRC95DT 10 Cushion Foot Set 2 95 BRC95RS 11 Unloading Tube Set 1 95 STDDUT Part Description Qty SMG Part ...
Page 18 - TECHNICAL INFORMATION; For any queries or assistance call; Customer Service; Keep your purchase receipt, this will be required to
18 * TECHNICAL INFORMATION Specifications Inflator SXAC2036121 Voltage 240V AC ~ 50Hz Motor Electric 2 HP Wattage 1500W No Load Speed 2850 RPM Free Air Delivery (FAD) 105L per minute Tank Size 36L Duty Cycle 75% Max. Tank Pressure 145PSI (10 Bar) Outlet Pressure 1PSI - 145 PSI Adjustable Minimum Gen...