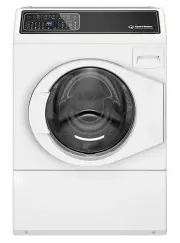
Page 3 - Read all instructions before using unit.
WARNING Failure to install, maintain, and/or operate this ma-chine according to the manufacturer's instructionsmay result in conditions which can produce bodilyinjury and/or property damage. W030 WARNING For your safety and to reduce the risk of fire or anexplosion, do not store or use gasoline or o...
Page 4 - or contact your
Product Registration New owners of Alliance Laundry Systems equipment are en-couraged to register their appliance to insure proper limitedwarranty coverage. Register online at https://speed- queen.com/support/register-your-products/ or contact your dealer to register your appliance. All information ...
Page 5 - Explanation of Safety Messages; DANGER; Important Safety Instructions; WARNING
Safety Information Explanation of Safety Messages Precautionary statements (“DANGER,” “WARNING,” and “CAU-TION”), followed by specific instructions, are found in this man-ual and on machine decals. These precautions are intendedfor the personal safety of the operator, user, servicer, andthose mainta...
Page 7 - Table of Contents
Table of Contents Product Registration ............................................................................... 4 Safety Information .................................................................................. 5 Explanation of Safety Messages ...............................................
Page 9 - Before Washing; Loading the Washer
Operation Before Washing Prepare Wash Load Empty Pockets and Cuffs Make sure all pockets are empty and turn them inside out.One bobby pin, metal or plastic toy, nail or sharp object in aload can catch laundry, cause tears and plug the pump. Facialtissue left in a pocket will produce extreme “lint”. ...
Page 10 - Wash Temperature; NOTE: Always follow manufacturer’s care labels.; Wash Temperature Guide; Water; Table 1; Energy
Wash Temperature Hot Hot water is the most effective for cleaning, but it is not recom-mended for all fabric types (read labels). Warm The Warm Wash is useful for providing a thorough cleaning onlight and moderately soiled clothing without damaging fabricor adding to color fading. Warm water also re...
Page 11 - Digital Display; The display also shows diagnostic codes.; Cycles
Control Panel FLW2503N_SVG Extra Rinse(s) Stain Boost Sanitize with Oxi Hold 3 seconds Tub Clean Digital Display The two-digit display is used to show the time remaining in acycle. If the cycle time is over 99 minutes the control will display ei-ther 1H, 2H, etc., and then the additional minutes ove...
Page 13 - Selections; Temp; Spin Speed; Options; Soak
NOTE: The washtub must be empty while using the TubClean feature, otherwise damage to items may occur. NOTE: Regular cleaning intervals will keep the unit per-forming at its best. Along with running the Tub Cleancycle, it is recommended to regularly clean the dis-penser drawer and door gasket. Refer...
Page 14 - Status
rinses can be set. The digital display will cycle between thenumber of extra rinses and total cycle time. A default selectionof 1 extra rinse will be displayed after entering the selectionmode. Set the amount of extra rinses by pressing the ExtraRinse(s) keypad again or pressing the up and down arro...
Page 15 - Close the loading door tightly. The washer will not operate; er. Press the Power button to turn on the washer.
FLW2457N_SVG NOTE: High efficiency (HE) detergents are designedespecially for frontload washers to reduce over-sudsing and maximize cleaning results. Look for theHE logo or “high efficiency” on the detergent’s la-bel. IMPORTANT: If using non-HE detergent, avoid over-sudsing by using only 1/2 of the ...
Page 16 - Out of Balance Load
While a cycle is paused, the display will show the cycle time re-maining and St to restart the cycle. Close the door and press the Start/Pause button to resume the cycle. The Door Lock light will flash while the door re-locks. NOTE: If water needs to be removed before openingthe door, run a Spin cyc...
Page 17 - Heavy Duty, Whites, Perm Press, Bedding and Quick Wash Cycles
Cycle Operation The cycles of your washer include several different stages. Re-fer to the table below for what can be expected during the cy-cles that you select. The washer operates by gently tumbling the clothing throughthe water. The wash action consists of a period of tumbling inone direction, a...
Page 24 - Common Washer Sounds
Tub Clean Cycle Cycle Stage Activity Time (minutes) Speed Comments Fluff Tumble 1:00 Breakaway Agitate Common Washer Sounds Sounds Cause Accelerating This sound is heard duringthe spin portions of everycycle. Tapping These sharp sounds maycome from metal fasteners,zippers, belt buckles orcoins hitti...
Page 25 - Using Your Dispenser Drawer; Detergent Compartments; Figure 1; Liquid Bleach Compartment
Using Your Dispenser Drawer FLW2389N_SVG E H H R S P O R F E T W W E A A N N A M I S S LIQUID BLEACH 3 2 1 4 1. Main Wash Detergent2. Liquid Bleach3. Fabric Softener4. Pre-Wash and Stain Boost Detergent Figure 1 Detergent Compartments The detergent compartments are located on the right side ofthe di...
Page 27 - Clothing Concerns; Problem
Clothing Care Clothing Concerns To keep clothes looking white or bright, use good washingpractices at all times to prevent a gradual build-up of soil orwater hardness minerals on them. If you notice that your clothes are not as bright as they should be, take correctivemeasures immediately. Problem C...
Page 29 - Figure 2
Maintenance Lubrication All moving parts are sealed in a permanent supply of lubricantor are equipped with oilless bearings. Additional lubricationwill not be necessary. Do not lubricate the door hinge. If the hinge makes noise, re-place the hinge. Cold Weather Care If the unit is delivered on a col...
Page 30 - Cleaning Foreign Object Trap; Cleaning Door Seal Drain Holes; Figure 4
FLW2452N_SVG 1. Shipping Brace Figure 2 FLW2297N_SVG 1 1. Shipping Bolt Assembly Figure 3 Refer to the Installation instructions for proper procedureswhenever the washer is moved. Cleaning Foreign Object Trap Refer to Figure 1 . The washer’s pump has a trap that may collect foreign objects.The trap ...
Page 31 - Preventative Maintenance; Frequency; Table 2
Preventative Maintenance Follow these guidelines to ensure the washer operates proper-ly. Call for service if you observe any of the following: water ofany amount on the floor, an increase in operating noise or wa-ter remaining in the wash basket after a cycle. Frequency Maintenance Proce-dure As ne...
Page 32 - Washer Symptom; • Make sure power cord is plugged all the way into the elec-
Troubleshooting Try these troubleshooting tips before making a service call.They may save you time and money. Washer Symptom Possible/Cause Solution Won't Fill • Make sure power cord is plugged all the way into the elec- trical outlet. • Make sure hot and cold water faucets are turned on.• Make sure...
Page 36 - Er
Washer Symptom Possible/Cause Solution Er , ub on digital display or Left Decimal Point blinking on display one second on/onesecond off • This code indicates that the washer did not reach the maxi- mum intended speed in the final spin. • This could be due to an unbalanced load, excessive suds in the...
Page 37 - Warranty Repairs; specifications; Contact Information; Date Purchased
Warranty Repairs If something should occur with your washer or that requiresservice please use the service locator at www.speed-queen.com. We would like to point out items that would not be considereda product failure and are not covered under warranty. If a serv-ice technician is called for the ite...