Page 2 - Notice for users
2 GB Notice for users Program © 1999, 2000, 2001, 2002, 2003, 2004, 2005, 2006, 2007, 2008, 2009 Sony CorporationDocumentation ©2009 Sony Corporation All rights reserved. This manual or the software described herein, in whole or in part, may not be reproduced, translated or reduced to any machine re...
Page 3 - Table of Contents; Getting Started
3 GB Table of Contents Techniques for Better Recording .............. 6 Getting Started Step 1: Checking the Contents of the Package ..................................................... 9 Index to parts and controls ................. 10 Step 2: Inserting the Batteries ................. 12 When to r...
Page 6 - Techniques for Better Recording; For recording a piano performance; Tips for setup; REC LEVEL
6 GB Techniques for Better Recording The PCM-M10/M10P linear PCM recorder allows you to enjoy high-quality recording in a variety of situations. This section introduces easy recording setups for 6 typical music scenes. For recording a solo acoustic guitar performance z Tips for setup • Use a tripod ...
Page 9 - Operating Instructions
9 GB G e tt in g S ta rte d Getting Started Step 1: Checking the Contents of the Package Linear PCM recorder (1) Remove the film on the display window before you use the PCM recorder. Remote commander (1) USB connecting cable (1) LR6 (size AA) alkaline batteries (2) Hand strap (1) Carrying pouch (1)...
Page 10 - Index to parts and controls; Front
10 GB Index to parts and controls Front A Peak level L/R (-12 dB/OVER) indicators B Display window C DELETE button D MENU button E (folder) button F > FF/ v (fast-forward/up) button G . FR/ V (fast-rewind/down) button H x STOP button I X PAUSE button/indicator J N PLAY/ENTER button/indicator* K z...
Page 11 - wj
11 GB G e tt in g S ta rte d W REC LEVEL (recording level) MANUAL/AUTO switch X Hole for attaching the tripod (not supplied) Y Battery compartment Z Speaker (on the basement) wj Built-in microphones (stereo) wk DPC (SPEED CTRL) (speed control) ON/OFF switch wl i /LINE OUT (headphone/line output) jac...
Page 12 - Step 2: Inserting the Batteries; Be sure to insert the batteries with the
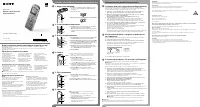
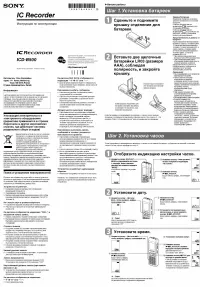
12 GB Step 2: Inserting the Batteries 1 Slide and lift the battery compartment lid in the direction of the arrow. 2 Insert the two supplied LR6 (size AA) alkaline batteries into the battery compartment, and then close the lid. Be sure to insert the batteries with the 3 and # ends in the right positi...
Page 13 - When to replace batteries; Battery remain indication; Tips; : “Change Battery” appears and the
13 GB G e tt in g S ta rte d batteries, select “NiMH Battery” in the “Battery Setting” submenu of the “Detail Menu.” With this setting, the battery remain indicator for the rechargeable batteries will be displayed more precisely. See “Making Settings for the Menu” on page 71. z Tips • Even if fully-...
Page 14 - Note
14 GB To operate with an AC power adaptor Insert a commercially-available applicable AC power adaptor securely into the DC IN 3V jack until it stops to the end. You can use an AC power adaptor that supports:• Output voltage: DC3V • Output current: 1A• Polarity of the plug P Note Operations of not al...
Page 15 - Step 3: Turning the PCM recorder On; Turning the power on
15 GB G e tt in g S ta rte d Step 3: Turning the PCM recorder On Turning the power on Slide the POWER/HOLD switch in the direction of “POWER” for more than 1 second. The PCM recorder is turned on, and an animation of “Accessing...” is displayed. Turning the power off Slide the POWER/HOLD switch in t...
Page 16 - Step 4: Setting the Clock
16 GB Step 4: Setting the Clock Recorded audio files (tracks) are named using the date and time of the clock. By setting the clock before recording, the recording’s date and time will be correctly saved.When the PCM recorder is turned on before the clock has been set, “Set Clock” appears on the disp...
Page 17 - Notes
17 GB G e tt in g S ta rte d 1 Press MENU to enter the menu mode.The menu mode window will be displayed. 2 Press > FF/ v or . FR/ V to select “Detail Menu,” and then press N PLAY/ENTER. 3 Press > FF/ v or . FR/ V to select “Clock,” and then press N PLAY/ENTER. 2 Press > FF/ v or . FR/ V to ...
Page 19 - Русский
19 GB G e tt in g S ta rte d 4 Press > FF/ v or . FR/ V to select the language that you want to use, and then press N PLAY/ENTER. You can select the following languages. Deutsch (German), English, Español (Spanish), Français (French), Italiano (Italian), Русский (Russian), (Japanese), (Korean), (...
Page 20 - HOLD; Tip; HOLD
20 GB Preventing Accidental Operation – HOLD Locking the buttons of the PCM recorder Slide the POWER/HOLD switch in the direction of “HOLD.”“HOLD” will appear for approximately 3 seconds and all the functions of the buttons of the PCM recorder are locked. Unlocking the buttons of the PCM recorder Sl...
Page 22 - Basic Operations; Recording; Selecting a folder
22 GB Basic Operations Recording P Note Before making a recording, turn on the power of the PCM recorder. Selecting a folder 1 Press to display the folder selection window in the stop mode. 2 Press > FF/ v or . FR/ V to select the folder in which you want to record tracks ( FOLDER01-10). When you...
Page 23 - Set the REC LEVEL switch to “AUTO,” and press
23 GB B a si c O per atio ns Starting recording (automatic recording) 1 Set the REC LEVEL switch to “AUTO,” and press z REC in the stop mode to enter the recording standby mode. The z REC indicator lights in red and the X PAUSE indicator flashes in orange (Recording Standby mode). When you select “A...
Page 24 - To stop recording; Note while accessing; Other operations; Press
24 GB To stop recording Note while accessing The PCM recorder is recording data and saving it in memory when the ACCESS indicator flashes in orange. While the PCM recorder is accessing data, do not remove the batteries, plug or unplug an AC power adaptor or connecting cables. Doing so may damage the...
Page 25 - If you connect headphones (not supplied) to the
25 GB B a si c O per atio ns • When a memory card is being inserted, you can continue recording a track by changing the folder to save the track from the internal memory to the memory card automatically after the internal memory is full (Cross-Memory Recording)(page 39). • When you connect the suppl...
Page 26 - Listening; Before you start playback; Connect headphones (not supplied) to the
26 GB Listening P Note Before the playback starts, turn on the power of the PCM recorder. Before you start playback To start playback Connect headphones (not supplied) to the i /LINE OUT (headphone/line output) jack for better playback sound. P Note Make sure that “Audio Out” in the menu is set to “...
Page 29 - Quickly locating the point you want to start playback (Easy Search); Tracks that the PCM recorder can play back; To select a folder
29 GB B a si c O per atio ns z Quickly locating the point you want to start playback (Easy Search) By setting “Easy Search” to “ON” in the menu, you can go back approximately 3 seconds by pressing . FR/ V , or advance approximately 10 seconds during playback by pressing > FF/ v (page 51). z Track...
Page 30 - Deleting; Selecting a track and deleting it
30 GB Deleting P Notes • Once a track has been deleted, you cannot retrieve it.• Before deleting the track, turn on the power. Selecting a track and deleting it 1 Select the track you want to delete when the PCM recorder is in the stop or playback mode. 2 Press DELETE. “Delete?” appears with the tra...
Page 31 - To cancel deleting midway
31 GB B a si c O per atio ns To cancel deleting midway Deleting another track Proceed with the steps 1 through 4 in “Selecting a track and deleting it.” Deleting a part of a track Use the Divide function in the menu to divide a track into two first, one you want to delete and the other you do not wa...
Page 32 - Other Recording Operations; Changing the Recording Method
32 GB Other Recording Operations Changing the Recording Method Recording using the remote commander You can use the supplied wired remote commander to perform recorder operations remotely. Insert the remote commander plug securely into the REMOTE jack. Press the appropriate buttons on the remote com...
Page 33 - Manual recording
33 GB Oth er R e cordin g O per atio ns Manual recording When you set the REC LEVEL switch to “MANUAL,” you can adjust the recording level manually, according to the sound source. If necessary, you can also utilize the “LIMITER” (page 44) and “LCF(Low Cut Filter)” (page 43) in the menu to reduce sou...
Page 36 - Set “PRE REC” to “OFF” in step 4.
36 GB 8 To start recording, press X PAUSE or N PLAY/ENTER. The standby for recording mode is released, and recording continues from the sound buffered in step 7. 9 To stop recording, press x STOP. P Notes • If you start recording with the pre-recording function using the built-in microphones, a clic...
Page 37 - About compatible memory cards; Inserting a memory card
37 GB Oth er R e cordin g O per atio ns About compatible memory cards Memory cards that you can use with the PCM recorder are as follows:• Memory Stick Micro™ (M2™) media: Up to16 GB is supported. For compatible M2™, please refer to the Sony web site (page 95). • microSD card: A microSD (FAT16) card...
Page 38 - To use the built-in memory
38 GB To remove a memory card Be sure that the ACCESS indicator is off, and then push the memory card into the slot. When it pops out, remove it from the memory card slot. On folder and track file structure Ten folders are created in a memory card in addition to those in the built-in memory. The str...
Page 39 - To start recording
39 GB Oth er R e cordin g O per atio ns To start recording Select the folder and press z REC to enter recording standby mode. Then press X PAUSE or N PLAY/ENTER to start recording.For automatic recording, see “Recording” on page 22. For manual recording, see “Manual recording” on page 33. Recording ...
Page 41 - Changing the Recording Settings; About the recording modes
41 GB Oth er R e cordin g O per atio ns Changing the Recording Settings Selecting the recording mode You can select the recording mode in the menu when the PCM recorder is in the stop mode. About the recording modes The PCM recorder is compatible with 2 types of recording modes: LPCM (Linear PCM) an...
Page 43 - Press MENU to enter the menu mode.
43 GB Oth er R e cordin g O per atio ns You can set the sensitivity of the built-in microphones and an external microphone connected to the m (microphone) jack of the PCM recorder. Switch the MIC SENS(ATT) switch according to the recording conditions or to suit your purposes, when the PCM recorder i...
Page 44 - To cancel the LCF function
44 GB 2 Press > FF/ v or . FR/ V to select “LCF(Low Cut Filter),” and then press N PLAY/ENTER. 3 Press > FF/ v or . FR/ V to select “ON,” and then press N PLAY/ ENTER. The LCF function is set to “OFF” when you purchase the PCM recorder. 4 Press x STOP to exit the menu mode. To cancel the LCF f...
Page 45 - To cancel the LIMITER function
45 GB Oth er R e cordin g O per atio ns 2 Press > FF/ v or . FR/ V to select “Detail Menu,” and then press N PLAY/ENTER. 3 Press > FF/ v or . FR/ V to select “LIMITER,” and then press N PLAY/ ENTER. 4 Press > FF/ v or . FR/ V to select “ON,” and then press N PLAY/ ENTER. The LIMITER functio...
Page 46 - Recording via Other Devices
46 GB Recording via Other Devices Recording with an external microphone You can record from an external microphone. When an external microphone is connected, the built-in microphones and the input from the LINE IN jack become disabled. 1 Connect an external microphone to the m (microphone) jack when...
Page 49 - Other Playback Operations; Changing the Playback Method; Selecting the level meter display
49 GB Oth er P la y back Oper atio n s Other Playback Operations Changing the Playback Method Changing the display during playback You can change the display during playback between the file information display and the level meter display. • File information display A track recorded using the PCM re...
Page 50 - To display file information
50 GB 3 Press > FF/ v or . FR/ V to select “Level Meter in Playback,” and then press N PLAY/ENTER. 4 Press > FF/ v or . FR/ V to select “ON,” and then press N PLAY/ ENTER. The Level Meter in Playback function is set to “OFF” when you purchase the PCM recorder. 5 Press x STOP to exit the menu m...
Page 51 - or
51 GB Oth er P la y back Oper atio n s • When “Audio Out” in the menu is set to “LINE OUT,” do not connect headphones; the playback sound from the headphones will be very loud. Quickly locating the point you wish to start playback – Easy Search When “Easy Search” is set to “ON” in the menu, you can ...
Page 52 - Playing back repeatedly
52 GB 1 Press MENU to enter the menu mode when the PCM recorder is in the stop or playback mode. The menu mode window will be displayed. 2 Press > FF/ v or . FR/ V to select “Play Mode,” and then press N PLAY/ ENTER. 3 Press > FF/ v or . FR/ V to select “1,” “ ,” “ALL,” “ 1,” “ ,” or “ ALL ,” ...
Page 53 - Playing back a track repeatedly
53 GB Oth er P la y back Oper atio n s Playing back a track repeatedly During playback, press and hold N PLAY/ ENTER until “ 1” appears. The selected track will be played back repeatedly.To resume normal playback, press N PLAY/ENTER again. Playing back a specified section repeatedly – A-B Repeat 1 D...
Page 54 - Changing the Playback Sounds
54 GB Changing the Playback Sounds Adjusting the playback speed – the DPC function When you slide the DPC (SPEED CTRL) (Digital Pitch Speed Control) switch to “ON,” you can adjust the playback speed between +100% and –75% of normal speed in the menu.The track is played back in natural tones thanks t...
Page 55 - To resume normal playback
55 GB Oth er P la y back Oper atio n s 5 Press N PLAY/ENTER to execute the playback speed. 6 Press x STOP to exit the menu mode. 7 Press N PLAY/ENTER to start playback. Tracks are played back at the selected playback speed. To resume normal playback Slide the DPC (SPEED CTRL) switch to “OFF.” Adjust...
Page 58 - Playback via Other Devices
58 GB Playback via Other Devices Recording with other equipment You can record the sound of the PCM recorder with other equipment.Before you start recording, we recommend you to make a trial recording first. 1 Connect the i /LINE OUT (headphone/ line output) jack of the PCM recorder to the audio inp...
Page 60 - Editing Tracks; Adding a Mark to a Track; Using a track mark; Adding a track mark; The; Using the remote commander
60 GB Editing Tracks Adding a Mark to a Track Using a track mark Adding a track mark You can add a track mark at a point at which you would like to divide a track later or locate during playback.You can add a maximum of 98 track marks to each track. During recording, playback, or pausing, press the ...
Page 61 - Deleting a track mark
61 GB Editing T ra cks Locating a track mark and starting playback at the track mark In the stop mode, press > FF/ v or . FR/ V . When the (track mark) icon flashes once, press N PLAY/ENTER Dividing a track at all the track mark positions Select “Divide All T-MARK(Track Marks)” from the Divide me...
Page 64 - Protecting a track; To release protection
64 GB Protecting a track To prevent a track from being accidentally deleted or edited, you can protect an important track. A protected track is marked with the (protect) indicator and is regarded as a read-only file you cannot delete or edit. 1 Display the track which you would like to protect. 2 Pr...
Page 65 - Arranging Tracks
65 GB Editing T ra cks Arranging Tracks Copying a track to the other memory You can copy tracks between the built-in memory and a memory card, which is useful in saving a backup. Before starting the operation, insert a memory card to be used for copying into the memory card slot. P Notes • You canno...
Page 66 - To cancel the copy operation; Dividing a track into two
66 GB Memory Select Folder” is displayed and the folder selection window is displayed. 4 Press > FF/ v or . FR/ V to select the folder that you want to copy the track into, and then press N PLAY/ENTER. “Copying...” is displayed and the track is copied to the end in the destination folder. A file ...
Page 69 - To play a divided track; Deleting all tracks in a folder
69 GB Editing T ra cks 3 Press > FF/ v or . FR/ V to select “Execute,” and then press N PLAY/ ENTER. “Dividing...” appears, and the track is divided at all the track mark positions. The tracks divided from a single track will be suffixed with a sequential number (_1 and so on). 4 Press x STOP to ...
Page 70 - To cancel deleting
70 GB 1 Select the folder containing the tracks you want to delete when the PCM recorder is in the stop mode. 2 Press MENU to enter the menu mode. The menu mode window will be displayed. 3 Press > FF/ v or . FR/ V to select “Delete,” and then press N PLAY/ ENTER. The Delete menu is displayed. 4 P...
Page 71 - About the Menu Function; Making Settings for the Menu; To return to the previous window
71 GB A b out the Me nu Functi o n About the Menu Function Making Settings for the Menu 1 Press MENU to enter the menu mode. The menu mode window will be displayed. 2 Press > FF/ v or . FR/ V to select the menu item for which you want to make setting, and then press N PLAY/ ENTER. 3 Press > FF...
Page 72 - Menu settings
72 GB Menu settings Menu items Settings Operation mode( a : the setting can be made/ — : the setting cannot be made) Stopmode Playback mode Recording mode Divide a — — Divide Current Position Execute, Cancel a — — Divide All T-MARK(Track Marks) Execute, Cancel a — — Delete a — — Delete All Execute, ...
Page 75 - Protect; Memory
75 GB A b out the Me nu Functi o n Protect Protect the selected track to prevent the track from being deleted or divided.Execute: Protect the selected track. If you specify a track which has already been protected, cancel the protection. Cancel * : Protection or cancel protection is not executed. 64...
Page 76 - REC Mode
76 GB REC Mode Set the sampling frequency and quantifying bit number for recording: LPCM 22.05kHz/16bit LPCM 44.10kHz/16bit * LPCM 44.10kHz/24bitLPCM 48.00kHz/16bitLPCM 48.00kHz/24bitLPCM 96.00kHz/16bitLPCM 96.00kHz/24bit MP3 44.10kHz/64kbps (for a long-time recording)MP3 44.10kHz/128kbpsMP3 44.10kH...
Page 77 - Effect; Key Control
77 GB A b out the Me nu Functi o n DPC(Speed Control) Set the DPC(Speed Control) function.You can adjust the playback speed between +100% and –75% of normal speed in the menu.You can set the speed by 5% for – from –75% to 0%, 10% for + between 0% and 100%.(–30% * ) 54 Effect Set the effect you want ...
Page 79 - Clock; LED
79 GB A b out the Me nu Functi o n Clock Set the clock by setting year, month, day, hour, and minute in sequence.(09y01m01d 0:00 * ) z Tip The clock is displayed in 24-hour system. 0:00 = midnight, 12:00 = noon 16 LED Turn the operation of ACCESS indicator, peak level indicators, z REC button, N PLA...
Page 80 - Backlight; Language; Battery Setting
80 GB Backlight Turn the backlight in the display window on or off.10 SEC*: The backlight in the display window lights up for approx. 10 seconds. 60 SEC: The backlight in the display window lights up for approx. 60 seconds. Always-ON: The backlight in the display window lights up always. OFF: The ba...
Page 81 - LIMITER; PRE REC
81 GB A b out the Me nu Functi o n LIMITER Set the input level automatically to prevent the sound distortion that may occur when a too loud sound is input in Manual recording.ON: The LIMITER function is activated. OFF * : The LIMITER function is cancelled. P Note This feature is effective only when ...
Page 82 - Audio Out; Plug In Power
82 GB Audio Out Set the output of the i /LINE OUT (headphone/line output) jack. Headphones * : You can use the jack as a headphone jack. Select this option to listen playback sound with the headphones (not supplied) or an external speaker. LINE OUT: You can use the jack as a line output jack. Select...
Page 83 - Utilizing Your Computer; Using the PCM recorder with Your Computer; When you are using Windows
83 GB Utilizin g Yo u r Com p u te r Utilizing Your Computer Using the PCM recorder with Your Computer When the PCM recorder is connected to your computer, it is recognized by the computer, and you can transfer data between them. Copying tracks from the PCM recorder to your computer to save them (pa...
Page 91 - Left-click “Safely remove USB
91 GB Utilizin g Yo u r Com p u te r Disconnecting the PCM Recorder from Your Computer Follow the procedures below; otherwise, data may be damaged. 1 Make sure that the PCM recorder is in the stop mode. 2 Perform the following operation on your computer. On the Windows screen, left-click the icon at...
Page 92 - Additional Information; Precautions; On noise
92 GB Additional Information Precautions On noise • Noise may be heard when the unit is placed near an AC power source, a fluorescent lamp or a mobile phone during recording or playback. • Operation and touch noises may be recorded when you press the button on the PCM recorder, touch the case, or ho...
Page 93 - On maintenance
93 GB A dditio n a l Info rmatio n • You may feel pain in your ears if you use the headphones when the ambient air is very dry. This is not because of a malfunction of the headphones, but because of static electricity accumulated in your body. You can reduce static electricity by wearing non-synthet...
Page 95 - Specifications; System requirements; Hardware environment:
95 GB A dditio n a l Info rmatio n Specifications System requirements Operating systems: – Windows Vista ® Ultimate Service Pack 1 or higher – Windows Vista ® Business Service Pack 1 or higher – Windows Vista ® Home Premium Service Pack 1 or higher – Windows Vista ® Home Basic Service Pack 1 or high...
Page 97 - General; Speaker
97 GB A dditio n a l Info rmatio n Signal-to-noise ratio (S/N) (Input from the LINE IN jack and output from LINE OUT jack when recording/playing back LPCM) 87 dB (1 kHz IHF-A) (for 24 bit) General Speaker Approx. 16 mm dia. Input/Output • Microphone jack (minijack, stereo), input for plug in power –...
Page 98 - Optional accessories
98 GB Optional accessories Stereo headphones MDR-7502, MDR-7509HD, MDR-EX300SL, MDR-EX500SL, MDR-V300Electret condenser microphone ECM-MS957Audio connecting cable RK-G129Rechargeable battery NH-AA-B2KBattery charger BCG-34HS2KCarrying case speaker CKS-M10Wind screen AD-PCM2Tripod VCT-PCM1 Your deale...
Page 99 - Maximum recording time; Recording modes
99 GB A dditio n a l Info rmatio n Maximum recording time * 5 * 6 The maximum recording time of all the folders is as follows (rounded figures by 5 minutes). Recording modes Built-in memory Memory card 4GB 1 GB 2 GB 4 GB 8 GB 16 GB LPCM 96.00kHz/24bit 1 hr. 50 min. 25 min. 55 min. 1 hr. 55 min. 3 hr...
Page 100 - Battery life
100 GB *5 When you are going to record continuously for a long time, you may have to replace the batteries with new ones in the midst of recording. For details on the battery life, see the next table. *6 The maximum recording time varies if you record tracks in mixed recording mode. Battery life * 1...
Page 101 - When using Sony NH-AA rechargeable batteries
101 GB A dditio n a l Info rmatio n When using Sony NH-AA rechargeable batteries *1 The battery life is measured in testing using methods proprietary to Sony. The battery life may shorten depending on how you operate the PCM recorder. *2 When playing back music through the internal speaker with the ...
Page 102 - Troubleshooting; Symptom
102 GB Troubleshooting Troubleshooting Before taking the PCM recorder for repair, check the following sections. Should any problem persist after you have made these checks, consult your nearest Sony dealer.Please note that recorded tracks may be deleted during service or repair work. Symptom Remedy ...
Page 108 - Error Messages; Error message
108 GB Error Messages Error message Cause/Remedy Low Battery Level • You cannot format the memory or delete all the files in a folder because of insufficient battery power. Prepare new batteries to replace the current ones. Change Battery • Batteries are exhausted. Replace the old LR6 (size AA) alka...
Page 112 - System Limitations
112 GB System Limitations There are some system limitations of the PCM recorder. Troubles as mentioned below are not malfunctions of the PCM recorder. Symptom Cause/Remedy You cannot record tracks up to the maximum recording time. • If you record tracks in a mixture of the recording modes, the recor...
Page 113 - Display Window; Display when stop or recording; Operation mode indicator
113 GB T ro u b le s h ooting Display Window Display when stop or recording Display when playback (without level meter display) Level meter display when playback A Operation mode indicator Displays the following, depending on the current operation mode : stop : playback : recording : recording stand...
Page 116 - Index; Adding TAKE or KEEP to a file name .. 62
116 GB Index A A-B Repeat ............................................. 53 AC power adaptor ................................... 14 Adding a track mark ............................... 60 Adding TAKE or KEEP to a file name .. 62 Adjusting the playback sound tones ....... 55 Adjusting the volume .........
Page 117 - Menu
117 GB Ind e x K KEEP ...................................................... 62 Key Control ............................................ 55 L LCF(Low Cut Filter) ............................... 43 Level meter display ................................. 49 LIMITER .........................................
Page 119 - Trademarks
119 GB Trademarks • “Memory Stick™,” , “Memory Stick™” and “Memory Stick Micro™” (M2™) are trademarks or registered trademarks of Sony Corporation. • “MagicGate™” is a trademark of Sony Corporation. • microSD and microSDHC logos are trademarks of SD-3C, LLC. • Microsoft, Windows, Windows Vista and W...


 Sony ICD-MX20
Manual
Sony ICD-MX20
Manual
 Sony ICD-P520
Manual
Sony ICD-P520
Manual
 Sony ICDPX370
User Manual
Sony ICDPX370
User Manual
 Sony ICDPX470
User Manual
Sony ICDPX470
User Manual
 Sony ICD-PX720
Manual
Sony ICD-PX720
Manual
 Sony ICD-PX820
Manual
Sony ICD-PX820
Manual
 Sony ICD-TX650
User Manual
Sony ICD-TX650
User Manual
 Sony ICD-UX200
Manual
Sony ICD-UX200
Manual
 Sony ICD-UX533
Manual
Sony ICD-UX533
Manual
 Sony ICDUX570BLK
User Manual
Sony ICDUX570BLK
User Manual
 Sony TCM-150
User Manual
Sony TCM-150
User Manual
 Sony TCM-400DV
User Manual
Sony TCM-400DV
User Manual
 Sony TCM-450DV
User Manual
Sony TCM-450DV
User Manual
 Sony ICD-PX333
Manual
Sony ICD-PX333
Manual
 Sony ICD-B500
Manual
Sony ICD-B500
Manual
 Sony ICD-SX712
Manual
Sony ICD-SX712
Manual