Indice pagina Index page Istruzioni per l’installazione 3 Instructions pour l’installation 10 Installazione ad incasso 4 Encastrement 11 Messa in servizio 5 Mise en service 12 Alcuni suggerimenti 8 Quelques suggestions 15 Manutenzione 9 Entretien 16 Index page Inhaltsverzeichnis Seite Installation i...
Page 3 - Installation; ELECTRICAL CONNECTION
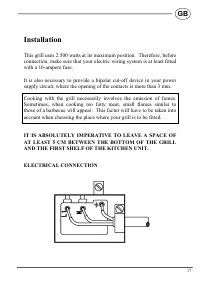
Installation This grill uses 2.500 watts at its maximum position. Therefore, beforeconnection, make sure that your electric wiring system is at least fittedwith a 16-ampere fuse. It is also necessary to provide a bipolar cut-off device in your powersupply circuit, where the opening of the contacts i...
Page 4 - Fitting
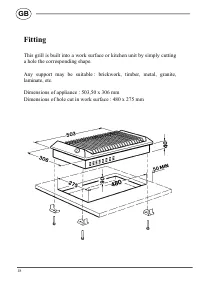
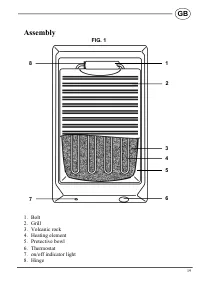
Fitting This grill is built into a work surface or kitchen unit by simply cuttinga hole the corresponding shape. Any support may be suitable : brickwork, timber, metal, granite,laminate, etc. Dimensions of appliance : 503,50 x 306 mmDimensions of hole cut in work surface : 480 x 275 mm 18 GB
Hinge : the « drainer » position The aluminium hinge which permits the turning of the elementduring maintenance is fitted with a stainless steel securing bolt.This piece runs to the right and secures the element, which isheld in the vertical position during the time necessary forcleaning. The applia...
Page 8 - Some suggestions
Some suggestions Before any utilization, preheat for 5 to 10 minutes in position 6. Position the knob according to the type of food to be cooked.These positions may vary in relation to the quantity used, and thepersonal taste of the consumer. THERMOSTAT POSITION PREPARATION Cooking Time Observations...
Page 9 - Maintenance; The heating element
Maintenance Before any maintenance, disconnect the appliance and let it cool. All the pieces can be maintained quickly : The grill : you can clean it easily when it is still warm. Proceed as for the rest of your dishes : a little detergent is enough. The heating element shall be cleaned with a damp ...