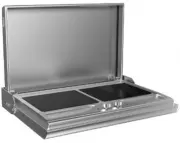
Page 4 - D E S C R I P T I O N O F T H E H O T P L A T E S
4 2 3 1 : S W I T C H F O R E L E C T R I C E L E M E N T S 1 2 / 3 : R E S I D U A L H E A T I N D I C A T O R S R A D I A N T E L E C T R I C H E A T I N G E L E M E N T S M O O T H G L A S S 7 5 0 W R A D I A N T E L E C T R I C H E A T I N G E L E M E N T U N D U L A T I N G G L A S S 7 5 0 ...
Page 5 - CONTENTS OF CARTON; BBQ WITH FIXING WALL BRACKET
5 CONTENTS OF CARTON ● UPPER SOCKET PUNCH ( TO USE AS TEMPLATE FOR DRILLING ) ● BBQ WITH FIXING WALL BRACKET ● INSTRUCTION MANUAL ● LOWER SOCKET PUNCH (TO USE AS TEMPLATE FOR DRILLING ) ● OIL DRAIN CUP ● RAZER SCRAPER FOR PLATES GLASS SUPPORT WALL FIXING BRACKET OIL DRAIN CUP POCKETS FOR OBJECTS
Page 6 - IMPORTANT SAFEGUARDS
6 IMPORTANT SAFEGUARDS a) Read all instructions. b) Do not touch hot surfaces. Use handles or knobs. c) To protect against electrical shock do not put immerse cord or plugs in water or other liquid. d) Close supervision is necessary when any appliance is used by or near children. e) Unplug from ...
Page 7 - INSTALLATION; TECHNICAL INSTRUCTIONS FOR INSTALLER
7 INSTALLATION INSTALLATION: transformations and maintenance below listed may only be carried out by a competent technician. A wrong installation may provoke damage to persons, animals or things, for which the manufacture can not be held reasonable for. After having cleared out all the packing c...
Page 8 - FIG A
8 INSTALLATION ● Use a suitable power drill. Drill 5 mm over the length of the plastic plug (See FIG 2 ) ● Clean out debris and dust from the holes. ● Insert the plastic plug into the wall with the help of a small hammer (See FIG 2) ● Separate the wall bracket from the BBQ by unscrewing the bolt...
Page 10 - ELECTRICAL CONNECTIONS & WARNINGS; ELECTRICAL CONNECTIONS; WARNINGS
ELECTRICAL CONNECTIONS & WARNINGS ELECTRICAL CONNECTIONS The electrical connections have to be done in accordance with all requirements and regulations of the county where the appliance has been sold. The appliance must be fed through a power point fitted with a switch with the appropriate pow...
Page 11 - USE
10 USE USE AND OPENING Lift the BBQ from the wall rotating it to 90 degrees until it reaches the working position at right angle to the wall. Now lift it a little higher to clear the wall bracket sides. Now push the BBQ towards the rear until it clicks into position slowly lowering the BBQ down in...
Page 12 - TAKING CARE OF YOUR BARBECUE; pour cold water onto a cooking zone without causing any damage.; PRECAUTIONS TO TAKE WITH YOUR BBQ
11 TAKING CARE OF YOUR BARBECUE ● Do not stand or place heavy weights on the BBQ in order to repair a light and do not drop a heavy object from above onto the ceramic top. ● It is resistant to heat and cold as well as extreme temperature change. You can pour cold water onto a cooking zone without ...
Page 13 - CLEANING INSTRUCTIONS FOR YOUR BBQ; ceramic glass
12 CLEANING INSTRUCTIONS FOR YOUR BBQ Each and every stain or deposit on your cooktop surface must be cleaned off quickly once the cooktop has cooled down. Exception: In the case of sugar deposits, remove all residues before the cooktop surface cools down. (Be careful not to burn yourself) - Impor...
Page 14 - Arisit Pty Limited; TECHNICAL ASSISTANCE AND SPARE PARTS
13 Before leaving the factory, this appliance has been carefully tested and verified by specialised and expert personnel to guarantee the best quality and performance. Any repairs or adjustments which may be subsequently required must be carried out by qualified personnel with care and attention F...
Page 15 - WARRANTY; Terms of Warranty & Important Notice
14 WARRANTY For all warranty claims please contact Arisit on 1300 815 589 Terms of Warranty & Important Notice TERMS OF WARRANTY Should a defect in this product due to either FAULTY MATERIAL or WORKMANSHIP become apparent within the period of 24 months from the date of original purchase of the...