Page 2 - “PLEASE READ THE INSTRUCTIONS BEFORE YOU INSTALL OR USE THIS; and modern plants without harming the nature.; “Conforms with the AEEE Regulations.”
2 Dear Customer, Thank you very much for your preference for Simfer products. Our objective is to ensure that you enjoy this product, manufactured environ-mentally-friendly with a total sense of quality in a precise working environment at our modern facilities, most efficiently. We recommend you to ...
Page 6 - Install “MAX. 6 A” fuse for the extractor
6 GB 24. For duct-out chimney hoods, use pipes with a diameter of 150 mm or 120 mm. You should minimize the ducting distance with minimum bends. 25. Make sure your children do not play with the product. Do not let young children operate the product. 26. If the power cord is damaged, the damaged cord...
Page 7 - INTRODUCTION AND TECHNICAL DRAWING OF THE CHIMNEY HOOD
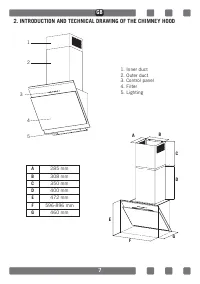
7 2. INTRODUCTION AND TECHNICAL DRAWING OF THE CHIMNEY HOOD 1 2 3 4 5 1. Inner duct2. Outer duct3. Control panel4. Filter 5. Lighting A B C D E F G A 285 mm B 308 mm C 350 mm D 400 mm E 472 mm F 596-896 mm G 460 mm GB
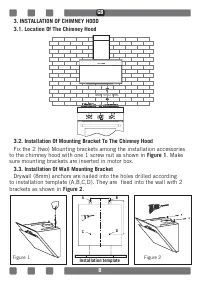
Page 8 - Installation Of Mounting Bracket To The Chimney Hood; to the chimney hood with one 1 screw nut as shown in; sure mounting brackets are inserted in motor box.; Installation Of Wall Mounting Bracket; Drywall (8mm) anchors are nailed into the holes drilled according; Figure 2; Figure 1; Installation template
8 3. INSTALLATION OF CHIMNEY HOOD 3.1. Location Of The Chimney Hood 3.2. Installation Of Mounting Bracket To The Chimney Hood Fix the 2 (two) Mounting brackets among the installation accessories to the chimney hood with one 1 screw nut as shown in Figure 1 . Make sure mounting brackets are inserted ...
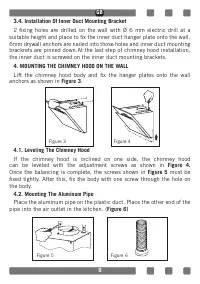
Page 9 - Installation Of Inner Duct Mounting Bracket; fixing holes are drilled on the wall with Ø 6 mm electric drill at a; MOUNTING THE CHIMNEY HOOD ON THE WALL; Lift the chimney hood body and fix the hanger plates onto the wall; Figure 3; Figure 4
9 3.4. Installation Of Inner Duct Mounting Bracket 2 fixing holes are drilled on the wall with Ø 6 mm electric drill at a suitable height and place to fix the inner duct hanger plate onto the wall. 6mm drywall anchors are nailed into those holes and inner duct mounting brackrets are pinned down.At t...
Page 10 - When the product operates for a certain time, the aluminum filters; Figure 7
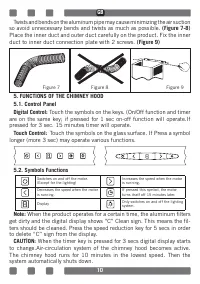
10 Twists and bends on the aluminum pipe may cause minimizing the air suction so avoid unnecessary bends and twists as much as possible. (Figure 7-8) Place the inner duct and outer duct carefully on the product. Fix the inner duct to inner duct connection plate with 2 screws. (Figure 9) 5. FUNCTIONS...
Page 11 - • Automatic Shutdown:
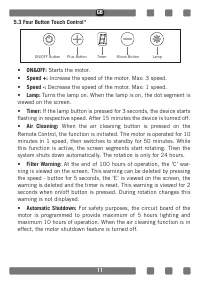
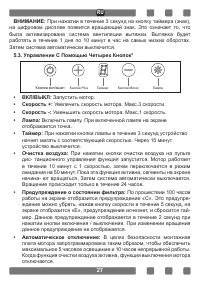
11 5.3 Four Button Touch Control* • ON&OFF: Starts the motor. • Speed +: Increase the speed of the motor. Max: 3 speed. • Speed -: Decrease the speed of the motor. Max: 1 speed. • Lamp: Turns the lamp on. When the lamp is on, the dot segment is viewed on the screen. • Timer: If the lamp button i...
Page 12 - • Cycle Adjustment Button:
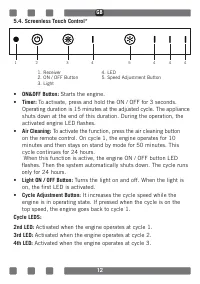
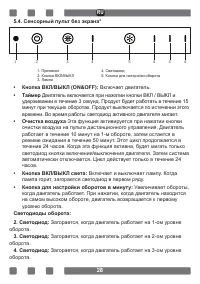
12 GB 5.4. Screenless Touch Control* • ON&OFF Button: Starts the engine. • Timer: To activate, press and hold the ON / OFF for 3 seconds. Operating duration is 15 minutes at the adjusted cycle. The appliance shuts down at the end of this duration. During the operation, the activated engine LED f...
Page 13 - OPERATING THE CHIMNEY HOOD; Chimney hood is used in ducted and non-ducted kitchens.
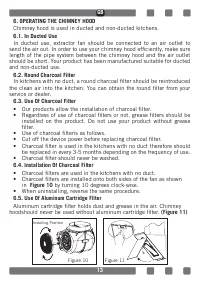
13 GB 6. OPERATING THE CHIMNEY HOOD Chimney hood is used in ducted and non-ducted kitchens. 6.1. In Ducted Use In ducted use, extractor fan should be connected to an air outlet to send the air out. In order to use your chimney hood efficiently, make sure length of the pipe system between the chimney...
Page 14 - Metal filter should be cleaned once a month with hot soapy water
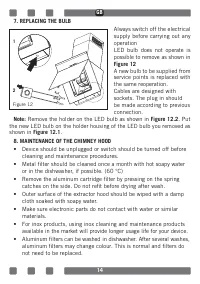
14 GB 7. REPLACING THE BULB Always switch off the electrical supply before carrying out any operationLED bulb does not operate is possible to remove as shown in Figure 12 A new bulb to be supplied from service points is replaced with the same reoperation.Cables are designed with sockets. The plug in...
Page 15 - WARNING; : When used with devices which use fuel (heaters working with; Efficient Use Of Chimney Hood
15 GB WARNING : When used with devices which use fuel (heaters working with gas, diesel fuel, coal or firewood, water heaters, etc) and the air in the environment; should be used cautiously. The chimney hood sending the air out in the environment may affect the burning adversely. This warning is not...
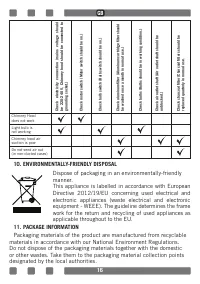
Page 16 - PACKAGE INFORMATION
16 GB 10. ENVIRONMENTALLY-FRIENDLY DISPOSAL Dispose of packaging in an environmentally-friendly manner. This appliance is labelled in accordance with European Directive 2012/19/EU concerning used electrical and electronic appliances (waste electrical and electronic equipment - WEEE). The guideline d...
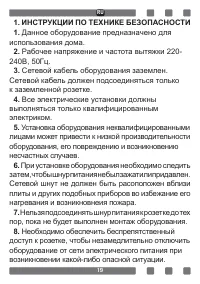
Page 22 - В целях безопасности в отношении
22 26. Следите за тем, чтобы дети не играли с оборудованием. Не позволяйте маленьким детям пользоваться оборудованием. 27. В случае повреждения шнура питания, во избежание опасной ситуации, шнур должен быть заменен на новый производителем оборудования, сервисным агенством или персоналом с надлежащей...
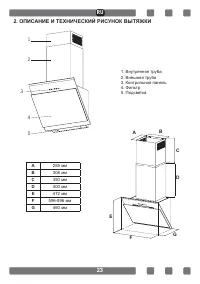
Page 23 - ОПИСАНИЕ И ТЕХНИЧЕСКИЙ РИСУНОК ВЫТЯЖКИ
23 2. ОПИСАНИЕ И ТЕХНИЧЕСКИЙ РИСУНОК ВЫТЯЖКИ 1 2 3 4 5 1. Внутренняя труба 2. Внешняя труба 3. Контрольная панель 4. Фильтр 5. Подсветка A B C D E F G A 285 мм B 308 мм C 350 мм D 400 мм E 472 мм F 596-896 мм G 460 мм RU
Page 24 - Рисунке 1; , прикрутите их с помощью 1; Рисунке 2; Шаблон монтажа
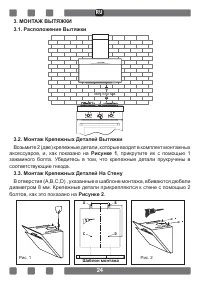
24 3. МОНТАЖ ВЫТЯЖКИ3.1. Расположение Вытяжки 3.2. Монтаж Крепежных Деталей Вытяжки Возьмите 2 (две) крепежные детали, которые входят в комплект монтажных аксессуаров, и, как показано на Рисунке 1 , прикрутите их с помощью 1 зажминого болта. Убедитесь в том, что крепежные детали прукручены в соответ...
Page 26 - Цифровое управление:
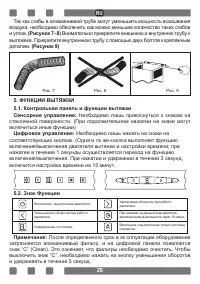
26 Так как сгибы в алюминиевой трубе могут уменьшить мощность всасывания воздуха, необходимо обеспечить как можно меньшее количество таких сгибов и углов. (Рисунок 7- 8) Внимательно прикрепите внешнюю и внутренню трубу к вытяжеке. Прикрепите внутреннюю трубу с помощью двух болтов к крепежным деталям...
Page 29 - ИСПОЛЬЗОВАНИЕ ВЫТЯЖКИ
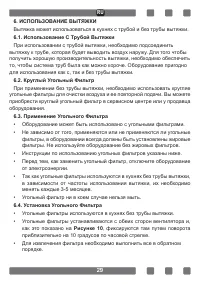
29 6. ИСПОЛЬЗОВАНИЕ ВЫТЯЖКИ Вытяжка может использоваться в кухнях с трубой и без трубы вытяжки. 6.1. Использование С Трубой Вытяжки При использовании с трубой вытяжки, необходимо подсоединить вытяжку к трубе, которая будет выводить воздух наружу. Для того чтобы получить хорошую производительность вы...
Page 30 - Применение Алюминиевого Рамочного Фильтра
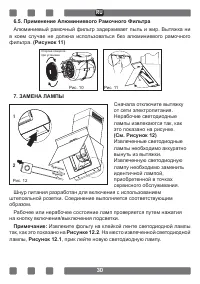
30 6.5. Применение Алюминиевого Рамочного Фильтра Алюминиевый рамочный фильтр задерживает пыль и жир. Вытяжка ни в коем случае не должна использоваться без алюминиевого рамочного фильтра. (Рисунок 11) 7. ЗАМЕНА ЛАМПЫ Сначала отключите вытяжку от сети электропитания. Нерабочие светодиодные лампы извл...
Page 32 - Сервисное обслуживание и запасные детали
32 9. ЕСЛИ ВЫТЯЖКА НЕ РАБОТАЕТ; Прежде чем связаться с сервисным центром проверьте, подключен ли шнур питания к электросети, а также состояние электрической сети в помещении; не предпринимайте никаких действий, которые могут повредить оборудование. Сервисное обслуживание и запасные детали • Вы может...