Page 3 - Dear Customer; We are pleased that you have chosen a Schulthess dryer.
3 Dear Customer We are pleased that you have chosen a Schulthess dryer. Your new dryer is the result of many years of development work. The highest quality requirements, both in development and manufacture, guarantee along lifetime.Its design meets all the demands of modern laundry care and offers y...
Page 4 - Contents
4 Contents Safety and safety measures . . . . . . . . . . . . . . . . . . . . . . . . . . . . . . . . . . . . . . . . . . . . . . . . . 6 Disposal . . . . . . . . . . . . . . . . . . . . . . . . . . . . . . . . . . . . . . . . . . . . . . . . . . . . . . . . . . . . . . . . . . . 10 Tips for drying ...
Page 6 - Safety and safety measures; Use in accordance
6 Safety and safety measures The enclosed documents contain important information on the instal- lation, use and safety of the dryer. Keep the documents safe for other users or subsequent owners. ► Read the instructions carefully before operating the machine. ► Keep the instructions near the machine...
Page 7 - Do not grip the appliance on; Warning
7 ► Always unplug the machine from the power source before carrying out maintenance work. ► If the machine is not needed for a longer period of time, disconnect it from the power supply. Warning Risk of fire! Risk of poisoning! Damage to goods and equipment! The device contains the environ- mentally...
Page 9 - Observe when drying
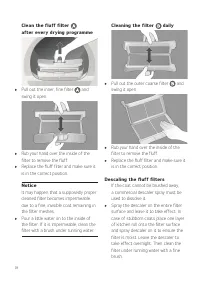
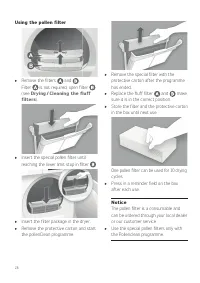
9 Observe when drying The fluff filters must be inserted when operating this machine. ► Never operate the machine with damaged fluff filters. ► Keep the area surrounding the dryer free of dust and fluff. ► The fluff filters must be cleaned regularly. Fluff may compromise and destroy the heat exchang...
Page 10 - Tips for drying; Sorting the laundry; Dry at normal temperature; Wool Finish; only; Notice; Disposal; Packaging from your new machine; or ask your local
10 Tips for drying Sorting the laundry Follow the care symbols in the fabrics.To achieve even drying results, sort the laundry by fabric type and desired level of dryness. Dry at normal temperature Dry at low temperature Do not tumble dry Dry wool or textiles containing wool with the special program...
Page 11 - ) and allow to finish; Time drying; programmes for; Express; or a; Timed drying; Environmentally; You should also spin easy care laundry.; Do not exceed the maximum load.; Observe before first use
11 Preparing the laundry ► Do up all zips, hooks and eyes. ► Button up duvet covers and pillowcases. Tie together loose belts, apron strings etc. Drying the laundry ► Remove easy care laundry from the dryer in a slightly damp state if possi-ble ( Slightly dry ) and allow to finish drying in the air....
Page 12 - Machine description
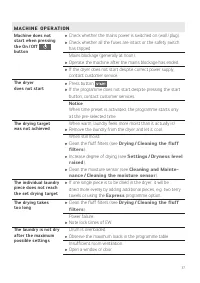
12 Loading door Cooling grid Machine description Control and display area(Illustration: Front operating panel)
Page 13 - Display and buttons
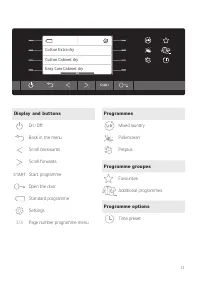
13 1/3 Easy Care Cabinet dry Cotton Cabinet dry Cotton Extra dry 1/3 Display and buttons On / Off Back in the menu Scroll backwards Scroll forwards Start programme Open the door Standard programme Settings 1/3 Page number programme menu Programmes Mixed laundry Pollenclean Petplus Programme groupes ...
Page 14 - Drying; Preparing the appliance; Switch on the power supply.; Turn on machine; Opening the door; Press button; Child lock active; See; Selecting programme; Select programme options
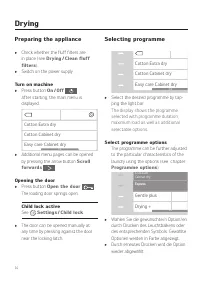
14 Drying Preparing the appliance ► Check whether the fluff filters are in place (see Drying / Clean fluff filters ). ► Switch on the power supply. Turn on machine ► Press button On / Off . After starting, the main menu is displayed. 1/3 Easy care Cabinet dry Cotton Cabinet dry Cotton Extra dry ► Ad...
Page 15 - Starting the programme; Skipping to the next; Forward; Cancel
15 Adding laundry ► Make sure that there is no foreign body in the drum and the detergent drawer (coins, nails, paper clips, etc.). ► Distribute the laundry evenly in the drum. ► Mix large and small laundry items. Closing the door ► Close the door by pushing it until the lock audibly engages. ► Ensu...
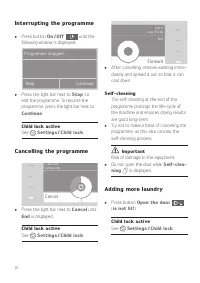
Page 16 - Interrupting the programme; Cancelling the programme; Important; Adding more laundry
16 Interrupting the programme ► Press button On / Off until the following window is displayed: Programme stopped Stop Continue ► Press the light bar next to Stop , to end the programme. To resume the programme, press the light bar next to Continue . Child lock active See Settings / Child lock . Canc...
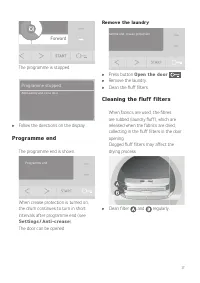
Page 17 - Programme end; Remove the laundry; Cleaning the fluff filters
17 Cotton Cabinet dry Cancel Forward Drying Gentle 0:32 h max. 8.0 kg The programme is stopped. Programme stopped Add laundry and close door. ► Follow the directions on the display. Programme end The programme end is shown. Programme end 0:01 h max. 8.0 kg When crease protection is turned on, the dr...
Page 19 - Switching off the machine
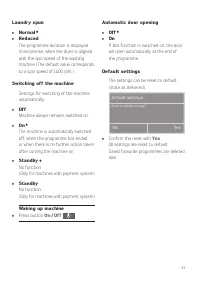
19 Notice ► Never operate the machine with damaged fluff filters. Fluff filters are consumables and replacements can be ordered from our customer service department. Switching off the machine ► Press button On / Off until the display turns off. ► Unplug the machine, when not used for longer periods ...
Page 20 - Programme survey; Most efficient programme for cotton textiles; Cotton and linen
20 Programme survey Always check the care symbols on the fabrics h:min = Duration / rpm = Spin speeds / kWh = Power consumption (approximate values) Most efficient programme for cotton textiles according to regulation (EU) no. 932 / 2012 The following standard programme (marked with ) is suitable fo...
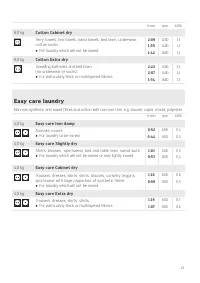
Page 21 - Easy care laundry
21 h:min rpm kWh 8,0 kg Cotton Cabinet dry Terry towels, tea towels, hand towels, bed linen, underwear, cotton socks ► For laundry which will not be ironed 2:09 1200 1,3 1:55 1400 1,2 1:42 1600 1,1 8,0 kg Cotton Extra dry Towelling bathrobs and bed linen(no underwear or socks) ► For particularly thi...
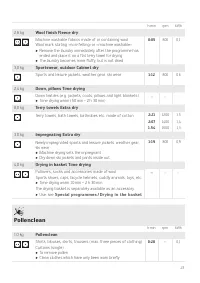
Page 23 - Pollenclean
23 h:min rpm kWh 2,6 kg Wool finish Fleece dry Machine washable fabrics made of or containing wool Wool mark stating «non-felting»or «machine washable» ► Remove the laundry immediately after the programme has ended and place it on a flat terry towel for drying ► The laundry becomes more fluffy, but ...
Page 24 - Special programmes; Drying in the basket; for drying shoes and accessories; Insert; for holding laundry items; Insert the basket; Lean the handle against the top.; The drum has to be empty!
24 Special programmes Pressing the symbol button the menu of the respective programme group is called up. Drying in the basket Notice You can purchase the drying basket as an accessory.at your specialist retailer or through our customer services team. ► Drying basket for delicate laundry items and s...
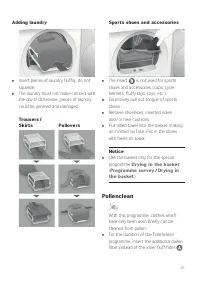
Page 25 - The insert
25 Adding laundry ► Insert pieces of laundry fluffily, do not squeeze. ► The laundry must not make contact with the drum! Otherwise, pieces of laundry could be jammed and damaged. Trousers / Skirts Pullovers Sports shoes and accessories ► The insert is not used for sports shoes and accessories (caps...
Page 27 - Time preset; is not being; Start menu selection; ites; Mixed laundry
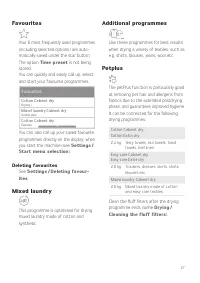
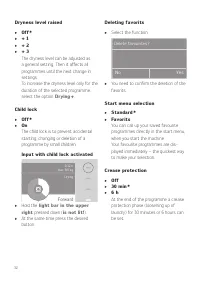
27 Favourites Your 6 most frequently used programmes (including selected options) are auto-matically saved under the star button.The option Time preset is not being stored.You can quickly and easily call up, select and start your favourite programmes. 1/2 Cotton Cabinet dry Drying + Mixed laundry Ca...
Page 28 - Programme options
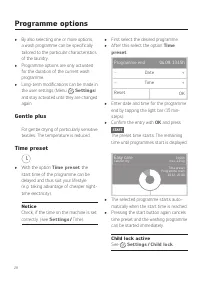
28 Programme options ► By also selecting one or more options, a wash programme can be specifically tailored to the particular characteristics of the laundry. ► Programme options are only activated for the duration of the current wash programme. ► Long-term modifications can be made in the user setti...
Page 29 - must be; tings / Dryness level increased; Time
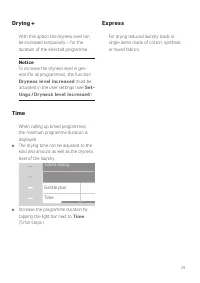
29 Drying + With this option the dryness level can be increased temporarily – for the duration of the selected programme. Notice To increase the dryness level in gen-eral (for all programmes), the function Dryness level increased must be activated in the user settings (see Set- tings / Dryness level...
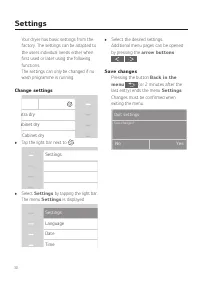
Page 30 - Settings; Change settings; Save changes
30 Settings Your dryer has basic settings from the factory. The settings can be adapted to the users individual needs either when first used or later using the following functions.The settings can only be changed if no wash programme is running. Change settings 1/3 Easy care Cabinet dry Cotone Cabin...
Page 31 - Menu Settings; arrow buttons; The button tone can be turned off.
31 Menu Settings * = Default setting Language ► English * ► ..... Additional menu pages can be opened by pressing the arrow buttons . ► Select the desired language by tapping the light bar. Date (Default setting) The date can be set by tapping the light bar (hold for fast forward). Confirm entry wit...
Page 32 - Hold the; light bar in the upper; Select the function.
32 Dryness level raised ► Off * ► + 1 ► + 2 ► + 3 The dryness level can be adjusted as a general setting. Then it affects all programmes until the next change in settings.To increase the dryness level only for the duration of the selected programme, select the option Drying + . Child lock ► Off * ► ...
Page 33 - Confirm the reset with
33 Laundry spun ► Normal * ► Reduced The programme duration is displayed more precise, when the dryer is aligned with the spin speed of the washing machine (The default value corresponds to a spin speed of 1400 rpm.). Switching off the machine Settings for switching of the machine automatically: ► O...
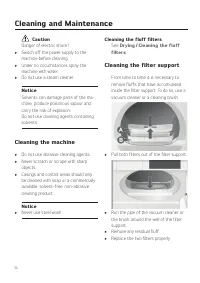
Page 34 - Cleaning and Maintenance; Caution; Cleaning the machine; Cleaning the filter support
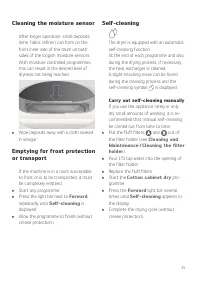
34 Cleaning and Maintenance Caution Danger of electric shock! ► Switch off the power supply to the machine before cleaning. ► Under no circumstances spray the machine with water. ► Do not use a steam cleaner. Notice Solvents can damage parts of the ma-chine, produce poisonous vapour andcarry the ris...
Page 36 - Problems
36 Problems Warning Improper repairs can result in severe accidents, damages and operation malfunctions! Do not make any changes, manipulations or attempt repairs using tools such as screw-drivers, etc. E R R O R M E S S A G E S O N T H E D I S P L AY Child lock active ► Hold the bar in the upper ri...
Page 37 - M A C H I N E O P E R AT I O N
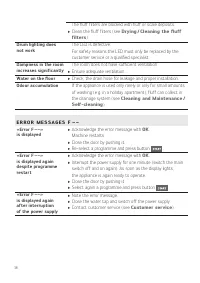
37 M A C H I N E O P E R AT I O N Machine does not start when pressing the On / Off button ► Check whether the mains power is switched on (wall / plug). ► Check whether all the fuses are intact or the safety switch has tripped.Mains blockage (generally at noon). ► Operate the machine after the mains...
Page 38 - E R R O R M E S S A G E S F – –
38 The fluff filters are blocked with fluff or scale deposits. ► Clean the fluff filters (see Drying / Cleaning the fluff filters ). Drum lighting does not work The LED is defective. For safety reasons the LED must only be replaced by the customer service or a qualified specialist. Dampness in the r...
Page 39 - Technical specifications; Product data sheet for household washing dryer
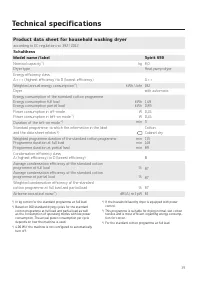
39 Technical specifications Product data sheet for household washing dryer according to EC regulation no. 392 / 2012 SchulthessModel name / label Spirit 650 Nominal capacity 1 ) kg 8,0 Dryer type Heat pump dryer Energy efficiency class A +++ (highest efficiency) to D (lowest efficiency) A ++ Weighte...
Page 41 - Notes
Page 44 - Brief instruction; Open the door
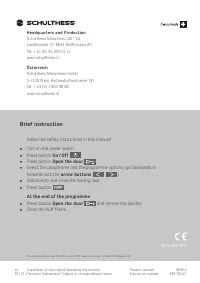
en Translation of the original Operating Instructions 0 7 / 2 1 Printed in Switzerland / Subject to change without notice Product number 8650.2 Instruction number 639 716.A C Brief instruction Follow the safety instructions in this manual! ► Turn on the power switch. ► Press button On / Off . ► Pres...