Page 2 - Contents
2 English C ontents Contents Contents Important safety instructions 3 Introducing your new oven 15 Overview 15What’s included with your oven 15 Before you begin 15 Energy saving tips 15 Operating the oven 16 The oven control panel 16 Control panel display modes 17 Setting the clock 17 Setting the ki...
Page 3 - SAVE THESE INSTRUCTIONS; CAUTION; Important safety instructions; This guide does not cover all possible; Important safety symbols and precautions; What the icons and signs in this user manual mean:
English 3 Impor tant saf ety ins truc tions SAVE THESE INSTRUCTIONS SAVE THESE INSTRUCTIONS CAUTION To reduce the risk of fire, explosion, electric shock, or personal injury when using your oven, follow these basic safety precautions. Do NOT attempt.Do NOT disassemble.Do NOT touch.Follow directions ...
Page 5 - Use only dry potholders.
English 5 Impor tant saf ety ins truc tions SAVE THESE INSTRUCTIONS SAVE THESE INSTRUCTIONS • Use only dry potholders. Placing moist or damp potholders on hot surfaces may result in burns from steam. Do not let the potholder touch hot heating elements. Do not use a towel or other bulky cloth instead...
Page 6 - WARNING
6 English Impor tant saf ety ins truc tions Important safety instructions SAVE THESE INSTRUCTIONS SAVE THESE INSTRUCTIONS WARNING • Ensure that the appliance is switched off before replacing the lamp to avoid the possibility of electric shock. CHILD SAFETY WARNING • This appliance is not intended fo...
Page 9 - CRITICAL INSTALLATION WARNINGS
English 9 Impor tant saf ety ins truc tions SAVE THESE INSTRUCTIONS SAVE THESE INSTRUCTIONS • Do not cut or remove the ground prong from the power cord under any circumstances. • Connect the oven to a circuit that provides the correct amperage. • Do not install this appliance in a humid, oily or dus...
Page 10 - Failing to do so may result in electric shock or fire.
10 English Impor tant saf ety ins truc tions Important safety instructions SAVE THESE INSTRUCTIONS SAVE THESE INSTRUCTIONS • Always observe safety precautions when using your oven. Never try to repair the oven on your own - there is dangerous voltage inside. If the oven needs to be repaired, contact...
Page 12 - USAGE CAUTIONS
12 English Impor tant saf ety ins truc tions Important safety instructions SAVE THESE INSTRUCTIONS SAVE THESE INSTRUCTIONS USAGE CAUTIONS CAUTION • If the surface is cracked, turn the appliance off. • Failing to do so may result in electric shock. • Dishes and containers can become hot. Handle with ...
Page 14 - CRITICAL CLEANING WARNINGS
14 English Impor tant saf ety ins truc tions Important safety instructions SAVE THESE INSTRUCTIONS SAVE THESE INSTRUCTIONS CRITICAL CLEANING WARNINGS CAUTION • Do not clean the appliance by spraying water directly on to it. • Do not use benzene, thinner, or alcohol to clean the appliance. • This may...
Page 15 - Before you begin; Energy saving tips; Introducing your new oven; Overview
English 15 Intr oducing y our ne w ov en / Be for e you begin Before you begin Clean the oven thoroughly before using it for the first time. Then, remove the accessories, set the oven to Bake, and then run the oven at 400 °F for 1 hour. There will be a distinctive odor. This is normal.Ensure your ki...
Page 16 - Operating the oven; The oven control panel
16 English Oper ating the o v en Operating the oven Operating the oven The oven control panel READ THE INSTRUCTIONS CAREFULLY BEFORE USING THE OVEN. For satisfactory use of your oven, become familiar with the various features and functions of the oven as described below. Detailed instructions for ea...
Page 17 - Control panel display modes
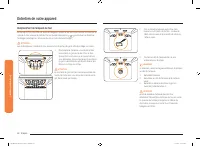
English 17 Oper ating the o v en Control panel display modes Selecting the upper or lower oven To change between the upper and lower oven, touch the UPPER OVEN or LOWER OVEN area. Note that each oven has its own set of control buttons. The button sets are identical and perform the same functions. Se...
Page 18 - Control Lockout; Timed Cooking
18 English Oper ating the o v en Operating the oven Control Lockout Control Lockout lets you lock the buttons on the touch pad so they cannot be activated accidently. Control Lock also locks both oven doors so they cannot be opened. You can only activate Control Lockout when the oven is in standby m...
Page 19 - Delay Start
English 19 Oper ating the o v en Delay Start With Delay Start, the oven’s timer turns the oven on and off at times you select in advance. • You can use Delay Start only with the Bake cooking and Self Clean operation. • You can set the oven for a delay start before setting other cooking operations. •...
Page 20 - Using the oven racks
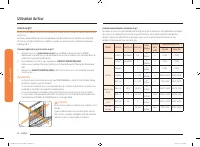
20 English Oper ating the o v en Operating the oven Using the oven racks Oven rack positions 1 2 3 4 5 6 Recommended rack position for cooking TYPE OF FOOD RACK POSITION Broiling hamburgers 6 Broiling meat or small cuts of poultry, fish 3-5 Bundt cakes, pound cakes, frozen pies, casseroles 4 or 3 An...
Page 21 - Baking
English 21 Oper ating the o v en Before using the racks Each rack has stops that need to be placed correctly on the supports. These stops will keep the rack from coming completely out. Removing the racks 1. Pull the rack straight out until it stops. 2. Lift up the front of the rack, and then pull it...
Page 22 - Broiling
22 English Oper ating the o v en Operating the oven Broiling Broiling is a method of cooking tender cuts of meat by direct heat under the broil element of the oven.The high heat cooks quickly and gives a rich, brown outer appearance. Broil mode is best for meat, fish, and poultry up to 1" thick....
Page 23 - Using Bread Proof; Using Settings
English 23 Oper ating the o v en Using Bread Proof Bread Proof provides an optimal temperature for the bread proofing process and therefore does not require a temperature adjustment. For the best results, always start the Bread Proof option with a cool oven. 1. Touch Bread Proof . 2. Touch START/SET...
Page 25 - Using the Sabbath feature
English 25 Oper ating the o v en Sound On/Off Using Sound On/Off, you can set the oven controls to operate silently. How to turn the sound on or off 1. Touch Settings , and then 5 on the number pad . 2. Touch 1 (On) or 2 (Off) on the number pad . 3. Touch START/SET to save the changes. Demo mode Thi...
Page 26 - Using Smart Control
26 English Oper ating the o v en Operating the oven Do not to attempt to activate any other program feature except Bake while the Sabbath feature is active. ONLY the following key pads will function correctly with the Sabbath feature on: Number , Bake , START/SET and OVEN OFF . All other keys should...
Page 27 - Maintaining your appliance
English 27 Maint aining y our applianc e Maintaining your appliance Self-cleaning This self-cleaning oven uses high temperatures (well above cooking temperatures) to burn off leftover grease and residue completely or reduce them to a finely powdered ash that you can wipe away with a damp cloth. CAUT...
Page 30 - Care and cleaning of the oven
30 English Maint aining y our applianc e Maintaining your appliance After a steam-cleaning cycle • Take care when opening the door after a steam-cleaning procedure has ended. The water on the bottom is hot. • Open the oven door and remove the remaining water with a sponge. Do not leave the residual ...
Page 32 - Removing the oven doors
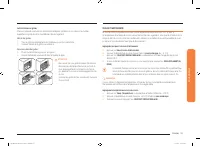
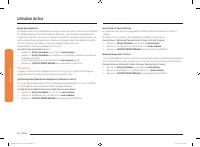
32 English Maint aining y our applianc e Maintaining your appliance Removing the oven doors CAUTION • The door is very heavy. Be careful when removing and lifting the door. • Do not lift the door by the handle. Use two hands to remove an oven door. For double ovens, repeat the process for each door....
Page 33 - Replacing the oven doors
English 33 Maint aining y our applianc e Replacing the oven doors CAUTION The door is very heavy. You may need help lifting the door high enough to slide it into the hinge slots. Do not lift the door by the handle. A A. Slot in the oven cavity for the door hinge lock 1. Using two hands, grasp the si...
Page 34 - Changing the oven light
34 English Maint aining y our applianc e Maintaining your appliance 2. While holding the glass cover with one hand, insert a flat-sharp tool such as a table knife between the glass and the frame to remove the glass cover. 3. Turn the bulb cap counterclockwise to remove. NOTE If necessary, remove the...
Page 35 - Troubleshooting
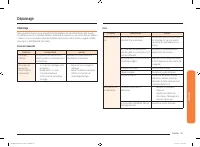
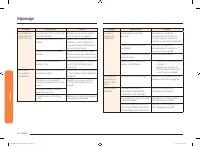
English 35 Tr ouble shoo ting OVEN Problem Possible cause Solution The oven will not turn on. The oven is not completely plugged into the electrical outlet. Make sure the electrical plug is inserted into a live, properly grounded outlet. A fuse in your home may be blown or a circuit breaker may have...
Page 38 - Information codes
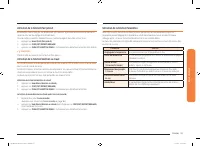
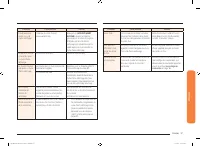
38 English Tr ouble shoo ting Troubleshooting Information codes OVEN Displayed Code Possible cause Solution C-d0 This code occurs if the control key is short for 1 minute. Clean the buttons and make sure there is no water on/around them. Turn off the oven and try again. If the problem continues, con...
Page 40 - Warranty
40 English W arranty Warranty EXCLUSION OF IMPLIED WARRANTIES IMPLIED WARRANTIES, INCLUDING THE IMPLIED WARRANTIES OF MERCHANTABILITY OR FITNESS FOR A PARTICULAR PURPOSE, ARE LIMITED TO ONE YEAR OR THE SHORTEST PERIOD ALLOWED BY LAW. Some states do not allow limitations on how long an implied warran...
Page 42 - Open Source Announcement; Memo
42 English W arranty Warranty Open Source Announcement The software included in this product contains open source software. You may obtain the complete corresponding source code for a period of three years after the last shipment of this product by sending an email to mailto:[email protected]....
Page 45 - Horno eléctrico empotrado en pared; Manual del usuario
Horno eléctrico empotrado en pared Manual del usuario NV51*5***D* NV51R5511D_AA_DG68-01126A-02_MES.indd 1 11/5/2019 10:35:53 AM
Page 46 - Contenido
2 Español Contenido Contenido Contenido Instrucciones de seguridad importantes 3 Introducción a su nuevo horno 15 Descripción general 15 Elementos incluidos con su horno 15 Antes de comenzar 15 Sugerencias para ahorrar energía 15 Funcionamiento del horno 16 Panel de control del horno 16 Modos de pan...
Page 47 - CONSERVE ESTAS INSTRUCCIONES; PRECAUCIÓN; Instrucciones de seguridad importantes; ADVERTENCIA
Español 3 Ins truccione s de seg uridad impor tantes CONSERVE ESTAS INSTRUCCIONES CONSERVE ESTAS INSTRUCCIONES PRECAUCIÓN Para reducir el riesgo de incendio, explosión, descarga eléctrica o lesiones personales cuando utilice el horno, siga estas instrucciones básicas de seguridad. NO intentar.NO des...
Page 49 - Utilice solamente agarradores aislantes secos.
Español 5 Ins truccione s de seg uridad impor tantes CONSERVE ESTAS INSTRUCCIONES CONSERVE ESTAS INSTRUCCIONES • Utilice solamente agarradores aislantes secos. Colocar agarradores aislantes mojados o húmedos sobre superficies calientes podría producir quemaduras por vapor. No permita que el agarrado...
Page 53 - ADVERTENCIAS FUNDAMENTALES PARA LA INSTALACIÓN
Español 9 Ins truccione s de seg uridad impor tantes CONSERVE ESTAS INSTRUCCIONES CONSERVE ESTAS INSTRUCCIONES • No corte ni retire el pin de conexión a tierra del cable de alimentación bajo ninguna circunstancia. • Conecte el horno a un circuito que proporcione el amperaje correcto. • No instale es...
Page 54 - ADVERTENCIA FUNDAMENTAL PARA EL USO
10 Español Ins truccione s de seg uridad impor tantes Instrucciones de seguridad importantes CONSERVE ESTAS INSTRUCCIONES CONSERVE ESTAS INSTRUCCIONES • Siempre respete las precauciones de seguridad cuando utilice su horno. Nunca intente reparar el horno: contiene voltaje peligroso en el interior. S...
Page 56 - PRECAUCIONES PARA EL USO
12 Español Ins truccione s de seg uridad impor tantes Instrucciones de seguridad importantes CONSERVE ESTAS INSTRUCCIONES CONSERVE ESTAS INSTRUCCIONES PRECAUCIONES PARA EL USO PRECAUCIÓN • Si la superficie está rajada, apague el electrodoméstico. • No hacerlo puede provocar una descarga eléctrica. •...
Page 58 - ADVERTENCIAS FUNDAMENTALES PARA LA LIMPIEZA
14 Español Ins truccione s de seg uridad impor tantes Instrucciones de seguridad importantes CONSERVE ESTAS INSTRUCCIONES CONSERVE ESTAS INSTRUCCIONES ADVERTENCIAS FUNDAMENTALES PARA LA LIMPIEZA PRECAUCIÓN • No rocíe agua directamente sobre el electrodoméstico para limpiarlo. • No utilice benceno, d...
Page 59 - Antes de comenzar; Sugerencias para ahorrar energía; Introducción a su nuevo horno; Descripción general
Español 15 Introduc ción a su nue vo horno / Ant es de c omenz ar Antes de comenzar Limpie el horno a fondo antes de utilizarlo por primera vez. Luego, retire los accesorios, programe el horno en Bake (Hornear) y luego haga funcionar el horno a 400 °F durante una hora. Se notará un olor característi...
Page 60 - Funcionamiento del horno; Panel de control del horno
16 Español Funcionamient o del horno Funcionamiento del horno Funcionamiento del horno Panel de control del horno LEA LAS INSTRUCCIONES CON ATENCIÓN ANTES DE UTILIZAR EL HORNO. Para obtener un funcionamiento satisfactorio del horno, familiarícese con las diversas características y funciones que se d...
Page 61 - Modos de pantalla del panel de control; Ajuste del reloj; Cómo programar el temporizador de cocina
Español 17 Funcionamient o del horno Modos de pantalla del panel de control Selección del horno superior o inferior Para cambiar entre el horno superior y el inferior, toque la zona UPPER OVEN (HORNO SUPERIOR) o LOWER OVEN (HORNO INFERIOR) . Observe que cada horno cuenta con su propio conjunto de bo...
Page 62 - Traba de controles; Cocción con temporizador
18 Español Funcionamient o del horno Funcionamiento del horno Traba de controles La traba de controles permite bloquear los botones del panel táctil de modo que no puedan activarse accidentalmente. El bloqueo de controles también traba las dos puertas del horno de modo que no puedan abrirse. Solo pu...
Page 63 - Inicio retardado; Cómo encender y apagar la luz; Ajustes mínimos y máximos
Español 19 Funcionamient o del horno Inicio retardado Con Inicio retardado, el temporizador enciende y apaga el horno a las horas que usted seleccione con anticipación. • Puede utilizar Inicio retardado únicamente con la operación de cocción Hornear y Autolimpieza. • Se puede programar el horno para...
Page 64 - Uso de las parrillas del horno
20 Español Funcionamient o del horno Funcionamiento del horno Uso de las parrillas del horno Posiciones de las parrillas en el horno 1 2 3 4 5 6 Posición recomendada de las parrillas para cocción TIPO DE ALIMENTO POSICIÓN DE LA PARRILLA Hamburguesas a la parrilla 6 Carnes o cortes pequeños de ave, p...
Page 65 - Horneado
Español 21 Funcionamient o del horno Antes de usar las parrillas Cada parrilla tiene topes que requieren una colocación correcta sobre las guías. Estos topes impedirán que la parrilla se salga completamente. Retirar las rejillas 1. Jale la parrilla directamente hacia afuera hasta que se trabe. 2. Le...
Page 66 - Asado a la parrilla
22 Español Funcionamient o del horno Funcionamiento del horno Asado a la parrilla El asado a la parrilla es un método de cocinar cortes tiernos de carne mediante el calor directo bajo el elemento de asado a la parrilla del horno.La elevada temperatura realiza una cocción rápida y deja el exterior co...
Page 67 - Uso de Levantamiento del pan; Uso de Configuración
Español 23 Funcionamient o del horno Uso de Levantamiento del pan Genera automáticamente una temperatura óptima para el proceso de levantamiento del pan y, por ende, no requiere ningún ajuste de temperatura. Para obtener los mejores resultados, siempre inicie la opción Bread Proof (Entibiar pan para...
Page 69 - Uso de la función Shabat
Español 25 Funcionamient o del horno Activar/Desactivar sonido Mediante esta función, puede configurar los controles del horno para que funcionen silenciosamente. Cómo activar o desactivar el sonido 1. Toque Settings (Configuración) y luego 5 en el teclado numérico . 2. Toque 1 (Activado) o 2 (Desac...
Page 70 - Uso de Smart Control
26 Español Funcionamient o del horno Funcionamiento del horno No intente activar ninguna otra función de programa excepto Hornear mientras la función Shabat está activa. ÚNICAMENTE las siguientes teclas funcionarán correctamente con la función Shabat activada: Número , Bake (Hornear) , START/SET (IN...
Page 71 - Mantenimiento de su electrodoméstico
Español 27 Mant enimient o de su elec tr odomé stic o NOTA • Si abre la puerta del horno o toca Smart Control se borrará de la pantalla y se evitará que usted pueda encender el horno de manera remota. • Si no aparece en la pantalla, aún puede supervisar el estado del horno y apagarlo. • Cuando la co...
Page 73 - Limpieza al vapor
Español 29 Mant enimient o de su elec tr odomé stic o Cómo diferir el inicio del proceso de auto-limpieza 1. Toque Self Clean 2/3/5h (Autolimpieza 2/3/5 h) . Seleccione el tiempo de auto-limpieza deseado tocando Self Clean 2/3/5h (Autolimpieza 2/3/5 h) . 2. Toque Delay Start (Inicio retardado) . 3. ...
Page 74 - Cuidado y limpieza del horno
30 Español Mant enimient o de su elec tr odomé stic o Mantenimiento de su electrodoméstico Después de un ciclo de limpieza al vapor • Tenga cuidado al abrir la puerta una vez finalizado el procedimiento de limpieza al vapor. El agua en la base está caliente. • Abra la puerta del horno y retire el ag...
Page 76 - Cómo retirar las puertas del horno
32 Español Mant enimient o de su elec tr odomé stic o Mantenimiento de su electrodoméstico Cómo retirar las puertas del horno PRECAUCIÓN • La puerta es muy pesada. Tenga cuidado al retirarla y levantarla. • No levante la puerta por la manija. Retire la puerta del horno con las dos manos. Si el horno...
Page 77 - Reemplazo de las puertas del horno
Español 33 Mant enimient o de su elec tr odomé stic o Reemplazo de las puertas del horno PRECAUCIÓN La puerta es muy pesada. Es posible que necesite ayuda para levantarla a una altura suficiente que permita encajarla en las ranuras de las bisagras. No levante la puerta por la manija. A A. Ranura de ...
Page 78 - Recambio de la luz del horno
34 Español Mant enimient o de su elec tr odomé stic o Mantenimiento de su electrodoméstico 2. Mientras sostiene la tapa de vidrio con una mano, inserte una herramienta plana afilada como un cuchillo de mesa entre el vidrio y el marco para quitar la tapa de vidrio. 3. Gire la bombilla en el sentido c...
Page 79 - Resolución de problemas
Español 35 Re solución de pr oblemas HORNO Problema Causa posible Solución El horno no se enciende. El horno no está bien enchufado al tomacorriente. Asegúrese de que el enchufe se encuentre insertado en un tomacorriente alimentado con corriente y bien conectado a tierra. Puede haberse quemado un fu...
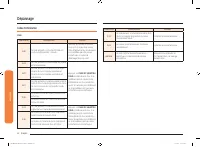
Page 82 - Códigos de información
38 Español Re solución de pr oblemas Resolución de problemas Códigos de información HORNO Código mostrado Causa posible Solución C-d0 Este código se muestra si en la tecla de control hay un cortocircuito durante 1 minuto. Limpie los botones y asegúrese de que no quede agua sobre ellos ni alrededor. ...
Page 84 - Garantía
40 Español Garantía Garantía EXCLUSIÓN DE GARANTÍAS IMPLÍCITAS LAS GARANTÍAS IMPLÍCITAS, INCLUYENDO GARANTÍAS IMPLÍCITAS DE COMERCIABILIDAD O APTITUD PARA UN PROPÓSITO EN PARTICULAR, ESTÁN LIMITADAS A UN AÑO O AL PERIODO MÁS CORTO PERMITIDO POR LA LEY. Algunos estados no permiten limitaciones en cua...
Page 86 - Anuncio de código abierto; Notas
42 Español Garantía Garantía Anuncio de código abierto El software incluido en este producto contiene software de código abierto. Puede obtener el código fuente correspondiente completo por un período de tres años a partir del último envío de este producto mandando un correo electrónico a mailto:[em...
Page 89 - Four mural électrique encastrable; Manuel d’utilisation
Four mural électrique encastrable Manuel d’utilisation NV51*5***D* NV51R5511D_AA_DG68-01126A-02_CFR.indd 1 11/5/2019 10:38:38 AM
Page 90 - Table des matières; Consignes de sécurité importantes
2 Français Table de s matièr es Table des matières Table des matières Consignes de sécurité importantes 3 Présentation de votre nouveau four 15 Présentation 15Accessoires fournis 15 Avant de commencer 15 Conseils pour économiser de l'énergie 15 Utilisation du four 16 Panneau de commande du four 16 M...
Page 91 - CONSERVEZ PRÉCIEUSEMENT CES INSTRUCTIONS; ATTENTION; Le présent guide ne couvre; Symboles de sécurité importants et précautions; Signification des icônes et des symboles utilisés dans ce manuel :
Français 3 Consigne s de sécurit é impor tantes CONSERVEZ PRÉCIEUSEMENT CES INSTRUCTIONS CONSERVEZ PRÉCIEUSEMENT CES INSTRUCTIONS ATTENTION Afin de réduire les risques d'incendie, d'explosion, d'électrocution ou de blessures lors de l'utilisation du four, vous devez respecter ces règles de sécurité ...
Page 92 - CALIFORNIA PROPOSITION 65 AVERTISSEMENT
4 Français Consigne s de sécurit é impor tantes Consignes de sécurité importantes CONSERVEZ PRÉCIEUSEMENT CES INSTRUCTIONS CONSERVEZ PRÉCIEUSEMENT CES INSTRUCTIONS CALIFORNIA PROPOSITION 65 AVERTISSEMENT AVERTISSEMENT Cancer et Troubles de l’appareil reproducteur – www.P65Warnings.ca.gov POUR VOTRE ...
Page 93 - Utilisez uniquement des maniques sèches.
Français 5 Consigne s de sécurit é impor tantes CONSERVEZ PRÉCIEUSEMENT CES INSTRUCTIONS CONSERVEZ PRÉCIEUSEMENT CES INSTRUCTIONS • Utilisez uniquement des maniques sèches. L'utilisation de maniques humides ou mouillées sur les surfaces chaudes peut entraîner des brûlures en raison de la vapeur qui ...
Page 94 - AVERTISSEMENT
6 Français Consigne s de sécurit é impor tantes Consignes de sécurité importantes CONSERVEZ PRÉCIEUSEMENT CES INSTRUCTIONS CONSERVEZ PRÉCIEUSEMENT CES INSTRUCTIONS AVERTISSEMENT • Afin d'éviter tout risque d'électrocution, veillez à ce que l'appareil soit hors tension avant de procéder au remplaceme...
Page 97 - Ne vrillez et ne serrez pas le cordon d'alimentation.
Français 9 Consigne s de sécurit é impor tantes CONSERVEZ PRÉCIEUSEMENT CES INSTRUCTIONS CONSERVEZ PRÉCIEUSEMENT CES INSTRUCTIONS • Ne coupez ni ne retirez JAMAIS la broche de mise à la terre de la fiche du cordon d'alimentation. • Assurez-vous que l'ampérage de la prise sur laquelle est branché l'a...
Page 98 - AVERTISSEMENTS IMPORTANTS RELATIFS À L'UTILISATION
10 Français Consigne s de sécurit é impor tantes Consignes de sécurité importantes CONSERVEZ PRÉCIEUSEMENT CES INSTRUCTIONS CONSERVEZ PRÉCIEUSEMENT CES INSTRUCTIONS • Respectez systématiquement les consignes de sécurité lorsque vous utilisez votre four. Ne tentez jamais de réparer vous-même l'appare...
Page 99 - Le non-respect de cette consigne risque d'entraîner un incendie.
Français 11 Consigne s de sécurit é impor tantes CONSERVEZ PRÉCIEUSEMENT CES INSTRUCTIONS CONSERVEZ PRÉCIEUSEMENT CES INSTRUCTIONS • N'insérez pas vos doigts, de substances étrangères ou d'objets métalliques tels que des épingles ou des aiguilles dans l'entrée, la sortie et les orifices de l'apparei...
Page 100 - AVERTISSEMENTS RELATIFS À L'UTILISATION
12 Français Consigne s de sécurit é impor tantes Consignes de sécurité importantes CONSERVEZ PRÉCIEUSEMENT CES INSTRUCTIONS CONSERVEZ PRÉCIEUSEMENT CES INSTRUCTIONS AVERTISSEMENTS RELATIFS À L'UTILISATION ATTENTION • Si la surface du four est fissurée, n'utilisez pas l'appareil. • Le non-respect de ...
Page 102 - AVERTISSEMENTS IMPORTANTS RELATIFS AU NETTOYAGE
14 Français Consigne s de sécurit é impor tantes Consignes de sécurité importantes CONSERVEZ PRÉCIEUSEMENT CES INSTRUCTIONS CONSERVEZ PRÉCIEUSEMENT CES INSTRUCTIONS AVERTISSEMENTS IMPORTANTS RELATIFS AU NETTOYAGE ATTENTION • Ne nettoyez pas l'appareil en pulvérisant directement de l'eau dessus. • N'...
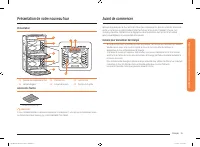
Page 103 - Avant de commencer; Conseils pour économiser de l'énergie; Présentation de votre nouveau four; Présentation
Français 15 Pr ésentation de v otr e nouv eau f our / A vant de c ommenc er Avant de commencer Nettoyez soigneusement le four avant de l'utiliser pour la première fois. Ensuite, retirez les accessoires, lancez un cycle Cuisson traditionnelle et faites fonctionner le four à 400 °F pendant 1 heure. Il...
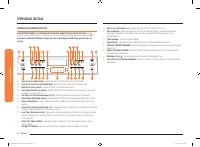
Page 104 - Utilisation du four; Panneau de commande du four
16 Français Utilisation du f our Utilisation du four Utilisation du four Panneau de commande du four LISEZ ATTENTIVEMENT LES CONSIGNES D'UTILISATION AVANT DE VOUS SERVIR DU FOUR. Afin de profiter au mieux de votre four, familiarisez-vous avec les fonctionnalités décrites ci-dessous. Vous trouverez u...
Page 105 - Modes d'affichage du panneau de commande; Réglage de la minuterie
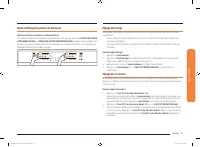
Français 17 Utilisation du f our Modes d'affichage du panneau de commande Sélection de la partie supérieure ou inférieure du four Pour alterner entre la partie supérieure ou inférieure du four, appuyez sur la zone UPPER OVEN (PARTIE SUPÉRIEURE DU FOUR) ou LOWER OVEN (PARTIE INFÉRIEURE DU FOUR) . Veu...
Page 106 - Verrouillage des commandes; Cuisson minutée
18 Français Utilisation du f our Utilisation du four Verrouillage des commandes La fonction Verrouillage des commandes vous permet de verrouiller les boutons du pavé tactile afin qu'ils ne puissent pas être actionnés par accident. La fonction Verrouillage des commandes vous permet également de verro...
Page 107 - Départ différé; Activation et désactivation de l'éclairage; Réglages minimum et maximum
Français 19 Utilisation du f our Départ différé Avec la fonction Départ différé, la minuterie du four permet d'allumer et d'éteindre le four aux heures que vous avez sélectionnées préalablement. • Vous ne pouvez utiliser la fonction Départ différé qu’avec les modes Cuisson traditionnelle et Auto-net...
Page 108 - Utilisation des grilles du four
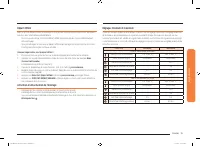
20 Français Utilisation du f our Utilisation du four Utilisation des grilles du four Hauteurs de grille 1 2 3 4 5 6 Position recommandée de la grille pour la cuisson TYPE D'ALIMENTS HAUTEUR DE GRILLE Cuisson d'hamburgers au gril 6 Gril de viande ou de petits morceaux de volaille, poisson 3-5 Couronn...
Page 109 - Cuisson traditionnelle
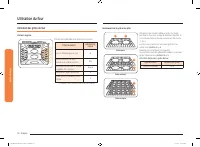
Français 21 Utilisation du f our Avant d'utiliser les grilles Chacune comporte une butée qui doit être correctement installée sur son support. Les butées empêchent la grille de sortir complètement de son logement. Retrait des grilles 1. Tirez la grille horizontalement vers l'extérieur jusqu'à ce qu'...
Page 110 - Cuisson au gril
22 Français Utilisation du f our Utilisation du four Cuisson au gril Le gril est une méthode de cuisson des morceaux de viande tendres utilisant la chaleur directe sous le gril du four.La chaleur élevée permet de cuire plus rapidement et permet de brunir les aliments. Le mode Broil (Cuisson au gril)...
Page 111 - Utilisation de la fonction Pain précuit.; Utilisation de la fonction Paramètres
Français 23 Utilisation du f our Utilisation de la fonction Pain précuit. Le mode Pain précuit procure une température optimale pour le procédé de précuisson du pain et ne nécessite donc pas de réglage de la température. Pour de meilleurs résultats, démarrez toujours l'option Levage du pain dans un ...
Page 113 - Utilisation de la fonction Shabbat
Français 25 Utilisation du f our Activation/Désactivation du son Cette fonction vous permet de désactiver la sonorité des boutons de commande. Comment activer ou désactiver le son ? 1. Appuyez sur Settings (Paramètres) puis sur 5 sur le pavé numérique . 2. Appuyez sur 1 (Activation) ou sur 2 (Désact...
Page 114 - Utilisation de la fonction Commande intelligente
26 Français Utilisation du f our Utilisation du four N'essayez pas d'activer une autre fonction de programme que la fonction Cuisson traditionnelle pendant que la fonction Shabbat est activée. Seules les touches suivantes fonctionnent correctement avec la fonction Shabbat activée : Pavé numérique , ...
Page 115 - Entretien de votre appareil
Français 27 Entretien de v otr e appar eil REMARQUE • Si vous ouvrez la porte du four ou si vous appuyez sur Smart Control (Commande intelligente) , disparaît de l’écran et vous ne pouvez plus allumer ou contrôler le four à distance. • Si n’apparaît pas à l’écran, vous pouvez quand-même surveiller l...
Page 117 - Nettoyage vapeur
Français 29 Entretien de v otr e appar eil Comment différer le cycle d’auto-nettoyage ? 1. Appuyez sur Self Clean 2/3/5h (Auto-nettoyage 2/3/5 h) . Sélectionnez la durée d’auto-nettoyage souhaitée en appuyant sur Self Clean 2/3/5h (Auto- nettoyage 2/3/5 h) . 2. Appuyez sur Delay Start (Départ différ...
Page 118 - Entretien et nettoyage du four
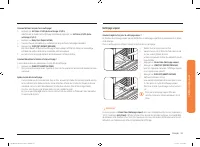
30 Français Entretien de v otr e appar eil Entretien de votre appareil Après un cycle de nettoyage vapeur • Soyez prudent lorsque vous ouvrez la porte après la fin du programme de nettoyage vapeur. L'eau située dans le fond du four est extrêmement chaude. • Ouvrez la porte du four et épongez l'eau r...
Page 120 - Retrait des portes du four
32 Français Entretien de v otr e appar eil Entretien de votre appareil Retrait des portes du four ATTENTION • La porte est très lourde. Soyez prudent lorsque vous retirez et soulevez la porte. • Ne soulevez pas la porte par la poignée. Utilisez vos deux mains pour retirer l'une des portes du four. P...
Page 121 - Réinstallation des portes du four
Français 33 Entretien de v otr e appar eil Réinstallation des portes du four ATTENTION La porte est très lourde. Il se peut que vous ayez besoin d'aide pour soulever la porte suffisamment haut pour la faire glisser dans les trous de la charnière. Ne soulevez pas la porte par la poignée. A A. Trou à ...
Page 122 - Remplacement de l'ampoule du four
34 Français Entretien de v otr e appar eil Entretien de votre appareil 2. Tout en tenant le cache en verre d'une main, insérez un outil pointu et plat (ex. : couteau de table) entre le verre et le cadre afin de retirer le cache en verre. 3. Tournez le culot de l'ampoule dans le sens antihoraire pour...
Page 123 - Dépannage
Français 35 Dépannag e FOUR Problème Cause possible Solution Le four ne s'allume pas. Le four n'est pas correctement branché à la prise électrique. Assurez-vous que la fiche électrique est branchée sur une prise en état de marche et correctement mise à la terre. Un fusible de votre habitation est pe...
Page 126 - Codes d’information
38 Français Dépannag e Dépannage Codes d’information FOUR Code affiché Cause possible Solution C-d0 Ce code apparaît si la touche Contrôle est court-circuitée pendant 1 minute. Nettoyez les boutons et assurez-vous qu'il n'y a pas d'eau autour d'eux. Éteignez le four et réessayez. Si le problème pers...
Page 128 - Garantie
40 Français Garantie Garantie EXCLUSION DE GARANTIES IMPLICITES LES GARANTIES IMPLICITES, Y COMPRIS LES GARANTIES IMPLICITES DE QUALITÉ MARCHANDE OU D’APTITUDE À UN USAGE PARTICULIER, SONT LIMITÉES À UN AN OU À LA PLUS COURTE PÉRIODE AUTORISÉE PAR LA LOI. Certains États et certaines juridictions n’a...
Page 130 - Annonce de contenu libre; Notes
42 Français Garantie Garantie Annonce de contenu libre Le présent produit contient un logiciel libre. Vous pouvez obtenir l’intégralité du code source correspondant durant une période de trois ans après la dernière livraison de ce produit en envoyant un e-mail à l’adresse suivante : mailto:[email pr...


 Samsung NE63T8951SS
User Manual
Samsung NE63T8951SS
User Manual
 Samsung NQ50J5530BS
User Manual
Samsung NQ50J5530BS
User Manual
 Samsung NQ50J9530BS
User Manual
Samsung NQ50J9530BS
User Manual
 Samsung NQ70CB700D12
User Manual
Samsung NQ70CB700D12
User Manual
 Samsung NQ70CG600DMT
User Manual
Samsung NQ70CG600DMT
User Manual
 Samsung NQ70CG600DSR
User Manual
Samsung NQ70CG600DSR
User Manual
 Samsung NQ70CG700DMT
User Manual
Samsung NQ70CG700DMT
User Manual
 Samsung NQ70CG700DSR
User Manual
Samsung NQ70CG700DSR
User Manual
 Samsung NQ70T5511DG/AA
User Manual
Samsung NQ70T5511DG/AA
User Manual
 Samsung NV51CB700D12
User Manual
Samsung NV51CB700D12
User Manual
 Samsung NV51CB700S12
User Manual
Samsung NV51CB700S12
User Manual
 Samsung NV51CG600DMT
User Manual
Samsung NV51CG600DMT
User Manual
 Samsung NV51CG600DSR
User Manual
Samsung NV51CG600DSR
User Manual
 Samsung NV51CG600SMT
User Manual
Samsung NV51CG600SMT
User Manual
 Samsung NV51CG600SSR
User Manual
Samsung NV51CG600SSR
User Manual
 Samsung NV51CG700DMT
User Manual
Samsung NV51CG700DMT
User Manual
 Samsung NV51CG700DSR
User Manual
Samsung NV51CG700DSR
User Manual
 Samsung NV51CG700SMT
User Manual
Samsung NV51CG700SMT
User Manual
 Samsung NV51CG700SSR
User Manual
Samsung NV51CG700SSR
User Manual