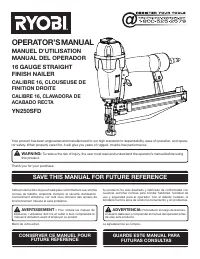
Page 2 - TABLE OF CONTENTS; RYOBI
2 — English Introduction ..................................................................................................................................................................... 2 Warranty .................................................................................................
Page 3 - PERSONAL SAFETY; GENERAL SAFETY RULES
3 — English DANGER: READ AND UNDERSTAND TOOL LABELS AND MANUAL. Failure to follow warnings could result in DEATH or SERIOUS INJURY. SAVE THESE INSTRUCTIONSWORK AREA Keep your work area clean and well lit. Cluttered benches and dark areas invite accidents. Do not operate power tools in explosive ...
Page 4 - SPECIFIC SAFETY RULES; Do not use the tool as a hammer.; OPERATION; Always assume that the tool contains fasteners.; Do not actuate the tool unless you intend to drive a
4 — English SPECIFIC SAFETY RULES Know your pneumatic tool. Read operator’s manual carefully. Learn its applications and limitations, as well as the specific potential hazards related to this tool. Following this rule will reduce the risk of electric shock, fire, or serious injury. Always wear s...
Page 5 - AIR SUPPLY AND CONNECTIONS; Always disconnect air supply:; LOADING TOOL; Do not load the tool with fasteners when any one of; SAVE THESE INSTRUCTIONS
5 — English SPECIFIC SAFETY RULES During normal use the tool will recoil immediately after driving a fastener. This is a normal function of the tool. Do not attempt to prevent the recoil by holding the nailer against the work. Restriction to the recoil can result in a second fastener being driven ...
Page 6 - SYMBOLS; SYMBOL
6 — English Some of the following symbols may be used on this product. Please study them and learn their meaning. Proper interpretation of these symbols will allow you to operate the product better and safer. SYMBOL NAME DESIGNATION/EXPLANATION Safety Alert Indicates a potential personal injury haza...
Page 7 - GLOSSARY OF TERMS
7 — English GLOSSARY OF TERMS Activate (operating controls)To move an operating control so that it is in a position that allows the tool to be actuated or that satisifes one require-ment for the tool to be actuated.Actuate (tool)To cause movement of the tool component(s) intended to drive a fastener...
Page 9 - APPLICATIONS; PREPARING THE TOOL FOR USE
9 — English WARNING: Do not allow familiarity with this product to make you careless. Remember that a careless fraction of a second is sufficient to inflict serious injury. WARNING: Always wear eye protection with side shields or goggles marked to comply with ANSI Z87.1. Failure to do so could resul...
Page 10 - LOADING THE TOOL WITH NAILS; DRIVING A FASTENER
10 — English WARNING: Always use an air fitting that discharges all the com-pressed air in the tool at the time the air fitting and air hose connector is disconnected. Using an air fitting that does not discharge the compressed air could cause un-intended operation and serious personal injury. WARNI...
Page 11 - SETTING THE AIR PRESSURE
11 — English OPERATION SETTING THE AIR PRESSURE The amount of air pressure required will depend on the size of the nail and the workpiece material. Begin testing the depth of drive by driving a test nail into the same type of workpiece material used for the actual job. Drive a test nail with the air...
Page 12 - MAINTENANCE; GENERAL MAINTENANCE
12 — English MAINTENANCE WARNING: When servicing, use only identical replacement parts. Use of any other parts could create a hazard or cause product damage. WARNING: Always wear eye protection with side shields or goggles marked to comply with ANSI Z87.1. Failure to do so could result in fluids ent...
Page 13 - REQUIRED DAILY CHECKLIST; Drive Depth; ACCESSORIES
13 — English MAINTENANCE REQUIRED DAILY CHECKLIST Disconnect the air supply from the tool and remove all fasteners. Check all screws, nuts, bolts, and pins on the tool. If any of these are loose, they must be tightened with the appropriate size wrench. Press the workpiece contact against a wor...
Page 14 - TROUBLESHOOTING; PROBLEM; FRENCH AND SPANISH LANGUAGE SECTIONS.
14 — English TROUBLESHOOTING Air leak near the top of the tool or in the trigger area PROBLEM POSSIBLE CAUSE SOLUTION Loose screwsWorn or damaged O-rings or seals Tool does nothing or operates sluggishly Tool jams frequently Tighten screwsInstall Overhaul Kit Inadequate air supplyInadequate lubricat...
Page 15 - TABLE DES MATIÈRES; OUTILS ÉLECTRIQUES RYOBI
2 — Français Introduction ..................................................................................................................................................................... 2 Garantie ................................................................................................
Page 16 - SÉCURITÉ PERSONNELLE; DÉPANNAGE; RÈGLES DE SÉCURITÉ GÉNÉRALES
3 — Français DANGER : LIRE ET VEILLER À BIEN COMPRENDRE LES AUTO-COLLANTS APPOSÉS SUR L’OUTIL ET LE MANUEL. Le non respect de cet avertissement pourrait entraîner des BLESSURES GRAVES ou MORTELLES. CONSERVER CES INSTRUCTIONSLIEU DE TRAVAI L Garder le lieu de travail propre et bien éclairé. Les éta...
Page 17 - RÈGLES DE SÉCURITÉ PARTICULIÈRES; UTILISATION
4 — Français RÈGLES DE SÉCURITÉ PARTICULIÈRES Apprendre à pneumatique l’outil. Lire attentivement le manuel d’utilisation. Apprendre les applications et les limites de l’outil, ainsi que les risques spécifiques relatifs à son utilisation. Le respect de cette règle réduira les risques d’incendie, d...
Page 18 - ALIMENTATION ET CONNEXIONS; Ne pas utiliser de l’oxygène ou des gaz combustibles; CHARGEMENT DE L’OUTIL; Ne pas charger l’outil lorsque l’une des commandes; CONSERVER CES INSTRUCTIONS
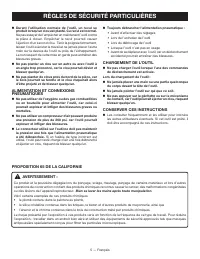
5 — Français RÈGLES DE SÉCURITÉ PARTICULIÈRES Durant l’utilisation normale de l’outil, un recul se produit lorsqu’un clou est planté. Ce recul est normal. Ne pas essayer de l’empêcher en maintenant l’outil contre la pièce à clouer. Empêcher le recul pourrait causer l’éjection d’un second clou. Ten...
Page 19 - SYMBOLES
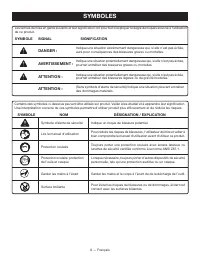
6 — Français Certains des symboles ci-dessous peuvent être utilisés sur produit. Veiller à les étudier et à apprendre leur signification. Une interprétation correcte de ces symboles permettra d’utiliser produit plus efficacement et de réduire les risques. SYMBOLE NOM DÉSIGNATION / EXPLICATION Symbol...
Page 20 - GLOSSAIRE
7 — Français Activer (commandes de l’outil)Mettre une commande sur une position déclenchant ou permettant de déclencher l’outil.Actionner (outil)Causer le mouvement des pièces conçues pour chasser le clou.Orifice d’entrée d’airSur un outil pneumatique, l’ouvreture sur laquelle la source d’air est co...
Page 21 - CARACTÉRISTIQUES; ASSEMBLAGE
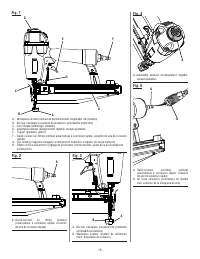
8 — Français CARACTÉRISTIQUES COMPRENDRE VOTRE CLUEUSE DE FINITION DROITE Voir la figure 1, page 15. L’utilisation sûre de ce produit exige une compréhension des renseignements figurant sur l’outil et contenus dans le manuel d’utilisation, ainsi qu’une bonne connaissance du projet entrepris. Avant d...
Page 22 - PRÉPARATION DE L’OUTIL POUR
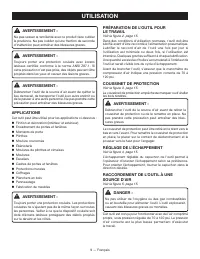
9 — Français AVERTISSEMENT : Ne pas laisser la familiarité avec le produit faire oublier la prudence. Ne pas oublier qu’une fraction de seconde d’inattention peut entraîner des blessures graves. AVERTISSEMENT : Toujours porter une protection oculaire avec écrans latéraux certifiée conforme à la norm...
Page 23 - DÉCLENCHEMENT PAR SÉQUENCE UNIQUE; CHARGEMENT DES CLOUS
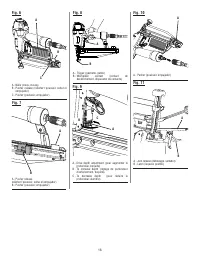
10 — Français AVERTISSEMENT : Ne jamais charger les clous avec la gâchette ou le mécanisme de déclenchement par contact activé. Cela pourrait entraîner des blessures graves. Glisser le poussoir à fond vers l’arrière du magasin jusqu’à ce qu’il se verrouille. Insérez la bande de clous dans le m...
Page 24 - DÉBLOCAGE D’UNE AGRAFE
11 — Français RÉGLAGE DE LA PRESSION D’AIR Le réglage de pression d’air dépend de la taille des clous et de la dureté du matériau à clouer. Commencer par tester la profondeur d’enfoncement en plantant l’un des clous à utiliser dans un morceau du même bois que la pièce à clouer. Pour le test, utilise...
Page 25 - ENTRETIEN; ENTRETIEN GÉNÉRAL; UTILISATION PAR TEMPS FROID
12 — Français ENTRETIEN AVERTISSEMENT : Utiliser exclusivement des pièces d’origine pour les réparations. L’usage de toute autre pièce peut créer une situation dangereuse ou endommager le produit. AVERTISSEMENT : Toujours porter une protection oculaire avec écrans latéraux ou lunettes de sécurité ce...
Page 26 - LISTE DE CONTRÔLE QUOTIDIEN; Régler la profondeur de clouage du manuel.; ACCESSOIRES
13 — Français ENTRETIEN LISTE DE CONTRÔLE QUOTIDIEN Débrancher l’alimentation d’air de l’outil et retirer toutes les agrafes. Vérifier toutes les vis et tiges, et tous les écrous et boulons de l’outil. Resserrer au besoin toute pièce à l’aide d’une clé de dimension appropriée. Appuyer la s...
Page 27 - PROBLÈME; SUR 15 DE PAGE APRÈS LA SECTION ESPAGNOL.
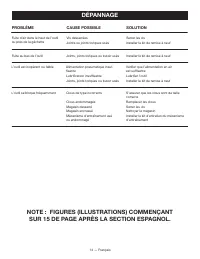
14 — Français DÉPANNAGE Fuite d’air dans le haut de l’outil ou près de la gâchette PROBLÈME CAUSE POSSIBLE SOLUTION Vis desserréesJoints ou joints toriques usés L’outil est inopérant ou faible L’outil se bloque fréquemment Serrer les visInstaller le kit de remise à neuf Alimentation pneumatique insu...
Page 28 - ÍNDICE DE CONTENIDO
2 — Español Introducción ...................................................................................................................................................................... 2 Garantía ................................................................................................
Page 29 - GUARDE ESTAS INSTRUCCIONES; SEGURIDAD PERSONAL; SERVICIO; REGLAS DE SEGURIDAD GENERALES
3 — Español PELIGRO: LEA Y COMPRENDA LAS ETIQUETAS DE LAS HER-RAMIENTAS Y EL MANUAL. La inobservancia de los avisos de advertencia podría causar la MUERTE o LE-SIONES SERIAS. GUARDE ESTAS INSTRUCCIONES ÁREA DE TRABAJO Mantenga limpia y bien iluminada el área de trabajo. Una mesa de trabajo mal des...
Page 30 - REGLAS DE SEGURIDAD ESPECÍFICAS; FUNCIONAMIENTO
4 — Español REGLAS DE SEGURIDAD ESPECÍFICAS Familiarícese con su herramienta neumáticas. Lea cuidadosamente el manual del operador. Aprenda sus usos y limitaciones, así como los posibles peligros específicos de esta herramienta. Con el cumplimiento de esta regla se reduce el riesgo de una descarga...
Page 31 - SUMINISTRO DE AIRE Y CONEXIONES; CÓMO CARGAR LA HERRAMIENTA
5 — Español REGLAS DE SEGURIDAD ESPECÍFICAS CALIFORNIA - PROPUESTA DE LEY NÚM. 65 ADVERTENCIA: Este producto puede contener sustancias químicas (por ejemplo, plomo) reconocidas por el estado de California como causantes de cáncer, defectos congénitos y otras afecciones del aparato reproductor. Láves...
Page 32 - SÍMBOLOS; SÍMBOLO
6 — Español SÍMBOLOS Las siguientes palabras de señalización y sus significados tienen el objeto de explicar los niveles de riesgo relacionados con este producto. SÍMBOLO SEÑAL SIGNIFICADO PELIGRO: Indica una situación peligrosa inminente, la cual, si no se evita, causará la muerte o lesiones serias...
Page 33 - GLOSARIO DE TÉRMINOS
7 — Español GLOSARIO DE TÉRMINOS Activar (los controles de accionamiento)Es mover un control de accionamiento de manera que quede en una posición en la cual se accione la herramienta o cumpla con un requisito necesario para accionar la misma.Accionar (la herramienta)Es producir el movimiento de los ...
Page 34 - CARACTERÍSTICAS; ESCAPE AJUSTABLE; ARMADO
8 — Español CARACTERÍSTICAS FAMILIARÍCESE CON LA CLAVADORA DE ACABADO RECTA Vea la figura 1, pagina 15. Para usar este producto con la debida seguridad se debe comprender la información indicada en la herramienta misma y en este manual, y se debe comprender también el trabajo que intenta realizar. A...
Page 35 - USOS; PREPARACIÓN DE LA HERRAMIENTA PARA
9 — Español ADVERTENCIA: No permita que su familarización con este producto le vuelva descuidado. Tenga presente que un descuido de un instante es suficiente para causar una lesión grave. ADVERTENCIA: Siempre póngase protección ocular con protección lateral o gafas protectoras con la marca de cumpli...
Page 36 - INTRODUCIR UN SUJETADOR
10 — Español NOTA: Una presión de aire mayor de 120 psi puede dañar la herramienta.La herramienta debe tener una conexión de aire que permita descargue la presión de la herramienta al desconectarle el conector de la manguera de aire. ADVERTENCIA: Siempre utilice una conexión de aire que descargue to...
Page 37 - AJUSTE DE LA PRESIÓN DE AIRE; CÓMO RETIRAR UN SUJETADOR ATORADO
11 — Español ADVERTENCIA: Durante el uso normal de la herramienta, ésta se retrae de inmediato después de introducir un sujetador. Así es el funcionamiento normal de la herramienta. No intente impedir la retracción presionando la clavadora contra la pieza de trabajo. Toda restricción impuesta a la r...
Page 38 - MANTENIMIENTO
12 — Español ADVERTENCIA: Al dar servicio a la unidad, sólo utilice piezas de repuesto idénticas. El empleo de piezas diferentes podría causar un peligro o dañar el producto. ADVERTENCIA: Siempre póngase protección ocular con protección lateral o gafas protectoras con la marca de cumplimiento de la ...
Page 39 - LISTA DE CONTROL DIARIA OBLIGATORIA; ACCESORIOS
13 — Español MANTENIMIENTO LISTA DE CONTROL DIARIA OBLIGATORIA Desconecte el suministro de aire de la herramienta y retire todos los sujetadores. Verifique todos los tornillos, tuercas, pernos y vástagos de la herramienta. Si hay alguno suelto, debe ser ajustado con una llave del tamaño adecuado...
Page 40 - SOLUCIÓN DE PROBLEMAS; PROBLEMA
14 — Español SOLUCIÓN DE PROBLEMAS Fuga de aire cerca de la parte superior de la herramienta o junto al gatillo PROBLEMA CAUSA POSIBLE SOLUCIÓN Tornillos sueltosJuntas tóricas o sellos gastados o dañados La herramienta no hace nada o funciona con lentitud Apriete los tornillosInstale el juego de man...
Page 44 - PARTS AND SERVICE; • MODEL NUMBER; HOW TO OBTAIN REPLACEMENT PARTS:; HOW TO LOCATE AN AUTHORIZED SERVICE CENTER:; HOW TO OBTAIN CUSTOMER OR TECHNICAL SUPPORT:; OPERATOR’S MANUAL / 16 GAUGE STRAIGHT FINISH NAILER
ONE WORLD TECHNOLOGIES, INC. 1428 Pearman Dairy Road, Anderson, SC 29625 A subsidiary of Techtronic Industries Co., Ltd. • Phone 1-800-525-2579 États-Unis, Téléphone 1-800-525-2579 • USA, Teléfono 1-800-525-2579 OTC: TTNDY www.ryobitools.com • PIEZAS DE REPUESTO Y SERVICIO Antes de solicitar servici...


 Ryobi SS630
User Manual
Ryobi SS630
User Manual
 Ryobi 18A-C06-734
User Manual
Ryobi 18A-C06-734
User Manual
 Ryobi 21AB454B734
User Manual
Ryobi 21AB454B734
User Manual
 Ryobi 41CD875A034
User Manual
Ryobi 41CD875A034
User Manual
 Ryobi 767R
User Manual
Ryobi 767R
User Manual
 Ryobi 2079R
User Manual
Ryobi 2079R
User Manual
 Ryobi 725R
User Manual
Ryobi 725R
User Manual
 Ryobi 890R
User Manual
Ryobi 890R
User Manual
 Ryobi 825R
User Manual
Ryobi 825R
User Manual
 Ryobi 96116000202
User Manual
Ryobi 96116000202
User Manual