Page 2 - RyObI
2 Introduction ..................................................................................................................................................................... 2 Warranty ...........................................................................................................
Page 3 - gENERAL SAfETy RULES; READ ALL INSTRUCTIONS; KEEP gUARDS IN PLACE and in good working order.; 6 is recommended for an extension
3 — English gENERAL SAfETy RULES WARNINg: Read and understand all instructions. Failure to follow all instructions listed below, may result in electric shock, fire and/or serious personal injury. READ ALL INSTRUCTIONS KNOW yOUR POWER TOOL. Read the operator’s manual carefully. Learn the saw’s appl...
Page 5 - SyMbOL; SyMbOLS
5 — English The following signal words and meanings are intended to explain the levels of risk associated with this product. SyMbOL SIgNAL MEANINg DANgER: Indicates an imminently hazardous situation, which, if not avoided, will result in death or serious injury. WARNINg: Indicates a potentially haza...
Page 6 - ELECTRICAL; ELECTRICAL CONNECTION; power supply that is 120 v, AC; SPEED AND WIRINg; ExTENSION CORDS; Cord Length
6 — English ELECTRICAL ELECTRICAL CONNECTION This tool is powered by a precision built electric motor. It should be connected to a power supply that is 120 v, AC only (normal household current), 60 hz. Do not operate this tool on direct current (DC). A substantial voltage drop will cause a loss of p...
Page 7 - POSITION Of ThE TILE SAW; fEATURES; KNOW yOUR TILE SAW
7 — English the saw to the outlet. The “drip loop” is that part of the cord below the level of the outlet, or the connector if an extension cord is used, to prevent water traveling along the cord and coming in contact with the outlet.If the plug or outlet does get wet, DO NOT unplug the cord. Discon...
Page 8 - ASSEMbLy; INSTALLINg ThE SPLASh hOOD
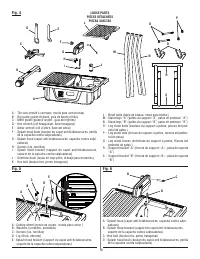
8 — English UNPACKINg See Figure 4, page 16. This product requires assembly. Carefully lift the saw from the carton and place on a level work surface. WARNINg: This new product has been shipped in a partially assembled condition as described below. Carefully check the packing list below to ensure ...
Page 9 - INSTALLINg ThE OvERfLOW DRAIN; OPERATION
9 — English WARNINg: Do not allow familiarity with tools to make you careless. Remember that a careless fraction of a second is suf-ficient to inflict serious injury. WARNINg: Always wear safety goggles or safety glasses with side shields when operating power tools. Failure to do so could result in ...
Page 10 - USINg ThE RIP gUIDE AND MITER gUIDE; MAKINg CUTS; TO MAKE A CROSS CUT; TO MAKE A 45° DIAgONAL CUT; Off. Wait for the; TO MAKE A MITER CUT
10 — English WARNINg: In the event of a power failure or when the tool is not in use, turn the switch Off and remove the switch key. This action will prevent the tool from accidentally starting when power returns. WARNINg: ALWAYS make sure your workpiece is not in contact with the cutting wheel befo...
Page 11 - TO MAKE A bEvEL CUT
11 — English OPERATION Using a marker or grease pencil, mark the area to be cut on material. Set the rip guide to desired width, and tighten the knob to secure in place. Slide miter guide onto rip guide from front. Adjust miter guide to desired angle, using angle scale, and tighten securely ...
Page 12 - ChANgINg ThE TILE CUTTINg WhEEL; MAINTENANCE; gENERAL MAINTENANCE; fRENCh AND SPANISh LANgUAgE SECTIONS.
12 — English ChANgINg ThE TILE CUTTINg WhEEL See Figure 20, page 19. WARNINg: A 7 in. tile cutting wheel is the maximum wheel capacity of the saw. Never use a wheel that is too thick to allow wheel washer to engage with the flats on the spindle. Larger wheels will come in contact with the splash hoo...
Page 13 - TABLE DES MATIÈRES; OUTILS ÉLECTRIQUES RYOBI; GARANTIE
2 — Français Introduction ..................................................................................................................................................................... 2 Garantie ................................................................................................
Page 14 - RÈGLES DE SÉCURITÉ GÉNÉRALES; LIRE TOUTES LES INSTRUCTIONS
3 — Français RÈGLES DE SÉCURITÉ GÉNÉRALES susceptibles de se prendre et vous entraîner dans les pièces mobiles. Des gants en caoutchouc et des chaussures antidérapantes (carter en caoutchouc) sont recommandées pour le travail à l’extérieur. Les cheveux longs doivent être ramassés sous un couvre-chef...
Page 15 - NE PAS UTILISER L’OUTIL SI LE COMMUTATEUR NE; POUR LES RÉPARATIONS. L’usage de toute
4 — Français NE PAS MALTRAITER LE CORDON D’ALIMENTATION. Ne jamais utiliser le cordon d’alimentation pour transporter l’outil et ne jamais débrancher ce dernier en tirant sur le cordon. Garder le cordon à l’écart de la chaleur, de l’huile et des objets tranchants. TOUJOURS UTILISER UN CORDON SPÉ...
Page 16 - RÈGLES DE SÉCURITÉ PARTICULIÈRES
5 — Français TOUJOURS ASSUJETTIR LA PIÈCE À COUPER fermement contre le guide de bord ou le bois de biseau. NE JAMAIS se tenir ou laisser une partie du corps se trouver dans la trajectoire de la meule. NE JAMAIS essayer de débloquer une muele coincées avant d’avoir ÉTEINT et débranché la scie. ...
Page 17 - SYMBOLES; SYMBOLE
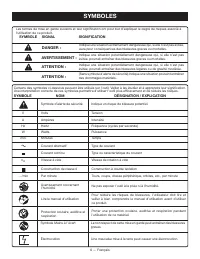
6 — Français SYMBOLES Certains des symboles ci-dessous peuvent être utilisés sur l’outil. Veiller à les étudier et à apprendre leur signification. Une interprétation correcte de ces symboles permettra d’utiliser l’outil plus efficacement et de réduire les risques. Lire le manuel d’utilisation Symbol...
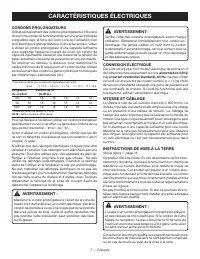
Page 18 - CONNEXION ÉLECTRIQUE; VITESSE ET CÂBLAGE; CORDONS PROLONGATEURS; CARACTÉRISTIQUES ÉLECTRIQUES
7 — Français AVERTISSEMENT : Vérifier l’état des cordons prolongateurs avant chaque utilisation. Remplacer immédiatement tout cordon en-dommagé. Ne jamais utiliser un outil dont le cordon d’alimentation est endommagé, car tout contact avec la partie endommagée pourrait causer un choc électrique et d...
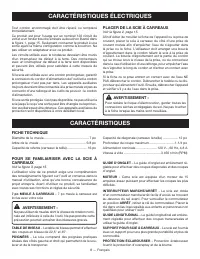
Page 19 - PLACER DE LA SCIE À CARREAUX; CARACTÉRISTIQUES; inTERRupTEuR mARchE/ARRÊT
8 — Français CARACTÉRISTIQUES ÉLECTRIQUES Tout cordon endommagé doit être réparé ou remplacé immédiatement.Ce produit est pour l’usage sur un nominal 120 circuit de volt et a un fonder bouche similaire au bouchon illustré dans la figure 1, page 15. Seulement connecter le produit à une sortie ayant l...
Page 20 - ASSEMBLAGE
9 — Français AVERTISSEMENT : Si des pièces manquent ou sont endommagées, ne pas utiliser cet outil avant qu’elles aient été remplacées. Le non-respect de cet avertissement pourrait entraîner des blessures graves. AVERTISSEMENT : Ne pas essayer de modifier cet outil ou de créer des ac-cessoires non r...
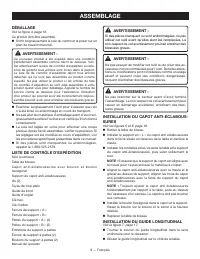
Page 21 - INSTALLATION DU GUIDE D’ONGLET; OUTILS NÉCESSAIRES :; INSTALLATION DU TUYAU DE TROP-PLEIN; Pour changer l’eau du réservoir :; UTILISATION; APPLICATIONS
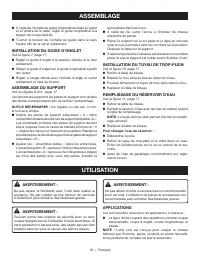
10 — Français ASSEMBLAGE À l’aide de l’échelle du guide longitudinal située à l’avant et à l’arrière de la table, régler le guide longitudinal à la largeur de coupe désirée. Tourner le bouton de l’échelle du guide dans le sens horaire afin de le serrer solidement. INSTALLATION DU GUIDE D’ONGLET ...
Page 22 - cOmmuTATEuR mARchE / ARRÊT; POUR METTRE LA SCIE EN MARCHE :; POUR VERROUILLER LA SCIE :; D’ARRÊT; EXÉCUTION DE COUPES; POUR EFFECTUER UNE COUPE TRANSVERSALE
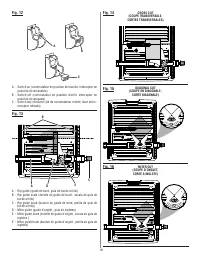
11 — Français cOmmuTATEuR mARchE / ARRÊT Voir la figure 12, page 18. Ce produit est équipé d’un commutateur avec dispositif de verrouillage intégré. Ce dispositif est conçu pour empêcher l’utilisation non autorisée et potentiellement dangereuse par des enfants ou personnes non compétentes. POUR METT...
Page 23 - POUR EFFECTUER UNE COUPE D’ONGLET; POUR EFFECTUER UNE COUPE EN L; POUR EFFECTUER UNE COUPE BISEAU
12 — Français Régler à l’angle désiré avec l’échelle d’angle et serrer solidement à l’aide du bouton Avant d’allumer la scie, s’assurer que le matériaux ne touche pas la meule à carreaux. Mettre le commutateur marche/arrêt en position de MARCHE (ON). Laissez le muele de coupe atteindre son r...
Page 24 - ENTRETIEN
13 — Français AVERTISSEMENT : Utiliser exclusivement des pièces Ryobi identiques à celles d’origine pour les réparations. L’usage de toute autre pièce pourrait créer une situation dangereuse ou endommager l’outil. AVERTISSEMENT : Toujours porter des lunettes étanches ou des lunettes de sécurité à co...
Page 25 - ÍNDICE DE CONTENIDO; LO QUE NO ESTÁ CUBIERTO:; GARANTÍA
2 — Español Introducción ...................................................................................................................................................................... 2 Garantía ................................................................................................
Page 26 - REGLAS DE SEGURIDAD GENERALES; LEA TODAS LAS INSTRUCCIONES; MANTENGA LIMPIA EL ÁREA DE TRABAJO.; NO deje herramientas o piezas de madera; MANTENGA ALEJADOS A LOS NIÑOS Y DEMÁS; SIEMPRE PÓNGASE ANTEOJOS DE SEGURIDAD CON
3 — Español REGLAS DE SEGURIDAD GENERALES ADVERTENCIA: Lea y comprenda todas las instrucciones. El incumplimiento de las instrucciones señaladas abajo puede causar descargas eléctricas, incendios y lesiones serias. LEA TODAS LAS INSTRUCCIONES FAMILIARÍCESE CON SU HERRAMIENTA ELÉCTRICA. Lea cuidado...
Page 27 - SIEMPRE UTILICE UN CORDÓN ELÉCTRICO DE
4 — Español REGLAS DE SEGURIDAD GENERALES AVANCE LA PIEZA DE TRABAJO EN LA DIRECCIÓN CORRECTA. Solamente empuje la pieza de trabajo hacia la muela, fresa o tambor de lijado, contra el sentido de rotación de éstos. N U N C A D E J E F U N C I O N A N D O D E S AT E N D I D A LA HERRAMIENTA. APAGU...
Page 28 - REGLAS DE SEGURIDAD ESPECÍFICAS; APAGAR y desconectar la sierra de
5 — Español REGLAS DE SEGURIDAD ESPECÍFICAS S I E M P R E A S E G U R E L A P I E Z A D E T R A B A J O firmemente contra guía de borde al hilo o la guía de corte a inglete. NUNCA se pare ni tenga ninguna parte del cuerpo en línea con la trayectoria de la muela de la sierra. NUNCA intente libe...
Page 29 - SÍMBOLOS; SÍMBOLO SEÑAL
6 — Español Es posible que se empleen en esta herramienta algunos de los siguientes símbolos. Le suplicamos estudiarlos y aprender su significado. Una correcta interpretación de estos símbolos le permitirá utilizar mejor y de manera más segura la herramienta. SÍMBOLO NOMBRE DENOMINACIÓN / EXPLICACIÓ...
Page 30 - CONEXIÓN ELÉCTRICA; VELOCIDAD Y CABLEADO; INSTRUCCIONES DE CONEXIÓN A TIERRA; CABLES DE EXTENSIÓN; Longitud; PARTES ELÉCTRICAS
7 — Español ADVERTENCIA: Inspeccione los cables de extensión cada vez antes de usarlos. Si están dañados, reemplácelos de inmediato. Nunca utilice la herramienta con un cable dañado, ya que si toca la parte dañada puede sufrir una descarga eléctrica, con las consecuentes lesiones graves. CONEXIÓN EL...
Page 31 - POSICIONAR DEL SIERRA DE LOSAS; CARACTERÍSTICAS; FAMILIARÍCESE CON LA SIERRA DE LOSAS; APAGADO, retire la llave del interruptor.
8 — Español Consulte a un electricista calificado o técnico de servicio si no ha comprendido completamente las instrucciones de conexión a tierra o si no está seguro si la herramienta está bien conectada a tierra. Repare o reemplace de inmediato todo cordón dañado o gastado.Este producto se debe usa...
Page 32 - PEDESTAL PARA SIERRA DE AZULEJOS -Esta sierra; DESEMPAQUETADO; LISTA DE EMPAQUETADO; ARMADO
9 — Español Placa de soporte “A”Placa de soporte “B”Patas de pedestal “A” (2)Patas de pedestal “B” (2)Riostra del pedestal de patas (2)Tuercas del pedestal de patas (2)Pernos del pedestal de patas (2)Manual del operador ADVERTENCIA: Si hay piezas dañadas o faltantes, no utilice esta herramienta sin ...
Page 33 - Para cambiar el agua del tanque:
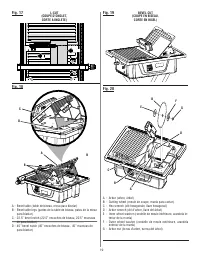
10 — Español Alinee la capucha contra salpicaduras con el disco y deslícela por encima del soporte. Alinee los orificios pasantes de la capucha contra salpicaduras con la ranura del soporte de la capucha contra salpicaduras. NOTA: Siempre ajuste la capucha contra salpicaduras horizontalmente a la ...
Page 34 - PARA APAGAR LA SIERRA:; PARA ASEGURAR LA SIERRA:; APAGADO y retire la llave. De esta manera se evita un; COUPES; FUNCIONAMIENTO
11 — Español ADVERTENCIA: No permita que su familarización con las herramientas lo vuelva descuidado. Tenga presente que un descuido de un instante es suficiente para causar una lesión seria. ADVERTENCIA: Cuando utilice herramientas, póngase siempre gafas de seguridad o anteojos protectores con prot...
Page 35 - PARA EFECTUAR CORTES TRANSVERSALES; PARA EFECTUAR CORTES A INGLETE; OFF. Espere a que la muela se; PARA EFECTUAR CORTES EN L
12 — Español FUNCIONAMIENTO Un problema común al cortar losa se desvía de la línea marcada. Una vez que usted se ha desviado de la marca, usted no puede forzar la espalda de la mueda a la línea torciendo el losa. En vez de eso, atrás arriba y recut el mosaico que corta una pequeña cantidad de losa h...
Page 36 - PARA EFECTUAR CORTES EN BISEL
13 — Español Asegúrese de que la material está lejos de la muela para cortar losas antes de encender la sierra. Coloque el interruptor de encendido/apagado en la posición de ENCENDIDO. Deje que la muela para cortar adquiera velocidad y espera para la rueda para mojar antes de mover la mesa de ...
Page 37 - CAMBIO DEL DISCO DE TROCEADO DE; MANTENIMIENTO
14 — Español ADVERTENCIA: Al dar servicio a la unidad, sólo utilice piezas de repuesto Ryobi idénticas. El empleo de piezas diferentes puede causar un peligro o dañar el producto. ADVERTENCIA: Siempre use gafas de seguridad o anteojos protectores con protección lateral al usar herramientas eléctrica...
Page 42 - bEvEl Cut
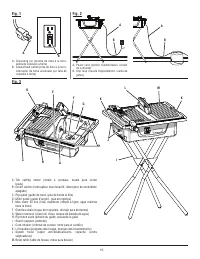
19 Fig. 17 Fig. 18 A b C A - Bevel table (table de biseau, mesa para biselar) B - Bevel table legs (pattes de la table de biseau, patas de la mesa para biselar) C - 22.5” bevel notch (22.5” encoches de biseau, 22.5” muescas de para biselar) D - 45” bevel notch (45” encoches de biseau , 45” muescas d...
Page 44 - MANUEL D’UTILISATION /MANUAL DEL OPERADOR; PARTS ANd SERVicE; • HOw tO OBtAIN REpLAcEMENt pARtS:; PiÈcES ET SERVicE
21 987000-6002-27-09 (REV:01) OPERATOR’S MANUAL / MANUEL D’UTILISATION /MANUAL DEL OPERADOR 7 in. TILE SAW WITh FOLDINg STANDSCIE À CARREAUx DE 178 mm (7 po) AvEC SUPPORTSIERRA DE LOSAS DE 178 mm (7 pulg.) CON bASE WS720S • PARTS ANd SERVicE Prior to requesting service or purchasing replacement part...


 Ryobi SS630
User Manual
Ryobi SS630
User Manual
 Ryobi 18A-C06-734
User Manual
Ryobi 18A-C06-734
User Manual
 Ryobi 21AB454B734
User Manual
Ryobi 21AB454B734
User Manual
 Ryobi 41CD875A034
User Manual
Ryobi 41CD875A034
User Manual
 Ryobi 767R
User Manual
Ryobi 767R
User Manual
 Ryobi 2079R
User Manual
Ryobi 2079R
User Manual
 Ryobi 725R
User Manual
Ryobi 725R
User Manual
 Ryobi 890R
User Manual
Ryobi 890R
User Manual
 Ryobi 825R
User Manual
Ryobi 825R
User Manual
 Ryobi 96116000202
User Manual
Ryobi 96116000202
User Manual