Page 2 - See this fold-out section for all the figures referenced
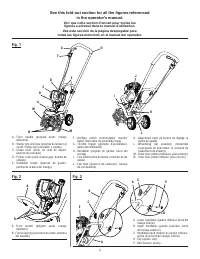
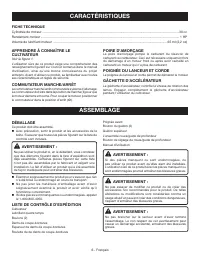
ii Fig. 1 A - Front handle (poignée avant, mango delantero) B - Frame opening (ouverture du cadre, abertura del bastidor) Fig. 2 Fig. 3 A - Front handle (poignée avant, mango delantero) B - Starter grip and rope (poignée du lanceur et corde, mango del arrancador y cuerda) C - Choke lever (levier de ...
Page 6 - INTRODUCTION; INTRODUCTION / INTRODUCCIÓN; TABLE OF CONTENTS; TABLE DES MATIÈRES / ÍNDICE DE CONTENIDO
2 - English INTRODUCTION INTRODUCTION / INTRODUCCIÓN This product has many features for making its use more pleasant and enjoyable. Safety, performance, and dependability have been given top priority in the design of this product making it easy to maintain and operate. * * * Ce produit offre de nomb...
Page 7 - SAVE THESE INSTRUCTIONS; GENERAL SAFETY RULES
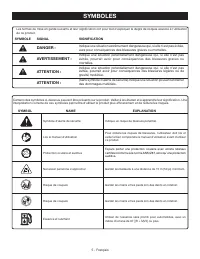
3 - English WARNING! READ AND UNDERSTAND ALL INSTRUCTIONS. Failure to follow all instructions listed below, may result in electric shock, fire and/or serious personal injury. SAVE THESE INSTRUCTIONS Read the operator’s manual carefully. Be thoroughly famil-iar with the controls and the proper use ...
Page 8 - REFUELING; SPECIFIC SAFETY RULES; SERVICE
4 - English Do not use near underground electric cables, telephone lines, pipes, or hoses. If in doubt, contact your utility or telephone company to locate underground services. If the unit strikes a foreign object, stop the engine, dis- connect the spark plug, thoroughly inspect the machine for...
Page 9 - SYMBOLS
5 - English SYMBOLS Some of the following symbols may be used on this product. Please study them and learn their meaning for safe operation of this product. SYMBOL NAME EXPLANATION Safety Alert Indicates a potential personal injury hazard. Read Operator’s Manual To reduce the risk of injury, user mu...
Page 11 - ASSEMBLY; INSTALLING THE FRONT HANDLE; OPERATION; ADDING/CHECKING ENGINE LUBRICANT
7 - English NOTE: Do not allow throttle cable to become pinched when installing the handlebar. Align the holes in the clip, the upper handlebar and lower handlebar. Install bolt as shown in Figure 3. Thread handlebar knob onto bolt and tighten securely. Repeat with other side INSTALLING THE WH...
Page 12 - FUELING AND REFUELING THE CULTIVATOR; APPLICATIONS
8 - English OPERATION Always use a 4-stroke motor lubricant that meets or exceeds the requirements for API service classification SJ. Check lubricant level before each use. NOTE: Non-detergent or 2-stroke engine lubricants will damage the engine and should not be used. To add engine lubricant: Rem...
Page 13 - GENERAL CULTIVATING
9 - English OPERATION Start the engine. Stand behind the unit with the tines on the ground and the work area clean and free of obstructions. Completely engage the throttle trigger to begin tine rotation. NOTE: If the machine moves forward too quickly and wheels are in position B (see figure 15...
Page 14 - USING THE CULTIVATOR FOR EDGING; EDGING TIPS; ADJUSTMENTS
10 - English OPERATION USING THE CULTIVATOR FOR EDGING See Figures 13 - 14. The cultivator will edge along sidewalks, driveways, flowerbeds, curbs, and similar areas. To install the edging tine: Remove all tines and felt washers from the shaft. NOTE: Keep all removable parts in a secure place as t...
Page 15 - MAINTENANCE; GENERAL MAINTENANCE; FUEL CAP
11 - English MAINTENANCE WARNING: When servicing, use only identical replacement parts. Use of any other parts may create a hazard or cause product damage. WARNING: Always wear eye protection with side shields marked to comply with ANSI Z87.1, along with hearing protection. Failure to do so could re...
Page 16 - CHANGING ENGINE LUBRICANT; CLEANING THE EXHAUST PORT AND MUFFLER
12 - English MAINTENANCE Air Filter: Clean the air filter as previously described. Cultivator Body: Clean dirt, grass, and other materials from the entire unit. Wipe the tines with lubricant or spray them with silicone lubricant to prevent rusting. Oil the throttle cable and all visible movi...
Page 17 - PROBLEM; PREPARING FOR USE AFTER STORAGE; HIGH ALTITUDE ENGINE OPERATION
13 - English MAINTENANCE TROUBLESHOOTING PROBLEM CAUSE REMEDY Engine fails to start. On/stop switch is in the off position.No fuel in tank.Spark plug shorted or fouled.Spark plug is broken (cracked porcelain or electrodes broken).Ignition lead wire shorted, broken, or disconnected from spark plug.Ig...
Page 18 - WARRANTY; CALL US FIRST; For any questions about operating or maintaining your product,; TROUBLESHOOTING
14 - English WARRANTY CALL US FIRST For any questions about operating or maintaining your product, call the Ryobi ® Help Line! Your product has been fully tested prior to shipment to ensure your complete satisfaction. TROUBLESHOOTING PROBLEM CAUSE REMEDY Engine rope cannot be pulled O i l h a s e n ...
Page 19 - LIMITED WARRANTY STATEMENT
15 - English WARRANTY LIMITED WARRANTY STATEMENT Techtronic Industries North America, Inc., warrants to the original retail purchaser that this RYOBI ® brand outdoor product is free from defect in material and workmanship and agrees to repair or replace, at Techtronic Industries North America, Inc.’...
Page 21 - NOTES
Page 22 - CONSERVER CES INSTRUCTIONS; RÈGLES DE SÉCURITÉ GÉNÉRALES; DÉPANNAGE
3 - Français AVERTISSEMENT ! Lire et veiller à bien comprendre toutes les instructions. Le non respect de toutes les instructions ci-dessous peut entraîner un choc électrique, un incendie et / ou des bles- sures graves. CONSERVER CES INSTRUCTIONS Lire attentivement le manuel d’utilisation. Bien se...
Page 23 - RAVITAILLEMENT EN CARBURANT; RÈGLES DE SÉCURITÉ PARTICULIÈRES
4 - Français Ne pas utiliser à proximité de conduites, tuyaux, lignes téléphoniques ou câbles électriques souterrains. En cas de doute, contacter la compagnie d’électricité, de gaz, d’eau ou de téléphone pour identifier les services souterrains. Si l’appareil frappe un corps étranger, couper...
Page 24 - SYMBOLES
5 - Français SYMBOLES Certains des symboles ci-dessous peuvent être présents sur le produit. Veiller à les étudier et à apprendre leur signification. Une interprétation correcte de ces symboles permettra d’utiliser le produit plus efficacement et de réduire les risques. SYMBOL NAME EXPLANATION Symbo...
Page 25 - CARACTÉRISTIQUES; FICHE TECHNIQUE; COMMUTATEUR MARCHE/ARRÊT; DÉBALLAGE; LISTE DE CONTRÔLE D’EXPÉDITION; ASSEMBLAGE
6 - Français CARACTÉRISTIQUES FICHE TECHNIQUE Cylindrée de moteur ....................................................................................................................................................... 30 ccRendement-moteur ...............................................................
Page 26 - INSTALLATION DE LA POIGNÉE AVANT; UTILISATION; AJOUT/VÉRIFICATION DE LUBRIFIANT
7 - Français INSTALLATION DE L’ENSEMBLE ROUES/GUIDE DE PROFONDEUR Voir les figures 4 - 5. Utiliser l’ensemble roues/guide de profondeur pour transporter l’unité vers le lieu de travail ou en revenir, ou pour la déplacer pendant le labourage. Pour installation : Localiser le bouton de réglage de ro...
Page 27 - APPROVISIONNEMENT EN CARBURANT; CARBURANTS OXYGÉNÉS; MISE EN MARCHE ET ARRÊT DU
8 - Français UTILISATION Pour vérifier le niveau du lubrifiant moteur : Mettre le cultivateur en position verticale en ayant installé les roues au préalable pour plus de stabilité Essuyer la jauge et l’insérer de nouveau dans le trou sans visser. Retirer une nouvelle fois la jauge et vérifier ...
Page 28 - TRAVAIL GÉNÉRAL DU SOL
9 - Français UTILISATION NOTE : Si l’équipement avance trop rapidement et que les roues sont en position B avec la barre de recouvrement installée (voir la figure 15), appuyer sur le guidon pour laisser la barre de recouvrement pénétrer dans la terre et ralentir le mouvement en avant de l’équipement...
Page 29 - PROFONDEUR AVIS; RÉGLAGES
10 - Français UTILISATION Placer la roue-guide sur un des côtés de l’arbre des dents. Pour fixer solidement la roue-guide, placer la goupille d’attelage dans le trou le plus près de la boîte d’engrenages. NOTE : La roue-guide est conçue pour se déplacer le long de l’arbre. Elle ne se verrouille ...
Page 30 - ENTRETIEN; ENTRETIEN GÉNÉRAL; NETTOYAGE DU FILTRE À AIR; BOUCHON DU RÉSERVOIR
11 - Français ENTRETIEN AVERTISSEMENT : Utiliser exclusivement des pièces d’origine pour les réparations. L’usage de toute autre pièce pourrait créer une situation dangereuse ou endommager le produit. AVERTISSEMENT : Tojours porter une protection oculaire avec écrans latéraux certifiée conforme à la...
Page 31 - CHANGER LE LUBRIFIANT À MOTEUR
12 - Français ENTRETIEN La bougie étant déposée, tirer deux ou trois fois sur le cordon du lanceur pour enduire l’intérieur de la paroi de cylindre. Inspecter la bougie et la nettoyer ou la remplacer, le cas échéant. Réinstaller la bougie, mais laisser le fil de bougie déconnecté. Filtre à air...
Page 32 - RÉGLAGE DU RALENTI
13 - Français ENTRETIEN DÉPANNAGE PROBLÈME CAUSE SOLUTION Le moteur ne démarre pas. L e c o m m u t a t e u r d u m o t e u r e s t e n position d’arrêt.Pas de carburant dans le réservoir.Bougie court-circuité ou encrassée.La bougie est cassée (porcelaine fissurée ou électrodes cassées).Fil de bougi...
Page 33 - NOUS APPELER D’ABORD
14 - Français GARANTIE DÉPANNAGE PROBLÈME CAUSE SOLUTION Le moteur dégage trop de fumée Une trop grande quantité d’huile se trouve dans le carter. V ider l’huile et remplir le moteur avec la quantité appropriée d’huile à moteur 20W 30. Consulter la section intitulée Ajout d’huile à moteur et vérific...
Page 34 - GARANTIE; ÉNONCÉ DE LA GARANTIE LIMITÉE
15 - Français GARANTIE ÉNONCÉ DE LA GARANTIE LIMITÉE Techtronic Industries North America, Inc., garantit à l’acheteur original que ce produit RYOBI ® est exempt de tous vices de matériaux ou de fabrication et s’engage à réparer ou remplacer gratuitement, à son choix, tout produit s’avérant défectueu...
Page 37 - REGLAS DE SEGURIDAD GENERALES; GUARDE ESTAS INSTRUCCIONES
3 - Español REGLAS DE SEGURIDAD GENERALES ¡ADVERTENCIA! LEA Y COMPRENDA TODAS LAS INSTRUCCIONES. El incumplimiento de las instrucciones señaladas abajo puede causar descargas eléctricas, incendios y lesiones corporales serias. GUARDE ESTAS INSTRUCCIONES Lea cuidadosamente el manual del operador. F...
Page 38 - REABASTECIMIENTO DE COMBUSTIBLE; REGLAS DE SEGURIDAD ESPECÍFICAS
4 - Español No utilice la unidad cerca de cables eléctricos o telefónicos, o tubería subterráneos, ni de mangueras Si tiene dudas, comuníquese con la compañía de servicios públicos o de teléfonos para localizar las líneas de servicio subterráneas. Si la unidad le pega a un objeto extraño, apague...
Page 39 - SÍMBOLOS
5 - Español SÍMBOLOS Es posible que se empleen en este producto algunos de los siguientes símbolos. Le suplicamos estudiarlos y aprender su significado. Una correcta interpretación de estos símbolos le permitirá utilizar mejor y de manera más segura la producto. SÍMBOLO NOMBRE DENOMINACIÓN / EXPLICA...
Page 40 - ESPECIFICACIONES DEL PRODUCTO
6 - Español CARACTERÍSTICAS DESEMPAQUETADO Este producto requiere armarse. Extraiga cuidadosamente de la caja el producto y los accesorios. Asegúrese de que estén presentes todos los artículos enumerados en la lista de empaquetado. ADVERTENCIA: No utilice este producto si alguna pieza incluida en ...
Page 41 - INSTALACIÓN DEL CONJUNTO DE LAS RUEDAS; ARMADO; INSTALACIÓN DEL MANGO DELANTERO; FUNCIONAMIENTO
7 - Español acelerador y el gatillo del acelerador se encuentren en el lado derecho, tal como se indica en la figura. NOTA: No deje que se comprima el cable del acelerador cuando instale la barra del mango. Alinee los agujeros del clip con los agujeros del parte superior de la barra del mango y lo...
Page 43 - CULTIVO GENERAL
9 - Español FUNCIONAMIENTO La barra de arrastre tiene dos posiciones de instalación a escoger. Con base en el tipo de tierra por cultivar y el estado de la misma, variará la altura correspondiente de la barra de arrastre. Ajuste la posición de la barra de arrastre según las directrices señaladas e...
Page 44 - PROFUNDIDAD CONSEJOS; AJUSTES
10 - Español FUNCIONAMIENTO USO DE LA CULTIVADORA PARA RECORTAR BORDES Vea la figura 13 . La cultivadora cortado los bordes del césped de aceras, de las maneras de la entrada, macizos de flores y de las áreas similares. Pour installer la dent de coupe-bordures: Retire todas las púas y las arandela...
Page 45 - MANTENIMIENTO
11 - Español MANTENIMIENTO ADVERTENCIA: Al dar servicio a la unidad, sólo utilice piezas de repuesto idénticas. El empleo de piezas diferentes puede causar un peligro o dañar el producto. ADVERTENCIA: Cuando utilice este producto, póngase siempre gafas de seguridad con protección lateral. Si la oper...
Page 46 - AJUSTE DE LA APERTURA DEL ÁRBOL DE
12 - Español MANTENIMIENTO Filtro de aire: Limpie el filtro de aire como se explicó previamente. Cuerpo de la cultivadora: Limpie toda la suciedad, pasto y demás materiales de toda la unidad. Limpie las aspas con lubricante o rocíelas con lubricante de silicón para impedir la oxidación de las ...
Page 47 - AJUSTE DE LA MARCHA LENTA
13 - Español MANTENIMIENTO SOLUCIÓN DE PROBLEMAS PROBLEMA CAUSA SOLUCIÓN El motor no arranca. El interruptor del apagado/marcha está en la posición de apagado.No hay combustible en el tanque.Falló o tiene corto la bujía.Se rompió la bujía (se rajó la porcelana o se rompieron los electrodos).El cable...
Page 48 - GARANTÍA; LLÁMENOS PRIMERO; ¿NECESITA A; SOLUCIÓN DE PROBLEMAS
14 - Español GARANTÍA LLÁMENOS PRIMERO Si tiene preguntas sobre el funcionamiento o el mantenimiento este producto,llame al teléfono de atención al consumidor de Ryobi ® ! La sopladora/aspiradora ha sido probada enteramente antes de embarcarse para asegurar la satisfacción del consumidor. 1-800-860-...
Page 51 - NOTAS
Page 52 - OPERATOR’S MANUAL; TECHTRONIC INDUSTRIES NORTH AMERICA, INC.
98700051910-15-10 (REV:08) OPERATOR’S MANUAL MANUEL D’UTILISATIONMANUAL DEL OPERADOR 4-CYCLE CULTIVATOR CULTIVATEUR QUATRE TEMPSCULTIVADORA DE CUATRO TIEMPOS RY64400 WARNING: The engine exhaust from this product contains chemicals known to the State of California to cause cancer, birth defects, or o...