Page 2 - TABLE OF CONTENTS; TABLE DES MATIÈRES / ÍNDICE DE CONTENIDO; INTRODUCTION; INTRODUCTION / INTRODUCCIÓN
Page 2 Introduction ....................................................................................................................................... 2 Introduction / Introducción Important Safety Instructions .................................................................................
Page 3 - Read and understand all instructions.; READ ALL INSTRUCTIONS; DANGER —; IMPORTANT SAFETY INSTRUCTIONS
Page 3 — English WARNING: Read and understand all instructions. Failure to follow all instructions listed below may result in electric shock, fire, and/or serious personal injury. READ ALL INSTRUCTIONS For safe operation, read and understand all instructions before using this product. Be familiar ...
Page 4 - Use outdoor extension cords marked; DANGER — Keep hands away from blade.; With a basic understanding of kickback, you
Page 4 — English Do not abuse the cord. Never use the cord to carry the product or to disconnect the plug from an outlet. Keep cord away from heat, oil, sharp edges, or moving parts. Replace damaged cords immediately. Damaged cords increase the risk of electric shock. Make sure your extension co...
Page 5 - If the power supply cord is damaged, it must; SPECIFIC SAFETY RULES
Page 5 — English SPECIFIC SAFETY RULES Do not operate the saw with one hand! Serious injury to the operator, helpers, bystanders, or any combination of these persons may results from one hand operation. This saw is intended for two-handed use. Use extreme caution when cutting small-sized brush...
Page 6 - SYMBOLS; NOTICE
Page 6 — English SYMBOLS The following signal words and meanings are intended to explain the levels of risk associated with this product. SYMBOL SIGNAL MEANING DANGER: Indicates an imminently hazardous situation, which, if not avoided, will result in death or serious injury. WARNING: Indicates a pot...
Page 7 - SYMBOL
Page 7 — English Some of the following symbols may be used on this product. Please study them and learn their meaning. Proper interpretation of these symbols will allow you to operate the product better and safer. SYMBOL NAME EXPLANATION Gloves Wear non-slip, heavy-duty protective gloves when handli...
Page 8 - DOUBLE INSULATION; Servicing of a product with double insulation; ELECTRICAL CONNECTION; power supply that is 120; EXTENSION CORDS; ELECTRICAL
Page 8 — English A proper extension cord is available at an authorized service center.It is possible to tie the extension cord and power cord in a knot to prevent them from becoming disconnected during use. Make the knot as shown in figure 1, then connect the plug end of the power cord into the rece...
Page 9 - PRODUCT SPECIFICATIONS; FEATURES; KNOW YOUR ELECTRIC LOPPER
Page 9 — English PRODUCT SPECIFICATIONS Chain Lubricant Tank Capacity ....................2 oz.Bar Length .....................................................8 in.Cutting Capacity............................................4 in.Chain Pitch .................................................3/8 in.Cha...
Page 10 - UNPACKING; Packing List; PACKING LIST; ASSEMBLY; LOWER JAW LOCK BUTTON
Page 10 — English UNPACKING This product requires assembly. Carefully remove the product and any acces- sories from the box. Make sure that all items listed in the packing list are included. WARNING: Do not use this product if any parts in the Packing List are already assembled to your product whe...
Page 11 - INSTALLING FRONT HANDLE
Page 11 — English ASSEMBLY INSTALLING FRONT HANDLE See Figures 3 - 4. Install the front handle so that the short side of the handle is on the same side as the motor. Disconnect the lopper from the power supply. Rotate the front handle knob counterclockwise to remove. Set knob and washer aside. ...
Page 12 - OIL; APPLICATIONS; Lopper comes from the factory with no; OPERATION
Page 12 — English CHAIN LUBRICANT Fig. 5 OIL RESERVOIR CAP QUICK VIEW OIL INDICATOR DANGER: Never cut near power lines, electric cords, or other electric sources. If bar and chain jams on any electrical cord or line, DO NOT TOUCH THE BAR OR CHAIN! THEY CAN BECOME ELECTRICALLY LIVE AND VERY DANGEROUS...
Page 13 - CONNECTING TO POWER SUPPLY; BUTTON; STARTING AND STOPPING
Page 13 — English Wipe off excess lubricant. Check and fill the oil tank when quick view oil indicator is below the MIN indicator line. Repeat as needed. NOTE: Do not use dirty, used, or otherwise contaminated lubricants. Damage may occur to the bar or chain. NOTE: It is normal for oil to seep...
Page 14 - HOLDING THE LOPPER; PROPER OPERATING POSITION
Page 14 — English HOLDING THE LOPPER See Figure 7. The unit has both a front and rear handle. With the blade directed away from you, hold the unit by both handles and wear non-slip gloves for maximum grip and protection. WARNING: Always keep both hands on the handles. Never hold limbs with one hand ...
Page 16 - GENERAL MAINTENANCE; Replacing the Bar and Chain; MAINTENANCE
Page 16 — English WARNING: When servicing, use only identical replacement parts. Use of any other parts could create a hazard or cause product damage. WARNING: Always wear eye protection with side shields marked to comply with ANSI Z87.1, along with head protection. Failure to do so could result in ...
Page 17 - REPLACING THE BAR AND CHAIN
Page 17 — English MAINTENANCE Chain must be re-tensioned whenever the flats on the drive links hang out of the bar groove as shown in fig. 12. During normal operation, the temperature of the chain will increase. The drive links of a correctly tensioned warm chain will hang approximately .050 in....
Page 19 - CHAIN OILER
Page 19 — English CHAIN OILER See Figure 18. Use Premium Bar and Chain Lubricant. It is de-signed for chains and chain oilers and is formu-lated to perform over a wide temperature range with no dilution required. Stop the motor and disconnect from power supply. Remove the oil reservoir cap and c...
Page 20 - HOW TO SHARPEN THE CUTTERS; Stop the motor and disconnect from power; TOP PLATE FILING ANGLE; CORRECT 30° - File holders are marked with
Page 20 — English MAINTENANCE HOW TO SHARPEN THE CUTTERS See Figures 20 - 23. Be careful to file all cutters to the specified angles and to the same length, as fast cutting can be obtained only when all cutters are uniform. Stop the motor and disconnect from power supply. Tighten the chain tensi...
Page 21 - SIDE PLATE ANGLE; KICKBACK; DEPTH GAUGE CLEARANCE
Page 21 — English SIDE PLATE ANGLE See Figure 25. CORRECT - 80° Produced automatically if cor- rect diameter file is used in file holder. HOOK - “Grabs” and dulls quickly. Increases potential of KICKBACK . Results from using a file with diameter too small, or file held too low. BACKWARD SLOPE ...
Page 22 - PROBLEM; Chain Tension; CALL US FIRST; For any questions about operating or maintaining your product,; STORING THE PRODUCT
Page 22 — English PROBLEM CAUSE REMEDY Bar and chain running hot and smoking. Check chain tension for overtightened condition.Oil reservoir empty. Tension chain. Refer to Chain Tension earlier in this manual. Check oil reservoir. Motor runs, but chain is not rotating. Chain tension too tight.Check g...
Page 23 - WARRANTY; LIMITED WARRANTY STATEMENT
Page 23 — English WARRANTY LIMITED WARRANTY STATEMENT Techtronic Industries North America, Inc., warrants to the original retail purchaser that this RYOBI ® brand outdoor product is free from defect in material and workmanship and agrees to repair or replace, at Techtronic Industries North America, ...
Page 24 - Lire et veiller à bien comprendre toutes les; LIRE TOUTES LES INSTRUCTIONS; DANGER —; INSTRUCTIONS IMPORTANTES CONCERNANT LA SÉCURITÉ
Page 3 — Français AVERTISSEMENT : Lire et veiller à bien comprendre toutes les instructions. Le non-respect des instructions ci-dessous peut entraîner une électrocution, un incendie et des blessures graves. LIRE TOUTES LES INSTRUCTIONS Pour travailler en toute sécurité, lire et veiller à bien comp...
Page 25 - A V E R T I S S E M E N T :; U t i l i s e z l e s c o r d o n s; DANGER — Éloigner les mains des lames.; Une compréhension élémentaire du rebond
Page 4 — Français seulement d’une façon. Si la fiche ne peut pas être branchée complètement dans le cordon d’extension, renversez la fiche. Si la fiche ne peut toujours pas être branchée, procurez-vous un cordon d’extension approprié. Un cordon d’extension polarisé exige l’utilisation d’une prise mu...
Page 26 - Ne pas faire fonctionner l’ébrancheur si le; RÈGLES DE SÉCURITÉ PARTICULIÈRES
Page 5 — Français Pour éviter les risques d’électrocution, ne pas travailler à moins de 15 metres (50 pi) de lignes électriques. Avant de lancer le moteur, s’assurer que la chaîne n’est en contact avec aucun objet. Ne pas faire fonctionner l’ébrancheur si le protecteur supérieur ou inférieur...
Page 27 - Indique une situation potentiellement dangereuse qui,; SYMBOLES; Indique un risque de blessure potentiel.
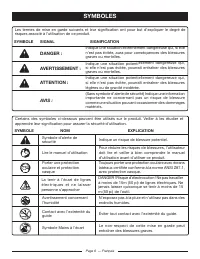
Page 6 — Français Les termes de mise en garde suivants et leur signification ont pour but d’expliquer le degré de risques associé à l’utilisation de ce produit. SYMBOLE SIGNAL SIGNIFICATION DANGER : Indique une situation extrêmement dangereuse qui, si elle n’est pas évitée, aura pour conséquences de...
Page 28 - SYMBOLE
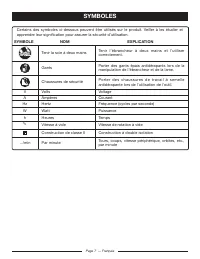
Page 7 — Français Certains des symboles ci-dessous peuvent être utilisés sur le produit. Veiller à les étudier et apprendre leur signification pour assurer la sécurité d’utilisation. SYMBOLE NOM EXPLICATION Tenir la scie à deux mains Tenir l’ébrancheur à deux mains et l’utiliser correctement. Gants ...
Page 29 - ISOLATION DOUBLE; a l i m e n t a t i o n 1 2 0 V, c . a . ( c o u r a n t r é s i d e n t i e l; CORDONS PROLONGATEURS; CARACTÉRISTIQUES ÉLECTRIQUES
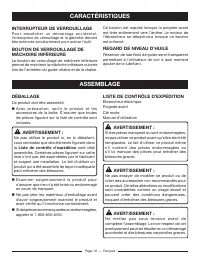
Page 8 — Français Avant d’utiliser un cordon prolongateur, vérifier que ses fils ne sont ni détachés ni exposés et que son isolation n’est ni coupée, ni usée.Il est possible de se procurer une rallonge électrique appropriée dans un centre de service autorisé.Il est possible d’attacher le cordon d’al...
Page 30 - CARACTÉRISTIQUES; APPRENDRE À CONNAÎTRE; Volume du réservoir
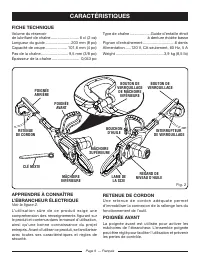
Page 9 — Français CARACTÉRISTIQUES APPRENDRE À CONNAÎTRE L’ÉBRANCHEUR ÉLECTRIQUE Voir la figure 2. L’ u t i l i s a t i o n s û re d e c e p ro d u i t e x i g e u n e comprehension des renseignements figurant sur le produit et contenus dans le manuel d’utilisation, ainsi qu’une bonne connaissance d...
Page 31 - Liste de contrôle d’expédition; ASSEMBLAGE; r u n d é m a r r a g e a c c i d e n t e l ,
Page 10 — Français LISTE DE CONTRÔLE D’EXPÉDITION Ébrancheur électriquePoignée avantClé mixteManuel d’utilisation AVERTISSEMENT : Si des pièces manquent ou sont endommagées, ne pas utiliser ce produit avant qu’elles aient été remplacées. Le fait d’utiliser ce produit même s’il contient des pièces en...
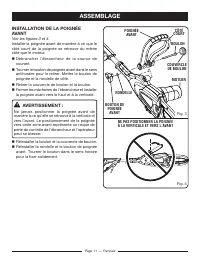
Page 32 - Voir les figures 3 et 4.
Page 11 — Français ASSEMBLAGE INSTALLATION DE LA POIGNÉE AVANT Voir les figures 3 et 4. Installer la poignée avant de manière à ce que le côté court de la poignée se retrouve du même côté que le moteur. Débrancher l’ébrancheur de la source de courant. Tourner le bouton de poignée avant dans le s...
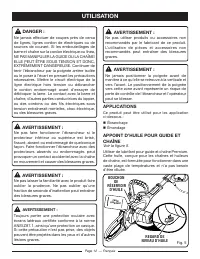
Page 33 - Continuer de; Ébranchage; UTILISATION
Page 12 — Français BOUCHON DE RÉSERVOIR D’HUILE REGARD DE NIVEAU D’HUILE DANGER : Ne jamais effectuer de coupes près de cerca de lignes, lignes cordon de électriques ou de sources de courant. Si les embouteillages de barre et chaîne sur la cordon électrique ou línea, NE PAS MANIPULER LA GUIDE OU LA ...
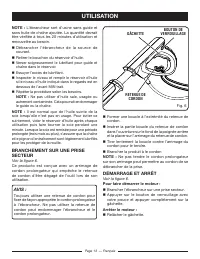
Page 34 - Essuyer l’excès de lubrifiant.; BOUTON DE; DÉMARRAGE ET ARRÊT; Pour faire démarrer le moteur :
Page 13 — Français NOTE : L’ébrancheur sort d’usine sans guide et sans huile de chaîne ajoutée. La quantité devrait être vérifiée à tous les 20 minutes d’utilisation et renouvelée au besoin. Débrancher l’ébrancheur de la source de courant. Retirer le bouchon du réservoir d’huile. Verser soigne...
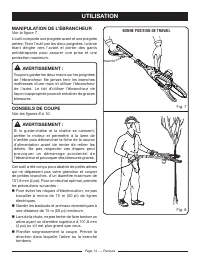
Page 35 - MANIPULATION DE L’ÉBRANCHEUR; Voir les figures 8 à 10.; BONNE POSITION DE TRAVAIL
Page 14 — Français MANIPULATION DE L’ÉBRANCHEUR Voir la figure 7. L’outil comporte une poignée avant et une poignée arrière. Tenir l’outil par les deux poignées, la lame étant dirigée vers l’avant et porter des gants antidérapants pour assurer une prise et une protection maximum. AVERTISSEMENT : Tou...
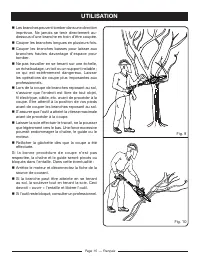
Page 36 - coupe. Être attentif à la position de vos pieds
Page 15 — Français Les branches peuvent tomber dans une direction imprévue. Ne jamais se tenir directement au-dessous d’une branche en train d’être coupée. Couper les branches longues en plusieurs fois. Couper les branches basses pour laisser aux branches hautes davantage d’espace pour tom...
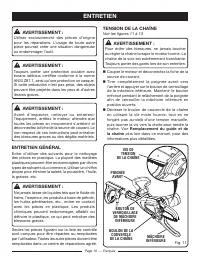
Page 37 - ENTRETIEN GÉNÉRAL; Remplacement du guide et de; ENTRETIEN
Page 16 — Français AVERTISSEMENT : Utiliser exclusivement des pièces d’origine pour les réparations. L’usage de toute autre pièce pourrait créer une situation dangereuse ou endommager l’outil. AVERTISSEMENT : Toujours porter une protection oculaire avec écrans latéraux certifiée conforme à la norme ...
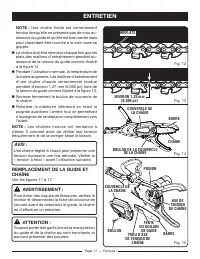
Page 38 - Une chaîne froide est correctement
Page 17 — Français ENTRETIEN NOTE : Une chaîne froide est correctement tendue lorsqu’elle ne présente pas de mou au-dessous du guide et qu’elle est bien serrée mais peut cependant être tournée à la main sans se gripper. La chaîne doit être retendue chaque fois que les plats des maillons d’entraîne...
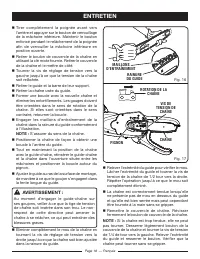
Page 39 - Tourner la vis de réglage de tension vers la
Page 18 — Français ENTRETIEN Tirer complètement la poignée avant vers l’arrière et appuyer sur le bouton de verrouillage de la mâchoire inférieure. Maintenir le bouton enfoncé pendant le relâchement de la poignée afin de verrouiller la mâchoire inférieure en position ouverte. Retirer le boulon d...
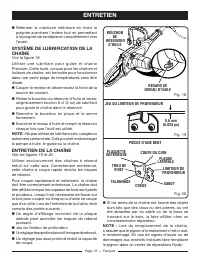
Page 40 - SYSTÈME DE LUBRIFICATION DE LA
Page 19 — Français Refermer la mâchoire inférieure en tirant la poignée avantvers l’arrière tout en permettant à la poignée de se déplacer complètement vers l’avant. SYSTÈME DE LUBRIFICATION DE LA CHAÎNE Voir la figure 18. Utiliser une lubrifiant pour guide et chaîne Premium. Cette huile, conçue p...
Page 41 - COMMENT AFFÛTER LES DENTS; Couper le moteur et déconnectez la fiche de la
Page 20 — Français COMMENT AFFÛTER LES DENTS Voir les figures 20 à 23. Veiller à limer toutes les dents aux angles spécifiés et à la même longueur, car une coupe rapide ne peut être obtenue qu’avec des dents uniformes. Couper le moteur et déconnectez la fiche de la source de courant. Serrer la c...
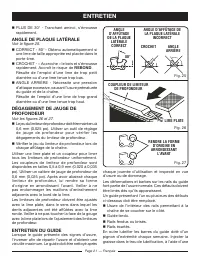
Page 42 - ANGLE DE PLAQUE LATÉRALE; REBOND; ENTRETIEN DU GUIDE
Page 21 — Français PLUS DE 30° - Tranchant aminci, s’émousse rapidement. ANGLE DE PLAQUE LATÉRALE Voir la figure 25. CORRECT - 80° - Obtenu automatiquement si une lime de taille appropriée est placée dans le porte-lime. CROCHET - « Accroche » le bois et s’émousse rapidement. Accroît le risque ...
Page 43 - REMISAGE LE PRODUIT; Tension de la chaîne; NOUS APPELER D’ABORD; BESOIN D’AID
Page 22 — Français seringue, une fois par semaine. Retourner le guide et s’assurer que les trous de lubrification et la rainure de chaîne sont propres. REMISAGE LE PRODUIT Déconnectez la fiche de la source de courant et garder hors de la portée des enfants. PROBLÈME CAUSE SOLUTION L e g u i d e e ...
Page 44 - GARANTIE; ÉNONCÉ DE LA GARANTIE LIMITÉE
Page 23 — Français GARANTIE ÉNONCÉ DE LA GARANTIE LIMITÉE Techtronic Industries North America, Inc., garantit à l’acheteur original que ce produit RYOBI ® est exempt de tous vices de matériaux ou de fabrication et s’engage à réparer ou remplacer gratuitement, à son choix, tout produit s’avérant défe...
Page 45 - NOTES
Page 46 - Lea y comprenda todas las instrucciones.; LEA TODAS LAS INSTRUCCIONES; PELIGRO —; INSTRUCCIONES DE SEGURIDAD IMPORTANTES
Página 3 — Español ADVERTENCIA: Lea y comprenda todas las instrucciones. El incumplimiento de las instrucciones señaladas abajo puede causar descargas eléctricas, incendios y lesiones corporales serias. LEA TODAS LAS INSTRUCCIONES Para la operación segura, lea y entienda todas las instrucciones an...
Page 47 - PELIGRO — Mantenga las manos alejadas de; REGLAS DE SEGURIDAD ESPECÍFICAS
Página 4 — Español un cordón de extensión polarizado. La clavija entra sólo de una forma en el enchufe de un cordón de extensión polarizado. Si la clavija no entra completamente en el enchufe del cordón de extensión, invierta la posición de la misma. Si aún así no entra la clavija, obtenga un cordón...
Page 49 - SÍMBOLOS; Indica un peligro posible de lesiones personales.
Página 6 — Español Las siguientes palabras de señalización y sus significados tienen el objeto de explicar los niveles de riesgo relacionados con este producto. SÍMBOLO SEÑAL SIGNIFICADO PELIGRO: Indica una situación peligrosa inminente, la cual, si no se evita, causará la muerte o lesiones serias. ...
Page 50 - SÍMBOLO
Página 7 — Español Es posible que se empleen en este producto algunos de los siguientes símbolos. Le suplicamos estudiarlos y aprender su significado para mayor seguridad al manejar este producto. SÍMBOLO NOMBRE EXPLICACIÓN Guantes Cuando maneje las tijeras de podar y la hoja de corte, póngase guant...
Page 51 - DOBLE AISLAMIENTO; ASPECTOS ELÉCTRICOS
Página 8 — Español Hay un cordón de extensión adecuado disponible en un centro de servicio autorizado.Se puede hacer un nudo para atar el cordón de extensión y el cordón eléctrico para impedir que se desconecten durante el uso. Ate el nudo como se muestra en la figura 1, luego conecte el extremo de ...
Page 52 - CARACTERÍSTICAS; FAMILIARÍCESE CON LAS TIJERAS DE; Capacidad del tanque
Página 9 — Español TAPA DE ACEITE CARACTERÍSTICAS FAMILIARÍCESE CON LAS TIJERAS DE PODAR ELÉCTRICAS Vea la figura 2. Para usar este producto con la debida seguridad se debe comprender la información indicada en la producto misma y en este manual, y se debe comprender también el trabajo que intenta r...
Page 53 - Lista de empaquetado; ARMADO; Para evitar los arranques accidentales, se deben
Página 10 — Español DESEMPAQUETADO Este producto requiere armarse. Extraiga cuidadosamente de la caja el producto y los accesorios. Asegúrese de que estén presentes todos los artículos enumerados en la lista de empaquetado. ADVERTENCIA: No utilice este producto si alguna pieza incluida en la Lista...
Page 54 - Vea las figuras 3 y 4.; Deposite el perilla de mango y la; el perilla de mango
Página 11 — Español ARMADO INSTALACIÓN DE LA MANGO DELANTERO Vea las figuras 3 y 4. Instale el mango delantero de manera que el lado corto del mango quede del mismo lado del motor. Desconecte las tijeras de podar del suministro de corriente. Gire a la izquierda el perilla de mango delantero para...
Page 55 - TAPA DEL; n eléctrico o de otras fuentes eléctricas.; APLICACIONES; Desramado; ABASTECIMIENTO DE LUBRICANTE; FUNCIONAMIENTO
Página 12 — Español TAPA DEL TANQUE DE ACEITE INDICADOR DE NIVEL DE ACEITE PELIGRO: Nunca couper cerca de líneas de corriente, cord ó n eléctrico o de otras fuentes eléctricas. Si mermeladas de barra y cadena en alguna cordón del eléctrica o líneas, ¡NO TOQUE LA BARRA NI LA CADENA! PUEDE CARGARSE DE...
Page 56 - C O N E X I Ó N A L S U M I N I S T R O D E; ARRANQUE Y APAGADO; Para arrancar el motor:
Página 13 — Español NOTA: Las tijeras de podar viene de la fábrica con la barra y la cadena sin aceitar. También se debe verificar el nivel después de cada 20 minutos de uso y reabastecerlo según sea necesario. Desconecte las tijeras de podar del suministro de corriente. Retire la tapa del tanqu...
Page 57 - SUJECIÓN DE LAS TIJERAS DE PODAR; Vea las figuras 8 a 10.; Para protegerse de una posible electrocución,; POSICIÓN CORRECTA PARA EL MANEJO
Página 14 — Español SUJECIÓN DE LAS TIJERAS DE PODAR Vea la figura 7. La unidad dispone de un mango delantero y uno trasero. Teniendo la hoja apuntando en la dirección opuesta a usted sujete la unidad por ambos mangos y póngase guantes antideslizantes para lograr la máxima capacidad de sujeción y pr...
Page 59 - La inobservancia de esta; MANTENIMIENTO GENERAL; Cómo reemplazar la barra y la cadena; MANTENIMIENTO
Página 16 — Español ADVERTENCIA: Al dar servicio a la unidad, sólo utilice piezas de repuesto idénticas. El empleo de piezas diferentes puede causar un peligro o dañar el producto. ADVERTENCIA: S i e m p re p ó n g a s e p ro t e c c i ó n o c u l a r c o n protección lateral con la marca de cumplim...
Page 60 - REEMPLAZO LA BARRA Y; CADENA
Página 17 — Español MANTENIMIENTO APPROX 1,25 mm (0,050 pulg.) en la parte inferior de la barra guía, la cadena se siente bien ajustada en la barra, y puede avanzarse con la mano sin ningún atoramiento. La cadena debe volver a tensarse cada vez que las partes planas de los eslabones de impulsión s...
Page 61 - Mientras sostiene la cadena en posición sobre
Página 18 — Español MANTENIMIENTO suelta el mango para fijar la mordaza inferior en la posición abierta. Retire el perno de la cubierta de la cadena utilizando la llave de combinación suministrada. Retire la cubierta de la cadena y apártela. Gire el tornillo tensor de la cadena en sentido antiho...
Page 62 - LUBRICADOR DE LA CADENA
Página 19 — Español TAPA DEL TANQUE DE ACEITE Vuelva a colocar la mordaza inferior en la posición cerrada tirando del mango delantero y p e r m i t i e n d o q u e e l m a n g o s e m u e v a completamente hacia adelante. LUBRICADOR DE LA CADENA Vea la figura 18. Use el lubricante Premium para la ...
Page 63 - Al cambiar la cadena, inspeccione la rueda
Página 20 — Español NOTA: Al cambiar la cadena, inspeccione la rueda dentada de impulsión para ver si tiene desgaste o daños. Si hay señales de desgaste o daños presentes en las áreas indicadas, lleve la sierra a un establecimiento de servicio de productos Ryobi para que cambien la rueda dentada. FO...
Page 64 - ÁNGULO DE LIMADURA DE LA PLACA; ÁNGULO CORRECTO: 30o - Los mangos de las; ÁNGULO DE LA PLACA LATERAL; Á N G U L O C O R R E C T O : 8 0 o; CONTRAGOLPE; PENDIENTE HACIA ATRÁS - Se necesita; ESPACIO LIBRE DEL CALIBRE DE; MANTENIMIENTO DE LA BARRA GUÍA
Página 21 — Español ÁNGULO DE LIMADURA DE LA PLACA SUPERIOR Vea la figura 24. ÁNGULO CORRECTO: 30º - Los mangos de las limas están marcados con marcas guía para alinear correctamente la lima con el fin de generar el ángulo correcto de la placa superior. MENOS DE 30º - Para corte transversal. M...
Page 65 - PROBLEMA; LLÁMENOS PRIMERO; ¿NECESITA A; ALMACENAMIENTO DE LA PRODUCTO
Página 22 — Español La formación de minúsculos surcos y protuberancias en los rieles de la barra es un proceso normal de desgaste de la misma. Tales fallas deben alisarse con una lima tan pronto como aparezcan.Debe cambiarse toda barra que presente cualquiera de las siguientes fallas. Desgaste den...
Page 66 - GARANTÍA; DECLARACIÓN DE LA GARANTÍA LIMITADA
Página 23 — Español GARANTÍA DECLARACIÓN DE LA GARANTÍA LIMITADA Techtronic Industries North America, Inc. garantiza al comprador original al menudeo que este producto de la marca RYOBI ® carece de defectos en los materiales y en la mano de obra, y acuerda reparar o remplazar, a la sola discreción d...
Page 67 - NOTAS
Page 68 - OPERATOR’S MANUAL / ELECTRIC LOPPER; MANUEL D’UTILISATION /; MANUAL DEL OPERADOR /; TECHTRONIC INDUSTRIES NORTH AMERICA, INC.; CALIFORNIA PROPOSITION 65; PROPOSITION 65 DE L’ÉTAT
9900007289-23-13 (REV:02) OPERATOR’S MANUAL / ELECTRIC LOPPER MANUEL D’UTILISATION / ÉBRANCHEUR ÉLECTRIQUE MANUAL DEL OPERADOR / TIJERAS DE PODAR ELÉCTRICAS RY43200 TECHTRONIC INDUSTRIES NORTH AMERICA, INC. 1428 Pearman Dairy Road, Anderson, SC 29625 USA 1-800-860-4050 • www.ryobitools.com A subsidi...


 Ryobi SS630
User Manual
Ryobi SS630
User Manual
 Ryobi 18A-C06-734
User Manual
Ryobi 18A-C06-734
User Manual
 Ryobi 21AB454B734
User Manual
Ryobi 21AB454B734
User Manual
 Ryobi 41CD875A034
User Manual
Ryobi 41CD875A034
User Manual
 Ryobi 767R
User Manual
Ryobi 767R
User Manual
 Ryobi 2079R
User Manual
Ryobi 2079R
User Manual
 Ryobi 725R
User Manual
Ryobi 725R
User Manual
 Ryobi 890R
User Manual
Ryobi 890R
User Manual
 Ryobi 825R
User Manual
Ryobi 825R
User Manual
 Ryobi 96116000202
User Manual
Ryobi 96116000202
User Manual