Page 4 - PROPER TRIMMER OPERATING POSITION
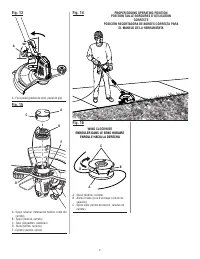
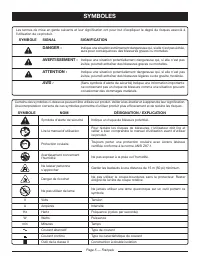
iv Fig. 7 PROPER TRIMMER OPERATING POSITION POSITION TAILLE-HAIES D’UTILISATION CORRECTE POSICIÓN RECORTADORA CORRECTA PARA EL MANEJO DE LA HERRAMIENTA Fig. 9 A - Direction of rotation (sens de rotation, sentido de la rotación) B - Best cutting area (d’efficacité, área de corte óptima) C - Dangerous...
Page 6 - TABLE OF CONTENTS; TABLE DES MATIÈRES / ÍNDICE DE CONTENIDO; INTRODUCTION; INTRODUCTION / INTRODUCCIÓN
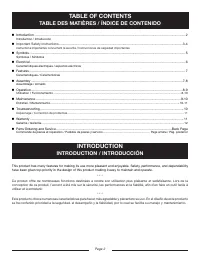
Page 2 Introduction ...................................................................................................................................................................... 2 Introduction / Introducción Important Safety Instructions ....................................................
Page 7 - Read and understand all instructions.; READ ALL INSTRUCTIONS; IMPORTANT SAFETY INSTRUCTIONS
Page 3 — English WARNING: Read and understand all instructions. Failure to follow all instructions listed below may result in electric shock, fire and/or serious personal injury. READ ALL INSTRUCTIONS For safe operation, read and understand all instructions before using thi s product. Follow all s...
Page 9 - SYMBOL SIGNAL; SYMBOL; SYMBOLS
Page 5 — English The following signal words and meanings are intended to explain the levels of risk associated with this product. SYMBOL SIGNAL MEANING DANGER: Indicates an imminently hazardous situation, which, if not avoided, will result in death or serious injury. WARNING: Indicates a potentially...
Page 10 - Cord Length; DOUBLE INSULATION; ELECTRICAL CONNECTION; power supply that is 120 volts, AC only; GFCI; ELECTRICAL
Page 6 — English When working outdoors with a product, use an extension cord that is designed for outside use. This type of cord is designated with “W-A” or “W” on the cord’s jacket.Before using any extension cord, inspect it for loose or exposed wires and cut or worn insulation.It is possible to ti...
Page 11 - FEATURES; ASSEMBLY
Page 7 — English Input ....................................................................................................................................120 V, AC only, 60 Hz, 5.5 AmpsCutting Swath .......................................................................................................
Page 12 - Follow these tips when using the string trimmer:; OPERATION
Page 8 — English TOOLS NEEDED See Figure 3. The following tools (not included or drawn to scale) are needed for assembly: Phillips Screwdriver ATTACHING GRASS DEFLECTOR See Figures 4 - 5. WARNING: The line cutting blade on the grass deflector is sharp. Avoid contact with the blade. Failure to avoi...
Page 13 - If grass becomes wrapped around the line head:; ADVANCING LINES; CUTTING TIPS; MAINTENANCE
Page 9 — English Trimmer should be held at a comfortable position with the rear handle about hip height. Cut tall grass from the top down. This will prevent grass from wrapping around the shaft housing and line head which may cause damage from overheating. If grass becomes wrapped around the lin...
Page 14 - GENERAL MAINTENANCE; LINE REPLACEMENT; STORING THE TRIMMER; TROUBLESHOOTING; PROBLEM
Page 10 — English WARNING: Before inspecting, cleaning, or servicing the machine, shut off motor, wait for all moving parts to stop, and disconnect extension cord. Failure to follow these instructions can result in serious personal injury or property damage. GENERAL MAINTENANCE Avoid using solvents ...
Page 15 - WARRANTY; LIMITED WARRANTY STATEMENT
Page 11 — English WARRANTY LIMITED WARRANTY STATEMENT Techtronic Industries North America, Inc., warrants to the original retail purchaser that this RYOBI ® brand outdoor product is free from defect in material and workmanship and agrees to repair or replace, at Techtronic Industries North America, ...
Page 16 - LIRE TOUTES LES INSTRUCTIONS; INSTRUCTIONS IMPORTANTES CONCERNANT LA SÉCURITÉ
Page 3 — Français AVERTISSEMENT : Lire et veiller à bien comprendre toutes les instructions. Le non-respect des instructions ci-dessous peut entraîner une électrocution, un incendie et des blessures graves. LIRE TOUTES LES INSTRUCTIONS Pour travailler en toute sécurité, lire et veiller à bien comp...
Page 18 - SYMBOLE SIGNAL; SYMBOLES
Page 5 — Français Les termes de mise en garde suivants et leur signification ont pour but d’expliquer le degré de risques associé à l’utilisation de ce produit. SYMBOLE SIGNAL SIGNIFICATION DANGER : Indique une situation extrêmement dangereuse qui, si elle n’est pas évitée, aura pour conséquences de...
Page 19 - Longueur du; DOUBLE ISOLATION; CONNEXIONS ÉLECTRIQUES; alimentation; CARACTÉRISTIQUES ÉLECTRIQUES
Page 6 — Français Pour le travail à l’extérieur, utiliser un cordon prolongateur spécialement conçu à cet effet. Ce type de cordon porte l’inscription « W-A » ou « W » sur sa gaine.Avant d’utiliser un cordon prolongateur, vérifier que ses fils ne sont ni détachés ni exposés et que son isolation n’es...
Page 20 - TÊTE DU TAILLE-HAIES ROTATIVE; CARACTÉRISTIQUES; ASSEMBLAGE
Page 7 — Français Alimentation..................................................................................................................... 120 V, c.a. seulement, 60 Hz, 5,5 A Largeur de coupe ......................................................................................................
Page 21 - OUTILS NÉCESSAIRES; BRANCHEMENT SUR UNE PRISE SECTEUR
Page 8 — Français AVERTISSEMENT : Ne pas brancher sur le secteur avant d’avoir terminé l’assemblage. Le non-respect de cet avertissement peut causer un démarrage accidentel, entraînant des bles-sures graves. AVERTISSEMENT : Ne pas essayer de modifier cet produit ou de créer des accessoires non recom...
Page 22 - M I S E E N M A R C H E E T A R R Ê T D E L A; Si l’herbe s’enroule autour de la tête de coupe :; UTILISATION
Page 9 — Français M I S E E N M A R C H E E T A R R Ê T D E L A TAILLE-BORDURES À LIGNE Voir la figure 6. Pour mettre la taille-bordures à ligne en marche, appuyer la gâchette. Pour arrêter la taille-bordures à ligne, relâcher la gâchette. POIGNÉE AVANT RÉGLABLE Voir la figure 7. La poignée avan...
Page 23 - FLÈCHE TÉLESCOPIQUE; TAILLE DES BORDURES; ENTRETIEN GÉNÉRAL
Page 10 — Français FLÈCHE TÉLESCOPIQUE Voir la figure 12. La flèche peut être déployée ou rétractée pour en faciliter l’utilisation. Débrancher la taille-bordures à ligne. Devisser le bouton de la flèche télescopique et la faire glisser sur la position souhaitée. Serrer le bouton de la flèche ...
Page 24 - REMPLACEMENT DU LIGNE; Remplacement de la bobine; ENTRETIEN
Page 11 — Français Force les fils étendre de la tête de coupe si le ligne les relâchements de les fentes ce la tête de coupe. Réinstaller la retenue de bobine en insérant les languettes dans les fentes et en enfonçant jusqu’à ce que la retenue de bobine s’insère en place. REMPLACEMENT DU LIGNE V...
Page 25 - GARANTIE; ÉNONCÉ DE LA GARANTIE LIMITÉE
Page 12 — Français GARANTIE ÉNONCÉ DE LA GARANTIE LIMITÉE Techtronic Industries North America, Inc., garantit à l’acheteur original que ce produit RYOBI ® est exempt de tous vices de matériaux ou de fabrication et s’engage à réparer ou remplacer gratuitement, à son choix, tout produit s’avérant défe...
Page 26 - Lea y comprenda todas las instrucciones.; LEA TODAS LAS INSTRUCCIONES; INSTRUCCIONES DE SEGURIDAD IMPORTANTES
Página 3 — Español ADVERTENCIA: Lea y comprenda todas las instrucciones. El incumplimiento de las instrucciones señaladas abajo puede causar descargas eléctricas, incendios y lesiones corporales serias. LEA TODAS LAS INSTRUCCIONES Para la operación segura, lea y entienda todas las instrucciones an...
Page 28 - SÍMBOLO SEÑAL; SÍMBOLO; SÍMBOLOS
Página 5 — Español Las siguientes palabras de señalización y sus significados tienen el objeto de explicar los niveles de riesgo relacionados con este producto. SÍMBOLO SEÑAL SIGNIFICADO PELIGRO: Indica una situación peligrosa inminente, la cual, si no se evita, causará la muerte o lesiones serias. ...
Page 29 - Longitud; DOBLE AISLAMIENTO; CONEXIÓN ELÉCTRICA; una línea; ASPECTOS ELÉCTRICOS
Página 6 — Español Al trabajar a la intemperie con un producto, utilice un cordón de extensión fabricado para uso en el exterior. Este tipo de cordón lleva las letras “W-A” o “W” en el forro.Antes de utilizar un cordón de extensión, inspecciónelo para ver si tiene conductores flojos o expuestos y ai...
Page 30 - CARACTERÍSTICAS; LISTA DE EMPAQUETADO; ARMADO
Página 7 — Español Corriente de entrada ......................................................................................................... 120 V, sólo corr. alt., 60 Hz, 5,5 AAncho de corte ..........................................................................................................
Page 31 - HERRAMIENTAS NECESARIAS; CONEXIÓN AL SUMINISTRO DE CORRIENTE
Página 8 — Español ADVERTENCIA: No conecte la unidad al suministro de corriente sin haber terminado de armarla. De lo contrario la unidad puede ponerse en marcha accidentalmente, con el consiguiente riesgo de lesiones corporales serias. ADVERTENCIA: No intente modificar este producto ni introducir a...
Page 32 - Si la hierba se enrolla en el cabezal del hilo:; FUNCIONAMIENTO
Página 9 — Español ENCENDIDO Y APAGADO DE LA RECORTADORA Vea la figura 6. Para encender la recortadora de hilo, presione el gatillo del interruptor de encendido. Para detener la recortadora de hilo, suelte el gatillo del interruptor. MANGO DELANTERO AJUSTABLE Vea la figura 7. El ángulo del mango...
Page 33 - BRAZO TELESCÓPICO; MANTENIMIENTO GENERAL
Página 10 — Español BRAZO TELESCÓPICO Vea la figura 12. El brazo puede extenderse o acortarse para facilitar su manejo. Desenchufe la recortadora de hilo. Destornille el botón del brazo telescópico y extiéndalo o retráigalo hasta la posición deseada. Apriételo el botón del brazo telescópico. R...
Page 34 - REEMPLAZO DEL LÍNEA; Reemplazo del carrete; ALMACENAMIENTO DE LA RECORTADORA; MANTENIMIENTO; Reemplazo del línea; CORRECCIÓN DE PROBLEMAS
Página 11 — Español REEMPLAZO DEL LÍNEA Vea las figuras 16. Desenchufe la recortadora de línea . Quite el carrete del cabezal del línea . NOTA: Retire todo el línea sobrante en el carrete. Corte dos tramos de línea de 2,7 m (9 ft) aproximadamente. Use solamente línea monofilar de 1,65 mm (0,06...
Page 35 - GARANTÍA; DECLARACIÓN DE LA GARANTÍA LIMITADA
Página 12 — Español GARANTÍA DECLARACIÓN DE LA GARANTÍA LIMITADA Techtronic Industries North America, Inc. garantiza al comprador original al menudeo que este producto de la marca RYOBI ® carece de defectos en los materiales y en la mano de obra, y acuerda reparar o remplazar, a la sola discreción d...
Page 36 - TECHTRONIC INDUSTRIES NORTH AMERICA, INC.; OPERATOR’S MANUAL; MANUEL D’UTILISATION / MANUAL DEL OPERADOR; CALIFORNIA PROPOSITION 65
99000074611-5-13 (REV:01) TECHTRONIC INDUSTRIES NORTH AMERICA, INC. 1428 Pearman Dairy Road, Anderson, SC 29625 USA 1-800-860-4050 • www.ryobitools.com A subsidiary of Techtronic Industries Co., Ltd. • OTC: TTNDY • PARTS AND SERVICE Prior to requesting service or purchasing replacement parts, please...