Page 2 - See this fold-out section for all of the figures; Consulter l’encart à volets afin d’examiner toutes les figures
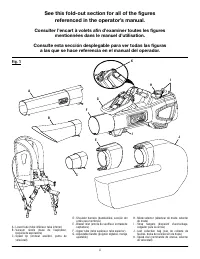
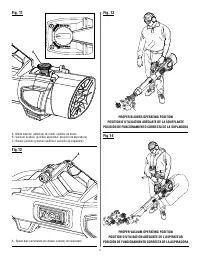
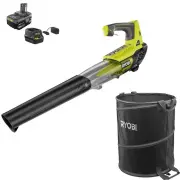
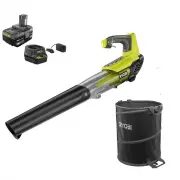
ii Fig. 1 A - Lower tube (tube inférieur, tubo inferior) B - Vacuum nozzle (buse de l’aspirateur, boquilla de aspiradora) C - Speed tip (embout accéléré, punta de velocidad) D - Shoulder harness (bandoulière, sección del arnés para hombros) E - Blower inlet (entrée du souffleur, entrada de sopladora...
Page 6 - IMPORTANT SAFETY INSTRUCTIONS
2 — English When using an electrical appliance, basic precautions should always be followed, including the following: WARNING! READ AND UNDERSTAND ALL INSTRUCTIONS BEFORE USING THIS BLOWER/VACUUM. To reduce the risk of electric shock, fire and/or serious personal injury. Know your blower/vacuum. R...
Page 8 - SYMBOLS
4 — English The following signal words and meanings are intended to explain the levels of risk associated with this product. SYMBOL SIGNAL MEANING DANGER: Indicates a hazardous situation, which, if not avoided, will result in death or serious injury. WARNING: Indicates a hazardous situation, which, ...
Page 11 - INSTALLING THE LOWER TUBE; ASSEMBLY; ASSEMBLING THE TOOL
7 — English Align the tabs on the blower inlet with the notches on the rear port and slide together. Lift and rotate the mode selector to the blower position to lock the blower inlet in place. Install lower tube and speed tip as described later in this section. INSTALLING THE LOWER TUBE See Fi...
Page 12 - OPERATION
8 — English WARNING: Do not allow familiarity with products to make you care- less. Remember that a careless fraction of a second is sufficient to inflict serious injury. WARNING: Always wear eye protection with side shields marked to comply with ANSI Z87.1, along with hearing protection. Failure to...
Page 13 - ADJUSTING THE HANDLE
9 — English OPERATION ADJUSTING THE HANDLE See Figure 10. Remove the battery pack. Place the blower/vacuum on a sturdy flat surface. Push pivot button and adjust handle until it snaps securely into place at one of the four detents. STARTING AND STOPPING THE BLOWER/VACUUM See Figures 11 - 12. U...
Page 14 - MAINTENANCE
10 — English NOTICE : Periodically inspect the entire product for damaged, missing, or loose parts such as screws, nuts, bolts, caps, etc. Tighten securely all fasteners and caps and do not operate this product until all missing or damaged parts are replaced. Please contact customer service or an au...
Page 15 - TROUBLESHOOTING
11 — English IF THESE SOLUTIONS DO NOT SOLVE THE PROBLEM CONTACT YOUR AUTHORIZED SERVICE DEALER. PROBLEM POSSIBLE CAUSE SOLUTION Product will not operate or starts and stops Lower tube not fully installed on the motor housing Ensure tab on the lower tube is fully latched onto bottom of motor housing...
Page 17 - RÈGLES DE SÉCURITÉ IMPORTANTES
2 — Français En utilisant un appareil électrique, précautions fondamentales toujours devraient être suivies, y compris le suivre : AVERTISSEMENT ! LIRE ET COMPRENDRE TOUTES LES INSTRUCTIONS AVANT D’UTILISER CETTE SOUFFLANTE / ASPIRATEUR. Pour réduire le risque de décharge électrique, et/ou de feu bl...
Page 19 - CONSERVER CES INSTRUCTIONS; SYMBOLES
4 — Français Les termes de mise en garde suivants et leur signification ont pour but d’expliquer le degré de risques associé à l’utilisation de ce produit. SYMBOLE SIGNAL SIGNIFICATION DANGER : Indique une situation dangereuse qui, si elle n’est pas évitée, aura pour conséquences des blessures grave...
Page 21 - CARACTÉRISTIQUES
6 — Français FICHE TECHNIQUE Moteur .................................................................................................................................................................................. 40 V c.c.Vitesse d’air M/H .............................................................
Page 22 - ASSEMBLAGE; INSTALLATION DE LA TUBE INFÉRIEUR; ASSEMBLAGE DE L’OUTIL
7 — Français ASSEMBLAGE Le cas échéant, appuyer sur le sélecteur de mode et le faire tourner vers la position du centre (déverrouillée), puis retirer le sac de collecte de feuilles du port arrière. Aligner les languettes de le entrée du souffleur avec les encoches du port arrière et les faire gl...
Page 23 - APPLICATIONS; UTILISATION
8 — Français APPLICATIONS Ce produit peut être utilisé pour les applications ci-dessous : Élimination des feuilles et d’autres débris des pelouses Élimination de les brins d’herbe, feuilles, aiguilles de pin, et d’autres débris des terrasses et allées de garage INSTALLATION / RETRAIT DU BLOC-PIL...
Page 24 - RÉGLAGE DE LA POIGNÉE
9 — Français RÉGLAGE DE LA POIGNÉE Voir la figure 10. Retirer le bloc-piles. Placer la soufflante / aspirateur sur une surface plane et stable. Appuyer sur le bouton de pivot et régler la poignée jusqu’à ce qu’elle s’enclenche en toute sécurité à l’un des quatre crans d’arrêt. MISE EN MARCHE E...
Page 25 - ENTRETIEN GÉNÉRAL; ENTRETIEN
10 — Français AVERTISSEMENT : Pour empêcher un démarrage accidentel pouvant entraîner des blessures graves, toujours retirer le bloc de pile de le produit avant tout nettoyage ou entretien. AVERTISSEMENT : Toujours porter une protection oculaire avec écrans latéraux certifiée conforme à la norme ANS...
Page 26 - DÉPANNAGE
SI LES PRÉSENTES SOLUTIONS NE RÉSOLVENT PAS LE PROBLÈME, CONTACTER LE CENTRE DE RÉPARATIONS AGRÉÉ. PROBLÈME CAUSE POSSIBLE SOLUTION Le produit ne fonctionne pas ou démarre et s’arrête Le tube inférieur n’est pas complètement installé sur le boîtier du moteur S’assurer que la languette du tube inféri...
Page 27 - Ce produit est accompagné d’une garantie limitée de cinq (5) ans pour
SI LES PRÉSENTES SOLUTIONS NE RÉSOLVENT PAS LE PROBLÈME, CONTACTER LE CENTRE DE RÉPARATIONS AGRÉÉ. PROBLÈME CAUSE POSSIBLE SOLUTION Bruit anormal ou changement de bruit pendant l’utilisation du produit Blocage du tube inférieur ou du boîtier du moteur Retirer la pile, puis le tube inférieur. Utilise...
Page 28 - INSTRUCCIONES IMPORTANTES DE SEGURIDAD
2 — Español Cuando se usa un electrodoméstico, las precauciones básicas siempre se deben seguir, inclusive lo siguiente: ¡ADVERTENCIA! LEA Y COMPRENDA TODAS LAS INSTRUCCIONES ANTES DE UTILIZAR ESTE SOPLADORA/ASPIRADORA. Para reducir el riesgo de calambre, el fuego y/o la herida personal grave. Fam...
Page 30 - SÍMBOLOS
4 — Español Las siguientes palabras de señalización y sus significados tienen el objeto de explicar los niveles de riesgo relacionados con este producto. SÍMBOLO SEÑAL SIGNIFICADO PELIGRO: Indica una situación peligrosa, la cual, si no se evita, causará la muerte o lesiones serias. ADVERTENCIA: Indi...
Page 32 - CARACTERÍSTICAS
6 — Español ESPECIFICACIONES DEL PRODUCTO Motor ...............................................................................................................................................................................40 V, corr. cont.Velocidad del aire MPH ........................................
Page 33 - ENSAMBLAJE DE LA HERRAMIENTA; ARMADO; INSTALACIÓN DEL TUBO INFERIOR
7 — Español ADVERTENCIA: Para evitar un arranque accidental que podría causar lesiones corporales serias, siempre desmonte de la herramienta el paquete de baterías al montarle piezas a aquélla. ADVERTENCIA: Este producto está diseñado solo para soplar y no para aspirar. No trate de remover la alojam...
Page 34 - USOS; FUNCIONAMIENTO
8 — Español USOS Esta sopladora puede emplearse para los fines enumerados abajo: Quitar hojas y otros desechos del jardín Mantener terrazas y caminos de entrada libres de recortes de hierba, hojas, agujas de pino y otros desechos del jardín DESMONTAR Y MONTAR EL PAQUETE DE BATERÍAS Vea la figura...
Page 35 - AJUSTE DE EL MANGO
9 — Español ADVERTENCIA: Las herramientas de baterías siempre están en condiciones de funcionamiento. Por lo tanto, siempre debe estar asegurado el interruptor cuando no esté usándose o el operador lo lleve por un lado. Retire el paquete de pilas al transportar o trasladar la sopladora a fin de evit...
Page 36 - MANTENIMIENTO; MANTENIMIENTO GENERAL
10 — Español MANTENIMIENTO ADVERTENCIA: Para evitar lesiones corporales serias, siempre retire el paquete de baterías de la herramienta al limpiarla o darle mantenimiento. ADVERTENCIA: Siempre póngase protección ocular con protección lateral con la marca de cumplimiento de la norma ANSI Z87.1 junto ...
Page 37 - SOLUCIÓN DE PROBLEMAS
SI CON ESTAS SOLUCIONES NO SE RESUELVE EL PROBLEMA, COMUNÍQUESE CON EL CONCESIONARIO DE SERVICIO AUTORIZADO DE SU PREFERENCIA. PROBLEMA CAUSA POSIBLE SOLUCIÓN El producto no funciona o se inicia y se detiene El tubo inferior no está completamente instalado en la carcasa del motor Asegúrese de que la...
Page 39 - NOTES
Page 40 - OPERATOR’S MANUAL; MANUEL D’UTILISATION / MANUAL DEL OPERADOR
9980009681-31-23 (REV:03) OPERATOR’S MANUAL MANUEL D’UTILISATION / MANUAL DEL OPERADOR 40V BLOWER/VACUUM SOUFFLANTE / ASPIRATEUR DE 40 VSOPLADORA/ASPIRADORA DE 40 V RY404015 TTI OUTDOOR POWER EQUIPMENT, INC. P.O. Box 1288, Anderson, SC 29622 USA 1-800-525-2579 • www.ryobitools.com RYOBI is a registe...