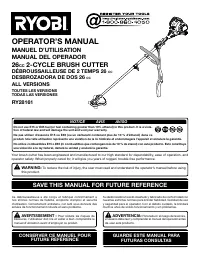
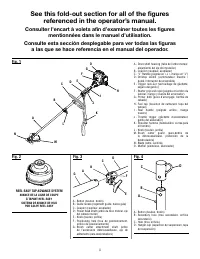
Page 2 - See this fold-out section for all of the figures; Consulter l’encart à volets afin d’examiner toutes les figures
ii Fig. 1 Fig. 3 A - Button (bouton, botón) B - Guide recess (logement guide, hueco guía) C - Coupler (coupleur, acoplador) D - Power head shaft (arbre du bloc moteur, eje del cabezal motor) E - Knob (bouton, perilla) F - Positioning hole (trou de positionnement, orificio de posicionamiento) G - Bru...
Page 6 - TABLE OF cONTENTS; TABLE DES MATIÈRES / ÍNDIcE DE cONTENIDO; INTRODUcTION; INTRODUcTION / INTRODUccIóN
2 Introduction ...................................................................................................................................................................... 2 Introduction / Introducción General Safety Rules ................................................................
Page 7 - GENERAL SAFETy RULES; READ ALL INSTRUcTIONS
3 — English GENERAL SAFETy RULES WARNING: Read and understand all instructions. Failure to follow all instructions listed below may result in electric shock, fire and/or serious personal injury. READ ALL INSTRUcTIONS For safe operation, read and understand all instructions before using this produc...
Page 8 - SPEcIFIc SAFETy RULES; SPEcIFIc SAFETy RULES FOR TRIMMER USE
4 — English SPEcIFIc SAFETy RULES This product is intended for infrequent use by homeown- ers and other occasional users for such general applica-tions as trimming light and heavy vegetation, etc. It is not intended for prolonged use. Prolonged periods of opera-tion can cause circulatory problems ...
Page 9 - SyMBOLS
5 — English Some of the following symbols may be used on this product. Please study them and learn their meaning for safe operation of this product. SyMBOL NAME EXPLANATION Safety Alert Indicates a potential personal injury hazard. Read Operator’s Manual To reduce the risk of injury, user must read ...
Page 11 - ASSEMBLy
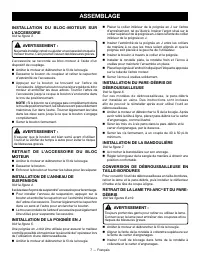
7 — English ASSEMBLy WARNING: To prevent accidental starting that could cause serious personal injury, always disconnect the engine spark plug wire from the spark plug when assembling parts. INSTALLING ThE POWER hEAD TO ThE ATTAchMENT See Figure 3. WARNING: Never install, remove, or adjust any attac...
Page 12 - ATTAchING ThE GRASS DEFLEcTOR
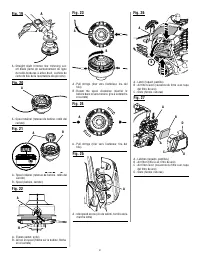
8 — English ASSEMBLy Align the slot in the flanged washer with the slot in the gear head. Place the gear head locking tool through the slot in the flanged washer and gear head. Remove the blade nut by turning it clockwise. Remove the cupped washer and the blade. Remove the flanged washer f...
Page 13 - FUELING AND REFUELING ThE TOOL; OPERATION; OXyGENATED FUELS
9 — English WARNING: Do not allow familiarity with this product to make you careless. Remember that a careless fraction of a second is sufficient to inflict serious injury. WARNING: Always wear eye protection with side shields marked to comply with ANSI Z87.1, along with hearing protection. Failure ...
Page 14 - STARTING AND STOPPING
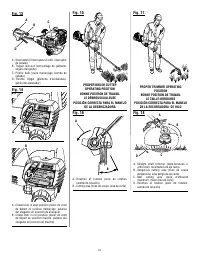
10 — English OPERATION STARTING AND STOPPING See Figures 12 - 14. Brush cutter should be on a flat, bare surface for starting. To start a cold engine: Slowly press the primer bulb 10 times. Set the choke lever to the START (A) position. Squeeze the throttle trigger fully and pull the starter h...
Page 15 - OPERATING ThE TRIMMER; cUTTING TIPS
11 — English Always hold brush cutter on your right side with both hands when operating. Use a firm grip on both handles. Maintain your grip and balance on both feet. Position yourself so that you will not be drawn off balance by the kickback reaction of the cutting blade. Inspect and clear th...
Page 16 - MAINTENANcE; GENERAL MAINTENANcE; LINE REPLAcEMENT
12 — English MAINTENANcE WARNING: When servicing, use only identical replacement parts. Use of any other parts could create a hazard or cause product damage. WARNING: Always wear eye protection with side shields marked to comply with ANSI Z87.1, along with hearing protection. Failure to do so could ...
Page 17 - SPARK PLUG REPLAcEMENT; hIGh ALTITUDE ENGINE OPERATION
13 — English IDLE SPEED ADJUSTMENT See Figure 25. WARNING: The blade/cutting head will move when adjusting the idle speed. Wear all protective clothing and keep all by-standers, children, and pets at least 50 ft. away. Make adjustments with the unit supported by hand so that the blade/cutting head d...
Page 18 - ThIS PRODUcT WAS MANUFAcTURED WITh A cATALyST MUFFLER; CALL US FIRST; For any questions about operating or maintaining your product,; MAINTENANcE SchEDULE
14 — English ThIS PRODUcT WAS MANUFAcTURED WITh A cATALyST MUFFLER congratulations! You have made an investment toward protecting the environment. In order to maintain this product’s original emission level, please refer to the maintenance section below. CALL US FIRST For any questions about operati...
Page 19 - TROUBLEShOOTING
15 — English PROBLEM POSSIBLE cAUSE SOLUTION IF ThESE SOLUTIONS DO NOT SOLVE ThE PROBLEM cONTAcT yOUR AUThORIzED SERVIcE DEALER. TROUBLEShOOTING 1. Clean or replace spark plug. Reset spark plug gap. Refer to Spark Plug Replacement earlier in this manual. 2. Push primer bulb until bulb is full of fue...
Page 20 - WARRANTy; LIMITED WARRANTy STATEMENT
16 — English WARRANTy LIMITED WARRANTy STATEMENT Techtronic Industries North America, Inc., warrants to the original retail purchaser that this RYOBI ® brand outdoor product is free from defect in material and workmanship and agrees to repair or replace, at Techtronic Industries North America, Inc.’...
Page 21 - RÈGLES DE SÉCURITÉ GÉNÉRALES; LIRE TOUTES LES INSTRUCTIONS
3 — Français RÈGLES DE SÉCURITÉ GÉNÉRALES AVERTISSEMENT : Lire et veiller à bien comprendre toutes les instructions. Le non respect des instructions ci-dessous peut entraîner un choc électrique, un incendie et / ou des blessures graves. LIRE TOUTES LES INSTRUCTIONS Pour travailler en toute sécurit...
Page 22 - RÈGLES DE SÉCURITÉ PARTICULIÈRES à
4 — Français RÈGLES DE SÉCURITÉ GÉNÉRALES carburant lentement une fois que le moteur est arrêté. Ne pas fumer pendant le ravitaillement en carburant. Arrêter le moteur et le laisser refroidir avant de faire le plein ou de le remiser. Pour le transport dans un véhicule, laisser le moteur refroidi...
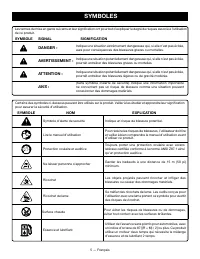
Page 23 - SyMbOLES
5 — Français Certains des symboles ci-dessous peuvent être utilisés sur le produit. Veiller à les étudier et apprendre leur signification pour assurer la sécurité d’utilisation. SyMbOLE NOM EXPLICATION Symbole d’alerte de sécurité Indique un risque de blessure potentiel. Lire le manuel d’utilisation...
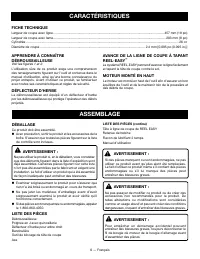
Page 24 - CARACTÉRISTIQUES; FICHE TECHNIQUE; DÉFLECTEUR D’HERbE; ASSEMbLAGE; DÉbALLAGE
6 — Français CARACTÉRISTIQUES FICHE TECHNIQUE Largeur de coupe avec ligne .......................................................................................................................... 457 mm (18 po)Largeur de coupe avec lame .................................................................
Page 26 - INSTALLATION DE LA TÊTE DE COUPE À LIGNE
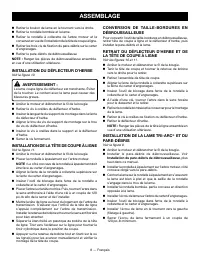
8 — Français ASSEMbLAGE Retirer le boulon de lame en le tournant vers la droite. Retirer la rondelle bombée et la lame. Retirer la rondelle à collerette de l’arbre moteur et la conserver en vue de l’installation de la tête de coupe à ligne. Retirer les trois vis de fixation du pare-débris su...
Page 27 - UTILISATION; APPROVISIONNEMENT EN CARbURANT; CARbURANTS OXyGÉNÉS
9 — Français UTILISATION AVERTISSEMENT : Ne pas laisser la familiarité avec le produit faire oublier la prudence. Ne pas oublier qu’une fraction de seconde d’inattention peut entraîner des blessures graves. AVERTISSEMENT : Toujours porter une protection oculaire avec écrans latéraux certifiée confor...
Page 28 - DÉMARRAGE ET ARRÊT; UTILISATION DE LA DÉbROUSSAILLEUSE; RICOCHET DE LAME
10 — Français UTILISATION DÉMARRAGE ET ARRÊT Voir les figures 12 à 14. Pour le démarrage, la débroussailleuse doit être posé sur un sol nu et plat. Démarrage du moteur froid : Appuyer lentement 10 fois sur la poire d’amorçage. Mettre le volet de départ en position d’étranglement START (A) (démar...
Page 29 - TECHNIQUES DE COUPE - LAME; UTILISATION DU TAILLE-bORDURES; AVANCE DE LA LIGNE DE COUPE (TÊTE À; CONSEILS DE COUPE
11 — Français UTILISATION TECHNIQUES DE COUPE - LAME Voir la figure 16. AVERTISSEMENT : Lorsqu’une lame est utilisée, il est impératif de faire preuve de la plus extrême prudence pour assurer la sécurité. Lire les instruction de sécurité de la lame, au chapitre Règles de sécurité particulières à l’u...
Page 30 - ENTRETIEN; ENTRETIEN GÉNÉRAL; REMPLACEMENT DE LIGNE
12 — Français ENTRETIEN AVERTISSEMENT : Utiliser exclusivement des pièces d’origine pour les réparations. L’usage de toute autre pièce pourrait créer une situation dangereuse ou endommager l’outil. AVERTISSEMENT : Toujours porter une protection oculaire avec écrans latéraux certifiée conforme à la n...
Page 31 - REMPLACEMENT DE LA bOUGIE; REMISAGE LE PRODUIT
13 — Français Le pare-étincelles doit être nettoyé ou remplacé toutes les 50 heures de fonctionnement ou tous les ans pour assurer le fonctionnement correct de l’outil. L’emplacement du pare-étincelles diffère suivant le modèle. Contacter le concessionnaire le plus proche pour connaître l’emplacemen...
Page 32 - CE PRODUIT A ÉTÉ ÉQUIPÉ EN USINE D’UN CONVERTISSEUR CATALyTIQUE; NOUS APPELER D’ABORD; BESOIN D’AID; PROGRAMME D’ENTRETIEN; FONCTIONNEMENT DU MOTEUR à HAUTE
14 — Français ENTRETIEN CE PRODUIT A ÉTÉ ÉQUIPÉ EN USINE D’UN CONVERTISSEUR CATALyTIQUE Félicitations ! Vous venez d’investir dans la protection de l’environnement. Pour maintenir le niveau d’émissions original de ce produit, voir la section Entretien ci-dessous. NOUS APPELER D’ABORD Pour toute ques...
Page 33 - DÉPANNAGE
15 — Français DÉPANNAGE PRObLÈME CAUSE POSSIbLE SOLUTION SI LES PRÉSENTES SOLUTIONS NE RÉSOLVENT PAS LE PRObLÈME, CONTACTER LE CENTRE DE RÉPARATIONS AGRÉÉ. 1. N e t toye r o u r e m p l a c e r l a b o u g i e . R é g l e r l’écartement de l’électrode. Voir Remplacement de la bougie plus haut dans c...
Page 34 - GARANTIE; ÉNONCÉ DE LA GARANTIE LIMITÉE
16 — Français GARANTIE ÉNONCÉ DE LA GARANTIE LIMITÉE Techtronic Industries North America, Inc., garantit à l’acheteur original que ce produit RyOBI ® est exempt de tous vices de matériaux ou de fabrication et s’engage à réparer ou remplacer gratuitement, à son choix, tout produit s’avérant défectueu...
Page 35 - REGLAS DE SEGURIDAD GENERALES; LEA ToDAS LAS INSTRUCCIoNES
3 — Español REGLAS DE SEGURIDAD GENERALES ADVERTENCIA: Lea y comprenda todas las instrucciones. El incumplimiento de las instrucciones señaladas abajo puede causar descargas eléctricas, incendios y lesiones corporales serias. LEA ToDAS LAS INSTRUCCIoNES Para utilizar este producto de una forma seg...
Page 36 - REGLAS DE SEGURIDAD ESPECÍFICAS; REGLAS DE SEGURIDAD ESPECÍFICAS PARA
4 — Español REGLAS DE SEGURIDAD ESPECÍFICAS Este producto está diseñado para uso poco frecuente por parte de propietarios y otros usuarios ocasionales para aplicaciones generales como cortar vegetación ligera y pesada, etc. No es para uso prolongado. Los períodos prolongados de manejo de la unidad...
Page 37 - SyMboLES
5 — Español Es posible que se empleen en este producto algunos de los siguientes símbolos. Le suplicamos estudiarlos y aprender su significado para mayor seguridad al manejar este producto. SÍMboLo NoMbRE EXPLICATIÓN Símbolo de alerta de seguridad Indica un peligro posible de lesiones personales. Le...
Page 38 - ARMADo
6 — Español ARMADo CARACTERÍSTICAS ESPECIFICACIoNES DEL PRoDUCTo Anchura del corte del hilo .................................................................................................................................... 457 mm (18 pulg.)Anchura del corte de la cuchilla ............................
Page 41 - AbASTECIMIENTo DE CoMbUSTIbLE; FUNCIoNAMIENTo; CoMbUSTIbLES oXIGENADoS
9 — Español ADVERTENCIA: Do not allow familiarity with this product to make you careless. Remember that a careless fraction of a second is sufficient to inflict serious injury. ADVERTENCIA: Siempre utilice protección ocular con protección lateral con la marca de cumplimiento de la norma ANSI Z87.1, ...
Page 42 - ARRANQUE y APAGADo
10 — Español FUNCIoNAMIENTo ARRANQUE y APAGADo Vea las figuras 12 a 14. Para el arranque debe colocarse la desbrozadora en una superficie plana y despejada. Para arrancar con el motor frío: Presione lentamente 10 veces la bomba de cebado. Coloque la palanca del anegador en la posición START (A) ...
Page 43 - TÉCNICA DE CoRTE - CoN CUChILLA; UTILIzACIÓN DE LA RECToDoRA; SUGERENCIAS PARA CoRTAR
11 — Español TÉCNICA DE CoRTE - CoN CUChILLA Vea la figura 16. ADVERTENCIA: Debe tenerse un cuidado extremo para asegurarse de manejar la unidad de forma segura al utilizar cuchillas. Lea la información se seguridad para el manejo seguro de la unidad al utilizar cuchillas; consulte el apartado Regla...
Page 44 - MANTENIMIENTo; MANTENIMIENTo GENERAL; REAbASTECIMIENTo DEL hILo
12 — Español MANTENIMIENTo ADVERTENCIA: Al dar servicio a la unidad, sólo utilice piezas de repuesto idénticas. El empleo de piezas diferentes podría causar un peligro o dañar el producto. ADVERTENCIA: Siempre utilice protección ocular con protección lateral con la marca de cumplimiento de la norma ...
Page 45 - AjUSTE DE LA MARChA LENTA
13 — Español MANTENIMIENTo NoTA: Dependiendo del tipo de combustible utilizado, el tipo y la cantidad de lubricante utilizado, o las condiciones de funcionamiento en particular, la abertura de escape, el silenciador y/o el parachispas pueden resultar obstruidos con depósitos de carbón. Si observa al...
Page 46 - ESTE PRoDUCTo SE FAbRICÓ CoN UN SILENCIADoR CATALÍTICo; LLÁMENOS PRIMERO; ¿NECESITA A; ALMACENAMIENTo DE LA PRoDUCTo
14 — Español MANTENIMIENTo ESTE PRoDUCTo SE FAbRICÓ CoN UN SILENCIADoR CATALÍTICo ¡Felicidades! Acaba de realizar una inversión para proteger el medio ambiente. A fin de conservar el nivel de emisiones original de este producto, le suplicamos consultar el apartado sobre mantenimiento que aparece aba...
Page 47 - SoLUCIÓN DE PRobLEMAS
15 — Español SoLUCIÓN DE PRobLEMAS PRobLEMA CAUSA PoSIbLE SoLUCIÓN SI CoN ESTAS SoLUCIoNES No SE RESUELVE EL PRobLEMA, CoMUNÍQUESE CoN EL CoNCESIoNARIo DE SERVICIo AUToRIzADo DE SU PREFERENCIA. 1. Limpie o reemplace la bujía, según sea necesario. Reajuste la separación interelectródica de la bujía. ...
Page 48 - GARANTÍA
16 — Español GARANTÍA DECLARACIÓN DE LA GARANTÍA LIMITADA Techtronic Industries North America, Inc. garantiza al comprador original al menudeo que este producto de la marca RyOBI ® carece de defectos en los materiales y en la mano de obra, y acuerda reparar o remplazar, a la sola discreción de Techt...
Page 52 - OPERATOR’S MANUAL; MANUEL D’UTILISATION / MANUAL DEL OPERADOR; BRUSh cUTTER; DéBROUSSAILLEUSE DE 26; DESBROzADORA 26; TEchTRONIc INDUSTRIES NORTh AMERIcA, INc.; cALIFORNIA PROPOSITION 65
99000067711-21-13 (REv:02) • PARTS AND SERVIcE Prior to requesting service or purchasing replacement parts, please obtain your model and serial number from the product data plate. • MODEL NO. ______________________SERIAL NO. __________________________ • hOW TO OBTAIN REPLAcEMENT PARTS: Replacement p...


 Ryobi SS630
User Manual
Ryobi SS630
User Manual
 Ryobi 18A-C06-734
User Manual
Ryobi 18A-C06-734
User Manual
 Ryobi 21AB454B734
User Manual
Ryobi 21AB454B734
User Manual
 Ryobi 41CD875A034
User Manual
Ryobi 41CD875A034
User Manual
 Ryobi 767R
User Manual
Ryobi 767R
User Manual
 Ryobi 2079R
User Manual
Ryobi 2079R
User Manual
 Ryobi 725R
User Manual
Ryobi 725R
User Manual
 Ryobi 890R
User Manual
Ryobi 890R
User Manual
 Ryobi 825R
User Manual
Ryobi 825R
User Manual
 Ryobi 96116000202
User Manual
Ryobi 96116000202
User Manual