Page 2 - See this fold-out section for all the figures; Voir que cette section d’encart pour toutes les
ii See this fold-out section for all the figures referenced in the operator’s manual. Voir que cette section d’encart pour toutes les figures a adressé dans le manuel d’utilisation. Vea esta sección de la página desplegable para todas las figuras mencionó en el manual del operador.
Page 6 - TAblE oF CoNTENTs; TAblE DEs MATIÈREs / ÍNDICE DE CoNTENIDo; INTRoDUCTIoN; INTRoDUCTIoN / INTRoDUCCIóN
2 — English Introduction ...................................................................................................................................................................... 2 Introduction / Introducción Important Safety Instructions ...............................................
Page 7 - READ All INsTRUCTIoNs; IMpoRTANT sAFETy INsTRUCTIoNs
3 — English WARNINg! When using electric gardening appliances, basic safety precautions should always be followed to reduce the risk of fire, electric shock and personal injury. READ All INsTRUCTIoNs For safe operation, read and understand all instructions before using this product. Follow all saf...
Page 9 - DoUblE INsUlATIoN; ElECTRICAl CoNNECTIoN; gFCI
5 — English ElECTRICAl (AC) Make sure the cord and extension cord are securely attached as shown in Figure 5, then connect the plug end of the power cord into the receptacle end of the extension cord. Check that connection is secure. **Ampere rating (on product data plate) 0-2.0 2.1-3.4 3.5-5.0 5.1-...
Page 10 - syMbols
6 — English Some of the following symbols may be used on this product. Please study them and learn their meaning. Proper interpretation of these symbols will allow you to operate the product better and safer. syMbol NAME DEsIgNATIoN/EXplANATIoN Safety Alert Indicates a potential personal injury haza...
Page 11 - FEATUREs
7 — English Some of the following symbols may be used on this product. Please study them and learn their meaning. Proper interpretation of these symbols will allow you to operate the product better and safer. syMbol NAME DEsIgNATIoN/EXplANATIoN Direct Current Type or a characteristic of current Alte...
Page 12 - AssEMbly; ATTAChINg gRAss DEFlECToR
8 — English UNpACkINg This product requires assembly. Carefully remove the product and any accessories from the box. Make sure that all items listed in the packing list are included. WARNINg: Do not use this product if any parts on the Packing List are already assembled to your product when you un...
Page 13 - opERATIoN
9 — English WARNINg: Do not allow familiarity with products to make you care-less. Remember that a careless fraction of a second is sufficient to inflict serious injury. WARNINg: Always wear eye protection with side shields marked to comply with ANSI Z87.1. Failure to do so could result in objects b...
Page 14 - opERATINg ThE TRIMMER; CUTTINg TIps
10 — English opERATINg ThE TRIMMER See Figure 11. Hold the trimmer with your right hand on the rear handle and your left hand on the front handle. Keep a firm grip with both hands while in operation. Trimmer should be held at a comfortable position with the rear handle about hip height. Cut ...
Page 15 - ADVANCINg ThE lINE MANUAlly; EDgINg
11 — English opERATIoN ADVANCINg ThE lINE MANUAlly See Figure 13. Remove the battery pack or disconnect from power sup- ply. Push the black button located on the string head while pulling on line to manually advance the line. lINE CUT-oFF blADE See Figure 14. This trimmer is equipped with a line...
Page 16 - MAINTENANCE; gENERAl MAINTENANCE; sToRINg ThE TRIMMER
12 — English MAINTENANCE WARNINg: When servicing, use only identical replacement parts. Use of any other parts could create a hazard or cause product damage. WARNINg: Always wear eye protection with side shields marked to comply with ANSI Z87.1. Failure to do so could result in objects being thrown ...
Page 17 - TRoUblEshooTINg; CALL US FIRST; For any questions about operating or maintaining your product,; pRoblEM
13 — English TRoUblEshooTINg CALL US FIRST For any questions about operating or maintaining your product, call the Ryobi ® Help Line! Your product has been fully tested prior to shipment to ensure your complete satisfaction. pRoblEM possIblE CAUsE solUTIoN Line will not advance when using the auto-f...
Page 18 - lIMITED WARRANTy sTATEMENT; WARRANTy
14 — English lIMITED WARRANTy sTATEMENT Techtronic Industries North America, Inc., warrants to the original retail purchaser that this RYOBI ® brand outdoor product is free from defect in material and workmanship and agrees to repair or replace, at Techtronic Industries North America, Inc.’s, discre...
Page 19 - NoTEs
Page 20 - lIRE TouTES lES INSTRucTIoNS; INSTRucTIoNS IMPoRTANTES coNcERNANT lA SÉcuRITÉ
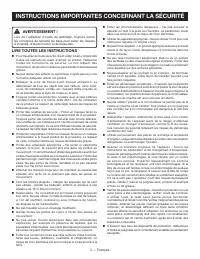
3 — Français AVERTISSEMENT ! Lors de l’utilisation d’outils de jardinage, toujours suivre les consignes de sécurité de base pour éviter les risques d’incendie, d’électrocution et de blessures. lIRE TouTES lES INSTRucTIoNS Pour travailler en toute sécurité, lire et veiller à bien comprendre toutes ...
Page 21 - RèglES PARTIculIèRES coNcERNANT l’uTIlISATIoN dE lA PIlE
4 — Français INSTRucTIoNS IMPoRTANTES coNcERNANT lA SÉcuRITÉ Utiliser exclusivement des lignes de coupe d’origine. Ne pas utiliser un autre accessoire de coupe, tel que fil métallique, corde, ou autre. L’utilisation d’une tête de coupe d’autre marque sur cette tondeuse à fouet peut entraîner des b...
Page 22 - douBlE ISolATIoN; coNNEXIoNS ÉlEcTRIQuES; gFcI
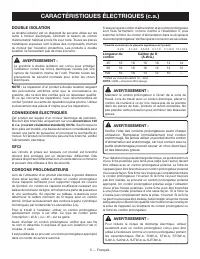
5 — Français douBlE ISolATIoN La double isolation est un dispositif de sécurité utilisé sur les outils à moteur électriques, éliminant le besoin de cordon d’alimentation habituel à trois fils avec terre. Toutes les pièces métalliques exposées sont isolées des composants internes du moteur par l’isol...
Page 23 - SYMBolES
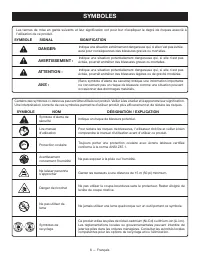
6 — Français Les termes de mise en garde suivants et leur signification ont pour but d’expliquer le degré de risques associé à l’utilisation de ce produit. SYMBolE SIgNAl SIgNIFIcATIoN dANgER: Indique une situation extrêmement dangereuse qui, si elle n’est pas évitée, aura pour conséquences des bles...
Page 25 - ASSEMBlAgE; dÉBAllAgE; INSTAllATIoN dE lA PoIgNÉE AVANT
8 — Français ASSEMBlAgE dÉBAllAgE Ce produit nécessite un assemblage. Avec précaution, sortir l’produit et les accessoires de la boîte. S’assurer que toutes les pièces figurant sur la liste de contrôle sont incluses. AVERTISSEMENT : Ne pas utiliser le produit si, en le déballant, vous constatez qu...
Page 26 - APPlIcATIoNS; uTIlISATIoN; INSTAllER lE Bloc-PIlES
9 — Français AVERTISSEMENT : Ne pas laisser la familiarité avec l’produit faire oublier la prudence. Ne pas oublier qu’une fraction de seconde d’inattention peut entraîner des blessures graves. AVERTISSEMENT : Toujours porter une protection oculaire avec écrans latéraux certifiée conforme à la norme...
Page 27 - MISE EN MARCHE ET ARRÊT DE LA TAILLE-; ARBRE TÉlEScoPIQuE; PoIgNÉE AVANT RÉglABlE; uTIlISATIoN dE lA ToNdEuSE À FouET; coNSEIlS dE couPE
10 — Français MISE EN MARCHE ET ARRÊT DE LA TAILLE- BoRduRES (a.c.) Voir les figures 6 à 8. démarrage : S’il est installé, retirer le bloc-piles du taille-bordures. Glisser la porte des options d’alimentation sur le logement de la pile jusqu’à ce qu’elle s’enclenche en place. Acheminer le cord...
Page 28 - AVANcE MANuEllE dE lIgNE; lAME dE SEcTIoNNEMENT dE lIgNE; TAIllE dES BoRduRES
11 — Français AVANcE MANuEllE dE lIgNE Voir la figure 13. Retirer le bloc-piles ou débrancher l’outil de la source d’alimentation. Appuyer sur le bouton noir situé sur la tête de coupe tout en tirant sur la ligne pour le faire avancer manuellement. lAME dE SEcTIoNNEMENT dE lIgNE Voir la figure 1...
Page 29 - ENTRETIEN; REMPlAcEMENT dE lIgNE; REMISAgE dE lA ToNdEuSE À FouET
12 — Français AVERTISSEMENT : Utiliser exclusivement des pièces d’origine pour les réparations. L’usage de toute autre pièce pourrait créer une situation dangereuse ou endommager l’produit. AVERTISSEMENT : Toujours porter une protection oculaire avec écrans latéraux certifiée conforme à la norme ANS...
Page 30 - dÉPANNAgE; NOUS APPELER D’ABORD; BESOIN D’AID; PRoBlèME
13 — Français dÉPANNAgE NOUS APPELER D’ABORD Pour toute question concernant l’utilisation ou l’entretien utiliser ce produit , appeler le service d’assistance téléphonique Ryobi ® ! Le taille-bordures à été entièrement testé avant expédition pour assurer la complète satisfaction de l’utilisateur. 1-...
Page 31 - gARANTIE; ÉNoNcÉ dE lA gARANTIE lIMITÉE
14 — Français gARANTIE ÉNoNcÉ dE lA gARANTIE lIMITÉE Techtronic Industries North America, Inc., garantit à l’acheteur original que ce produit RYOBI ® est exempt de tous vices de matériaux ou de fabrication et s’engage à réparer ou remplacer gratuitement, à son choix, tout produit s’avérant défectueu...
Page 32 - INSTRUCCIONES DE SEGURIDAD IMPORTANTES; LEA TODAS LAS INSTRUCCIONES
3 — Español INSTRUCCIONES DE SEGURIDAD IMPORTANTES ¡ADVERTENCIA! Al utilizar herramientas eléctricas para el cuidado del jardín, con el fin de reducir el riesgo de incendio, descargas eléctricas y lesiones corporales, siempre deben seguirse ciertas medidas básicas de precaución. LEA TODAS LAS INSTRU...
Page 33 - REGLAS ESPECífICAS PARA EL fUNCIONAMIENTO A bATERíA
4 — Español INSTRUCCIONES DE SEGURIDAD IMPORTANTES En el cabezal de corte use únicamente hilo de repuesto del fabricante original. No use ningún otro aditamento de corte, por ejemplo, cable metálico, cuerda o producto similar. Instalar cualquier otra marca de hilo de corte en esta recortadora de h...
Page 34 - DObLE AISLAMIENTO; GfCI
5 — Español DObLE AISLAMIENTO El doble aislamiento es una característica de seguridad de las herramientas eléctricas, la cual elimina la necesidad de usar el típico cordón eléctrico de tres conductores con conexión a tierra. Todas las partes metálicas expuestas están aisladas de los componentes metá...
Page 35 - SíMbOLOS; SíMbOLO
6 — Español Es posible que se empleen en este producto algunos de los siguientes símbolos. Le suplicamos estudiarlos y aprender su significado. Una correcta interpretación de estos símbolos le permitirá utilizar mejor y de manera más segura el producto. SíMbOLO NOMbRE DENOMINACIÓN/EXPLICACIÓN Alerta...
Page 36 - CARACTERíSTICAS; DIÁMETRO DE CORTE AJUSTABLE
7 — Español Es posible que se empleen en este producto algunos de los siguientes símbolos. Le suplicamos estudiarlos y aprender su significado. Una correcta interpretación de estos símbolos le permitirá utilizar mejor y de manera más segura el producto. SíMbOLO NOMbRE DENOMINACIÓN/EXPLICACIÓN Corrie...
Page 37 - DESEMPAQUETADO; ARMADO; ACOPLAMIENTO DEL DEfLECTOR DE HIERbA; MONTAJE DEL MANGO DELANTERO
8 — Español DESEMPAQUETADO Este producto requiere armarse. Extraiga cuidadosamente de la caja la producto y los accesorios. Asegúrese de que estén presentes todos los artículos enumerados en la lista de empaquetado. ADVERTENCIA: No utilice este producto si alguna pieza incluida en la Lista de empa...
Page 38 - APPLICATIONS; fUNCIONAMIENTO; INSTALACIÓN DEL PAQUETE DE bATERíAS
9 — Español ADVERTENCIA: No permita que su familarización con las herramientas lo vuelva descuidado. Tenga presente que un descuido de un instante es suficiente para causar una lesión grave. ADVERTENCIA: Siempre póngase protección ocular con protección lateral con la marca de cumplimiento de la norm...
Page 39 - bRAZO TELESCÓPICO; MANGO DELANTERO AJUSTABLE; MANEJO DE LA RECORTADORA; RECOMENDACIONES DE CORTE
10 — Español ENCENDIDO Y APAGADO DE LA RECORTA-DORA (CA) Vea las figuras 6 a 8. Para arrancar: Retire el paquete de baterías de la recortadora si está instalado. Deslice la puerta de selección de alimentación sobre el puerto de la batería hasta que encaje en su lugar. Pase el cable de extensió...
Page 40 - AVANCE MANUAL DEL HILO; CUCHILLA DE CORTE DEL HILO; RECORTE DE bORDES
11 — Español fUNCIONAMIENTO AVANCE MANUAL DEL HILO Vea la figura 13. Retire el paquete de baterías o desconecte el suministro de alimentación. Oprima el botón negro ubicado en el cabezal del hilo mientras tira del hilo para avanzar manualmente el hilo. CUCHILLA DE CORTE DEL HILO Vea la figura 14...
Page 41 - MANTENIMIENTO; MANTENIMIENTO GENERAL; ALMACENAMIENTO DE LA RECORTADORA
12 — Español MANTENIMIENTO ADVERTENCIA: Al dar servicio a la unidad, sólo utilice piezas de repuesto idénticas. El empleo de piezas diferentes podría causar un peligro o dañar el producto. ADVERTENCIA: Siempre póngase protección ocular con protección lateral con la marca de cumplimiento de la norma ...
Page 42 - CORRECCIÓN DE PRObLEMAS; LLÁMENOS PRIMERO; ¿NECESITA A; PRObLEMA
13 — Español CORRECCIÓN DE PRObLEMAS LLÁMENOS PRIMERO Si tiene preguntas sobre el funcionamiento o el mantenimiento este producto,llame al teléfono de atención al consumidor de Ryobi ® ! La recortadora ha sido probada enteramente antes de embarcarse para asegurar la satisfacción del consumidor. 1-80...
Page 43 - GARANTíA; DECLARACIÓN DE LA GARANTíA LIMITADA
14 — Español GARANTíA DECLARACIÓN DE LA GARANTíA LIMITADA Techtronic Industries North America, Inc. garantiza al comprador original al menudeo que este producto de la marca RYOBI ® carece de defectos en los materiales y en la mano de obra, y acuerda reparar o remplazar, a la sola discreción de Techt...
Page 44 - CAlIFoRNIA pRoposITIoN 65; TEChTRoNIC INDUsTRIEs NoRTh AMERICA, INC.; opERAToR’s MANUAl; MANUEl D’UTIlIsATIoN / MANUAl; 8 VolT hybRID sTRINg TRIMMER; TAIllE-boRDUREs hybRIDE DE 18 V
CAlIFoRNIA - pRopUEsTA DE lEy NúM. 65 ADVERTENCIA: Este producto y sustancias que puedan llegar a ser aerotransportadas por su uso pueden contener sustancias químicas (por ejemplo, plomo) consideradas por el estado de California como causantes de cáncer, defectos de nacimiento u otras alteraciones r...


 Ryobi SS630
User Manual
Ryobi SS630
User Manual
 Ryobi 18A-C06-734
User Manual
Ryobi 18A-C06-734
User Manual
 Ryobi 21AB454B734
User Manual
Ryobi 21AB454B734
User Manual
 Ryobi 41CD875A034
User Manual
Ryobi 41CD875A034
User Manual
 Ryobi 767R
User Manual
Ryobi 767R
User Manual
 Ryobi 2079R
User Manual
Ryobi 2079R
User Manual
 Ryobi 725R
User Manual
Ryobi 725R
User Manual
 Ryobi 890R
User Manual
Ryobi 890R
User Manual
 Ryobi 825R
User Manual
Ryobi 825R
User Manual
 Ryobi 96116000202
User Manual
Ryobi 96116000202
User Manual