Page 2 - se hace referencia en el manual del operador.
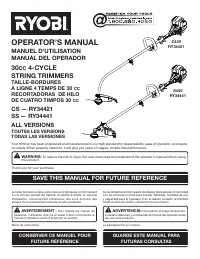
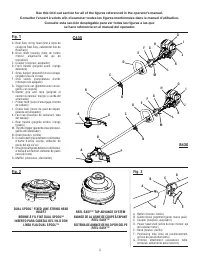
ii A - Reel Easy string head (tête à ligne de coupe de Reel Easy, cabezal del hilo de Reel Easy) B - Drive shaft housing (tube de l’arbre moteur, alojamiento del eje de impulsión) C - Coupler (coupleur, acoplador) D - Front handle (poignée avant, mango delantero) E - Strap hanger (dispositif d’accro...
Page 6 - TABLE OF CONTENTS; TABLE DES MATIÈRES / ÍNDICE DE CONTENIDO; INTRODUCTION; INTRODUCTION / INTRODUCCIÓN
2 Introduction ...................................................................................................................................................................... 2 Introduction / Introducción General Safety Rules ................................................................
Page 7 - GENERAL SAFETY RULES; READ ALL INSTRUCTIONS
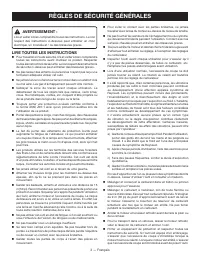
3 — English GENERAL SAFETY RULES WARNING: Read and understand all instructions. Failure to follow all instructions listed below may result in electric shock, fire and/or serious personal injury. READ ALL INSTRUCTIONS For safe operation, read and understand all instructions before using this produc...
Page 8 - SPECIFIC SAFETY RULES; SPECIFIC SAFETY RULES FOR TRIMMER
4 — English SPECIFIC SAFETY RULES SPECIFIC SAFETY RULES FOR TRIMMER USE Inspect before use. Replace damaged parts. Make sure fasteners are in place and secure. Check for fuel leaks. Replace string head if cracked, chipped, or damaged in any way. Be sure the string head or blade is properly insta...
Page 9 - SYMBOLS
5 — English SYMBOLS Some of the following symbols may be used on this product. Please study them and learn their meaning for safe operation of this product. SYMBOL NAME EXPLANATION Safety Alert Indicates a potential personal injury hazard. Read Operator’s Manual To reduce the risk of injury, user mu...
Page 10 - PRODUCT SPECIFICATIONS; FEATURES; KNOW YOUR STRING TRIMMER
6 — English PRODUCT SPECIFICATIONS Weight - (without fuel) C430 ..................................................................................................................................................................10.7 lbs. S430 ..............................................................
Page 11 - ASSEMBLY; For removing or changing the attachment:
7 — English ASSEMBLY UNPACKING This product requires assembly. Carefully remove the product and any accessories from the box. Make sure that all items listed in the packing list are included. WARNING: Do not use this product if any parts on the packing list are already assembled to your product wh...
Page 12 - TO ATTACH THE CURVED SHAFT GRASS; OPERATION; FUELING AND REFUELING THE TRIMMER
8 — English The secondary hole in the attachment shaft can be used for hanging purposes as well. ATTACHING THE FRONT HANDLE See Figure 5. Remove wing nut, washer, and bolt from the front handle. Install the front handle onto the top side of the drive shaft housing in the area indicated by th...
Page 13 - OXYGENATED FUELS; are not; ADDING/CHECKING ENGINE LUBRICANT; To check engine lubricant level:; OPERATING THE TRIMMER
9 — English OPERATION WARNING: Always shut off engine before fueling. Never add fuel to a machine with a running or hot engine. Move at least 30 ft. from refueling site before starting engine. Do not smoke and stay away from open flames and sparks. Failure to safely handle fuel could result in serio...
Page 14 - TO ADVANCE THE CUTTING LINE (REEL EASY
10 — English OPERATION TO ADVANCE THE CUTTING LINE (REEL EASY STRING HEAD) Line advance is controlled by tapping the string head on grass while running engine at full throttle. Run engine at full throttle. Tap the knob on ground to advance line. The line advances each time the knob is tapped. Do...
Page 15 - MAINTENANCE; NOTE: Make sure the arrows on the spool are aligned
11 — English MAINTENANCE Insert the new spool into the string head. NOTE: Make sure the arrows on the spool are aligned with the eyelets in the string head housing. Push down and hold the spool and housing together while complet- ing the installation. Reinstall the spool retainer to secure. To i...
Page 17 - CLEARANCE; When storing 1 month or longer:; HIGH ALTITUDE ENGINE OPERATION
13 — English MAINTENANCE ADJUSTING CAMSHAFT-TO-ROCKER ARM CLEARANCE See Figures 27 - 30. Inspect the camshaft-to-rocker arm clearance after every 25 hours of operation. This should be done in a clean, dust-free environment.NOTE: This procedure requires partial disassembly of the engine. If you are u...
Page 18 - TROUBLESHOOTING; PROBLEM; Spark Plug Replacement earlier in this; cant earlier in this manual.
14 — English IF THESE SOLUTIONS DO NOT SOLVE THE PROBLEM CONTACT YOUR AUTHORIZED SERVICE DEALER. TROUBLESHOOTING PROBLEM POSSIBLE CAUSE SOLUTION Engine will not start No spark. No fuel. Engine is flooded. Clean or replace spark plug. Reset spark plug gap. Refer to Spark Plug Replacement earlier in t...
Page 19 - MAKE THE MOST OF YOUR PURCHASE!; Your product has been fully tested prior to shipment
15 — English IF THESE SOLUTIONS DO NOT SOLVE THE PROBLEM CONTACT YOUR AUTHORIZED SERVICE DEALER. TROUBLESHOOTING WARRANTY EMISSIONS MAINTENANCE SCHEDULE AND WARRANTED PARTS LIST Emissions Parts Inspect Before Clean Every Replace Every Replace Every Each Use 5 Hours 25 Hours or Yearly 50 Hours or Yea...
Page 20 - WARRANTY; LIMITED WARRANTY STATEMENT; service center within the warranty
16 — English WARRANTY LIMITED WARRANTY STATEMENT Techtronic Industries North America, Inc., warrants to the original retail purchaser that this RYOBI ® brand outdoor product is free from defect in material and workmanship and agrees to repair or replace, at Techtronic Industries North America, Inc.’...
Page 22 - NOTES
Page 23 - RÈGLES DE SÉCURITÉ GÉNÉRALES; LIRE TOUTES LES INSTRUCTIONS
3 — Français RÈGLES DE SÉCURITÉ GÉNÉRALES AVERTISSEMENT : Lire et veiller à bien comprendre toutes les instructions. Le non respect des instructions ci-dessous peut entraîner un choc électrique, un incendie et / ou des blessures graves. LIRE TOUTES LES INSTRUCTIONS Pour travailler en toute sécurit...
Page 24 - RÈGLES DE SÉCURITÉ PARTICULIÈRES
4 — Français RÈGLES DE SÉCURITÉ PARTICULIÈRES Inspecter l’outil avant chaque utilisation. Remplacer les pièces endommagées. S’assurer que toutes les pièces de boulonnerie sont en place et bien serrées. S’assurer de l’absence de fuites de carburant. Si la tête de coupe est fendue, brisée ou end...
Page 25 - SYMBOLES; SYMBOLE
5 — Français SYMBOLES Certains des symboles ci-dessous peuvent être utilisés sur le produit. Veiller à les étudier et apprendre leur signification pour assurer la sécurité d’utilisation. SYMBOLE NOM EXPLICATION Symbole d’alerte de sécurité Indique un risque de blessure potentiel. Lire le manuel d’ut...
Page 26 - FICHE TECHNIQUE; CARACTÉRISTIQUES; CONCEPTION ERGONOMIQUE
6 — Français FICHE TECHNIQUE Poids - (sans carburant) C430 ........................................................................................................................................................4,8 kg (10,7 lb) S430 ......................................................................
Page 27 - Retrait ou remplacement de l’accessoire :; DÉBALLAGE; ASSEMBLAGE
7 — Français AVERTISSEMENT : Si des pièces manquent, ne pas utiliser ce produit avant qu’elles aient été installées. Ne pas prendre cette précaution pourrait entraîner des blessures graves. INSTALLATION DU BLOC-MOTEUR SUR L’ACCESSOIRE Voir les figures 2 - 3. AVERTISSEMENT : Ne jamais installer, retr...
Page 29 - UTILISATION; CARBURANTS OXYGÉNÉS; ne sont pas couverts par la garantie.; AJOUT/VÉRIFICATION DE LUBRIFIANT; UTILISATION DU TAILLE-BORDURES
9 — Français UTILISATION CARBURANTS OXYGÉNÉS NE PAS UTILISER LE CARBURANT E85. LE NON-RESPECT DE CETTE DIRECTIVE ENTRAÎNE L’ANNULATION DE LA GARANTIE. NOTE : Les dommages au circuit de carburant et les problèmes de performance résultant de l’utilisation de carburant oxygéné contenant des pourcentage...
Page 30 - AVANCE DE LA LIGNE DE COUPE (TÊTE À; CONSEILS DE COUPE
10 — Français UTILISATION AVANCE DE LA LIGNE DE COUPE (TÊTE À LIGNE DE COUPE DE REEL EASY) L’avance de la ligne est obtenue en tapant la tête de coupe sur le gazon, le moteur tournant à plein régime. Faire tourner le moteur à plein régime. Taper la tête de coupe sur le sol pour faire avance la l...
Page 31 - ENTRETIEN GÉNÉRAL; ENTRETIEN; REMPLACEMENT DE LIGNE; INSTALLATION DU FIL DANS LA TÊTE DE
11 — Français AVERTISSEMENT : Utiliser exclusivement des pièces d’origine pour les réparations. L’usage de toute autre pièce pourrait créer une situation dangereuse ou endommager l’outil. AVERTISSEMENT : Toujours porter des lunettes de sécurité munies d’écrans latéraux lors de l’utilisation d’outils...
Page 32 - RÉGLAGE DU RALENTI
12 — Français ENTRETIEN Arrêter le moteur et débrancher le fil de la bougie. Prendre deux bouts de fil pour coupe-bordure coupés préalablement (fournis) ou couper deux bouts de fil d’une longueur de 279,4 mm (11 po). Insérer les fils dans les fentes situées de chaque côté de la tête de c...
Page 33 - R É G L A G E D E L’ A R B R E À C A M E S PA R; REMISAGE LE PRODUIT; Remisage 1 mois ou plus :
13 — Français ENTRETIEN R É G L A G E D E L’ A R B R E À C A M E S PA R RAPPORT AU CULBUTEUR – DÉGAGEMENT Voir les figures 27 - 30. Examiner le dégagement entre l’arbre à cames et le culbuteur à toutes les 25 heures d’utilisation. Cette opération doit être effectuée dans un environnement propre et e...
Page 34 - DÉPANNAGE; PROBLÈME; Ajout et
14 — Français SI LES PRÉSENTES SOLUTIONS NE RÉSOLVENT PAS LE PROBLÈME, CONTACTER LE CENTRE DE RÉPARATIONS AGRÉÉ. DÉPANNAGE PROBLÈME CAUSE POSSIBLE SOLUTION Le moteur ne démarre pas Pas d’étincelle. Pas de carburant. Moteur noyé. Nettoyer ou remplacer la bougie. Régler l’écartement de l’électrode. Vo...
Page 35 - TIREZ LE MEILLEUR PARTI DE VOTRE ACHAT!; BESOIN D’AID
15 — Français SI LES PRÉSENTES SOLUTIONS NE RÉSOLVENT PAS LE PROBLÈME, CONTACTER LE CENTRE DE RÉPARATIONS AGRÉÉ. DÉPANNAGE GARANTIE PROGRAMME D’ENTRETIEN DU SYSTÈME D’ÉMISSIONS ET LISTE DES PIÈCES GARANTIES FILTRE À AIR INCLUT : ÉLÉMENT FILTRANT .........................................................
Page 36 - GARANTIE; ÉNONCÉ DE LA GARANTIE LIMITÉE
16 — Français GARANTIE ÉNONCÉ DE LA GARANTIE LIMITÉE Techtronic Industries North America, Inc., garantit à l’acheteur original que ce produit RYOBI ® est exempt de tous vices de matériaux ou de fabrication et s’engage à réparer ou remplacer gratuitement, à son choix, tout produit s’avérant défectueu...
Page 39 - REGLAS DE SEGURIDAD GENERALES; LEA TODAS LAS INSTRUCCIONES
3 — Español REGLAS DE SEGURIDAD GENERALES ADVERTENCIA: Lea y comprenda todas las instrucciones. El incumplimiento de las instrucciones señaladas abajo puede causar descargas eléctricas, incendios y lesiones corporales serias. LEA TODAS LAS INSTRUCCIONES Para utilizar este producto de una forma seg...
Page 40 - REGLAS DE SEGURIDAD ESPECÍFICAS; REGLAS DE SEGURIDAD ESPECÍFICAS PARA
4 — Español REGLAS DE SEGURIDAD ESPECÍFICAS REGLAS DE SEGURIDAD ESPECÍFICAS PARA EL USO DE LA RECORTADORA Inspeccione el producto cada vez antes usarlo. Reemplace toda pieza dañada. Asegúrese de que todos los tornillos y demás elementos de unión estén en lugar y bien firmes. Revise la herramienta ...
Page 42 - Diámetro del hilo; CARACTERÍSTICAS
6 — Español ESPECIFICACIONES DEL PRODUCTO Peso - (sin combustible) C430 .......................................................................................................................................................4,8 kg (10,7 lb.) S430 .........................................................
Page 43 - Para desmontar o cambiar el aditamento:; ARMADO
7 — Español ADVERTENCIA: Para evitar un arranque accidental que podría causar lesiones corporales graves, siempre desconecte el cable de la bujía del motor de la bujía misma al ensamblar las piezas. INSTALACIÓN DEL CABEZAL MOTOR EN EL ADITAMENTO Vea las figuras 2 - 3. ADVERTENCIA: Nunca una ni ajust...
Page 44 - MONTAJE DEL MANGO DELANTERO; NOTA: El lado abierto del mango debe quedar orientado; MONTAJE DEL DEFLECTOR DE PASTO; PARA MONTAR EL DEFLECTOR DE PASTO DEL; FUNCIONAMIENTO; NOTA: Es normal que salga humo de un motor nuevo
8 — Español Gire levemente la tapa de un lado a otro hasta que quede asegurado en su lugar el botón. El orificio secundario del eje del aditamento puede emplearse también para colgar éste. MONTAJE DEL MANGO DELANTERO Vea la figura 5. Retire la tuerca de mariposa, arandela y perno del clip de la ...
Page 45 - COMBUSTIBLES OXIGENADOS; ABASTECIMIENTO Y VERIFICACIÓN DE; MANEJO DE LA RECORTADORA
9 — Español FUNCIONAMIENTO ADVERTENCIA: Siempre apague el motor antes de abastecer el combustible. Nunca agregue combustible a una máquina con el motor en marcha o caliente. Aléjese por lo menos 30 pies (9 metros) del sitio de reabastecimiento de combustible antes de encender el motor. ¡No fume! La ...
Page 46 - SUGERENCIAS PARA CORTAR
10 — Español FUNCIONAMIENTO PARA AVANZAR EL HILO DE CORTE (CABEZAL DEL HILO DE REEL EASY) El avance del hilo se controla golpeando levemente el cabezal del hilo contra el pasto mientras el motor funciona a la máxima aceleración. Haga funcionar el motor a la máxima aceleración. Golpee el perilla ...
Page 47 - MANTENIMIENTO GENERAL; MANTENIMIENTO; REABASTECIMIENTO DEL HILO
11 — Español ADVERTENCIA: Al dar servicio a la unidad, sólo utilice piezas de repuesto idénticas. El empleo de piezas diferentes puede causar un peligro o dañar el producto. ADVERTENCIA: Siempre use gafas de seguridad o anteojos protectores con protección lateral al usar herramientas. Si la operació...
Page 48 - INSTALACIÓN DEL HILO EN EL CABEZAL DEL
12 — Español INSTALACIÓN DEL HILO EN EL CABEZAL DEL HILO CON LÍNEA FIJA DUAL SPOOL™ Vea la figura 22. Use únicamente hilo monofilar de 2,4 mm a 2,7 mm. (0,095 pulg. a 0,105 pulg.) de diámetro. Detenga el motor y desconecte el cable de la bujía. Tome dos de los tramos precortados del hilo de l...
Page 49 - CAMBIO DEL LUBRICANTE PARA MOTOR
13 — Español MANTENIMIENTO CAMBIO DEL LUBRICANTE PARA MOTOR Vea la figura 26. Para lograr un desempeño óptimo, el lubricante para motor debe cambiarse cada 25 horas de uso. Para cambiar el lubricante para motor: Detenga el motor y desconecte el cable de la bujía. Deje enfriar el motor completament...
Page 50 - ALMACENAMIENTO DE LA PRODUCTO; Al almacenar 1 mes o más:
14 — Español ALMACENAMIENTO DE LA PRODUCTO Limpie todo material extraño de la producto. Almacene la unidad en un espacio bien ventilado inaccesible a los niños. Evite que la unidad entre en contacto con agentes corrosivos como las sustancias químicas para el jardín y las sales para derretir el hie...
Page 51 - SOLUCIÓN DE PROBLEMAS; PROBLEMA
15 — Español SI CON ESTAS SOLUCIONES NO SE RESUELVE EL PROBLEMA, COMUNÍQUESE CON EL CONCESIONARIO DE SERVICIO AUTORIZADO DE SU PREFERENCIA. SOLUCIÓN DE PROBLEMAS PROBLEMA CAUSA POSIBLE SOLUCIÓN El motor no arranca No hay chispa. No hay combustible. Está ahogado el motor. Limpie o reemplace la bujía,...
Page 52 - ¡APROVECHE AL MÁXIMO SU COMPRA!
16 — Español SI CON ESTAS SOLUCIONES NO SE RESUELVE EL PROBLEMA, COMUNÍQUESE CON EL CONCESIONARIO DE SERVICIO AUTORIZADO DE SU PREFERENCIA. SOLUCIÓN DE PROBLEMAS GARANTÍA PROGRAMA DE MANTENIMIENTO PARA EL CONTROL DE EMISIONES Y LISTA DE PIEZAS GARANTIZADAS Piezas para el control Inspeccionar cada ve...
Page 53 - GARANTÍA; DECLARACIÓN DE LA GARANTÍA LIMITADA
17 — Español GARANTÍA DECLARACIÓN DE LA GARANTÍA LIMITADA Techtronic Industries North America, Inc. garantiza al comprador original al menudeo que este producto de la marca RYOBI ® carece de defectos en los materiales y en la mano de obra, y acuerda reparar o remplazar, a la sola discreción de Techt...
Page 55 - NOTAS
Page 56 - CALIFORNIA PROPOSITION 65; TECHTRONIC INDUSTRIES NORTH AMERICA, INC.; OPERATOR’S MANUAL; MANUEL D’UTILISATION / MANUAL DEL OPERADOR; CC; -CYCLE STRING TRIMMERS; TAILLE-BORDURES À LIGNE 4 TEMPS DE 30 CC /
987000-8578-18-10 (REV:03) WARNING: The engine exhaust from this product contains chemicals known to the State of California to cause cancer, birth defects, or other reproductive harm. CALIFORNIA PROPOSITION 65 TECHTRONIC INDUSTRIES NORTH AMERICA, INC. 1428 Pearman Dairy Road, Anderson, SC 29625 USA...