Page 2 - DANGER; TABLE OF CONTENTS; Care and Maintenance
2 DANGER If you smell gas: 1. Shut off gas to the appliance.2. Extinguish an open flame. TABLE OF CONTENTS Care and Maintenance .............................................................................................................. 3 Assembly Instructions.........................................
Page 3 - CARE AND MAINTENANCE; Precautions
3 CARE AND MAINTENANCE Precautions WHEN USING THE GRILL, DO NOT TOUCH THE GRILL RACK, BURNER GRATE OR IMMEDIATE SURROUNDINGS WHICH BECOME EXTREMLY HOT DURING USE AND CAN CAUSE BURNS. AVOID ALLOWING EXCESS GREASE TO COLLECT IN THE GREASE TRAY AT THE BOTTOM OF THE GRILL'S FIREBOX. CLEAN THE GREASE TRA...
Page 4 - PROPER PLACEMENT AND CLEAR ANCE OF GRILL; WARNING
4 PROPER PLACEMENT AND CLEAR ANCE OF GRILL • Never use your gas grill in a garage, porch, shed, breezeway or any other enclosed area. Your gas grill is to be used outdoors only. • Do Not install this unit into combustible enclosures. • Minimum clearance from sides and back of unit to combustible con...
Page 6 - PREPARATION; Tools Required for Assembly:
6 THE MARKING OF INJECTORS The marking of injectors as diagram is the injector size. REGULATORANDHOSEASSEMBLY: · After the assembly has been secured, turn on the gas and check for leaks. See the following Checking for Gas Leaks .Make certain this procedure is carried out in well-ventilated area and ...
Page 8 - Tank Installation; building, garage or any other enclosed area.; INSTALLATION INSTRUCTIONS; Main burners
8 Regulator Cylinder Tank Installation If the outdoor cooking appliance is notin use, the gas must be turned “OFF” at the Liquid Propane Cylinder. If the outdoor cooking gas appliance is not in use, the gas must be turned off at the supply cylinders. Storage of an outdoor cooking gas appliance Indoo...
Page 9 - GAS FLOW CHECK; Flames should be blue and stable with no yellow
9 check must be performed at the installation site due to possible mishanding in shipment 1. are “ ” 2. a is 3. a is 4.5. service at (1)855-882-2333. Only those parts recommended by themanufacturer should be used on the grill.Substitution will void the warranty. Do not use thegrill until all connect...
Page 11 - The cylinder supply system must be arranged for vapor withdrawal.; Before lighting, please check the connection; This appliance will be hot during and after use.
11 Inspect the gas supply hose prior to turning on the gas. If there is evidence of cuts, wear, or abrasion, itmust be replaced prior to use.Connect the regulator (type QCC791) onto the cylinder, and leak check the hose and regulatorconnections before operating the grill.Only the pressure regulator ...
Page 12 - accumulated gas to dissipate.
12 1. If you have already attempted to light the main burner with the igniter, allow 5 minutes for any accumulated gas to dissipate. 2. Insert a match into the lighting rod. Ignite the match and insert through the cooking grids to the burner. 3. If the burner does not light within seconds turn the k...
Page 13 - Temperature gauge
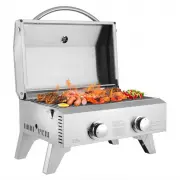
NO. Part Description QTY. NO. Part Description QTY. 1 Main Lid Hinge Bolt 2 14 Knob 2 2 Lid “ R ” Pin 2 15 Leg Plug 4 3 Main Lid 1 16 Foot Stand Leg, Right 2 4 Lid Rubber Pad 2 17 Grease Tray 1 5 Temperature gauge 1 18 Lighting Rod 1 6 Lid Handle Insulating Spacer 2 19 Burner Supporter 2 7 Handle 1 ...