Page 2 - Rotisserie; Table of Contents; Ill; WJ
EZ-cfto�e ™ Rotisserie Table of Contents Important Safeguards I Cleaning & Care .................................................................. 3-5 Rotisserie Model Specs ............................................................................................... 6 Parts Included ............
Page 3 - Two Original Style Roast Chickens; Easy Steps to Great Rotisserie Chicken; IMPORTANT SAFEGUARDS
EZ -Store ™ Rotisserie Two Original Style Roast Chickens Two 3½ to 4 pound whole chicken 2 teaspoons each of Salt and Paprika 1 teaspoon each of Onion Powder, Dried Thyme, White Pepper ½ teaspoon each of Cayenne Pepper, Black Pepper, Garlic Powder Salt and fresh Ground Pepper 2 Onions, quartered In ...
Page 4 - THIS PRODUCT IS FOR HOUSEHOLD USE ONLY; SAVE THESE INSTRUCTIONS
EZ -Store ™ Rotisserie 16. When using the Rotisserie Baskets, be sure no small bones or other food can fall between or extend beyond the wires and catch on the Drip Tray or Heating Element or anything else during rotation. It is important to check while cooking. If the food moves around inside the B...
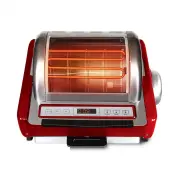
Page 6 - ROTISSERIE MODEL SPECS; UNPACKING ROTISSERIE; PARTS INCLUDED; El
EZ -Store ™ Rotisserie ROTISSERIE MODEL SPECS 5250, 5260, 5270 Series • Dimensions: 17.25" W X 12.75" H X 15.75" D • 12 lb Cooking Capacity • 120 Volts AC / 60 Hz / 1250 Watts NOTE: The model number is located on the back of your E-Z Store ™ Rotisserie. UNPACKING ROTISSERIE A. Fold flaps...
Page 7 - Recipes; GETTING STARTED: Setting Up Your Rotisserie; IMPORTANT: FOR YOUR SAFETY, THE ROTISSERIE WILL ONLY
EZ -Store ™ Rotisserie Recipes Roast Chicken with Lemon Herb Rub One 3½ to 4 pound Whole Chicken Rind of 2 Lemons, minced 5 Garlic Cloves, minced 1 tablespoon Dried Thyme, finely crumbled 2 teaspoons Dried Rosemary, finely crumbled 2 teaspoons Dried Sage Leaves, finely crumbled Salt and freshly Grou...
Page 8 - GETTING STARTED; Meal Suggestions
EZ -Store ™ Rotisserie GETTING STARTED {cont'd) 5. SPIT ROD ASSEMBLY: One end of the spit rod is held in place by a WIRE CLIP installed on Gear Wheel A. Insert the notched end of the SPIT ROD into Gear Wheel A while squeezing the WIRE CLIP together. The SPIT ROD is secure when the WIRE CLIP snaps in...
Page 9 - Helpful Hints; Once the food is rotating, watch it; NOT; Call for order information; You can use a small strip of aluminum; Healthy; Rotisserie Basket; Perfect for hamburgers, chicken pieces, vegetables, whole fish; You can use a small strip of aluminum foil inside the Basket--
EZ -Store ™ Rotisserie Helpful Hints Burnt Edges on Food? You can put a small strip of aluminum foil on the top and bottom edges inside the Basket to prevent burnt edges as it cooks. Seasonings and spices should be sprinkled on or rubbed into the food before it goes into the Rotisserie. Once the foo...
Page 10 - How to Tie Chicken; CAUTIONS
EZ -Store ™ Rotisserie Always use CAUTION with Hot Food and Metal Parts. The Food, Basket and the Spit Assembly get HOT! Always wear protective gloves when removing the Basket. If you feel the Oven Gloves are not insulated enough to adequately protect you from the hot surfaces you are handling, set ...
Page 11 - Round BBQ Rib Basket (Optional Accessory); How to Tie Turkey; El-Store Rotisserie Series
EZ -Store ™ Rotisserie Round BBQ Rib Basket (Optional Accessory) � C Hook 22 ACCESSORIES Stair Hook 1. Place baby back or spare ribs in boiling water for 15 minutes. Drain ribs and let them cool. T his step makes the ribs more pliable and tender and reduces fat. When cooled, cover both sides of the ...
Page 12 - Placing Poultry on the Spit Rod Assembly; Carving Knife
EZ -Store ™ Rotisserie Placing Poultry on the Spit Rod Assembly There are two ways to load the Spit Rods. Keep hands clear of pointed rods as they exit from the meat. Piercing Poultry with Rods Hold the tied poultry or meat down securely with one hand while firmly pushing the Spit Rods into the bird...
Page 13 - Kabob Rods; Large Multipurpose Basket; Cooking Position
EZ -Store ™ Rotisserie Kabob Rods (Optional Accessory) Set the completed Spit Rod Assembly in the Rotisserie, Position A (see page 13). Load the Kabobs with food then insert them into the holes on the gear wheels. Start with sharp end on the left side, then load and snap the Kabob with the Auto Turn...
Page 14 - Loading the Spit Rod Assembly; Solid Flavor Injector
EZ -Store ™ Rotisserie Loading the Spit Rod Assembly IMPORTANT: Food must be centered. Put the Spit Rods through center of the food so it will be balanced and the food does not touch the Heating Element as it rotates. This is important for large foods like turkeys, standing rib roasts, 2 chickens si...
Page 15 - AVAILABLE ACCESSORIES; How to Load Injector; KEEP AWAY FROM CHILDREN.; Digital Timer; El-Store Rotisserie Timer; Cook Settings; Cl· LI Cl ·J; co; Ll·LILI
EZ -Store ™ Rotisserie AVAILABLE ACCESSORIES Liquid Flavor Injector (Optional Accessory) For poultry meat and seafood, just add your favorite liquid, or one of Ron's marinades, for the best flavor you've ever had. Mix with water, juice, wine, soy sauce, vinegar, olive oil, etc. Be creative, use the ...
Page 16 - Carving Platform; Estimated Time and Temperature Chart; POULTRY; PORK; BEEF; LAMB; SEAFOOD
EZ -Store ™ Rotisserie Carving Platform After your roast, leg of lamb, or ham is done, you can place the Carving Platform under the Gear Wheel to hold the Spit rod assembly in a vertical position while you carve the meat. And, if you want the roast browned further, you can put the roast back in the ...
Page 17 - Safety Warning; THE FOLLOWING MUST BE FOLLOWED IN ORDER TO PREVENT YOUR
Safety Warning CAREFULLY FOLLOW THE INSTRUCTIONS FOR SET UP & USE OF YOUR RONCO SHOWTIME ROTISSERIE • Ronco Showtime Rotisserie Product Manuals Can Be Accessed at Ronco.com Using th e Dropdown Menu for “SHOP” or “CUSTOMER CARE” • Customers Should Read the Complete Product Manual Prior to Use • Y...