Page 2 - Warning and Safety Information; Gas Installations; and any other statutory regulations.
Warning and Safety Information This appliance shall be installed only by authorised persons and in accordance with local and national building instructions, local gas fitting regulations, municipal building codes, electrical wiring regulations and AS 5601-2010 Gas Installations and any other statuto...
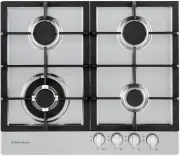
Page 3 - Operating Instructions; Igniting the Burners; Burner
Operating Instructions Igniting the Burners In these models the knob controls both ignition and the safety device. Proceed as follows to ignite the burners: 1) Depress the chosen knob and turn to the large flame. 2) Keep the knob depressed for 3 to 4 seconds to allow the spark to ignite the burner a...
Page 5 - CLEANING AND MAINTENANCE; General; Avoid using acid or chlorine based cleaning products.; Enamelled Parts (only available in some models); non abrasive products.; Burners and Grids; These parts can be removed and cleaned with appropriate products.
Operating Instructions CLEANING AND MAINTENANCE General Cleaning and maintenance should be carried out regularly while the appliance is cold especially when cleaning the enamelled & Stainless steel parts. Avoid leaving alkaline or acid substances on the surfaces (lemon juice, vinegar etc). Avoid...
Page 6 - Gas Taps; Do not modify this appliance.
Operating Instructions Gas Taps Periodic lubrication of the gas taps must be carried out by authorised personnel only. In the event of operating faults with the gas taps call an authorised service agent. General Advice • When the appliance is not being used it is advisable to keep the gas tap closed...
Page 7 - Installation; Cutout Dimensions
Installation Cutout Dimensions 650mm 30 mm 50mm 552mm 470mm 827mm 470mm
Page 9 - Apply gas type label provided with the conversion kit.; THIS SHOULD ONLY BE CARRIED OUT BY AUTHORISED PERSONNEL!
Ventilation • Ventilation must be in accordance with AS5601-2010 Gas Installations. • The appliance should have adequate ventilation for complete combustion of gas, proper fluing and to maintain temperature of immediate surroundings within safe limits. Discharging Products of Combustion • Extractor ...
Page 10 - Orientation of the Elbow; Remove the gratings and the burner covers
Orientation of the Elbow This appliance is supplied with a Gas Inlet elbow connection located below the maintop, at the rear. The actual location by measurement is 110mm from the right hand side of the 4 burner hob, and 50mm from the left hand side of the 5 burner hob. The connection to the gas supp...
Page 11 - Regulating the Burner Minimum Setting; Turn the screw (A) to the correct setting with a screwdriver.
Installation Regulating the Burner Minimum Setting When switching from one type of gas to another, the minimum flow rate must be correct so that the flame will not go when changing from maximum to minimum flame. To regulate the flame follow the instructions below: • Light the burner then turn the kn...
Page 12 - continued; Replacing the Power Supply Cable
Installation - continued For connections to the mains power supply never use adapters, reductions or multiple power points as these may overheat and catch fire. In the event that installation should require modifications to the mains supply wiring system or if the power plug is not suitable for the ...
Page 13 - Terms and Conditions
Warranty Certificate (New Zealand) Pre-Installation Should you require service please contact u us on: New Zealand Monaco Corporation Ltd Telephone: (09) 415 6000 Facsimile: (09) 415 7400 Email: [email protected] www.robinhood.co.nz Terms and Conditions The following conditions apply in respect of t...