Page 2 - WARNING DECAL PLACEMENT
2 WARNING DECAL PLACEMENT . . . . . . . . . . . . . . . . . . . . . . . . . . . . . . . . . . . . . . . . . . . . . . . . . . . . . . . . . . . . . . . 2 IMPORTANT PRECAUTIONS . . . . . . . . . . . . . . . . . . . . . . . . . . . . . . . . . . . . . . . . . . . . . . . . . . . . . . . . . . . . . . ...
Page 3 - IMPORTANT PRECAUTIONS
3 1. It is the responsibility of the owner to ensure that all users of this treadmill are adequately informed of all warnings and precautions. 2. Before beginning any exercise program, consult your physician. This is especially important for persons over age 35 or persons with pre-existing health pr...
Page 4 - SAVE THESE INSTRUCTIONS
4 21. The treadmill is capable of high speeds. Adjust the speed in small increments to avoid sudden jumps in speed. 22. The heart rate monitor is not a medical device. Various factors, including the user’s movement, may affect the accuracy of heart rate readings. The heart rate monitor is intended o...
Page 5 - BEFORE YOU BEGIN
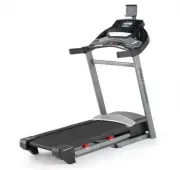
5 Thank you for selecting the new PROFORM ® PERFORMANCE 400I treadmill. The PERFORMANCE 400I treadmill provides an impressive selection of fea- tures designed to make your workouts at home more effective and enjoyable. For your benefit, read this manual carefully before you use the treadmill. If you...
Page 6 - PART IDENTIFICATION CHART
6 PART IDENTIFICATION CHART Use the drawings below to identify small parts used for assembly. The number in parentheses below each draw- ing is the key number of the part, from the PART LIST near the end of this manual. The number following the key number is the quantity used for assembly. Note: If ...
Page 7 - ASSEMBLY
7 • Assembly requires two persons. • Place all parts in a cleared area and remove the packing materials. Do not dispose of the packing materials until you finish all assembly steps. • After shipping, there may be an oily substance on the exterior of the treadmill. This is normal. If there is an oily...
Page 17 - HOW TO USE THE TREADMILL; AUS
17 HOW TO PLUG IN THE POWER CORD This product must be earthed. If it should malfunc- tion or break down, earthing provides a path of least resistance for electric current to reduce the risk of electric shock. This product’s power cord has an equipment-earthing conductor and an earthing plug. IMPORTA...
Page 25 - HOW TO FOLD AND MOVE THE TREADMILL
25 HOW TO FOLD THE TREADMILL To avoid damaging the treadmill, adjust the incline to zero before you fold the treadmill. Then, remove the key and unplug the power cord. CAUTION: You must be able to safely lift 45 lbs. (20 kg) to raise, lower, or move the treadmill. 1. Hold the metal frame firmly in t...
Page 26 - MAINTENANCE AND TROUBLESHOOTING
26 MAINTENANCE Regular maintenance is important for optimal per- formance and to reduce wear. Inspect and properly tighten all parts each time the treadmill is used. Regularly clean the treadmill and keep the walking belt clean and dry. First, press the power switch into the off position and unplug ...
Page 29 - EXERCISE GUIDELINES
29 EXERCISE GUIDELINES These guidelines will help you to plan your exercise program. For detailed exercise information, obtain a reputable book or consult your physician. Remember, proper nutrition and adequate rest are essential for successful results. EXERCISE INTENSITY Whether your goal is to bur...
Page 30 - PART LIST
30 Key No. Qty. Description Key No. Qty. Description PART LIST Model No. PETL79816.0 R0416A 1 23 #8 x 1/2" Screw 2 4 1/4" x 1/2" Screw 3 2 Base Pad 4 29 #8 x 3/4" Screw 5 4 #10 Star Washer 6 2 5/16" x 3/4" Screw 7 4 3/8" x 2 3/8" Screw 8 4 #8 x 5/8" Machine Screw ...
Page 32 - EXPLODED DRAWING A
32 54 60 55 23 15 15 42 23 95 49 56 34 30 59 23 21 45 48 61 30 34 59 23 43 44 21 53 51 53 51 46 19 19 46 37 34 30 59 34 30 59 37 14 57 14 40 40 47 14 14 95 95 37 37 37 37 14 95 66 39 66 39 35 35 35 66 39 35 66 39 98 15 14 97 14 97 14 97 14 97 103 103 107 108 109 11 5 11 4 11 0 20 99 111 11 3 11 3 11...
Page 33 - EXPLODED DRAWING B
33 68 65 72 78 33 29 69 70 16 71 33 71 32 4 4 4 68 68 68 68 4 4 4 4 4 4 4 4 4 67 67 102 102 96 96 33 33 76 75 104 EXPLODED DRAWING B Model No. PETL79816.0 R0416A
Page 34 - EXPLODED DRAWING C
34 84 79 87 26 2 74 31 1 1 1 28 28 1 1 28 11 11 11 9 5 28 11 9 5 26 84 93 85 2 1 1 1 1 1 17 17 33 77 81 33 94 13 22 22 62 13 62 10 63 82 91 38 83 90 38 91 101 100 102 50 102 13 7 13 63 7 13 13 7 13 12 12 3 3 50 81 89 1 1 88 58 95 EXPLODED DRAWING C Model No. PETL79816.0 R0416A
Page 35 - EXPLODED DRAWING D
35 36 80 18 86 92 25 92 92 92 4 4 4 4 4 8 8 4 105 105 105 105 27 64 1 4 4 1 4 4 1 1 4 EXPLODED DRAWING D Model No. PETL79816.0 R0416A
Page 36 - ORDERING REPLACEMENT PARTS; RECYCLING INFORMATION
Part No. 379996 R0416A Printed in China © 2016 ICON Health & Fitness, Inc. To order replacement parts, please see the front cover of this manual. To help us assist you, be prepared to provide the following information when contacting us: • the model number and serial number of the product (see t...