Page 2 - Warranty and service
2 Warranty and service Powermatic warrants every product it sells against manufacturers’ defects. If one of our tools needs service or repair, please contact Technical Service by calling 1-800-274-6846, 8AM to 5PM CST, Monday through Friday. Warranty Period The general warranty lasts for the time pe...
Page 3 - Table of contents
3 Table of contents Warranty and service ............................................................................................................................................ 2 Warning .............................................................................................................
Page 7 - General Operating Instructions; Operating Tips
7 General Operating Instructions The suggestions listed below are meant to give you a general idea of how your new Panel Saw is intended to be operated. No amount of instruction can replace good common sense and experience. Be sure the operators of your new Panel Saw are given enough time and materi...
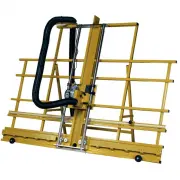
Page 8 - 11 Panel Saw Features
Page 10 - Installation of Panel Saw; Uncrating; Grounding Instructions
10 Installation of Panel Saw Uncrating Remove the panel saw from the shipping container and check for damage. Report any damage to the freight company immediately. A wooden block and three cables have been fastened to the counterweight to secure it during shipment. This wooden block and cables must ...
Page 11 - Extension Cords; Operation
11 A temporary adapter, shown in Figure 6, can be used to connect a grounded plug to a two-prong outlet. The green rigid ear or lug extending from the adapter must be connected to a permanent ground such as a properly grounded outlet box or receptacle. Simply remove the center screw from the outlet,...
Page 12 - Crosscutting
12 2. Feed material through the saw (ripping) or lower the carriage (crosscutting) slowly, smoothly and whenever possible without stopping. Overfeeding can result in poor quality cuts, shorten the life of the blade, and overload the motor. 3. Do not drop heavy material onto the rollers, as this will...
Page 13 - Ripcutting
13 6. Start motor and allow it to reach full speed. 7. Pull carriage down slowly and smoothly as the blade moves through the workpiece. Keep one hand on the handle at all times and do not force the saw. NOTE: If the blade binds in the workpiece, or the workpiece shifts during the cut, stop the motor...
Page 14 - Adjustments; Changing the Blade
14 NOTE: If the blade binds in the workpiece, or the workpiece shifts during the cut, stop the motor, back the workpiece out of the saw, reposition workpiece, restart motor, and then begin the cut again. Do not place hands, clothing or body parts under carriage or in cutting path of blade. Do not lo...
Page 17 - Maintenance
17 STEP 3: Align Blade Parallel to Guides The blade must move parallel to the guides or tail burning may occur, and the kerf may be wider than the set of the blade. Always adjust the rollers and guides before adjusting the blade. To check for blade alignment: 1. Make sure rollers and guides are alig...
Page 18 - Optional Accessories
18 Do not use cleaning solvents such as gasoline, turpentine, lacquer thinner, paint thinner, or ammonia, as these are harmful to plastic and some of the insulated parts on the machine. Never use flammable or combustible solvents around tools. Do not immerse the saw in liquid as this may create risk...
Page 19 - 11 Panel Saw – Exploded View I
19 511 Panel Saw – Exploded View I refer to parts list, pages 22-24
Page 20 - 11 Panel Saw – Exploded View II
Page 21 - Parts List: 511 Panel Saw; Description
21 Parts List: 511 Panel Saw Index No. Part No. Description Size Qty .................. 2078021 .................... Carriage Assembly (Items 15, 17 & 24) ................... ...................................... 1 1 ............... 2218033 .................... Frame Assembly .....................
Page 24 - 11 Panel Saw Dust Collection System
24 511 Panel Saw Dust Collection System refer to parts list, pages 21-23
Page 25 - Electrical Connections
25 Electrical Connections refer to parts list, pages 21-23