Page 2 - CAUTION; The; POWER; switch on this unit will not completely
En 2 Voltage selector You can find the voltage selector switch on the top panel of multi-voltage models. The factory setting for the voltage selector is 220-240 V. Please set it to the correct voltage for your country or region. Before changing the voltage, disconnect the AC power cord. Use a medium...
Page 3 - Information to User; For other areas; FEDERAL COMMUNICATIONS COMMISSION DECLARATION OF CONFORMITY; English
En 3 NOTE: This equipment has been tested and found to comply with the limits for a Class B digital device, pursuant to Part 15 of the FCC Rules. These limits are designed to provide reasonable protection against harmful interference in a residential installation. This equipment generates, uses, and...
Page 4 - Contents; How to read this manual
En 4 Contents How to read this manual ! Thank you for buying this Pioneer DJ product. Be sure to read this booklet, which includes important information that you must understand before using this product. After you have finished reading the instructions, put them away in a safe place for future refe...
Page 5 - Before start; Features; What’s in the box; WARNING
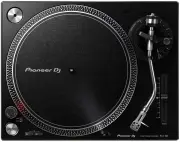
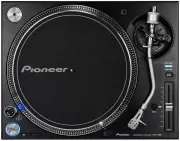
En 5 English Before start Features This unit is a high-torque direct drive turntable that can be enjoyed in a variety of applications ranging from home listening to DJing. High-quality analog record sound The path from the stylus tip to the PHONO/LINE output has been designed as the shortest to fait...
Page 6 - Before you start; Double-click the downloaded file to unzip it.; Assembly; Attach the turntable and slip mat.; Attach the headshell.
En 6 Before you start Installing rekordbox (Mac/Windows) 1 Access rekordbox.com. https://rekordbox.com/en/store/ ! The page content is subject to change without notice. 2 Check the Get Started guide and then click [Free to Download]. 3 Carefully read the Software End User License Agreement and selec...
Page 7 - Attach the balance weight.; Attach the dust cover.
En 7 English ! Before use, remove the stylus cover without touching the stylus tip. Stylus cover 3 Attach the balance weight. Attach the balance weight to the rear shaft of the tone arm. Balance weight Attach the dust cover. Insert the hinges of the dust cover into the holders at the rear panel of t...
Page 8 - Part names and functions; Top panel
En 8 Part names and functions Top panel 1 2 3 4 5 6 c d e f g h i j a 9 7 b 8 1 POWER switch When turning the switch to the [ ON ] side, the power is turned on and the strobe illuminator on the side lights. = Turning the power on (p. 14 ) Turning the power off (p. 14 ) 2 START/STOP button Pressing t...
Page 9 - Rear panel; USB terminal; Audio cable; AC IN; Insulator
En 9 English Rear panel 3 1 2 4 5 1 PHONO/LINE switch Switches the level of the sound output from the unit. — [ PHONO ]: Select this when the unit is connected with a device that supports phono level input, such as a pre-main amplifier or component. — [ LINE ]: Select this when the unit is connected...
Page 10 - Adjustment; Adjusting the tone arm balance; Adjusting the stylus pressure; Adjust the stylus pressure.
En 10 Adjustment Adjusting the tone arm balance Because the cartridge and headshell weights differ depending on the product, the balance of the tone arm is adjusted.Prepare as follows. ! Remove the stylus cover and arm clamper while paying attention not to touch the stylus tip. ! Push down the lifte...
Page 11 - Adjusting anti-skating; When scratch play is performed; Adjusting the arm lifter height; Adjusting the arm height
En 11 English Adjusting anti-skating This adjustment is made to prevent stylus jumping. Match to the same scale position as the stylus pressure value. Turn the [ ANTI SKATING ] dial to match the reference line to the same value as the cartridge stylus pressure value. When scratch play is performed T...
Page 12 - Connecting to powered speakers; Powered speakers; Connect the power cord.; Connect the power cord.
En 12 Connections ! Be sure to turn off the power and unplug the power cord from the power outlet whenever making or changing connections. ! Refer to the operating instructions for the component to be connected. ! Connect the power cord after all the connections between devices have been completed. ...
Page 13 - Connecting to a DJ mixer; Connect the USB cable to a USB port on the computer.; Place of installation; Adjusting the height of the main
En 13 English Connecting to a DJ mixer Turntable DJ Mixer Audio cable Audio cable Rear panel Power cord To power outlet 2 3 1 1 Set the [PHONO/LINE] switch to [PHONO]. 2 Connect the audio cable to the [PHONO] input terminal of the DJ mixer. ! If this product is connected to a DJ mixer that does not ...
Page 14 - Operation; Push down the lifter lever.; Strobe pattern
En 14 Operation Turning the power on 1 Make all the connections, then plug the power cord into a power outlet. = Connections (p. 12 ) 2 Change the [POWER] switch to the [ON] side to turn on the power of the unit. This unit’s indicators light and the power turns on. Turning the power off Change the [...
Page 15 - To play a standard EP record; Illuminating the stylus tip; Recording; Replacing the stylus; Hold the cartridge with one hand.; Changing the cartridge; Removing the cartridge; Disconnect the lead wires connected to the cartridge.; Attaching the cartridge; Cartridge; Adjusting the overhang; Overhang adjustment scale
En 15 English To play a standard EP record Attach the EP record adapter to the center spindle and press the [ 45 ] button. Illuminating the stylus tip When the stylus illuminator switch is pressed, the stylus illuminator lights in white and ascends to the position at which the stylus tip is illumina...
Page 16 - Additional information; Troubleshooting; Cautions on use; About condensation; Maintenance of each part
Additional information Troubleshooting ! Incorrect operation is often mistaken for trouble or malfunction. If you think that there is something wrong with this component, check the points below and the [ FAQ ] for the [ PLX-500 ] on the Pioneer DJ support site. http://pioneerdj.com/support/ Sometime...
Page 17 - About trademarks and registered; Turntable part
En 17 English Cleaning the dust cover, etc. Use a soft cloth to clean the dust cover and cabinet ! Do not clean the dust cover while playing. Static electricity could cause the tone arm to be pulled by the dust cover. About trademarks and registered trademarks ! "Pioneer DJ" is a trademark o...