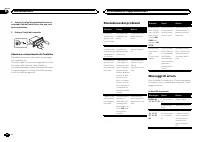
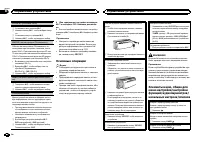
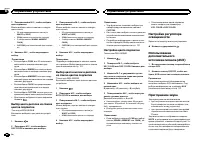
Page 2 - CAUTION; DEMO
Thank you for purchasing this PIONEER product To ensure proper use, please read through thismanual before using this product. It is especiallyimportant that you read and observe WARN- ING s and CAUTION s in this manual. Please keep the manual in a safe and accessible place forfuture reference. If yo...
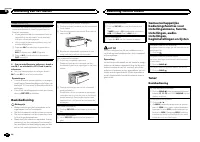
Page 3 - Head unit; c d e; Do not use unauthorized products.; Display indication; After installation of this unit, turn the; Operating this unit
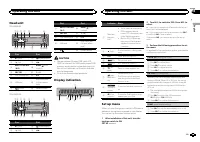
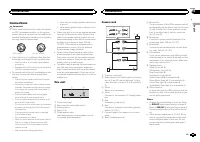
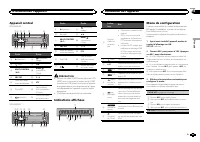
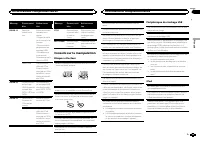
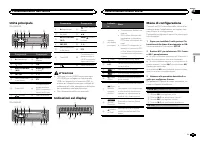
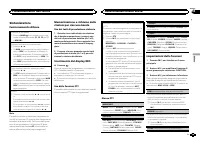
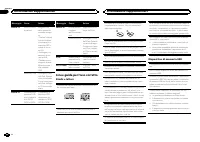
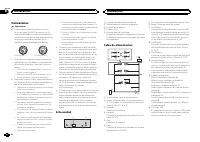
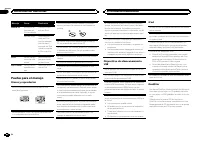
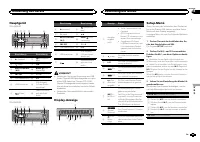
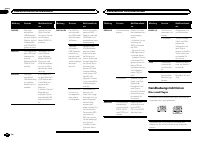
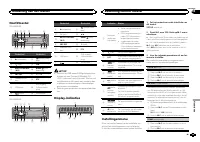
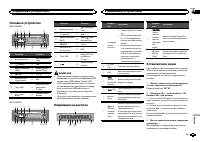
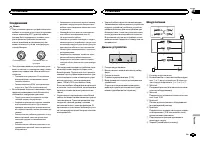
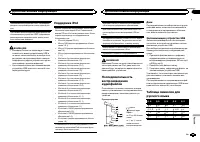
Head unit DEH-3400UB b c d e a 8 7 12 3 4 5 6 9 Part Part 1 h (eject) 8 (back/display) 2 (list) 9 c / d 3 MULTI-CONTROL ( M.C. ) a BAND / (iPod control) 4 SRC / OFF b 1 to 6 5 Disc loading slot c PTY 6 USB port d AUX input jack(3.5 mm stereojack) 7 (color) e Detach button DEH-2400UB b c d e a 8 7 12...
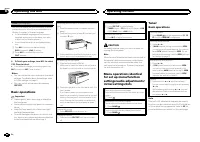
Page 4 - Important; Note; Basic operations; Note
TITLE (multi-language) This unit can display the text information of a com-pressed audio file even if they are embedded in aWestern European or Russian language. ! If the embedded language and the selectedlanguage setting are not the same, text infor-mation may not display properly. ! Some character...
Page 5 - Using preset tuning buttons; When you find a station that you want; Switching the RDS display; Press; Using PTY functions; Function settings; and press to select FUNCTION.
Storing and recalling stationsfor each band Using preset tuning buttons 1 When you find a station that you want to store in memory, press one of the presettuning buttons (1 to 6) and hold until thepreset number stops flashing. 2 Press one of the preset tuning buttons (1 to 6) to select the desired s...
Page 6 - Displaying text information; iPod
SEEK (left/right key setting) You can assign a function to the left and right keysof the unit.Select MAN (manual tuning) to tune up or down manually or select PCH (preset channel) to switch between preset channels. 1 Press M.C. to select MAN or PCH . CD/CD-R/CD-RW and USBstorage devices Basic operat...
Page 7 - Notes; Notes; Notes
Selecting an album 1 Press 1 / or 2 / . ! The album may not be selected correctly if theiPod has more than one album with the sametitle on it. Select the album you want to listento using list search. For details, refer to Brows- ing for a song on this page. Fast forwarding or reversing 1 Press and h...
Page 8 - Audio adjustments; and press to select AUDIO.
— The function settings are not available. — The browse function cannot be operated fromthis unit. Function settings 1 Press M.C. to display the main menu. 2 Turn M.C. to change the menu option and press to select FUNCTION. 3 Turn M.C. to select the function. After selecting, perform the following p...
Page 9 - Initial settings; Selecting the illumination color; English
Initial settings Important PW SAVE (power saving) is cancelled if the ve- hicle battery is disconnected and will need to beturned back on once the battery is reconnected.When PW SAVE (power saving) is off, depend- ing on connection methods, the unit may con-tinue to draw power from the battery if yo...
Page 10 - Customizing the illumination color; Switching the dimmer setting; Sound muting
2 Turn M.C. to display KEY COLOR and press to select. 3 Turn M.C. to select the illumination color. You can select one option from the following list. ! 30 preset colors ( WHITE to ROSE ) ! SCAN (cycle through all colors) ! 3 sets of colors ( WARM , AMBIENT , CALM ) ! CUSTOM (customized illumination...
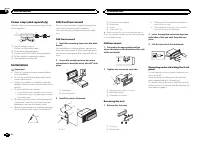
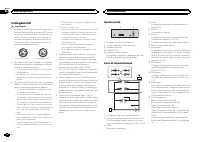
Page 11 - Connections; This unit; Installation
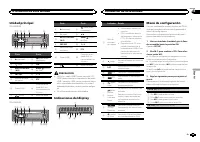
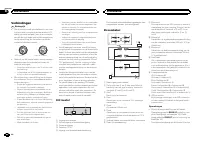
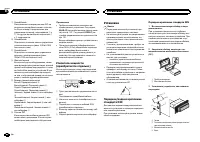
Connections Important ! When installing this unit in a vehicle withoutan ACC (accessory) position on the ignitionswitch, failure to connect the red cable to theterminal that detects operation of the ignitionkey may result in battery drain. O N S T A R T O F F ACC position No ACC position ! Use of th...
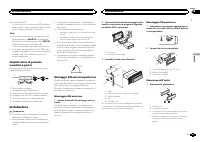
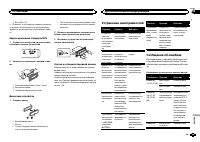
Page 12 - Removing the unit; Removing the front panel to
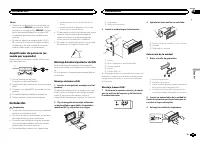
Power amp (sold separately) Perform these connections when using the op-tional amplifier. 1 3 2 4 5 5 1 System remote controlConnect to Blue/white cable. 2 Power amp (sold separately) 3 Connect with RCA cables (sold separately) 4 To Rear output or subwoofer output 5 Rear speaker or subwoofer...
Page 13 - Additional information
Troubleshooting Symptom Cause Action The display il-luminationturns on andoff at random. Demo mode ison. Turn off the demodisplay setting. The displayautomaticallyreturns to theordinary dis-play. You did not per-form any opera-tion withinabout 30 sec-onds. Perform operationagain. The repeatplay rang...
Page 14 - Handling guidelines; Discs and player
Message Cause Action CHECK USB The USB con-nector or USBcable has short-circuited. Check that theUSB connector orUSB cable is notcaught in some-thing or dam-aged. The connectedUSB storage de-vice consumesmore than500 mA (maxi-mum allowablecurrent). Disconnect theUSB storage de-vice and do notuse it....
Page 16 - Disc; Put those files into a folder.; iTunes; Made for iPod
iPod compatibility This unit supports only the following iPod models.Supported iPod software versions are shownbelow. Older versions may not be supported.Made for ! iPhone 4 (software version 4.1) ! iPhone 3GS (software version 3.0.1) ! iPhone 3G (software version 2.0) ! iPhone (software version 1.1...
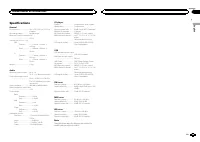
Page 17 - Specifications
Specifications General Power source ................... 14.4 V DC (10.8 V to 15.1 V al- lowable) Grounding system ............ Negative typeMaximum current consumption ................................... 10.0 A Dimensions (W × H × D): DIN Chassis .............. 178 mm × 50 mm × 165 mm Nose ............
Page 18 - Nous vous remercions; APPAREIL À LASER DE CLASSE 1; PRÉCAUTION
Nous vous remercions d ’ avoir acheté cet ap- pareil PIONEER Pour garantir une utilisation correcte, lisez bience mode d ’ emploi avant d ’ utiliser cet appareil. Il est particulièrement important que vous lisiez etrespectiez les indications ATTENTION et PRÉ- CAUTION de ce mode d ’ emploi. Conser ve...
Page 19 - Après avoir installé l
Appareil central DEH-3400UB b c d e a 8 7 12 3 4 5 6 9 Partie Partie 1 h (éjection) 8 (retour/affi- chage) 2 (liste) 9 c / d 3 MULTI-CONTROL ( M.C. ) a BAND / (contrôle del ’ iPod) 4 SRC / OFF b 1 à 6 5 Fente de charge-ment des disques c PTY 6 Port USB d Jack d ’ entrée AUX (jack stéréo3,5 mm) 7 (co...
Page 20 - Opérations de base; Remarque; Utilisation de l
Normalement, l ’ incrément d ’ accord FM employé par l ’ accord automatique est 50 kHz. Quand la fonction AF ou TA est en service, l ’ incrément d ’ ac- cord passe automatiquement à 100 kHz. Il peutêtre préférable de régler l ’ incrément d ’ accord à 50 kHz quand la fonction AF est en service. ! Pen...
Page 21 - Syntoniseur; Utilisation des touches de présélection; Changement de l; Utilisation des fonctions PTY; Réglages des fonctions; Français
Syntoniseur Opérations de base Sélection d ’ une gamme 1 Appuyez sur BAND / jusqu ’ à ce que la gamme désirée ( F1 , F2 , F3 en FM ou MW/LW (PO/GO)) s ’ affiche. Rappel des fréquences en mémoire 1 Appuyez sur c ou d . ! Si MAN (accord manuel) est sélectionné dans le réglage SEEK , vous ne pouvez pas...
Page 23 - Utilisation avancée à l; option de; Remarques
Sélection et lecture des fichiers/plages à partir de la liste des noms 1 Appuyez sur pour passer en mode liste des noms de fichiers/plages. 2 Utilisez M.C. pour sélectionner le nom de fichier (ou nom de dossier) désiré. Modification du nom de fichier ou de dossier 1 Tournez M.C. Lecture 1 Lorsqu ’ u...
Page 25 - Réglages sonores
Remarques ! Régler le mode de commande sur CTRL iPod / CTRL APP met en pause la lec- ture d ’ une plage musicale. Utilisez l ’ iPod pour reprendre la lecture. ! Les fonctions suivantes sont toujours acces-sibles à partir de l ’ appareil même si le mode de commande est réglé sur CTRL iPod / CTRL APP ...
Page 26 - Réglages initiaux
SUB.W (réglage en service/hors service du haut- parleur d ’ extrêmes graves) Cet appareil est équipé d ’ une sortie haut-parleur d ’ extrêmes graves qui peut être mise en service ou hors service. 1 Appuyez sur M.C. pour choisir le mode désiré. NOR (phase normale) — REV (phase inversée) — OFF (haut-p...
Page 27 - éclairage
La sortie de connexion des haut-parleurs arrièrepeut être utilisée pour la connexion d ’ un haut-par- leur pleine gamme ou d ’ un haut-parleur d ’ extrê- mes graves.Si vous basculez sur SW , vous pouvez connecter une borne de haut-parleur arrière à un haut-par-leur d ’ extrêmes graves directement, s...
Page 28 - Seulement pour le DEH-3400UB
1 Appuyez sur . 2 Tournez M.C. pour afficher BOTH COLOR, puis appuyez pour sélectionner. 3 Tournez M.C. pour choisir la couleur d ’ é- clairage. Vous pouvez sélectionner une option dans laliste suivante. ! 30 couleurs présélectionnées ( WHITE à ROSE ) ! SCAN (parcourir les différentes couleurs) 4 Ap...
Page 29 - Connexions; Cet appareil
Connexions Important ! Lors de l ’ installation de cet appareil dans un véhicule sans position ACC (accessoire) surle contacteur d ’ allumage, ne pas connecter le câble rouge à la borne qui détecte l ’ utilisa- tion de la clé de contact peut entraîner le dé-chargement de la batterie. O N S T A R T O...
Page 30 - Montage avant/arrière DIN; Montage frontal DIN
Vert/noir : Arrière gauche * ou haut-parleur d ’ extrêmes graves * Violet : Arrière droite + ou haut-parleur d ’ ex- trêmes graves + Violet/noir : Arrière droite * ou haut-parleur d ’ extrêmes graves * e Connecteur ISODans certains véhicules, il est possible quele connecteur ISO soit divisé en deux....
Page 31 - Retrait et remontage de la face avant; appareil contre le vol.; Dépannage; Messages d; entretien agréé par Pioneer le plus; Informations complémentaires
2 Insérez les clés d ’ extraction fournies dans les deux côtés de l ’ appareil jusqu ’ à ce qu ’ el- les s ’ enclenchent en place. 3 Tirez l ’ appareil hors du tableau de bord. Retrait et remontage de la face avant Vous pouvez retirer la face avant pour protégerl ’ appareil contre le vol. Appuyez su...
Page 33 - Conseils sur la manipulation; Disques et lecteur
Message Causes possi-bles Action correc-tive ERROR-19 Panne decommunica-tion. Effectuez une desopérations sui-vantes. – Coupez et remet- tez le contact d ’ al- lumage. – Déconnectez le périphérique destockage USB. – Choisissez une autre source.Revenez ensuite àla source USB. Panne iPod. Déconnectez ...
Page 34 - utilisation de ce produit.
Quelques mots sur les réglages de l ’ iPod ! Lorsqu ’ un iPod est connecté, cet appareil dés- active le réglage EQ (égaliseur) de l ’ iPod afin d ’ optimiser l ’ acoustique. Le réglage EQ origi- nal est rétabli lorsque l ’ iPod est déconnecté. ! Vous ne pouvez pas mettre la fonction de répé-tition h...
Page 35 - Disque
Compatibilité iPod Cet appareil prend en charge uniquement les mo-dèles d ’ iPod suivants. Les versions du logiciel iPod prises en charge sont indiquées ci-dessous. Lesversions antérieures ne sont pas prises en charge.Conçu pour ! iPhone 4 (version logicielle 4.1) ! iPhone 3GS (version logicielle 3....
Page 36 - Caractéristiques techniques; Généralités
Caractéristiques techniques Généralités Tension d ’ alimentation ..... 14,4 V CC (10,8 V à 15,1 V ac- ceptable) Mise à la masse ............... Pôle négatifConsommation maximale ................................... 10,0 A Dimensions (L × H × P) : DIN Châssis .............. 178 mm × 50 mm × 165 mm Pan...
Page 38 - PRODOTTO LASER DI CLASSE 1; ATTENZIONE
Grazie per aver acquistato questo prodotto PIONEER Leggere attentamente questo manuale prima diutilizzare il prodotto, per assicurarne il correttoutilizzo. È particolarmente importante leggere eosservare le precauzioni contrassegnate da AV- VERTENZA e ATTENZIONE in questo ma- nuale. Conser vare ques...
Page 39 - Dopo aver installato l
Unità principale DEH-3400UB b c d e a 8 7 12 3 4 5 6 9 Componente Componente 1 h (espulsione) 8 (tasto indietro/ display) 2 (lista) 9 c / d 3 MULTI-CONTROL ( M.C. ) a BAND / (control- lo iPod) 4 SRC / OFF b 1 - 6 5 Vano d ’ inserimen- to dei dischi c PTY 6 Porta USB d Connettore di in-gresso ausilia...
Page 40 - Funzionamento di base; Importante; Nota; Funzionamento dell
Normalmente il passo per la sintonizzazione in FMimpiegata dalla ricerca di sintonia è 50 kHz. Quan-do sono attivate le funzioni AF o TA il passo di sin-tonizzazione cambia automaticamente a 100 kHz.Quando è attivata la funzione AF, è preferibile im-postare il passo di sintonizzazione a 50 kHz. ! Il...
Page 41 - Sintonizzatore; Uso dei tasti di preselezione sintonia; Quando viene individuata una stazione; Scorrimento del display RDS; Premere; Uso delle funzioni PTY; Impostazioni delle funzioni; opzione di
Sintonizzatore Funzionamento di base Selezione di una banda 1 Premere BAND / fino a quando viene visua- lizzata la banda desiderata ( F1 , F2 , F3 per FM o MW/LW ). Richiamo delle stazioni preselezionate 1 Premere c o d . ! Se MAN (sintonizzazione manuale) è selezio- nato in SEEK , non è possibile r...
Page 42 - elenco dei nomi
La ricerca di sintonia in modo locale consente disintonizzare solo le stazioni radio con segnaliradio sufficientemente potenti per una buona rice-zione. 1 Premere M.C. per selezionare l ’ impostazione desiderata.FM: OFF — LV1 — LV2 — LV3 — LV4 MW/LW: OFF — LV1 — LV2 L ’ impostazione di livello massi...
Page 43 - Scorrimento dei brani; Per passare al menu superiore della ricer-
Operazioni avanzate tramite itasti speciali Selezione di un intervallo di ripetizione 1 Premere 6 / per alternare: CD/CD-R/CD-RW ! ALL – Ripete tutti i brani ! ONE – Ripete il brano corrente ! FLD – Ripete la cartella corrente Lettore audio USB/memoria USB ! ALL – Ripete tutti i file ! ONE – Ripete ...
Page 46 - illuminazione; elenco dei colori; Solo per il modello DEH-3400UB
3 Ruotare M.C. per selezionare l ’ imposta- zione iniziale. Dopo averla selezionata, eseguire la proceduradescritta di seguito per impostare l ’ impostazio- ne iniziale. CLOCK SET (impostazione dell ’ orologio) 1 Premere M.C. per visualizzare la modalità di impostazione. 2 Premere M.C. per seleziona...
Page 48 - Collegamenti; Questa unità; Installazione
Collegamenti Importante ! Quando si installa questa unità in un veicoloche non dispone della posizione ACC (acces-soria) per l ’ interruttore della chiave di avvia- mento, se non si collega il cavo rosso a unterminale accoppiato al funzionamento del-l ’ interruttore della chiave di avviamento, la ba...
Page 49 - Montaggio DIN anteriore/posteriore; Montaggio DIN anteriore; Italiano
e Connettore ISOIn alcuni veicoli, il connettore ISO potrebbeessere diviso in due. In questo caso, accertar-si di collegare entrambi i connettori. Note ! Cambiare le impostazioni iniziali dell ’ unità. Fare riferimento a REAR-SP (impostazione dell ’ uscita posteriore) a pagina 46 e PREOUT (impostazi...
Page 50 - Rimozione e reinserimento del frontalino; alto tirandolo verso l; Risoluzione dei problemi; Messaggi di errore; Informazioni supplementari
2 Inserire le chiavi di estrazione fornite su entrambi i lati dell ’ unità fino a che non scat- tano in posizione. 3 Estrarre l ’ unità dal cruscotto. Rimozione e reinserimento del frontalino È possibile rimuovere il frontalino per protegge-re l ’ unità dai furti. Premere il tasto di rimozione e spi...
Page 52 - Linee guida per l; Dischi e lettori
Messaggio Causa Azione ERROR-19 Errore di comu-nicazione. Eseguire unadelle operazioniriportate di segui-to. – Portare l ’ interrut- tore della chiavedi avviamento inposizione OFF equindi di nuovosu ON. – Scollegare il di- spositivo di me-moria USB. – Passare a una sorgente diversa.Quindi, tornareal...
Page 54 - Compatibilità iPod; Disco; Tabella dei caratteri cirillici
ATTENZIONE ! Pioneer non garantisce la compatibilità contutti i dispositivi di memoria USB e non si as-sume alcuna responsabilità per l ’ eventuale perdita di dati da lettori di file multimediali,smartphone o altri dispositivi anche se i dativengono persi durante l ’ uso con questa unità. ! Non lasc...
Page 55 - Dati tecnici
MP3 La fornitura di questo prodotto prevede il trasfe-rimento di una licenza esclusivamente per usoprivato, non-commerciale e non prevede la con-cessione di una licenza, né implica qualsiasi di-ritto a utilizzare questo prodotto in qualsiasitrasmissione in diretta commerciale (ovvero,che generi prof...
Page 56 - Gracias; PRODUCTO LASER CLASE 1; PRECAUCIÓN; Evite la exposición a la humedad.
Gracias por haber adquirido este producto PIONEER Lea con detenimiento este manual antes de utili-zar el producto por primera vez para que puedadarle el mejor uso posible. Es muy importanteque lea y cumpla con la información que apare-ce bajo los mensajes de ADVERTENCIA y PRECAUCIÓN en este manual. ...
Page 57 - Unidad principal; No utilice productos no autorizados.; Indicaciones del display; Una vez instalada la unidad, gire la llave; Utilización de esta unidad
Unidad principal DEH-3400UB b c d e a 8 7 12 3 4 5 6 9 Parte Parte 1 h (expulsar) 8 (parte poste- rior/display) 2 (lista) 9 c / d 3 MULTI-CONTROL ( M.C. ) a BAND / (control de iPod) 4 SRC / OFF b 1 a 6 5 Ranura de cargade discos c PTY 6 Puerto USB d Conector de en-trada AUX (co-nector estéreo de3,5 ...
Page 58 - Funcionamiento básico
Normalmente, el paso de sintonía de FM emplea-do en la sintonización por búsqueda es de 50 kHz.Si la función AF o TA está activada, el paso de sin-tonía cambia automáticamente a 100 kHz. Puedeque sea conveniente ajustar el paso de sintonía a50 kHz si la función AF está activada. ! El paso de sintoní...
Page 59 - Sintonizador; Cambio de la visualización RDS; Pulse; Uso de las funciones PTY; Ajustes de funciones; menú y pulse para seleccionar FUNCTION.
Sintonizador Funcionamiento básico Selección de una banda 1 Pulse BAND / hasta que se visualice la banda deseada ( F1 , F2 , F3 para FM o MW/ LW ). Recuperación de emisoras prefijadas 1 Pulse c o d . ! Si está seleccionado MAN (sintonización ma- nual) en SEEK , no podrá recuperar las emiso- ras pres...
Page 61 - Notas; Para buscar una canción; Para ir al menú superior de la búsqueda
Operaciones avanzadas medianteel uso de botones especiales Selección de una gama de repetición de reproduc-ción 1 Pulse 6 / para desplazarse entre las siguien- tes opciones: CD/CD-R/CD-RW ! ALL – Repite todas las pistas ! ONE – Repite la pista actual ! FLD – Repite la carpeta actual Reproductor de a...
Page 63 - Ajustes de audio; menú y pulse para seleccionar AUDIO.
1 Pulse M.C. para activar la función de repro- ducción aleatoria de todas las canciones(shuffle all).Para desactivarla, desactive SHUFFLE en el menú FUNCTION . LINK PLAY (reproducción de enlace) 1 Pulse M.C. para mostrar el modo de ajuste. 2 Haga girar M.C. para cambiar el modo y pulse para seleccio...
Page 64 - Ajustes iniciales
Ajustes iniciales Importante PW SAVE (ahorro de energía) se cancela si la batería del vehículo se desconecta, y se debe ac-tivar de nuevo cuando se vuelva a conectar labatería. Dependiendo de los métodos de cone-xión, cuando PW SAVE (ahorro de energía) está desactivado, la unidad puede seguir obteni...
Page 65 - Uso de una fuente AUX; Silenciamiento del sonido; Español
Esta unidad dispone de iluminación multicolor.Puede seleccionar los colores que desee paralas teclas y el display de esta unidad. Tambiénes posible personalizar los colores que deseeaplicar. Selección del color de las teclas dela lista de colores de la iluminación Sólo para DEH-3400UB Es posible ele...
Page 66 - Conexiones; Esta unidad; Instalación
Conexiones Importante ! Cuando esta unidad se instale en un ve-hículo sin posición ACC (accesorio) en lallave de encendido, el cable rojo se debe co-nectar al terminal que pueda detectar la ope-ración de la llave de encendido. De locontrario, puede descargarse la batería. O N S T A R T O F F Posició...
Page 67 - Montaje delantero/posterior de DIN; Montaje delantero DIN
Notas ! Cambie la configuración inicial de esta uni-dad. Consulte REAR-SP (ajuste de la salida posterior) en la página 64 y PREOUT (configu- ración del preamplificador) en la página 64. La salida de graves de esta unidad es mo-noaural. ! Al usar un altavoz de subgraves de 70 W (2 Ω ), conecte el mis...
Page 68 - Retirada y colocación del panel delantero; Colocación del panel delantero; Solución de problemas; Mensajes de error; Información adicional
Retirada y colocación del panel delantero Puede extraer el panel delantero para protegerla unidad contra robo.Pulse el botón de soltar, empuje el panel delan-tero hacia arriba y tire de él hacia sí.Para obtener más información, consulte Extrac- ción del panel delantero para proteger la unidadcontra ...
Page 70 - Pautas para el manejo; Discos y reproductor; DualDisc
Mensaje Causa Resolución ERROR-16 La versión defirmware deliPod es antigua. Actualice la ver-sión del iPod. Fallo del iPod. Desconecte elcable del iPod.Una vez que apa-rezca el menúprincipal del iPod,vuelva a conectarel iPod y reinície-lo. STOP No hay cancio-nes en la listaactual. Seleccione unalist...
Page 71 - Compatibilidad con iPod
La carga y expulsión frecuente de un discoDualDisc puede producir ralladuras en el disco.Las ralladuras graves pueden producir problemasde reproducción en esta unidad. En algunoscasos, un DualDisc puede atascarse en la ranurade carga del disco y no se expulsará. Para evitarlo,recomendamos que no uti...
Page 72 - Coloque esos archivos en una carpeta.
Al utilizar un iPod se requiere un conector delDock del iPod para el cable USB. El cable de la interfaz CD-IU51 de Pioneer tambiénestá disponible. Para obtener información, consul-te con su proveedor. Si desea más información sobre la compatibilidadde archivos y formatos, consulte los manuales deliP...
Page 74 - Zu diesem Gerät; LASER KLASSE 1; VORSICHT; Zu dieser Anleitung; Im Störungsfall; Bevor Sie beginnen
Vielen Dank , dass Sie sich für dieses PIONEER-Produkt entschieden haben Bitte lesen Sie diese Anleitung vor der Verwen-dung dieses Produkts zur Gewährleistung seinerordnungsgemäßen Verwendung durch. Lesenund befolgen Sie dabei insbesondere die Hin-weise WARNUNG und VORSICHT . Bewahren Sie die Anlei...
Page 75 - Hauptgerät; Drehen Sie nach der Installation des Ge-; Bedienung des Geräts
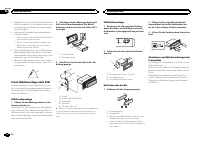
Hauptgerät DEH-3400UB b c d e a 8 7 12 3 4 5 6 9 Bezeichnung Bezeichnung 1 h (Auswurf) 8 (Zurück/Dis- play) 2 (Liste) 9 c / d 3 MULTI-CONTROL ( M.C. ) a BAND / (iPod- Steuerung) 4 SRC / OFF b 1 bis 6 5 Disc-Ladeschacht c PTY 6 USB-Anschluss d AUX-Eingang(3,5-mm-Stereo-anschluss) 7 (Farbe) e Taste zu...
Page 76 - Grundlegende Bedienvorgänge; Wichtig; Hinweis
Bei der Suchlaufabstimmung wird normalerweisedas 50-kHz-UKW-Kanalraster verwendet. Wennder Alternativfrequenzsuchlauf (AF) oder die Ver-kehrsmeldungen (TA) eingeschaltet sind, ändertsich das Kanalraster automatisch zu 100 kHz. Eskann jedoch vorteilhaft sein, das Kanalraster fürden Alternativfrequenz...
Page 77 - Verwendung der Stationstasten; Zum Speichern eines abgestimmten Sen-; Umschalten der RDS-Anzeige; Drücken Sie; Funktionseinstellungen; Deutsch
Tuner Grundlegende Bedienvorgänge Wahl eines Bands (Wellenbereich) 1 Drücken Sie BAND / , bis der gewünschte Wellenbereich angezeigt wird ( F1 , F2 , F3 für UKW bzw. MW/LW ). Abrufen von programmierten Stationen 1 Drücken Sie c oder d . ! Ist MAN (manuelle Abstimmung) unter SEEK ausgewählt, können S...
Page 78 - Anzeigen von Textinformationen
Bei Verwendung des Alternativfrequenz-Suchlaufsbeschränkt die Regionalfunktion die Auswahl aufSender, die regionale Programme ausstrahlen. 1 Drücken Sie M.C. , um die Regionalfunktion ein- oder auszuschalten. LOCAL (Lokal-Suchlaufabstimmung) Mit der Lokal-Suchlaufabstimmung wird nur nachStationen mi...
Page 79 - Hinweise
Erweiterte Bedienvorgänge mitspeziellen Tasten Wählen eines Wiederholbereichs 1 Drücken Sie 6 / , um zwischen den folgen- den Optionen umzuschalten: CD/CD-R/CD-RW-Discs ! ALL – Wiederholung aller Titel ! ONE – Wiederholung des momentanen Ti- tels ! FLD – Wiederholung des momentanen Ordners USB-Audio...
Page 82 - Grundeinstellungen
Grundeinstellungen Wichtig PW SAVE (Energiesparmodus) wird deaktiviert, wenn die Fahrzeugbatterie abgeklemmt wirdund muss neu aktiviert werden, sobald die Bat-terie wieder angeschlossen wird. Wenn PW SAVE (Energiesparmodus) deaktiviert ist, kann das Gerät je nach Anschlussart Batterie-leistung in An...
Page 83 - Wählen der Beleuchtungsfarbe
Das Gerät kann Textinformationen komprimierterAudiodateien auch dann anzeigen, wenn sie ent-weder in einer europäischen Sprache oder in Rus-sisch aufgezeichnet wurden. ! Falls die für die Aufzeichnung verwendeteSprache und die gewählte Spracheinstellungnicht übereinstimmen, werden die Textinfor-mati...
Page 84 - Abschalten des Tons
Hinweise ! Wenn SCAN oder ein Farbbereich ( WARM , AMBIENT oder CALM ) ausgewählt wurde, kann die Beleuchtungsfarbe nicht individuellangepasst werden. ! Sie können Beleuchtungsfarben für sowohl KEY COLOR als auch DISP COLOR indivi- duell anpassen. Umschalten der Dimmer-Einstellung Sie können die Hel...
Page 86 - Entfernen des Geräts; Entfernen der Frontplatte zum Schutz vor
! Wenden Sie sich an Ihren Fachhändler, wennfür die Installation Löcher gebohrt oder ande-re Änderungen am Fahrzeug vorgenommenwerden müssen. ! Installieren Sie dieses Gerät keinesfalls anfolgenden Orten: — Orte, an denen das Gerät die Steuerung desFahrzeugs behindern könnte. — Orte, an denen das Ge...
Page 87 - Zusätzliche Informationen
Fehlerbehebung Symptom Ursache Abhilfemaßnah-me Die Bild-schirmbe-leuchtungschaltet sichzufällig einund aus. Der Demo-Modus ist akti-viert. Deaktivieren Siedie Demoanzeige-Einstellung. Das Displayschaltet auto-matisch in dienormale An-zeige um. Sie haben kei-nen Bedienvor-gang innerhalbvon 30 Sekun-...
Page 88 - Handhabungsrichtlinien; Discs und Player
Meldung Ursache Abhilfemaßnah-me SKIPPED Das ange-schlosseneUSB-Speicher-medium enthältDateien, die mitWindows Me-dia ä DRM 9/10 geschützt sind. Spielen Sie eineAudio-Datei ab,die keinen Schutzmit WindowsMedia DRM 9/10aufweist. PROTECT Alle Dateien aufdem USB-Spei-chermediumsind mitWindows MediaDRM ...
Page 89 - DualDiscs
Verwenden Sie ausschließlich herkömmliche,runde Discs. Discs einer anderen Form solltennicht verwendet werden. In den CD-Ladeschacht darf kein anderer Gegen-stand als eine CD eingeführt werden. Verwenden Sie keinesfalls Discs, die Sprünge, Ein-kerbungen/Absplitterungen, Verformungen oderandere Besch...
Page 91 - Reihenfolge der Audio-Dateien; Russischer Zeichensatz; mand; WMA
Das CD-IU51-Schnittstellenkabel von Pioneer istseparat erhältlich. Weitere Einzelheiten erfahrenSie bei Ihrem Fachhändler. Informationen bezüglich der Datei-/Formatkompa-tibilität finden Sie im Handbuch Ihres iPods. Hörbuch, Podcast: Kompatibel VORSICHT Pioneer haftet in keinem Fall für den Verlust ...
Page 92 - Technische Daten; Allgemein
Technische Daten Allgemein Stromversorgung ............. 14,4 V Gleichspannung (Tole- ranz 10,8 V bis 15,1 V) Erdungssystem ................ NegativMaximale Leistungsaufnahme ................................... 10,0 A Abmessungen (B × H × T): DIN Einbaugröße ...... 178 mm × 50 mm × 165 mm Frontfläch...
Page 94 - Hartelijk dank; Informatie over dit toestel; LET OP; Demostand; Bij problemen; Vóór u begint
Hartelijk dank voor uw vertrouwen in ons bij de aankoop van dit Pioneer-product Lees deze handleiding voordat u het product ingebruik neemt zodat u het goed leert gebruiken.Lees vooral de gedeelten die met WAARSCHU- WING en LET OP gemarkeerd zijn aandachtig. Bewaar deze handleiding na het lezen op e...
Page 95 - Hoofdtoestel; Instellingenmenu; Zet het contact aan na de installatie van; Bediening van het toestel
Hoofdtoestel DEH-3400UB b c d e a 8 7 12 3 4 5 6 9 Onderdeel Onderdeel 1 h (uitwerpen) 8 (achteruit/dis- play) 2 (lijst) 9 c / d 3 MULTI-CONTROL ( M.C. ) a BAND / (iPod- bediening) 4 SRC / OFF b 1 t/m 6 5 Laadsleuf voordisc c PTY 6 USB-poort d AUX-ingang(3,5mm-stereo-plug) 7 (kleur) e Verwijderen DE...
Page 96 - Belangrijk; Opmerking; Basisbediening
TITLE (taalinstelling) Dit toestel kan tekstinformatie bij een gecompri-meerd audiobestand in West-Europese talen enRussisch weergeven. ! Als de gebruikte taal niet overeenkomt met detaalinstelling van dit toestel, wordt tekst wel-licht niet correct weergegeven. ! Het is mogelijk dat sommige tekens ...
Page 97 - De voorkeuzetoetsen gebruiken; Stem af op de zender die u in het geheu-
Handmatig afstemmen (stap voor stap) 1 Druk op c of d . ! Als PCH (voorkeuzezender) is geselecteerd in SEEK kunt u niet handmatig afstemmen. U moet MAN (handmatig afstemmen) selecte- ren in SEEK . Raadpleeg SEEK (instelling linker/ rechter toets) op de volgende bladzijde voor meer informatie over de...
Page 98 - Tekstinformatie weergeven; Druk op
U kunt PTY-informatie (programmatype-informatie)gebruiken om op een bepaalde zender af te stem-men. 1 Druk op M.C. om de instellingenmodus weer te geven. 2 Draai aan M.C. en selecteer de gewenste in- stelling. NEWS/INFO — POPULAR — CLASSICS — OTHERS 3 Druk op M.C. om het zoeken te beginnen. Het toes...
Page 99 - Opmerkingen
Het afspelen onderbreken 1 Druk op 4 / PAUSE om het afspelen te onderbre- ken (pauze) of te hervatten. De geluidskwaliteit van gecomprimeerde audioverbeteren (sound retriever) 1 Druk op 3 / S.Rtrv om over te schakelen tussen: 1 — 2 — OFF (uit) 1 heeft effect bij lagere compressie en 2 heeft effect b...
Page 101 - Begininstellingen
FAD/BAL (fader/balansinstelling) 1 Druk op M.C. om de instellingenmodus weer te geven. 2 Druk op M.C. om over te schakelen tussen de fader (voor/achter) en de balans (links/rechts). 3 Draai aan M.C. om de luidsprekerbalans te re- gelen. ! Als de achteruitgang en RCA-uitgang op SW zijn ingesteld, kun...
Page 102 - De verlichtingskleur selecteren; De toetskleur in de lijst selecteren; De displaykleur in de lijst selecteren
Deze instelling maakt het mogelijk de bron auto-matisch naar USB / iPod te laten overschakelen. 1 Druk op M.C. om Plug en Play in of uit te scha- kelen. ON – Wanneer u een USB-opslagapparaat of iPod aansluit, wordt de bron (afhankelijk vanhet type apparaat) automatisch naar USB / iPod overgeschakeld...
Page 103 - De verlichtingskleur zelf aanpassen; De dimmer in- of uitschakelen; Uitschakeling van het geluid; Nederlands
Opmerking Raadpleeg De toetskleur in de lijst selecteren op de vorige bladzijde voor meer informatie over dekleurenlijst. De toets- en displaykleur in delijst selecteren Alleen voor DEH-3400UB U kunt zelf de gewenste kleuren selecteren voorde toetsen en het display van dit toestel. 1 Druk op . 2 Dra...
Page 104 - Verbindingen; Dit toestel; Installatie
Verbindingen Belangrijk ! Als dit toestel wordt geïnstalleerd in een voer-tuig met een contactschakelaar zonder ACC-stand (accessoirestand), kan de accu leeglo-pen als de rode kabel niet wordt aangeslotenop de aansluiting die de bediening van decontactschakelaar herkent. O N S T A R T O F F ACC-stan...
Page 105 - Het toestel verwijderen; Het voorpaneel tegen diefstal ver wij-
! Als u een subwoofer van 70 W (2 Ω ) gebruikt, moet u de subwoofer aansluiten op de vio-lette en zwart-violette draden van dit toestel.Sluit niets aan op de groene en groen-zwartedraden. Versterker (apart verkrijgbaar) Maak deze verbindingen als de optionele verster-ker wordt gebruikt. 1 3 ...
Page 106 - Problemen verhelpen; Foutmeldingen; Aanvullende informatie
Problemen verhelpen Symptoom Oorzaak Actie De displayver-lichting gaatwillekeurigaan en uit. De demostandis ingeschakeld. Schakel de demo-weergave uit. Het displaykeert automa-tisch terugnaar het ge-wone display. U hebt gedu-rende ongeveer30 secondengeen handelinguitgevoerd. Voer de handelingopnieuw...
Page 107 - Aanwijzingen voor het gebruik; Discs en de player
Melding Oorzaak Actie CHECK USB Er is kortsluitingopgetreden inde USB-aanslui-ting of de USB-kabel. Controleer of deUSB-stekker ende USB-kabel nietergens ingeklemdzijn of beschadigdzijn. Het aangeslotenUSB-opslagap-paraat verbruiktmeer dan500 mA (maxi-maal toelaat-bare stroom-sterkte). Ontkoppel het...
Page 109 - Plaats de bestanden in een map.
USB-opslagapparaat Mappenhiërarchie: maximaal acht niveaus diep(Voor praktisch gebruik kunt u beter niet meer dantwee niveaus gebruiken). Afspeelbare mappen: maximaal 500 Afspeelbare bestanden: maximaal 15 000 Afspelen van auteursrechtelijk beschermde be-standen: Niet compatibel Gepartitioneerd USB-...
Page 110 - Technische gegevens; Algemeen
WMA Windows Media is een gedeponeerd handels-merk of een handelsmerk van MicrosoftCorporation in de Verenigde Staten en/of in an-dere landen.Dit product bevat technologie die het eigendomis van Microsoft Corporation en die niet gebruiktof gedistribueerd mag worden zonder toestem-ming van Microsoft L...
Page 112 - Благодарим Вас; PIONEER; Держите данное; Сведения об этом устройстве; ЛАЗЕРНЫЙ ПРОДУКТ КЛАСС 1; ВНИМАНИЕ; Сведения об этом руководстве; Перед началом эксплуатации
Благодарим Вас за покупку этого изделия компании PIONEER Для обеспечения правильности эксплуата - ции внимательно прочитайте данное руко - водство перед началом использованияизделия . Особенно важно , чтобы Вы прочли и соблюдали инструкции , помеченные в дан - ном руководстве заголовками ПРЕДУПРЕ - ...
Page 113 - Основное устройство; USB; Индикация на дисплее; Установочное меню; ON; Управление устройством
Основное устройство DEH-3400UB b c d e a 8 7 12 3 4 5 6 9 Элемент Элемент 1 h ( извлечение ) 8 ( назад / дисп - лей ) 2 ( список ) 9 c / d 3 MULTI-CONTROL ( M.C. ) a BAND / ( упра - вление iPod) 4 SRC / OFF b 1 до 6 5 Щель для за - грузки диска c PTY 6 Порт USB d Вход AUX ( сте - реоразъем 3,5 мм ) ...
Page 114 - YES; На; SRC
CLOCK SET ( установка часов ) 1 Установите часы , вращая M.C. 2 Нажмите кнопку M.C. , чтобы выбрать мину - ты . 3 Установите минуты , вращая M.C. 4 Нажмите M.C. , чтобы подтвердить выбор . FM STEP ( шаг настройки в FM- диапазоне ) Обычно шаг настройки в FM- диапазоне , ис - пользуемый при настройке ...
Page 115 - Тюнер; Основные операции; SEEK; AF; Переключение режима; Использование функций; Список; Настройка функций; FUNCTION
Тюнер Основные операции Выбор диапазона 1 Нажимайте кнопку BAND / , пока на дис - плее не отобразится нужный диапазон ( F1 , F2 , F3 для FM или MW/LW ). Вызов сохраненных станций 1 Нажимайте кнопку c или d . ! Если для параметра SEEK выбрано значе - ние MAN ( настройка вручную ), вызвать со - хранен...
Page 116 - Примечание
BSM ( запоминание лучших станций ) Функция BSM ( запоминание лучших станций ) позволяет автоматически сохранять в памятиустройства шесть станций с самым мощнымсигналом в порядке убывания его мощности . 1 Нажмите M.C. , чтобы включить функцию BSM. Для отмены режима нажмите M.C. еще раз . REGION ( рег...
Page 117 - дорожек из списка
Выбор и воспроизведениефалов / дорожек из списка 1 Нажмите кнопку , чтобы отобразить список названий файлов / дорожек . 2 С помощью M.C. выберите нужное имя файла ( или папки ). Выбор названия файла или папки 1 Вращайте M.C. Воспроизведение 1 Выберите файл или дорожку и нажмите M. C. Просмотр списка...
Page 118 - Поиск композиции
Примечания ! iPod можно включить или выключить , если выбран режим управления CTRL AUDIO . ! Перед подключением iPod к устройству отключите от него наушники . ! Выключение iPod происходит примерно через две минуты после установки ключазажигания в положение OFF. Отображение текстовойинформации Выбор ...
Page 119 - Регулировки параметров звука
Управление функциями iPod с устройства iPod Можно вывести звук из приложений iPod на громкоговорители автомобиля , если выбран режим CTRL APP . ! Эта функция несовместима с моделью iPod nano 1 поколения . Режим APP несовместим со следующими моделями iPod. ! iPhone 4 ( версия ПО 4.1 или более позд - ...
Page 120 - Начальные настройки
FAD/BAL ( регулировка уровня сигнала / балан - са ) 1 Для вызова меню настройки нажмите M.C. 2 Нажимайте M.C. для переключения между настройками уровня сигнала ( передние / за - дние ) и баланса ( правые / левые ). 3 Для регулировки баланса громкоговорите - лей вращайте M.C. ! Если настройка выхода ...
Page 121 - Выбор цвета подсветки; Только для; Нажмите
Устройство может автоматически искать дру - гую станцию с такой же программой даже вовремя вызова предварительной настройки . 1 Нажмите M.C. , чтобы включить или выклю - чить автоматический поиск по идентифика - тору программы . AUX ( вспомогательный вход ) Активируйте эту настройку при подключении ...
Page 122 - Настройка цвета подсветки; AUX; Приглушение звука
3 Поворачивайте M.C. , чтобы выбрать цвет подсветки . Можно выбрать один из цветов из следую - щего списка . ! 30 запрограммированных цветов ( от WHITE до ROSE ) ! SCAN ( смена всех цветов по очереди ) ! 3 набора цветов ( WARM , AMBIENT , CALM ) ! CUSTOM ( пользовательский цвет подсвет - ки ) 4 Нажм...
Page 123 - Соединения; Важно; Данное устройство; Установка
Соединения Важно ! При установке данного устройства в авто - мобиле , в котором отсутствует положение ключа зажигания АСС , красный кабель должен быть подключен к клемме , кото - рая определяет рабочее положениеключа зажигания ; в противном случае может возникнуть утечка тока аккумуля - торной батар...
Page 124 - настройка выхода заднего кана; Усилитель мощности; Переднее; Переднее крепление стандарта
9 Синий / белый Расположение штекера разъема ISO на различных автомобилях может отличать - ся . Если штекер 5 предназначен для управления антенной , подсоедините 9 к b . На других автомобилях подключать 9 к b запрещается . a Синий / белый Подключите к клемме панели управленияусилителя мощности ( мак...
Page 125 - Устранение неисправностей; Сообщения об ошибках; Pioneer; Дополнительная информация
5 Винт (M4 × 8) # Убедитесь , что устройство надежно закрепле - но в гнезде . Неустойчивость устройства может привести к его выпадению и неполадкам в рабо - те . Заднее крепление стандарта DIN 1 Совместите отверстия на кронштейне и боковых панелях устройства . 2 Затяните по два винта с каждой сторо ...
Page 127 - Диски и проигрыватель
Сообщение Причина Действие ERROR-19 Сбой связи . Выполните сле - дующие дей - ствия . – Установите ключ зажиганияв положение OFF, а затем – в положение ON. – Отключите за - поминающее ус - тройство USB. – Выберите дру - гой источник сиг - нала . Затем вновь вы - берите USB в ка - честве источни - ка...
Page 128 - компакт
iPod Не оставляйте iPod в местах с высокой темпе - ратурой воздуха . Чтобы устройство функционировало надлежа - щим образом , подключите iPod с помощью ка - беля dock connector непосредственно к данному устройству . При движении автомобиля надежно закрепите iPod. Не роняйте iPod на пол , где он може...
Page 129 - Поддержка; Диск
Запоминающее устройство USB, содержащее разделы : воспроизводится только первый раз - дел . При начале воспроизведения аудиофайлов назапоминающем устройстве USB, содержащем разветвленные иерархии папок , может возни - кать небольшая задержка . ВНИМАНИЕ ! Компания Pioneer не гарантирует совме - стимо...
Page 130 - Технические характеристики; Общие
Д : Б Д : Б Д : Б Д : Б Д : Б : Х : Ц : Ч : Ш , Щ : Ъ : Ы : Ь : Э : Ю : Я Д : Дисплей Б : Буква Авторское право итоварные знаки iTunes Apple и iTunes являются торговыми знаками компании Apple Inc., зарегистрированными в США и других странах . MP3 Поставка этого изделия дает право только наего частно...
Page 132 - PIONEER CORPORATION
PIONEER CORPORATION 1-1, Shin-ogura, Saiwai-ku, Kawasaki-shi,Kanagawa 212-0031, JAPAN Импортер ООО “ ПИОНЕР РУС ” 125040, Россия , г . Москва , ул . Правды , д .26 Тел .: +7(495) 956-89-01 PIONEER ELECTRONICS (USA) INC. P.O. Box 1540, Long Beach, California 90801-1540, U.S.A. TEL: (800) 421-1404 PIO...


 Pioneer AVH-P3100DVD
Manual
Pioneer AVH-P3100DVD
Manual
 Pioneer AVH-P3200BT
Manual
Pioneer AVH-P3200BT
Manual
 Pioneer AVH-P3300BT
Manual
Pioneer AVH-P3300BT
Manual
 Pioneer AVH-P4000DVD
Manual
Pioneer AVH-P4000DVD
Manual
 Pioneer AVH-P4100DVD
Manual
Pioneer AVH-P4100DVD
Manual
 Pioneer AVH-P5000DVD
Manual
Pioneer AVH-P5000DVD
Manual
 Pioneer AVH-P5100DVD
Manual
Pioneer AVH-P5100DVD
Manual
 Pioneer AVH-P5200BT
Manual
Pioneer AVH-P5200BT
Manual
 Pioneer AVH-P6000DVD
Manual
Pioneer AVH-P6000DVD
Manual
 Pioneer AVH-P6500DVD
Manual
Pioneer AVH-P6500DVD
Manual
 Pioneer AVH-P6800DVD
Manual
Pioneer AVH-P6800DVD
Manual
 Pioneer AVH-P7500DVD
Manual
Pioneer AVH-P7500DVD
Manual
 Pioneer AVH-P7800DVD
Manual
Pioneer AVH-P7800DVD
Manual
 Pioneer AVH-X1500DVD
Manual
Pioneer AVH-X1500DVD
Manual
 Pioneer AVH-X1800DVD
Manual
Pioneer AVH-X1800DVD
Manual
 Pioneer AVH-X2500BT
Manual
Pioneer AVH-X2500BT
Manual
 Pioneer AVH-X2800BT
Manual
Pioneer AVH-X2800BT
Manual
 Pioneer AVH-X4800DVD
Manual
Pioneer AVH-X4800DVD
Manual
 Pioneer AVH-X5800BT
Manual
Pioneer AVH-X5800BT
Manual
 Pioneer AVH-X7500BT
Manual
Pioneer AVH-X7500BT
Manual