Page 2 - About this unit; WARNING; Avoid exposure to moisture.; If you experience problems; Before you start
Thank you for purchasing this PIONEER product To ensure proper use, please read through thismanual before using this product. It is especiallyimportant that you read and observe WARN- ING s and CAUTION s in this manual. Please keep the manual in a safe and accessible place forfuture reference. If yo...
Page 3 - Head unit; a b; CAUTION; Display indication; After installation of this unit, turn the; English; Using this unit
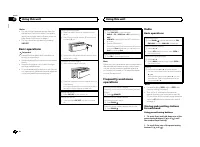
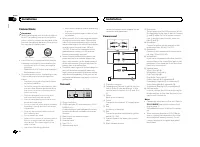
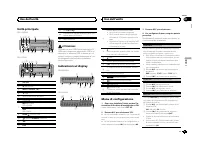
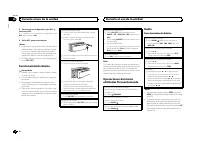
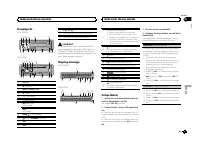
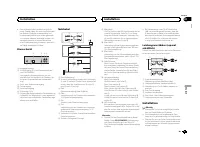
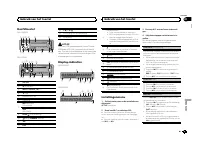
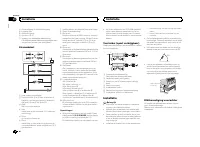
Head unit DEH-X3600UI 2 4 6 5 3 d 8 9 e 7 a b c 1 DEH-2600UI 6 2 4 5 3 1 8 9 de 7 b c a 1 SRC / OFF 2 h (eject) 3 MULTI-CONTROL ( M.C. ) 4 (list) 5 Disc loading slot 6 USB port 7 MIX (MIXTRAX) DEH-X3600UI iPod DEH-2600UI 8 BAND / (iPod control) 9 (back)/ DIMMER (dimmer) a c / d b DISP c 1 / to 6 / d...
Page 4 - Important; Radio; Basic operations; Notes; Using preset tuning buttons
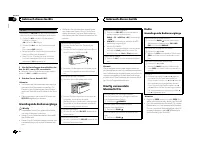
Notes ! You can set up the menu options from thesystem menu and initial menu. For detailsabout the settings, refer to System menu on page 9 and Initial menu on page 11. ! You can cancel set up menu by pressing SRC / OFF . Basic operations Important ! Handle the front panel with care when re-moving o...
Page 5 - Switching the display; Using PTY functions; Function settings; and press to select FUNCTION.; MTP connection
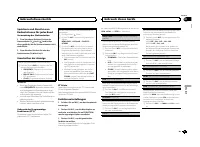
Switching the display Selecting the desired text information 1 Press DISP to cycle between the following: ! FREQUENCY (program service name or frequency) ! BRDCST INFO (program service name/PTY information) ! CLOCK (source name and clock) Notes ! If the program service name cannot be ac-quired in FR...
Page 6 - Note; Press; Operations using special buttons; iPod
Switching between compressed audio and CD-DA 1 Press BAND / . Switching between playback memory devicesYou can switch between playback memory deviceson USB storage devices with more than one MassStorage Device-compatible memory device. 1 Press BAND / . ! You can switch between up to 32 differentmemo...
Page 8 - For iPhone users; Starting procedure for iPhone users; Audio adjustments
2 Turn M.C. to change the menu option and press to select FUNCTION. 3 Turn M.C. to select the function. Once selected, the following functions can beadjusted. ! AUDIO BOOK is not available when CONTROL iPod/CTRL iPod is selected in the control mode. For details, refer to Using this unit ’ s iPod fun...
Page 9 - System menu
1 Press M.C. to display the setting mode. 2 Turn M.C. to adjust the left/right speaker bal- ance. EQ SETTING (equalizer recall) 1 Press M.C. to display the setting mode. 2 Turn M.C. to select the equalizer. POWERFUL — NATURAL — VOCAL — CUS- TOM1 — CUSTOM2 — FLAT — SUPER BASS The equalizer band and e...
Page 10 - Selecting the illumination color; Illumination function menu; Customizing the illumination color; MIXTRAX menu
Activate this setting when using an auxiliary de-vice connected to this unit. 1 Press M.C. to turn AUX on or off. DIMMER (dimmer) 1 Press M.C. to turn the dimmer on or off. ! You can also change the dimmer setting bypressing and holding / DIMMER . BRIGHTNESS (brightness adjustment) You can use this ...
Page 12 - Connections; This unit; Installation
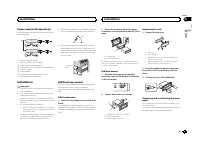
Connections Important ! When installing this unit in a vehicle withoutan ACC (accessory) position on the ignitionswitch, failure to connect the red cable to theterminal that detects operation of the ignitionkey may result in battery drain. O N S T A R T O F F ACC position No ACC position ! Use of th...
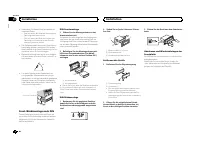
Page 13 - Removing the unit; Removing the front panel
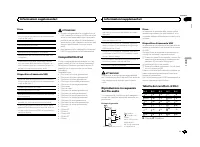
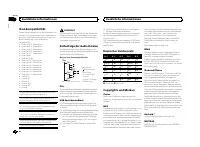
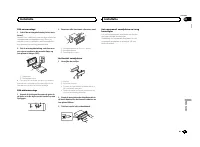
Power amp (sold separately) Perform these connections when using the op-tional amplifier. 1 1 3 2 4 5 5 3 2 6 7 7 1 System remote controlConnect to Blue/white cable. 2 Power amp (sold separately) 3 Connect with RCA cables (sold separately) 4 To Front output 5 Front speaker 6 To Rear ...
Page 14 - Common; Additional information
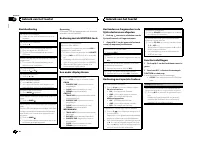
Troubleshooting Symptoms are written in bold and causes in reg-ular, non-indented text. Regular, indented text isused to indicate actions to be taken. The display automatically returns to the ordinarydisplay. You did not perform any operation within about 30seconds. Perform operation again. The repe...
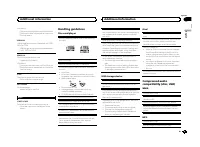
Page 15 - Apps; Handling guidelines; Discs and player
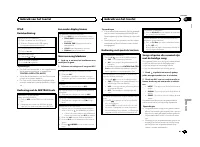
iPod failure. Disconnect the cable from the iPod. Once theiPod ’ s main menu is displayed, reconnect the iPod and reset it. ERROR-23 USB storage device was not formatted with FAT12,FAT16 or FAT32. USB storage device should be formatted withFAT12, FAT16 or FAT32. ERROR-16 The iPod firmware version is...
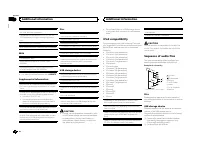
Page 16 - USB MTP; iPod compatibility; Sequence of audio files
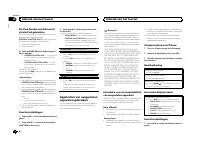
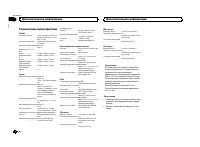
Sampling frequency: 8 kHz to 48 kHz (32 kHz,44.1 kHz, 48 kHz for emphasis) Compatible ID3 tag version: 1.0, 1.1, 2.2, 2.3, 2.4(ID3 tag Version 2.x is given priority over Version1.x.) M3u playlist: Not compatible MP3i (MP3 interactive), mp3 PRO: Not compatible WAV File extension: .wav Quantization bi...
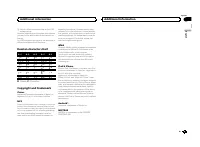
Page 17 - iTunes; Made for iPod; Android; Android is a trademark of Google Inc.; MIXTRAX
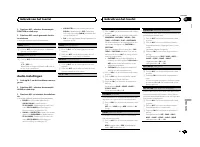
3 Save the folder containing files on the USBstorage device. However, depending on the system environment,you may not be able to specify the playback se-quence.For USB portable audio players, the sequence isdifferent and depends on the player. Russian character chart D: C D: C D: C D: C D: C : А : Б...
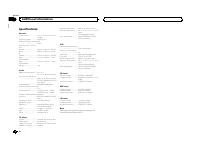
Page 18 - Specifications
Specifications General Power source ................... 14.4 V DC (10.8 V to 15.1 V al- lowable) Grounding system ............ Negative typeMaximum current consumption ................................... 10.0 A Dimensions (W × H × D):DINChassis ............................ 178 mm × 50 mm × 165 mmNos...
Page 20 - Nous vous remercions; Quelques mots sur cet appareil; ATTENTION; APPAREIL À LASER DE CLASSE 1; Avant de commencer
Nous vous remercions d ’ avoir acheté cet ap- pareil PIONEER Pour garantir une utilisation correcte, lisez bience mode d ’ emploi avant d ’ utiliser cet appareil. Il est particulièrement important que vous lisiez etrespectiez les indications ATTENTION et PRÉ- CAUTION de ce mode d ’ emploi. Conservez...
Page 21 - Appareil central; PRÉCAUTION; importe quel périphérique relié directement à; Indications affichées; Après avoir installé l; Français; Utilisation de cet appareil
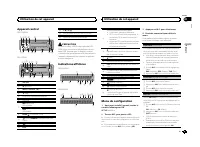
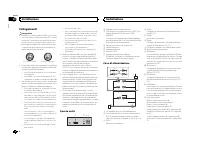
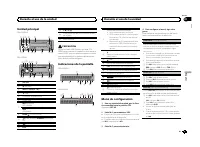
Appareil central DEH-X3600UI 2 4 6 5 3 d 8 9 e 7 a b c 1 DEH-2600UI 6 2 4 5 3 1 8 9 de 7 b c a 1 SRC / OFF 2 h (éjection) 3 MULTI-CONTROL ( M.C. ) 4 (liste) 5 Fente de chargement des disques 6 Port USB 7 MIX (MIXTRAX) DEH-X3600UI iPod DEH-2600UI 8 BAND / (contrôle de l ’ iPod) 9 (retour)/ DIMMER (at...
Page 22 - Opérations de base; Remarques
5 Pour terminer la configuration, tournez M.C. pour sélectionner YES. # Si vous souhaitez modifier à nouveau le réglage, tournez M.C. pour passer à NO . 6 Appuyez sur M.C. pour sélectionner. Remarques ! Vous pouvez configurer les options de menuà partir du menu système et du menu initial.Pour des dé...
Page 23 - Utilisation des touches de présélection; Changement de l; Utilisation des fonctions PTY; Vous pouvez rechercher une station à l; Liste des codes PTY; Réglages des fonctions
Enregistrement et rappel desstations pour chaque gamme Utilisation des touches de présélection 1 Pour la mise en mémoire : Appuyez de façon prolongée sur l ’ une des touches de présélection (1/ à 6/ ) jusqu ’ à ce que le numéro cesse de clignoter. 2 Pour le rappel : Appuyez sur une des tou- ches de ...
Page 24 - Appuyez sur
CD/CD-R/CD-RW etpériphériques de stockage USB Connexion MTP Il est possible de connecter des périphériquesAndroid compatibles MTP (utilisant le systèmed ’ exploitation Android 4.0 ou version supérieure) via une connexion MTP à l ’ aide de la source USB. Pour connecter un périphérique Android,utilise...
Page 25 - option de
Pause de la lecture 1 Appuyez sur 4 / PAUSE pour mettre en pause ou reprendre la lecture. Amélioration de l ’ audio compressé et restauration d ’ un son riche (sound retriever (correcteur de son compressé)) 1 Appuyez sur 3 / S.Rtrv pour parcourir les op- tions disponibles : 1 — 2 — OFF (hors service...
Page 27 - appareil connecté; Pour les utilisateurs d; un iPhone; Réglages sonores
Utilisation des applicationsde l ’ appareil connecté Vous pouvez utiliser cet appareil pour la lectureen continu et le contrôle de plages d ’ applica- tions iPhone ou simplement pour la lecture encontinu. Important L ’ utilisation d ’ applications tierces peut impli- quer ou nécessiter la fourniture...
Page 28 - Menu système
1 Appuyez sur M.C. pour afficher le mode de ré- glage. 2 Tournez M.C. pour sélectionner l ’ égaliseur. POWERFUL — NATURAL — VOCAL — CUS- TOM1 — CUSTOM2 — FLAT — SUPER BASS La bande et le niveau de l ’ égalisateur peuvent être personnalisés lorsque CUSTOM1 ou CUS- TOM2 est sélectionné. Si CUSTOM1 ou ...
Page 29 - éclairage; Menu des fonctions d; appuyez pour sélectionner.
1 Appuyez sur M.C. pour afficher le mode de ré- glage. 2 Appuyez sur M.C. pour sélectionner le seg- ment de l ’ affichage de l ’ horloge que vous sou- haitez régler.Heure — Minute 3 Tournez M.C. pour régler l ’ horloge. 12H/24H (notation temporelle) 1 Appuyez sur M.C. pour sélectionner le réglage so...
Page 30 - Remarque; Menu MIXTRAX; Menu initial
Personnalisation de la couleurd ’ éclairage Vous pouvez personnaliser les couleurs d ’ éclai- rage pour KEY COLOUR et DISP COLOUR . 1 Appuyez sur M.C. pour afficher le menu principal. 2 Tournez M.C. pour afficher ILLUMI, puis appuyez pour sélectionner. 3 Tournez M.C. pour afficher KEY COLOUR ou DISP...
Page 32 - Connexions; Cet appareil
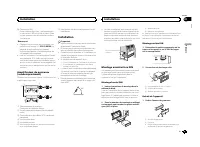
Connexions Important ! Lors de l ’ installation de cet appareil dans un véhicule sans position ACC (accessoire) surle contact d ’ allumage, ne pas connecter le câble rouge à la borne qui détecte l ’ utilisa- tion de la clé de contact peut entraîner le dé-chargement de la batterie. O N S T A R T O F ...
Page 33 - Montage avant/arrière DIN; Montage frontal DIN
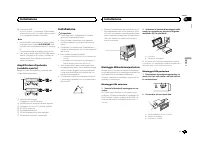
e Connecteur ISODans certains véhicules, il est possible quele connecteur ISO soit divisé en deux. Dansce cas, assurez-vous de connecter les deuxconnecteurs. Remarques ! Changez le menu initial de cet appareil. Re-portez-vous à la page 31, SP-P/O MODE (ré- glage de la sortie arrière et du préamp) . ...
Page 34 - Retrait et remontage de la face avant; appareil contre le vol.; Dépannage; entretien agréé par Pioneer le plus; Informations complémentaires
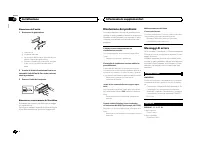
! Quand vous remontez l ’ anneau de garniture, pointez le côté avec l ’ encoche vers le bas. 2 Insérez les clés d ’ extraction fournies dans les deux côtés de l ’ appareil jusqu ’ à ce qu ’ el- les s ’ enclenchent en place. 3 Tirez l ’ appareil hors du tableau de bord. Retrait et remontage de la fac...
Page 35 - Conseils sur la manipulation; Disques et lecteur
ERROR-23 Format CD non pris en charge. Utilisez un autre disque. FORMAT READ Le début de la lecture et le début de l ’ émission des sons sont parfois décalés. Attendez que le message disparaisse pourentendre les sons. NO AUDIO Le disque inséré ne contient pas de fichiers pouvantêtre lus. Utilisez un...
Page 36 - Informations supplémentaires
Ne touchez pas la surface enregistrée des dis-ques. Rangez les disques dans leur coffret dès que vousne les écoutez plus. Ne posez aucune étiquette sur la surface des dis-ques, n ’ écrivez pas sur un disque, n ’ appliquez aucun agent chimique sur un disque. Pour nettoyer un CD, essuyez le disque ave...
Page 37 - Compatibilité iPod; Séquence des fichiers audio; Disque
Disque Hiérarchie des dossiers pouvant être lus : jusqu ’ à 8 niveaux (dans la pratique, la hiérarchie comptemoins de 2 niveaux). Dossiers pouvant être lus : jusqu ’ à 99 Fichiers pouvant être lus : jusqu ’ à 999 Système de fichiers : ISO 9660 Niveau 1 et 2,Romeo, Joliet Lecture multi-session : comp...
Page 39 - Caractéristiques techniques; Généralités
Caractéristiques techniques Généralités Tension d ’ alimentation ..... 14,4 V CC (10,8 V à 15,1 V ac- ceptable) Mise à la masse ............... Pôle négatifConsommation maximale ................................... 10,0 A Dimensions (L × H × P) :DINChâssis ............................ 178 mm × 50 mm ...
Page 40 - Informazioni sull; AVVERTENZA; PRODOTTO LASER DI CLASSE 1; In caso di problemi; Prima di iniziare
Grazie per aver acquistato questo prodotto PIONEER Leggere attentamente questo manuale prima diutilizzare il prodotto, per assicurarne il correttoutilizzo. È particolarmente importante leggere eosservare le precauzioni contrassegnate da AV- VERTENZA e ATTENZIONE contenute in questo manuale. Conserva...
Page 41 - ATTENZIONE; Dopo aver installato l; Italiano
Unità principale DEH-X3600UI 2 4 6 5 3 d 8 9 e 7 a b c 1 DEH-2600UI 6 2 4 5 3 1 8 9 de 7 b c a 1 SRC / OFF 2 h (espulsione) 3 MULTI-CONTROL ( M.C. ) 4 (lista) 5 Vano d ’ inserimento dei dischi 6 Porta USB 7 MIX (MIXTRAX) DEH-X3600UI iPod DEH-2600UI 8 BAND / (controllo iPod) 9 (indietro)/ DIMMER (var...
Page 42 - Nota; Funzionamento di base
5 Per completare le impostazioni, ruotare M.C. per selezionare YES. # Se si desidera modificare ancora l ’ impostazione, ruotare M.C. per selezionare NO . 6 Premere M.C. per selezionare. Note ! È possibile configurare le opzioni di menudal menu di sistema e dal menu iniziale. Perinformazioni dettagl...
Page 43 - Uso dei tasti di preselezione sintonia; ) fino a quando il numero; Commutazione del display; Uso delle funzioni PTY; Per ulteriori dettagli sull; Impostazioni delle funzioni; opzione di; Uso dell
Memorizzazione e richiamo dellestazioni per ciascuna banda Uso dei tasti di preselezione sintonia 1 Per memorizzare: Premere e tenere pre- muto uno dei tasti di preselezione sintonia(da 1/ a 6/ ) fino a quando il numero smette di lampeggiare. 2 Per richiamare: Premere uno dei tasti di preselezione s...
Page 44 - Premere
CD/CD-R/CD-RW e dispositividi memoria USB Collegamento MTP È possibile connettere i dispositivi Android com-patibili MTP (che eseguono Android OS 4.0 oversione successiva) tramite collegamento MTP,utilizzando la sorgente USB. Per collegare il di-spositivo Android, utilizzare il cavo fornito col di-s...
Page 45 - Operazioni col pulsante MIXTRAX; Per passare al menu superiore della ricer-
Messa in pausa della riproduzione 1 Premere 4 / PAUSE per attivare o disattivare la pausa. Miglioramento dell ’ audio compresso e ripristino del suono completo (funzione Sound Retriever) 1 Premere 3 / S.Rtrv per passare in rassegna: 1 — 2 — OFF (disattivata) 1 è efficace per le velocità di compressi...
Page 46 - Operazioni con i pulsanti speciali; unità dall
Operazioni con i pulsanti speciali Selezione di un intervallo di ripetizione 1 Premere 6 / per alternare: ! ONE – Ripete il brano corrente ! ALL – Ripete tutti i brani dell ’ elenco sele- zionato ! Se la modalità di controllo è impostata su CONTROL iPod/CTRL iPod , l ’ intervallo di ri- produzione r...
Page 47 - Per gli utenti iPhone
Importante L ’ utilizzo di applicazioni di terze parti potrebbe comportare o richiedere di fornire informazio-ni personali di identificazione attraverso lacreazione di un account utente o in altromodo e, per alcune applicazioni, attraversol ’ invio di dati di geolocalizzazione. TUT TE LE APPLICAZION...
Page 48 - Menu di sistema; Importante
1 Premere M.C. per visualizzare la modalità di impostazione. 2 Ruotare M.C. per selezionare l ’ equalizzatore. POWERFUL — NATURAL — VOCAL — CU- STOM1 — CUSTOM2 — FLAT — SUPER BASS La banda di equalizzazione e il livello dell ’ equa- lizzatore possono essere personalizzati se è se-lezionata l ’ impos...
Page 49 - illuminazione
CLOCK SET (impostazione dell ’ orologio) 1 Premere M.C. per visualizzare la modalità di impostazione. 2 Premere M.C. per selezionare il segmento del display dell ’ orologio che si desidera impostare. Ora — Minuto 3 Ruotare M.C. per regolare l ’ orologio. 12H/24H (nota temporale) 1 Premere M.C. per s...
Page 50 - Menu iniziale
Personalizzazione del coloredell ’ illuminazione È possibile creare un colore dell ’ illuminazione personalizzato per KEY COLOUR e DISP COLOUR . 1 Premere M.C. per visualizzare il menu principale. 2 Ruotare M.C. per visualizzare ILLUMI, quindi premere per selezionare. 3 Ruotare M.C. per visualizzare...
Page 52 - Collegamenti; Questa unità; Installazione
Collegamenti Importante ! Quando si installa questa unità in un veicoloche non dispone della posizione ACC (acces-soria) per l ’ interruttore della chiave di avvia- mento, se non si collega il cavo rosso a unterminale accoppiato al funzionamento del-l ’ interruttore della chiave di avviamento, la ba...
Page 53 - Montaggio DIN anteriore/posteriore; Montaggio DIN anteriore; Inserire la fascetta di montaggio nel cru-; Montaggio DIN posteriore; Determinare la posizione appropriata, in
e Connettore ISOIn alcuni veicoli, il connettore ISO potrebbeessere diviso in due. In questo caso, accertar-si di collegare entrambi i connettori. Note ! Modifica delle impostazioni di menu inizialidi questa unità. Vedere SP-P/O MODE (usci- ta posteriore e impostazione pre-out) a pagina 51.L ’ uscit...
Page 54 - Rimuovere la guarnizione.; Rimozione e reinserimento del frontalino; Per ulteriori dettagli, vedere; Risoluzione dei problemi; Messaggi di errore; Problemi comuni; Lettore CD; Informazioni supplementari
Rimozione dell ’ unità 1 Rimuovere la guarnizione. 1 Guarnizione 2 Linguetta intaccata ! La rimozione del frontalino permette di acce-dere facilmente alla guarnizione. ! Quando si riapplica la guarnizione, spingereil lato con la linguetta intaccata verso ilbasso. 2 Inserire le chiavi di estrazione f...
Page 55 - Linee guida per l; Dischi e lettori
ERROR-07, 10, 11, 12, 15, 17, 30, A0 Si è verificato un errore elettrico o meccanico. Spegnere e accendere il motore oppure passarea una sorgente diversa e poi di nuovo al lettoreCD. ERROR-15 Il disco inserito è vuoto. Sostituire il disco. ERROR-23 Il formato del CD non è supportato. Sostituire il d...
Page 56 - opzione
Non toccare la superficie registrata dei dischi. Quando non si utilizzano, conservare i dischi nellerispettive custodie. Non attaccare etichette, non scrivere e non appli-care prodotti chimici sulla superficie dei dischi. Per pulire un CD, passare delicatamente unpanno morbido sul disco procedendo d...
Page 57 - Compatibilità iPod; Disco; Tabella dei caratteri cirillici
Disco Gerarchia delle cartelle riproducibili: fino a otto li-velli (una gerarchia pratica non dovrebbe prevede-re più di due livelli.) Cartelle riproducibili: fino a 99 File riproducibili: fino a 999 File system: ISO 9660 di livello 1 e 2, Romeo, Joliet Riproduzione multi-sessione: compatibile Trasf...
Page 58 - Copyright e marchi registrati; Android è un marchio di fabbrica di Google Inc.
Copyright e marchi registrati iTunes Apple ed iTunes sono marchi di fabbrica diApple Inc., registrati negli Stati Uniti ed in altriPaesi. MP3 La fornitura di questo prodotto prevede il trasfe-rimento di una licenza esclusivamente per usoprivato, non-commerciale e non prevede la con-cessione di una l...
Page 59 - Dati tecnici
Dati tecnici Generali Alimentazione .................. 14,4 V di c.c. (variazioni con- sentite da 10,8 V a 15,1 V) Messa a terra ................... NegativaConsumo massimo .......... 10,0 ADimensioni (L × A × P):DINUnità principale ............... 178 mm × 50 mm × 165 mmPannello anteriore ............
Page 60 - Acerca de esta unidad; ADVERTENCIA; Evite la exposición a la humedad.; PRODUCTO LASER CLASE 1; Antes de comenzar
Gracias por haber adquirido este producto PIONEER Lea con detenimiento este manual antes de utili-zar el producto por primera vez para que puedadarle el mejor uso posible. Es muy importanteque lea y cumpla con la información que apare-ce bajo los mensajes de ADVERTENCIA y PRECAUCIÓN de este manual. ...
Page 61 - Unidad principal; PRECAUCIÓN; Indicaciones de la pantalla; Una vez instalada la unidad, gire la llave; Español; Durante el uso de la unidad
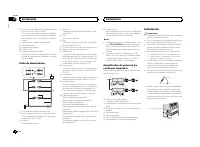
Unidad principal DEH-X3600UI 2 4 6 5 3 d 8 9 e 7 a b c 1 DEH-2600UI 6 2 4 5 3 1 8 9 de 7 b c a 1 SRC / OFF 2 h (expulsar) 3 MULTI-CONTROL ( M.C. ) 4 (lista) 5 Ranura de carga de discos 6 Puerto USB 7 MIX (MIXTRAX) DEH-X3600UI iPod DEH-2600UI 8 BAND / (control de iPod) 9 (parte posterior)/ DIMMER (re...
Page 62 - Funcionamiento básico; Notas
5 Para cerrar la configuración, gire M.C. y seleccione YES. # Si prefiere volver a cambiar la configuración, gire M.C. para cambiar a NO . 6 Pulse M.C. para seleccionarlo. Notas ! Se pueden configurar las opciones del menúdesde el menú del sistema y desde el menúde inicio. Si desea más información s...
Page 63 - Cambio de la visualización; Uso de las funciones PTY; Ajustes de funciones; menú y pulse para seleccionar FUNCTION.; Conexión MTP
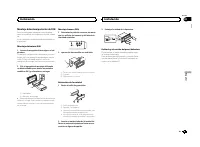
Almacenamiento y recuperaciónde emisoras para cada banda Uso de los botones de ajuste depresintonías 1 Para guardar: mantenga pulsado uno de los botones de ajuste de presintonías (1/ a 6/ ) hasta que el número deje de parpa- dear. 2 Para recuperar emisoras: pulse uno de los botones de ajuste de pres...
Page 64 - Operaciones con el botón MIXTRAX; Pulse; Operaciones con botones especiales
Funcionamiento básico Reproducción de un CD/CD-R/CD-RW 1 Inserte el disco en la ranura de carga de dis-cos con el lado de la etiqueta hacia arriba. Expulsión de un CD/CD-R/CD-RW 1 Pulse h . Reproducción de canciones de un dispositivo dealmacenamiento USB 1 Abra la tapa del puerto USB. 2 Conecte el d...
Page 65 - Para ir al menú superior de la búsqueda
Pausa de la reproducción 1 Pulse 4 / PAUSE para pausar o reanudar. Mejora del audio comprimido y restauración delsonido óptimo (Sound Retriever) 1 Pulse 3 / S.Rtrv para desplazarse entre: 1 — 2 — OFF (desactivado) 1 es efectivo para tasas de compresión baja, y 2 para tasas de compresión alta. ! El t...
Page 67 - Para usuarios de iPhone; El dispositivo tiene un iOS 5.0 o superior.; Ajustes de audio; menú y pulse para seleccionar AUDIO.
Importante El uso de aplicaciones de terceros puede im-plicar o necesitar la puesta a disposición deinformación de identificación personal, bienmediante la creación de una cuenta de usua-rio o de algún otro modo, y, para ciertas apli-caciones, la puesta a disposición de datos degeoubicación.TODAS LA...
Page 68 - Menú del sistema
1 Pulse M.C. para mostrar el modo de ajuste. 2 Gire M.C. para seleccionar el ecualizador. POWERFUL — NATURAL — VOCAL — CUS- TOM1 — CUSTOM2 — FLAT — SUPER BASS La banda y el nivel de ecualización se puedenpersonalizar si se selecciona CUSTOM1 o CUSTOM2 . Si selecciona CUSTOM1 o CUSTOM2 , com- plete l...
Page 69 - Menú de funciones de iluminación
La unidad puede buscar automáticamente unaemisora diferente con el mismo programa, inclusodurante la recuperación de emisoras presintoni-zadas. 1 Pulse M.C. para activar o desactivar la función de búsqueda PI automática. AUX (entrada auxiliar) Active este ajuste si utiliza un dispositivo auxiliarcon...
Page 70 - Menú MIXTRAX; Menú inicial; Para obtener más información, consulte; Uso de una fuente AUX
Notas ! Según el archivo/canción, es posible que losefectos de sonido no estén disponibles. ! Apague MIXTRAX si los efectos visuales queproduce tienen efectos adversos en la con-ducción. Consulte Operaciones con el botón MIXTRAX en la página 64. Menú MIXTRAX 1 Pulse M.C. para acceder al menú princi-...
Page 71 - Función de silenciamiento; Conexiones; Esta unidad; Entrada del cable de alimentación; Instalación
1 Pulse M.C. para acceder al menú princi- pal. 2 Gire M.C. para cambiar la opción de menú y pulse para seleccionar SYSTEM. 3 Gire M.C. para visualizar DEMO OFF y púlselo para realizar la selección. 4 Pulse M.C. para cambiar a YES. 5 Pulse M.C. para seleccionarlo. Función de silenciamiento Solo para ...
Page 72 - Cable de alimentación
2 Conector de entrada AUX2 (conector estéreode 3,5 mm) (solo DEH-X3600UI)Un conector de entrada dedicado diseñadoexclusivamente para utilizarse con dispositi-vos equipados con una función de silencia-miento. 3 Salida trasera o salida de subgraves 4 Salida delantera 5 Entrada de la antena 6 Fusible (...
Page 73 - Montaje delantero/posterior de DIN; Montaje delantero DIN; ción del panel frontal
Montaje delantero/posterior de DIN Esta unidad puede instalarse correctamentetanto si se realiza una instalación frontal o trase-ra.En la instalación, emplee piezas disponibles enel mercado. Montaje delantero DIN 1 Inserte el manguito de montaje en el sal- picadero. Si realiza la instalación en un e...
Page 74 - Comunes; Información adicional
Solución de problemas Los síntomas se escriben en negrita y las cau-sas en escritura normal sin sangría. El texto nor-mal con sangría se utiliza para indicar lasacciones que se han de tomar. La pantalla vuelve automáticamente a lavisualización normal. No ha realizado ninguna operación en aproximada-...
Page 75 - Aplicaciones; Pautas para el manejo; Discos y reproductor
CHECK USB El iPod funciona correctamente pero no se carga. Compruebe que el cable de conexión del iPod noesté cortocircuitado (p. ej., atrapado entreobjetos metálicos). Una vez confirmado, cambiela llave de encendido del automóvil a la posiciónde desactivación y luego pase de nuevo aactivación; o bi...
Page 76 - No puede usar esta función con; Información complementaria; Compatibilidad con iPod; iPod classic
iPod No deje el iPod en lugares expuestos a una tempe-ratura elevada. Cuando conduzca, fije el iPod firmemente. Nodeje caer el iPod al suelo, ya que puede quedaratascado debajo del freno o del acelerador. Acerca de los ajustes del iPod ! Cuando el iPod está conectado, esta unidaddesactiva el ajuste ...
Page 77 - Secuencia de archivos de audio; Tabla de caracteres rusos
! iPod nano (1.ª generación) ! iPhone 5 ! iPhone 4S ! iPhone 4 ! iPhone 3GS ! iPhone 3G ! iPhone Según la generación o versión del iPod, es posibleque algunas funciones no estén disponibles. Las funciones pueden variar según la versión desoftware del iPod. Los usuarios de iPod con conector Lightning...
Page 78 - Especificaciones
Especificaciones Generales Fuente de alimentación .... 14,4 V cc (10,8 V a 15,1 V per- misible) Sistema de derivación a tierra ................................... Tipo negativo Consumo máximo de corriente ................................... 10,0 A Dimensiones (An × Al × Pr):DINBastidor ................
Page 80 - Zu diesem Gerät; WARNUNG; LASER KLASSE 1; Im Problemfall; Bevor Sie beginnen
Vielen Dank , dass Sie sich für dieses PIONEER-Produkt entschieden haben Bitte lesen Sie diese Anleitung vor der Verwen-dung dieses Produkts zur Gewährleistung seinerordnungsgemäßen Verwendung durch. Lesenund befolgen Sie dabei insbesondere die Hin-weise WARNUNG und VORSICHT . Bewahren Sie die Anlei...
Page 81 - Hauptgerät; VORSICHT; Drehen Sie nach der Installation des Ge-; Deutsch; Gebrauch dieses Geräts
Hauptgerät DEH-X3600UI 2 4 6 5 3 d 8 9 e 7 a b c 1 DEH-2600UI 6 2 4 5 3 1 8 9 de 7 b c a 1 SRC / OFF 2 h (Auswurf) 3 MULTI-CONTROL ( M.C. ) 4 (Liste) 5 Disc-Ladeschacht 6 USB-Anschluss 7 MIX (MIXTRAX) DEH-X3600UI iPod DEH-2600UI 8 BAND / (iPod-Steuerung) 9 (Zurück)/ DIMMER (Dimmer) a c / d b DISP c ...
Page 82 - Wichtig; Grundlegende Bedienvorgänge; Hinweise
FM STEP (UKW-Kanalraster) Verwenden Sie FM STEP , um die UKW-Kanalraste- roptionen (Suchschritteinstellungen) einzustellen. 1 Drehen Sie M.C. , um die UKW-Kanalraster- Funktion zu wählen. 100 (100 kHz) — 50 (50 kHz) 2 Drücken Sie M.C. , um die Auswahl zu bestäti- gen.Die Angabe QUIT erscheint. ! Bei...
Page 83 - Verwendung der Stationstasten; Zum Speichern: Drücken Sie eine der; Umschalten der Anzeige; Funktionseinstellungen
Speichern und Abrufen vonRadiostationen für jedes Band Verwendung der Stationstasten 1 Zum Speichern: Drücken Sie eine der Stationstasten (1/ bis 6/ ) und halten diese gedrückt, bis die Stationsnummer nichtmehr blinkt. 2 Zum Abrufen: Drücken Sie eine der Stationstasten (1/ bis 6/ ). Umschalten der A...
Page 84 - Hinweis; Drücken Sie
CD/CD-R/CD-RW-Discs undUSB-Speichermedien MTP-Verbindung MTP-kompatible Android-Geräte (mit Android-Betriebssystem 4.0 oder höher) können übereine MTP-Verbindung unter Verwendung einerUSB-Quelle verbunden werden. Um einAndroid-Gerät anzuschließen, verwenden Siedas dem Gerät beiliegende Kabel. Hinwei...
Page 89 - Systemmenü; Wählen der Beleuchtungsfarbe; Beleuchtungsfunktionsmenü
Systemmenü Wichtig Die Funktion PW SAVE (Energiesparmodus) wird deaktiviert, wenn die Fahrzeugbatterie ab-geklemmt wird und muss neu aktiviert werden,sobald die Batterie wieder angeschlossen wird.Wenn PW SAVE (Energiesparmodus) deaktiviert ist, kann das Gerät je nach Anschlussart Batte-rieleistung i...
Page 91 - Für detaillierte Informationen hierzu siehe
Die blinkende Farbe und MIXTRAX-Sondereffekt-anzeige ändern sich aufgrund von Änderungender Lautstärke und des Bass-Pegels. 1 Drücken Sie auf M.C. , um den Einstellmodus aufzurufen. 2 Drehen Sie M.C. , um die gewünschte Einstel- lung zu wählen. ! SOUND LEVEL 1 bis SOUND LEVEL 6 – Das Blinkmuster änd...
Page 92 - Stummschaltung; Anschlüsse
2 Drehen Sie M.C., um die Menüoption zu wechseln, und drücken Sie auf SYSTEM, umdie angezeigte Option zu wählen. 3 Drehen Sie M.C., um die Option DEMO OFF zur Anzeige zu bringen, und drü-cken Sie dann darauf, um Ihre Auswahl zubestätigen. 4 Drehen Sie M.C., um zu YES umzuschal- ten. 5 Drücken Sie zu...
Page 94 - Entfernen des Geräts; Abnehmen der Frontplatte
! Installieren Sie dieses Gerät keinesfalls anfolgenden Orten: — Orte, an denen das Gerät die Steuerung desFahrzeugs behindern könnte. — Orte, an denen das Gerät die Insassen desFahrzeugs im Anschluss an eine Schnell-bremsung verletzen könnte. ! Der Halbleiterlaser kann durch Überhitzungbeschädigt w...
Page 95 - Allgemeines; Zusätzliche Informationen
Fehlerbehebung Symptome sind in Fett, Ursachen in normalem,nicht eingerückten Text und Abhilfemaßnahmenin normalem, eingerückten Text geschrieben. Das Display schaltet automatisch in die normaleAnzeige um. Sie haben keinen Bedienvorgang innerhalb von 30Sekunden durchgeführt. Wiederholen Sie den Vorg...
Page 96 - Handhabungsrichtlinien; Discs und Player
CHECK USB Das angeschlossene USB-Speichermedium ver-braucht mehr als den maximal zulässigen Stromver-brauch. Trennen Sie das USB-Speichermedium vondiesem Gerät und verwenden Sie es nicht mehrin Verbindung mit dem Gerät. Drehen Sie denZündschlüssel in die Position OFF (Aus) undanschließend in die Pos...
Page 97 - Diese Funktion kann nicht mit
Sorgen Sie für eine sichere Befestigung des USB-Speichermediums während der Fahrt. Lassen Siedas USB-Speichermedium nicht auf den Bodenfallen, wo es unter der Bremse oder dem Gaspedaleingeklemmt werden könnte. Je nach USB-Speichermedium können folgendeProbleme auftreten: ! Die Bedienung kann untersc...
Page 98 - Reihenfolge der Audio-Dateien; Russischer Zeichensatz
iPod-Kompatibilität Dieses Gerät unterstützt nur die folgenden iPod-Modelle. Die unterstützten iPod-Softwareversio-nen sind unten stehend aufgelistet. Ältere Ver-sionen werden ggf. nicht unterstützt.Hergestellt für ! iPod touch (5. Generation) ! iPod touch (4. Generation) ! iPod touch (3. Generation...
Page 99 - Technische Daten; Allgemein; USB
Technische Daten Allgemein Stromversorgung ............. 14,4 V Gleichspannung (Tole- ranz 10,8 V bis 15,1 V) Erdungssystem ................ NegativMaximale Leistungsaufnahme ................................... 10,0 A Abmessungen (B × H × T):DINEinbaugröße .................... 178 mm × 50 mm × 165 m...
Page 100 - Informatie over dit toestel; WAARSCHUWING; LET OP; KLASSE 1 LASERPRODUCT; Vóór u begint
Hartelijk dank voor uw keuze voor dit Pioneer-product Lees deze handleiding voordat u het product ingebruik neemt zodat u het goed leert gebruiken.Lees vooral de gedeelten die met WAARSCHU- WING en LET OP gemarkeerd zijn aandachtig. Bewaar deze handleiding na het lezen op een vei-lige, voor de hand ...
Page 101 - Hoofdtoestel; Instellingenmenu; Zet het contact aan na de installatie van; Nederlands; Gebruik van het toestel
Hoofdtoestel DEH-X3600UI 2 4 6 5 3 d 8 9 e 7 a b c 1 DEH-2600UI 6 2 4 5 3 1 8 9 de 7 b c a 1 SRC / OFF 2 h (uitwerpen) 3 MULTI-CONTROL ( M.C. ) 4 (lijst) 5 Laadsleuf voor disc 6 USB-poort 7 MIX (MIXTRAX) DEH-X3600UI iPod DEH-2600UI 8 BAND / (iPod-bediening) 9 (terug)/ DIMMER (dimmer) a c / d b DISP ...
Page 102 - Belangrijk; Veelgebruikte menufuncties; Basisbediening; Opmerkingen
5 Draai aan M.C. en selecteer YES om de in- stelling te voltooien. # Als u nog iets wilt wijzigen, draait u M.C. naar NO . 6 Druk op M.C. om uw keuze te bevesti- gen. Opmerkingen ! U kunt de menu-opties instellen in het sys-teemmenu en het begininstellingenmenu.Raadpleeg Systeemmenu op bladzijde 108...
Page 103 - De voorkeuzetoetsen gebruiken; mer stopt met knipperen.; Een ander display kiezen
Zenders voor de verschillendefrequentiebanden opslaan enoproepen De voorkeuzetoetsen gebruiken 1 Opslaan: Houd de gewenste voorkeuzet- oets (1/ t/m 6/ ) ingedrukt tot het num- mer stopt met knipperen. 2 Oproepen: Druk op de gewenste voor- keuzetoets (1/ t/m 6/ ). Een ander display kiezen De gewenste...
Page 104 - Opmerking; Bediening met de MIXTRAX-toets; Druk op; Bediening met speciale toetsen; FUNCTION en druk erop.
Basisbediening Een cd/cd-r/cd-rw afspelen 1 Plaats een disc met het etiket omhoog in delaadsleuf. Een cd/cd-r/cd-rw uitwerpen 1 Druk op h . Songs op een USB-opslagapparaat afspelen 1 Open het deksel van de USB-poort. 2 Sluit het USB-opslagapparaat aan via eenUSB-kabel. Stoppen met afspelen van songs...
Page 105 - De volgende lijsten voor songs zijn beschikbaar.
iPod Basisbediening Muziek op een iPod afspelen 1 Open het deksel van de USB-poort. 2 Sluit een iPod aan op de USB-ingang.Het afspelen begint automatisch. Een song selecteren (hoofdstuk) 1 Druk op c of d . Een album selecteren 1 Druk op 1 / of 2 / . Vooruit of achteruit spoelen 1 Houd c of d ingedru...
Page 106 - Voor iPhone; Startprocedure voor iPhone
De iPod-functie van dit toestelvia de iPod gebruiken De iPod-functie van dit toestel kan via een aan-gesloten iPod bediend worden. CONTROL iPod/CTRL iPod kan niet worden ge- bruikt met de volgende iPod-modellen. ! iPod nano 1e generatie ! iPod met video % Druk op BAND/ om de bedieningsmo- dus te wij...
Page 108 - Systeemmenu; De verlichtingskleur selecteren; Verlichtingsfuncties; U kunt de volgende audiofuncties aanpassen.
SLA (bronniveauregeling) De functie voorkomt sterke volumewisselingenwanneer de bron wordt overgeschakeld. ! De instellingen zijn gebaseerd op het FM-volu-meniveau, dat zelf niet gewijzigd kan worden. ! Het MW/LW-volumeniveau kan ook met dezefunctie worden aangepast. ! USB , iPod en APP worden autom...
Page 109 - De verlichtingskleur zelf aanpassen
KEY COLOUR (kleurinstelling voor toetsen) U kunt de kleur van de toetsen van het toestelnaar wens instellen. 1 Druk op M.C. om de instellingenmodus weer te geven. 2 Draai aan M.C. en selecteer de verlichtings- kleur. ! Vooringestelde kleuren ( WHITE tot BLUE ) ! SCAN (automatisch verschillende kleur...
Page 110 - Raadpleeg; Zet het ongewenste scherm als volgt uit.
De knipperende kleur en speciale effecten vanMIXTRAX veranderen mee met het geluid en debasniveaus. 1 Druk op M.C. om de instellingenmodus weer te geven. 2 Draai aan M.C. en selecteer de gewenste in- stelling. ! SOUND LEVEL 1 t/m SOUND LEVEL 6 – Het knipperpatroon verandert naargelanghet geluidsnive...
Page 111 - Dempingsfunctie; Verbindingen; Dit toestel; Ingang stroomkabel; Installatie
5 Druk op M.C. om uw keuze te bevesti- gen. Dempingsfunctie Alleen voor DEH-X3600UI Deze functie wordt ingeschakeld als een appa-raat met een dempingsfunctie op dit toestelwordt aangesloten.Als u een telefoongesprek maakt of ontvangtmet een apparaat met dempingsfunctie, wordthet geluid automatisch g...
Page 112 - Stroomkabel
3 Achteruitgang of subwooferuitgang 4 Uitgang voor 5 Antenne-ingang 6 Zekering (10 A) 7 Ingang voor draadafstandsbedieningEen bedrade afstandsbedieningsadapter kanaangesloten worden (los verkrijgbaar). Stroomkabel 1 3 3 2 4 4 5 5 6 6 b 8 9 7 a e d c 1 Naar ingang stroomkabel 2 De functie van 3 en 5 ...
Page 113 - Het toestel verwijderen; Het voorpaneel verwijderen
DIN-voormontage 1 Schuif de montagebehuizing in het dash- board. Gebruik voor installatie in een ondiepe ruimte demeegeleverde montagebehuizing. Als er vol-doende ruimte is, gebruikt u de montagebehui-zing die met het voertuig geleverd werd. 2 Zet de montagebehuizing vast door met een schroevendraai...
Page 114 - Algemeen; Aanvullende informatie
Problemen verhelpen Symptomen worden vet gedrukt. Oorzaken wor-den in gewoon lettertype zonder inspringen ge-drukt. Gewone en ingesprongen tekst geeft aanwat u moet doen. Het display keert automatisch terug naar hetgewone display. U hebt gedurende ongeveer 30 seconden geen han-deling uitgevoerd. Voe...
Page 115 - Applicaties; Aanwijzingen voor het gebruik; Discs en de player
CHECK USB De iPod functioneert correct maar wordt niet opgela-den. Controleer of de kabel van de iPod niet iskortgesloten, bijvoorbeeld contact maakt metmetalen voorwerpen. Zet daarna het contact uiten weer aan, of ontkoppel de iPod en sluit dezeweer aan. ERROR-19 Communicatiefout. Probeer de volgen...
Page 116 - Bijkomende informatie; Compatibiliteit met iPod
Compatibiliteit metgecomprimeerde audio(disc, USB) WMA Bestandsextensie: .wma Bitsnelheid: 48 kbps tot 320 kbps (CBR), 48 kbpstot 384 kbps (VBR) Bemonsteringsfrequentie: 32 kHz, 44,1 kHz, 48 kHz Windows Media ä Audio Professional, Lossless, Voice/DRM Stream/Stream met video: Niet com-patibel MP3 Bes...
Page 117 - Volgorde van audiobestanden; Disc; Plaats de bestanden in een map.; Lijst van Russische tekens; Gemaakt voor iPod; Android is een handelsmerk van Google Inc.
Volgorde van audiobestanden De gebruiker kan met dit toestel geen mapnum-mers toewijzen of de afspeelvolgorde wijzigen. Voorbeeld van een boomstructuur 12 34 56 01 02 03 04 05 Niveau 1 Niveau 2 Niveau 3 Niveau 4 : Map : Gecomprimeerd audiobestand01 tot 05: Mapnum-mer 1 tot 6 : Afspeel- volgorde Disc...
Page 118 - Technische gegevens
Technische gegevens Algemeen Spanningsbron ................ 14,4 V gelijkstroom (10,8 tot 15,1 V toelaatbaar) Aarding ........................... NegatiefMaximaal stroomverbruik ................................... 10,0 A Afmetingen (B × H × D):DINChassis ............................ 178 mm × 50 mm ×...
Page 120 - Благодарим Вас; PIONEER; Держите данное; Сведения об этом устройстве; RDS; ПРЕДУПРЕЖДЕНИЕ; Pioneer CarStereo-Pass; ЛАЗЕРНЫЙ ПРОДУКТ КЛАСС 1; При возникновении проблем; Перед началом эксплуатации
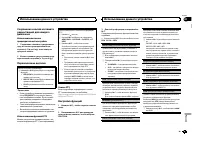
Благодарим Вас за покупку этого изделия компании PIONEER Для обеспечения правильности эксплуата - ции внимательно прочитайте данное руко - водство перед началом использованияизделия . Особенно важно , чтобы Вы прочли и соблюдали инструкции , помеченные в дан - ном руководстве заголовками ПРЕДУПРЕ - ...
Page 121 - Основное устройство; ВНИМАНИЕ; Индикация на дисплее; Установочное меню; SET UP; Использование данного устройства
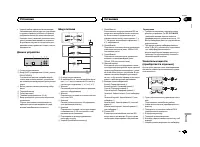
Основное устройство DEH-X3600UI 2 4 6 5 3 d 8 9 e 7 a b c 1 DEH-2600UI 6 2 4 5 3 1 8 9 de 7 b c a 1 SRC / OFF 2 h ( извлечение ) 3 MULTI-CONTROL ( M.C. ) 4 ( список ) 5 Щель для загрузки диска 6 USB порт 7 MIX (MIXTRAX) DEH-X3600UI iPod DEH-2600UI 8 BAND / ( управление iPod) 9 ( назад )/ DIMMER ( ре...
Page 122 - YES; Основные операции; Радиоприемник; Основные операции; SEEK; SEEK; AF
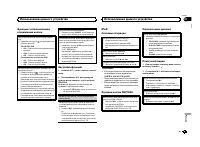
FM STEP ( шаг настройки в FM- диапазоне ) Для установки шага настройки в FM- диапазоне ( настройки поиска ) используйте меню FM STEP . 1 Поверните M.C. , чтобы выбрать шаг на - стройки в FM- диапазоне . 100 (100 кГц ) — 50 (50 кГц ) 2 Нажмите M.C. , чтобы подтвердить выбор . Появится надпись QUIT . ...
Page 123 - Переключение дисплея; FREQUENCY; Использование функций; Список; PTY; Настройка функций; FUNCTION
Сохранение и вызов из памятирадиостанций для каждогодиапазона Использование кнопокпредварительной настройки 1 Сохранение : нажмите и удерживайте одну из кнопок предварительной на - стройки ( с 1 / по 6 / ), пока номер не прекратит мигать . 2 Вызов : нажмите одну из кнопок пред - варительной настройк...
Page 124 - Подключение по протоколу; Функции кнопки
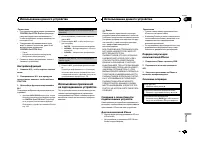
CD/CD-R/CD-RW и запоминающие устройства USB Подключение по протоколу MTP Устройства Android, поддерживающие прото - кол MTP ( с операционной системой Android OS 4.0 или выше ), можно подключить по про - токолу MTP как USB- устройство . Для под - ключения используйте кабель , входящий в комплект пост...
Page 126 - Только для
Воспроизведение композиции в выбранной ка - тегории 1 Выберите категорию , затем нажмите и удерживайте M.C. Поиск в списке по алфавиту 1 Когда список выбранной категории отобра - зится на дисплее , нажмите , чтобы вклю - чить режим поиска по алфавиту . ! Дважды повернув M.C. , можно перейти в режим ...
Page 127 - Для пользователей; iPhone
Примечания ! При переключении на режим управления CONTROL iPod/CTRL iPod воспроизведе - ние композиции приостанавливается . Чтобы возобновить воспроизведение , ис - пользуйте iPod. ! Следующими функциями можно упра - влять с данного устройства , даже если выбран режим управления CONTROL iPod/CTRL iP...
Page 128 - Регулировки параметров звука; AUDIO
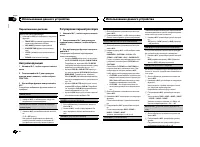
Переключение дисплея Выбор текстовой информации 1 Нажимайте DISP для выбора из следующих функций : ! TRACK INFO ( название дорожки / имя ис - полнителя / название альбома ) ! APP NAME ( название приложения ) ! ELAPSED TIME ( время воспроизведе - ния ) ! CLOCK ( название источника сигнала и часы ) ! ...
Page 129 - Меню системы; PW SAVE; DIMMER
HPF SETTING ( настройка фильтра верхних ча - стот ) Используйте эту функцию , если вы хотите , чтобы воспроизводились только высокие ча - стоты . На громкоговорители будут выводиться только частоты выше , чем установленные фильтром высоких частот (HPF). 1 Для отображения установочного меню на - жмит...
Page 130 - Выбор цвета подсветки; Меню функции подсветки; Настройка цвета подсветки; Информация о; Меню
Звук / уровень звукового сигнала данной систе - мы автоматически понижается при получениисигнала от оборудования с функцией приглу - шения звука . 1 Для отображения установочного меню на - жмите M.C. 2 Поворачивайте M.C. для выбора настрой - ки . ! MUTE – приглушение звука ! 20dB ATT – ослабление ур...
Page 131 - Стартовое меню
SHORT PLAYBCK ( режим краткого воспроизве - дения ) Можно выбрать длительность времени вос - произведения . 1 Для отображения установочного меню на - жмите M.C. 2 Поворачивайте M.C. для выбора настрой - ки . 1.0 MIN (1,0 мин ) — 1.5 MIN (1,5 мин ) — 2.0 MIN (2,0 мин ) — 2.5 MIN (2,5 мин ) — 3.0 MIN ...
Page 132 - Функция приглушения звука; Соединения; Установка
3 Поворачивайте M.C. для прокрутки пунктов меню ; нажмите , чтобы выбрать SYSTEM . 4 Для выбора функции меню системы поворачивайте M.C. Подробную информацию см . в Меню систе - мы на стр . 129. Использованиедополнительногоисточника сигнала (AUX) 1 Вставьте мини - штекер стереокабеля в гнездо AUX. 2 ...
Page 133 - ISO; настройка выхода заднего канала и; Усилитель мощности
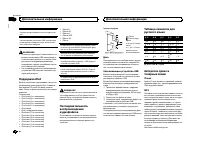
! Черный кабель является заземляющим . Заземляющие кабели данного устройстваи других устройств ( особенно устройств , предназначенных для эксплуатации прибольших токах , таких как усилитель мощ - ности ) должны монтироваться отдельно . В противном случае их случайное отсое - динение может привести к...
Page 134 - Переднее; Переднее крепление стандарта
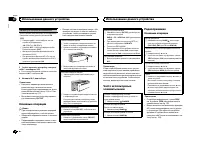
Установка Важно ! Перед окончательной установкой про - верьте все соединения и системы . ! Не используйте детали , не разрешенные производителем к использованию , по - скольку это может стать причиной неис - правностей . ! Уточните у дилера компании , требует ли установка сверления отверстий или вне...
Page 135 - Общие; Дополнительная информация
Устранение неисправностей Симптомы выделены жирным шрифтом ; причины показаны обычным шрифтом безотступа . Способы устранения показаны обы - чным шрифтом с отступом . Дисплей автоматически возвращается висходный режим . В течение 30 секунд не было выполнено никаких операций . Повторите операцию . Ди...
Page 136 - Приложения; Диски и проигрыватель
CHECK USB Короткое замыкание на разъеме USB или в кабе - ле USB. Убедитесь , что разъем USB или кабель USB не защемлен и не поврежден . CHECK USB Подключенное запоминающее устройство USB потребляет больше максимально допустимойсилы тока . Отсоедините запоминающее устройство USB и не используйте его ...
Page 137 - компакт; WMA; Эта функция не работает
При движении автомобиля надежно закрепитезапоминающее устройство USB. Не роняйте запоминающее устройство USB на пол , где оно может застрять под педалью тормоза илиакселератора . В зависимости от типа запоминающего устрой - ства USB могут возникнуть следующие про - блемы . ! Управление функциями мож...
Page 138 - Поддержка; Диск
Запоминающее устройство USB, содержащее разделы : воспроизводится только первый раз - дел . При начале воспроизведения аудиофайлов назапоминающем устройстве USB, содержащем разветвленные иерархии папок , может возни - кать небольшая задержка . ВНИМАНИЕ ! Pioneer не гарантирует совместимость со всеми...
Page 139 - Серийный номер
WMA Windows Media – это зарегистрированная торговая марка или торговая марка Microsoft Corporation в США и / или других странах . В данном изделии используются технологии , принадлежащие корпорации Microsoft, кото - рые не разрешается использовать или рас - пространять без лицензии от Microsoft Lice...
Page 140 - Технические характеристики
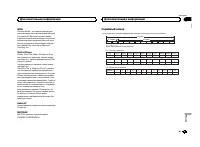
Технические характеристики Общие Источник питания ........... 14,4 В постоянного тока ( до - пустимый диапазон от 10,8 В до 15,1 В ) Система заземления ..... Заземление отрицательно - го полюса Максимальный потребляемый ток ................................... 10,0 А Размеры ( Ш × В × Г ): DIN Шасси ...
Page 148 - PIONEER CORPORATION
PIONEER CORPORATION 1-1, Shin-ogura, Saiwai-ku, Kawasaki-shi,Kanagawa 212-0031, JAPAN Корпорация Пайонир 1-1, Син - Огура , Сайвай - ку , г . Кавасаки , префектура Канагава , 212-0031, Япония Импортер ООО “ ПИОНЕР РУС ” 125040, Россия , г . Москва , ул . Правды , д .26 Тел .: +7(495) 956-89-01 PIONE...


 Pioneer AVH-P3100DVD
Manual
Pioneer AVH-P3100DVD
Manual
 Pioneer AVH-P3200BT
Manual
Pioneer AVH-P3200BT
Manual
 Pioneer AVH-P3300BT
Manual
Pioneer AVH-P3300BT
Manual
 Pioneer AVH-P4000DVD
Manual
Pioneer AVH-P4000DVD
Manual
 Pioneer AVH-P4100DVD
Manual
Pioneer AVH-P4100DVD
Manual
 Pioneer AVH-P5000DVD
Manual
Pioneer AVH-P5000DVD
Manual
 Pioneer AVH-P5100DVD
Manual
Pioneer AVH-P5100DVD
Manual
 Pioneer AVH-P5200BT
Manual
Pioneer AVH-P5200BT
Manual
 Pioneer AVH-P6000DVD
Manual
Pioneer AVH-P6000DVD
Manual
 Pioneer AVH-P6500DVD
Manual
Pioneer AVH-P6500DVD
Manual
 Pioneer AVH-P6800DVD
Manual
Pioneer AVH-P6800DVD
Manual
 Pioneer AVH-P7500DVD
Manual
Pioneer AVH-P7500DVD
Manual
 Pioneer AVH-P7800DVD
Manual
Pioneer AVH-P7800DVD
Manual
 Pioneer AVH-X1500DVD
Manual
Pioneer AVH-X1500DVD
Manual
 Pioneer AVH-X1800DVD
Manual
Pioneer AVH-X1800DVD
Manual
 Pioneer AVH-X2500BT
Manual
Pioneer AVH-X2500BT
Manual
 Pioneer AVH-X2800BT
Manual
Pioneer AVH-X2800BT
Manual
 Pioneer AVH-X4800DVD
Manual
Pioneer AVH-X4800DVD
Manual
 Pioneer AVH-X5800BT
Manual
Pioneer AVH-X5800BT
Manual
 Pioneer AVH-X7500BT
Manual
Pioneer AVH-X7500BT
Manual