Page 2 - In case of trouble; CAUTION; Avoid exposure to moisture.; Important; Before You Start
Thank you for purchasing this PIONEER product. To ensure proper use, please read through thismanual before using this product. It is espe-cially important that you read and observe WARNING s and CAUTION s in this manual. Please keep the manual in a safe and accessibleplace for future reference. If y...
Page 3 - Head unit; c d; Display indication; Basic Operations; Note; Operating this unit
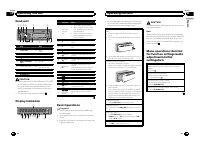
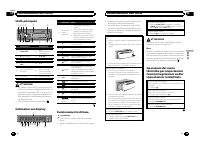
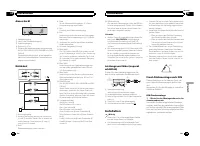
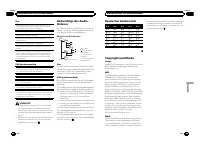
Head unit 1 2 4 5 6 3 7 8 a b c d 9 Part Part 1 S (SRC / OFF) 8 (Back/display/ scroll) 2 h (eject) 9 a / b / c / d 3 (list) a TA / NEWS 4 MULTI-CONTROL ( M.C. ) b 1 to 6 5 Disc loading slot c AUX input jack (3.5mm stereo jack) 6 USB port d Detach button 7 B (BAND / ESC) CAUTION ! Use an optional Pio...
Page 4 - Tuner; Using preset tuning buttons; When you find a station that you want; Switching the RDS display; Press; PTY list; Function settings; and press to select FUNCTION.; BSM
Tuner Basic Operations Selecting a band 1 Press B (BAND / ESC) until the desired band ( F1 , F2 , F3 for FM or MW/LW ) is displayed. Manual tuning (step by step) 1 Press c or d . Seeking 1 Press and hold c or d , and then release. You can cancel seek tuning by briefly pressing c or d . While pressin...
Page 5 - Displaying text information; Notes; Audio Adjustments; and press to select AUDIO.
CD/CD-R/CD-RW and USBstorage devices Basic Operations Playing a CD/CD-R/CD-RW 1 Insert the disc into the disc loading slot with thelabel side up. Ejecting a CD/CD-R/CD-RW 1 Press h . Playing songs on a USB storage device 1 Open the USB connector cover and plug in theUSB storage device using a USB ca...
Page 6 - Initial Settings; PW SAVE; Display the function name.; Insert the stereo mini plug into the; AUX; Sound muting; Sound is muted automatically when:
The cut-off frequency and output level can be ad-justed when the subwoofer output is on.Only frequencies lower than those in the selectedrange are outputted from the subwoofer. 1 Press M.C. to display the setting mode. 2 Press M.C. to cycle between the cut-off frequency and output level of the subwo...
Page 7 - Connections; This unit; Power cord; Installation
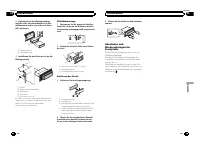
Connections Important ! When installing this unit in a vehicle withoutan ACC (accessory) position on the ignitionswitch, failure to connect the red cable to theterminal that detects operation of the ignitionkey may result in battery drain. O N S T A R T O F F ACC position No ACC position ! Use of th...
Page 8 - Removing the unit; Removing the front panel to
2 Power amp (sold separately) 3 Connect with RCA cable (sold separately) 4 To Rear output or subwoofer output 5 Rear speaker or subwoofer Installation Important ! Check all connections and systems beforefinal installation. ! Do not use unauthorized parts as this maycause malfunctions. ! Consult your...
Page 9 - USB storage device; Additional Information; Additional Information
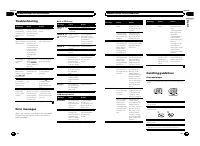
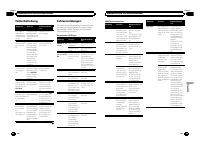
Troubleshooting Symptom Cause Action The displayautomaticallyreturns to theordinary dis-play. You did not per-form any opera-tion within about30 seconds. Perform operationagain. The repeat playrange changesunexpectedly. Depending onthe repeat playrange, the se-lected range maychange when se-lecting ...
Page 10 - Sequence of audio files; Example of a hierarchy; Put those files into a folder.
Unfinalized CD-R/CD-RW disc playback is not possi-ble. Do not touch the recorded surface of the discs. Store discs in their cases when not in use. Do not attach labels, write on or apply chemicals tothe surface of the discs. To clean a CD, wipe the disc with a soft cloth outwardfrom the center. Cond...
Page 11 - iTunes; Specifications
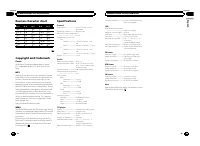
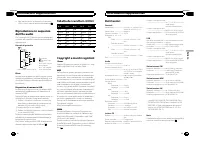
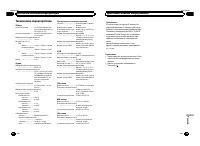
Russian character chart D: C D: C D: C D: C D: C : А : Б : В : Г : Д : Е , Ё : Ж : З : И , Й : К : Л : М : Н : О : П : Р : С : Т : У : Ф : Х : Ц : Ч : Ш , Щ : Ъ : Ы : Ь : Э : Ю : Я D : Display C : Character Copyright and trademark iTunes Apple and iTunes are trademarks of AppleInc., registered in th...
Page 12 - APPAREIL À LASER DE CLASSE 1; PRÉCAUTION; Remarque; Français
Nous vous remercions d ’ avoir acheté cet appareil PIONEER. Pour garantir une utilisation correcte, lisezbien ce mode d ’ emploi avant d ’ utiliser cet ap- pareil. Il est particulièrement important quevous lisiez et respectiez les indications AT- TENTION et PRÉCAUTION de ce mode d ’ emploi. Conser v...
Page 14 - Syntoniseur; Utilisation des touches de présélection; Nom du service de programme; Liste des codes PTY; Utilisation de l
Syntoniseur Opérations de base Sélection d ’ une gamme 1 Appuyez sur B (BAND / ESC) jusqu ’ à ce que la gamme désirée ( F1 , F2 , F3 en FM ou MW/LW (PO/GO)) s ’ affiche. Accord manuel (pas à pas) 1 Appuyez sur c ou d . Recherche 1 Appuyez de façon continue sur c ou d , puis relâ- chez.Vous pouvez an...
Page 15 - Opérations de base; Appuyez sur; Utilisation avancée à l; Réglages des fonctions; option de
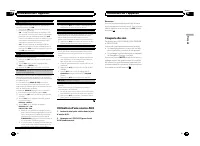
Vous pouvez rechercher une station à l ’ aide de son code PTY (type de programme). 1 Appuyez sur M.C. pour afficher le mode de para- métrage. 2 Tournez M.C. pour choisir le réglage désiré. NEWS/INFO — POPULAR — CLASSICS — OTHERS 3 Appuyez sur M.C. pour lancer la recherche. Cet appareil recherche une...
Page 16 - La fonction; ce que l
S.RTRV (sound retriever) Améliore automatiquement l ’ audio compressé et res- taure un son riche. 1 Appuyez sur M.C. pour afficher le mode de para- métrage. 2 Tournez M.C. pour choisir le réglage désiré. Pour les détails, reportez-vous à la page précé-dente, Amélioration de l ’ audio compressé et re...
Page 17 - Insérez la mini prise stéréo dans le jack; Le son est coupé automatiquement quand :
USB (Plug-and-Play) Ce réglage vous permet de basculer automatique-ment votre source sur USB . 1 Appuyez sur M.C. pour activer ou désactiver la fonction Plug-and-Play. ON – Lorsqu ’ un périphérique de stockage USB est connecté, la source peut, selon le type de péri-phérique, basculer automatiquement...
Page 18 - Connexions; Cet appareil; Cordon d
Connexions Important ! Lors de l ’ installation de cet appareil dans un véhicule sans position ACC (accessoire) sur lecontacteur d ’ allumage, ne pas connecter le câble rouge à la borne qui détecte l ’ utilisation de la clé de contact peut entraîner le déchar-gement de la batterie. O N S T A R T O F...
Page 19 - Montage avant/arrière DIN; Montage frontal DIN; Montage arrière DIN; Retrait de la
Remarques ! Changez les réglages initiaux de cet appareil.Reportez-vous à la page 32, SW CONTROL (ré- glage de la sortie arrière et du haut-parleur d ’ ex- trêmes graves) . La sortie haut-parleur d ’ extrêmes graves de cet appareil est monaurale. ! Lors de l ’ utilisation d ’ un haut-parleur d ’ ext...
Page 20 - entretien agréé par Pioneer le plus; Lecteur de CD intégré; Informations complémentaires; Informations complémentaires
Dépannage Symptôme Causes possi-bles Action corrective L ’ écran revient automatique-ment à l ’ affi- chage ordi-naire. Vous n ’ avez exé- cuté aucune opé-ration pendant30 secondes. Réexécutez l ’ opéra- tion. L ’ étendue de ré- pétition de lec-ture change demanière inat-tendue. En fonction del ’ ét...
Page 21 - Conseils sur la manipulation
Conseils sur la manipulation Disques et lecteur Utilisez uniquement des disques affichant l ’ un ou l ’ autre des logos suivants. Utilisez des disques 12 cm. N ’ utilisez pas de disques 8 cm ni un adaptateur pour disques 8 cm. Utilisez seulement des disques conventionnels deforme circulaire. N ’ uti...
Page 22 - Pioneer n; Disque; Placez ces fichiers dans un dossier.; WMA
PRÉCAUTION ! Pioneer n ’ accepte aucune responsabilité en cas de perte de données sur le périphériquede stockage USB, même si la perte de don-nées se produit pendant l ’ utilisation de cet ap- pareil. ! Ne laissez pas de disques ou un périphériquede stockage USB dans un lieu où les tempéra-tures son...
Page 24 - PRODOTTO LASER DI CLASSE 1; ATTENZIONE; Evitare l; Italiano
Grazie per aver acquistato questo prodotto PIONEER. Leggere attentamente questo manuale primadi utilizzare il prodotto, per assicurarne il cor-retto utilizzo. È particolarmente importanteleggere e osservare le precauzioni contrasse-gnate da AVVERTENZA e ATTENZIONE contenute in questo manuale. Conser...
Page 25 - Non utilizzare prodotti non approvati.; Importante
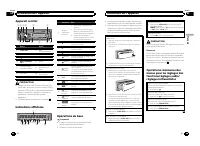
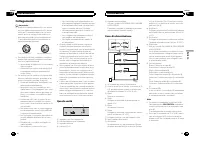
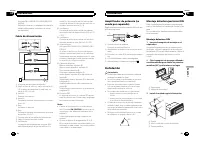
Unità principale 1 2 4 5 6 3 7 8 a b c d 9 Componente Componente 1 S (SRC / OFF) 8 (Tasto indietro/ visualizzazione/scorrimento) 2 h (espulsione) 9 a / b / c / d 3 (lista) a TA / NEWS 4 MULTI-CONTROL ( M.C. ) b 1 - 6 5 Vano d ’ inserimento dei dischi c Connettore di in-gresso ausiliario(AUX) (connet...
Page 26 - Sintonizzatore; Funzionamento di base; Uso dei tasti di preselezione sintonia; Quando viene individuata una stazione; Scorrimento del display RDS; Premere; Elenco PTY; Impostazioni delle funzioni; opzione; Funzionamento dell
Sintonizzatore Funzionamento di base Selezione di una banda 1 Premere B (BAND / ESC) fino a quando viene vi- sualizzata la banda desiderata ( F1 , F2 , F3 per FM o MW/LW ). Sintonizzazione manuale (passo per passo) 1 Premere c o d . Ricerca 1 Premere e tenere premuto c o d e poi rilasciare. È possib...
Page 27 - elenco dei nomi
È possibile sintonizzarsi su una stazione usando le in-formazioni PTY (tipo di programma). 1 Premere M.C. per visualizzare la modalità di im- postazione. 2 Ruotare M.C. per selezionare l ’ impostazione desi- derata. NEWS/INFO — POPULAR — CLASSICS — OTHERS 3 Premere M.C. per avviare la ricerca. L ’ u...
Page 28 - La modalità; fino a quando l
S.RTRV (Sound Retriever) Questa funzione migliora automaticamente l ’ audio compresso e ripristina il suono completo. 1 Premere M.C. per visualizzare la modalità di im- postazione. 2 Ruotare M.C. per selezionare l ’ impostazione desi- derata.Per ulteriori dettagli, vedere Miglioramento dell ’ au- di...
Page 29 - Collegare il cavo mini plug stereo al; MUTE
Questa impostazione consente di passare automati-camente alla sorgente USB . 1 Premere M.C. per attivare o disattivare la funzione plug and play. ON – Se viene collegato un dispositivo di memo- ria USB, a seconda del tipo di dispositivo, la sor-gente passa automaticamente a USB quando il motore vien...
Page 30 - Collegamenti; Questa unità; Cavo di alimentazione; Installazione
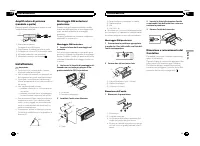
Collegamenti Importante ! Quando si installa questa unità in un veicoloche non dispone della posizione ACC (acces-soria) per l ’ interruttore della chiave di avvia- mento, se non si collega il cavo rosso a unterminale accoppiato al funzionamento del-l ’ interruttore della chiave di avviamento, la ba...
Page 31 - Montaggio DIN anteriore; Montaggio DIN posteriore; Rimozione del
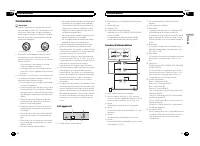
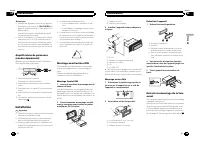
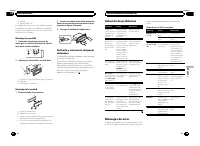
Amplificatore di potenza(venduto a parte) Eseguire questi collegamenti quando si usal ’ amplificatore opzionale. 1 3 2 4 5 5 1 Telecomando sistemaCollegare al cavo Blu/bianco. 2 Amplificatore di potenza (venduto a parte) 3 Collegare con un cavo RCA (venduto a parte) 4 All ’ uscita posteriore...
Page 32 - Lettore CD incorporato; Informazioni supplementari; Informazioni supplementari
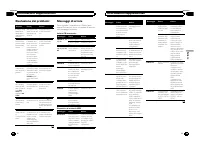
Risoluzione dei problemi Sintomo Causa Azione Il display tornaautomatica-mente alla vi-sualizzazionenormale. Non è stata ese-guita alcuna ope-razione per 30secondi. Eseguire nuova-mente l ’ operazio- ne. L ’ intervallo di ri- produzione ri-petuta cambiaimprevedibil-mente. A seconda del-l ’ intervall...
Page 33 - eventuale perdita di dati dal dispositivo di
Linee guida per l ’ uso corretto Dischi e lettori Utilizzare esclusivamente dischi che riportino uno deidue seguenti loghi. Utilizzare dischi da 12 cm. Non utilizzare dischi da 8cm o adattatori per dischi da 8 cm. Utilizzare esclusivamente dischi convenzionali, com-pletamente circolari. Non utilizza...
Page 34 - utente non può assegnare; Esempio di gerarchia; Disco; Inserire tali file in una cartella.; Tuttavia, a seconda dell; Tabella dei caratteri cirillici
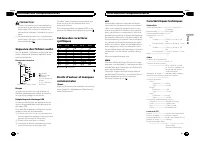
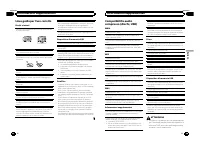
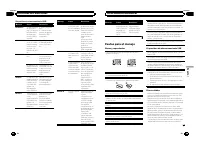
! Non lasciare dischi o dispositivi di memoriaUSB in luoghi esposti ad alte temperature. Riproduzione in sequenzadei file audio Con questa unità, l ’ utente non può assegnare i numeri alle cartelle e specificare sequenze diriproduzione. Esempio di gerarchia 12 34 56 01 02 03 04 05 Livello 1 Livello ...
Page 35 - En caso de problemas; PRODUCTO LASER CLASE 1; PRECAUCIÓN; Evite la exposición a la humedad.; Español; Antes de comenzar
Gracias por haber adquirido este producto PIONEER. Lea con detenimiento este manual antes deutilizar el producto por primera vez para quepueda darle el mejor uso posible. Es muy im-portante que lea y observe la información queaparece bajo los mensajes de ADVERTEN- CIA y PRECAUCIÓN en este manual. Un...
Page 36 - Unidad principal; No utilice productos no autorizados.; Indicaciones de pantalla; Funciones básicas; Utilización de esta unidad
Unidad principal 1 2 4 5 6 3 7 8 a b c d 9 Parte Parte 1 S (SRC / OFF) 8 (Atrás/visualiza- ción/desplazamien-to) 2 h (expulsar) 9 a / b / c / d 3 (lista) a TA / NEWS 4 MULTI-CONTROL ( M.C. ) b 1 a 6 5 Ranura de carga dediscos c Conector de entra-da AUX (conectorestéreo de 3,5 mm) 6 Puerto USB d Botó...
Page 37 - Sintonizador; Cuando encuentre la emisora que; Cambio de la visualización RDS; Pulse; Lista PTY; Ajustes de funciones
Sintonizador Funciones básicas Selección de una banda 1 Pulse B (BAND / ESC) hasta que se visualice la banda deseada ( F1 , F2 , F3 para FM o MW/LW ). Sintonización manual (paso a paso) 1 Pulse c o d . Búsqueda 1 Mantenga pulsado c o d y luego suéltelo. Se puede cancelar la sintonización por búsqued...
Page 38 - Ajustes de audio; de menú y pulse para seleccionar AUDIO.
1 Pulse M.C. para activar o desactivar la espera por anuncio de tráfico. AF (búsqueda de frecuencias alternativas) 1 Pulse M.C. para activar o desactivar la función AF. NEWS (interrupción por programa de noticias) 1 Pulse M.C. para activar o desactivar la función NEWS. CD/CD-R/CD-RW y dispositivosde...
Page 39 - Ajustes iniciales; que la unidad se apague.; Haga que el nombre de la función apa-
FAD/BAL (ajuste del fader/balance) 1 Pulse M.C. para mostrar el modo de ajuste. 2 Pulse M.C. para cambiar entre fader (delantero/ trasero) y balance (izquierdo/derecho). 3 Gire M.C. para ajustar el balance entre los altavo- ces. ! Cuando el ajuste de las salidas posterior y RCA es SW , no se puede a...
Page 40 - Uso de una fuente AUX; Inserte el miniconector estéreo en el co-; Silenciamiento del sonido; El sonido se desactiva, se visualiza; Esta unidad; Entrada del cable de alimentación; Instalación
La salida de cables de altavoces traseros y la salidaRCA se pueden usar para la conexión de altavoces detoda la gama o de subgraves.Si cambia a REAR-SP : SW , puede conectar un cable de altavoz trasero directamente a un altavoz de sub-graves sin tener que usar un amplificador auxiliar.En principio, ...
Page 41 - Cable de alimentación; Notas; Montaje delantero/posterior DIN; Montaje delantero DIN; Inserte el manguito de montaje en el
Sólo para DEH-2300UB, DEH-2300UBB y DEH-2320UB . Es posible conectar un adaptador de mando adistancia físicamente conectado (se vendepor separado). Cable de alimentación 1 3 3 2 4 4 5 5 6 6 b 8 9 7 a e d c 1 A la toma del cable de alimentación 2 Según el tipo de vehículo, las funciones de 3 y 5 pued...
Page 42 - Montaje trasero DIN; Determine la posición correcta, de; Retirada de la unidad; Retire el anillo de guarnición.; Mensajes de error; Reproductor de CD incorporado; Información adicional
4 Tornillo 5 Tornillo (M4 × 8) # Asegúrese de que la unidad esté firmemente instalada en su lugar. Una instalación inestablepuede causar saltos en el audio o un mal funcio-namiento de la unidad. Montaje trasero DIN 1 Determine la posición correcta, de modo que los orificios del soporte y del la-tera...
Page 43 - Dispositivo de almacenamiento USB; Discos y reproductor
Dispositivo de almacenamiento USB Mensaje Causa Resolución NO DEVICE Si está desactiva-do “ plug and play ” , no hay nin- gún dispositivode almacena-miento USB co-nectado. ! Active “ plug and play ” . ! Conecte un dis- positivo de almace-namiento USBcompatible. FRMT READ A veces se pro-duce un retra...
Page 44 - Ejemplo de una jerarquía; Coloque esos archivos en una carpeta.; Tabla de caracteres rusos
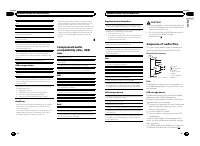
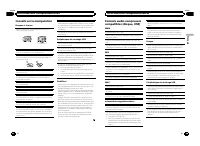
Compatibilidad con audiocomprimido (disco, USB) WMA Extensión de archivo: .wma Velocidad de grabación: 48 kbps a 320 kbps (CBR), 48kbps a 384 kbps (VBR) Frecuencia de muestreo: 32 kHz, 44,1 kHz, 48 kHz Windows Media Audio Professional, Lossless, Voice/DRM Stream/Stream con vídeo: no compatible MP3 E...
Page 45 - Especificaciones
MP3 La venta de este producto sólo otorga una li-cencia para su uso privado, no comercial. Nootorga ninguna licencia ni concede ningúnderecho a utilizar este producto en transmisio-nes comerciales (es decir, lucrativas) en tiem-po real (terrestres, vía satélite, por cable y/opor cualquier otro medio...
Page 46 - Im Störungsfall; Wichtig; Bevor Sie beginnen; LASER KLASSE 1; Hinweis; Deutsch; Bevor Sie beginnen
Vielen Dank , dass Sie sich für dieses PIONEER-Produkt entschieden haben. Bitte lesen Sie diese Anleitung vor der Verwen-dung dieses Produkts zur Gewährleistung sei-ner ordnungsgemäßen Verwendung durch.Lesen und befolgen Sie dabei insbesonderedie Hinweise WARNUNG und VORSICHT . Bewahren Sie die Anle...
Page 47 - Hauptgerät; Bedienung des Geräts
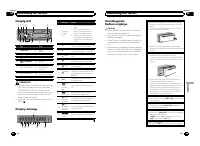
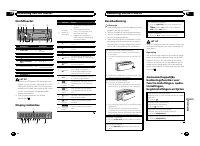
Hauptgerät 1 2 4 5 6 3 7 8 a b c d 9 Teil Teil 1 S (SRC / OFF) 8 (Zurück/Display/ Scrollen) 2 h (Auswurf) 9 a / b / c / d 3 (Liste) a TA / NEWS 4 MULTI-CONTROL ( M.C. ) b 1 bis 6 5 Disc-Ladeschacht c AUX-Eingang (3,5-mm-Stereoan-schluss) 6 USB-Anschluss d Taste zum Entrie-geln der Frontplatte 7 B (B...
Page 48 - Grundlegende Bedienvorgänge; Verwendung der Stationstasten; Zum Speichern eines abgestimmten; Umschalten der RDS-Anzeige; Drücken Sie; Funktionseinstellungen
VORSICHT Parken Sie Ihr Fahrzeug aus Sicherheitsgründenzum Abnehmen der Frontplatte. Hinweis Wenn das blau/weiße Kabel dieses Geräts an dieSteuerklemme des Automatikantennenrelais desKraftfahrzeugs angeschlossen wird, wird die An-tenne ausgefahren, sobald das Gerät eingeschal-tet wird. Zum Einfahren...
Page 49 - Anzeigen von Textinformationen; Hinweise
BSM (Best-Sender-Memory) BSM (Best-Sender-Memory) speichert die sechsstärksten Sender automatisch in der Reihenfolgeihrer Signalstärke. 1 Drücken Sie M.C. , um BSM einzuschalten. Zum Abbrechen des Speichervorgangs drückenSie M.C. erneut. REGION (Regional) Bei Verwendung des Alternativfrequenz-Suchla...
Page 50 - Bringen Sie das Funktionsmenü zur An-; Drücken und halten Sie
Pausieren der Wiedergabe 1 Drücken Sie 2 / PAUSE , um die Wiedergabe zu stoppen oder fortzusetzen. Verbessern der komprimierten Audiodaten und Wie-derherstellen eines reichen Klangbilds (Sound Retrie-ver) 1 Drücken Sie 1 / S.Rtrv , um zwischen folgenden Optionen umzuschalten: OFF (Aus) — 1 — 2 1 wir...
Page 51 - AUX als Programmquelle zu wählen.; Abschalten des Tons
3 Drehen Sie M.C., um die Grundeinstel- lung zu wählen. Nehmen Sie nach der Funktionswahl die fol-genden detaillierten Grundeinstellungen vor. CLOCK SET (Einstellen der Uhrzeit) Nur für DEH-2310UB . 1 Drücken Sie M.C. , um den Einstellmodus aufzuru- fen. 2 Drücken Sie M.C. , um den Teil der Zeitanze...
Page 53 - Führen Sie den Montagerahmen in das
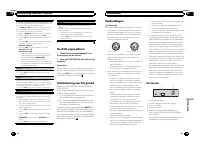
dieses Gerät 1 3 4 5 2 1 Netzkabelzugang 2 Heck- oder Subwooferausgang 3 Antenneneingang 4 Sicherung (10 A) 5 Eingang der festverdrahteten Fernbedienung Nur für DEH-2300UB, DEH-2300UBB und DEH-2320UB . Es besteht die Möglichkeit, einen (separat er-hältlichen) festverdrahteten Fernbedienungs-adapter ...
Page 54 - Entfernen des Geräts; Entfernen der Frontplatte zum Schutz vor
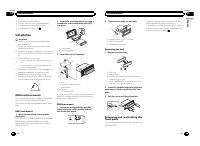
2 Befestigen Sie den Montagerahmen mithilfe eines Schraubendrehers: Die Me-tallklammern sind in eine sichere Position(90°) zu biegen. 1 2 1 Armaturenbrett 2 Montagerahmen 3 Installieren Sie das Gerät wie in der Ab- bildung gezeigt. 1 2 3 4 5 1 Mutter 2 Brand- oder Metallstütze 3 Metallband 4 Schraub...
Page 55 - Eingebauter CD-Player; Zusätzliche Informationen; Zusätzliche Informationen
Fehlerbehebung Symptom Ursache Abhilfemaßnah-me Das Displayschaltet auto-matisch in dienormale Anzei-ge um. Sie haben keinenBedienvorganginnerhalb von 30Sekunden durch-geführt. Wiederholen Sieden Vorgang. Der Wiederhol-bereich ändertsich unerwar-tet. Ja nach Wieder-holbereich kannsich der ausge-wähl...
Page 56 - Handhabungsrichtlinien; Discs und Player; DualDiscs
Meldung Ursache Abhilfemaßnah-me ERROR-19 Kommunikati-onsfehler Führen Sie einender folgenden Vor-gänge aus: – Schalten Sie die Zündung aus (OFF)und wieder ein(ON). – Trennen Sie die Verbindung zumtragbaren USB-Audio-Player bzw.USB-Speicherge-rät. – Schalten Sie auf eine andere Pro-grammquelle um.Ke...
Page 57 - Beispiel einer Disc-Struktur; Disc; Speichern Sie diese Dateien in einem Ordner.
Disc Abspielbare Ordnerstruktur: bis zu acht Ebenen (derEinfachheit halber sollte die Ordnerstruktur jedochaus weniger als zwei Ebenen bestehen). Abspielbare Ordner: bis zu 99 Abspielbare Dateien: bis zu 999 Dateisystem: Konformität mit ISO 9660 Stufe 1 und 2,Romeo, Joliet Multi-Session-Wiedergabe: ...
Page 58 - Technische Daten; Allgemein
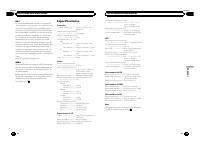
Technische Daten Allgemein Stromversorgung ..................... 14,4 V Gleichspannung (To-leranz 10,8 V bis 15,1 V) Erdungssystem ......................... Negativ Maximale Leistungsaufnahme ..................................................... 10,0 A Abmessungen (B × H × T): DIN Einbaugröße .........
Page 59 - Bij problemen; KLASSE 1 LASERPRODUCT; LET OP; Opmerking; Belangrijk; Nederlands; Vóór u begint
Hartelijk dank voor uw keuze voor dit Pioneer-product. Lees deze handleiding voordat u het productin gebruik neemt zodat u het goed leert gebrui-ken. Lees vooral de gedeelten die met WAAR- SCHUWING en LET OP gemarkeerd zijn aandachtig. Bewaar deze handleiding na het lezen op een veilige, bereikbare ...
Page 60 - Hoofdtoestel; Bediening van het toestel
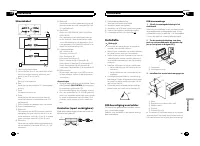
Hoofdtoestel 1 2 4 5 6 3 7 8 a b c d 9 Onderdeel Onderdeel 1 S (SRC / OFF) 8 (Terug/display/ scrollen) 2 h (uitwerpen) 9 a / b / c / d 3 (lijst) a TA / NEWS 4 MULTI-CONTROL ( M.C. ) b 1 t/m 6 5 Laadsleuf voor disc c AUX-ingang(3,5mm-stereoplug) 6 USB-poort d Verwijderen 7 B (BAND / ESC) LET OP ! Ver...
Page 61 - Basisbediening; De voorkeuzetoetsen gebruiken; Stem af op de zender die u in het ge-
Tuner Basisbediening Een frequentieband selecteren 1 Druk op B (BAND / ESC) totdat de gewenste fre- quentieband ( F1 , F2 , F3 voor FM of MW/LW ) op het display verschijnt. Handmatig afstemmen (stap voor stap) 1 Druk op c of d . Automatisch afstemmen 1 Houd c of d ingedrukt en laat deze weer los. U ...
Page 62 - Tekstinformatie weergeven; Opmerkingen; Druk op
U kunt PTY-informatie (programmatype-informatie)gebruiken om op een bepaalde zender af te stemmen. 1 Druk op M.C. om de instellingenmodus weer te geven. 2 Draai aan M.C. en selecteer de gewenste instel- ling. NEWS/INFO — POPULAR — CLASSICS — OTHERS 3 Druk op M.C. om het zoeken te beginnen. Het toest...
Page 63 - Geef de functienaam weer.
2 Draai aan M.C. om een andere menuop- tie te kiezen en druk erop om AUDIO te se-lecteren. 3 Draai aan M.C. en selecteer de audio- functie. Nadat u de audiofunctie geselecteerd hebt,stelt u deze als volgt in. FAD/BAL (fader/balansinstelling) 1 Druk op M.C. om de instellingenmodus weer te geven. 2 Dr...
Page 64 - Steek de stereo-miniplugkabel in de; Uitschakeling van het geluid; Het geluid wordt uitgeschakeld en; Dit toestel; Installatie
U kunt de aansluiting voor de achterluidspreker en deRCA-uitgang gebruiken om een luidspreker met volle-dig bereik of een subwoofer aan te sluiten.Als u REAR-SP : SW instelt, kunt u de luidspreker ach- terin rechtstreeks op een subwoofer aansluiten zon-der een externe versterker te gebruiken.Standaa...
Page 65 - Stroomkabel; Schuif de montagebehuizing in het
Stroomkabel 1 3 3 2 4 4 5 5 6 6 b 8 9 7 a e d c 1 Naar ingang stroomkabel 2 De functie van 3 en 5 kan verschillen afhan- kelijk van het type voertuig. Verbind in datgeval 4 met 5 en 6 met 3 . 3 GeelBack-up (of accessoire) 4 GeelAansluiten op de constante 12 V-voedingsaan-sluiting. 5 RoodAccessoire (...
Page 66 - Bevestigingsklem; Het toestel verwijderen; Verwijder de sierlijst.; Sierlijst; Steek de meegeleverde uittreksleutels; Foutmeldingen; Aanvullende informatie
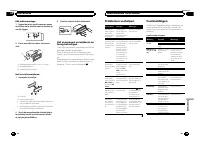
DIN-achtermontage 1 Bepaal de juiste positie waar de gaten in de klem en in de zijde van het toestel opeen lijn liggen. 2 Draai aan elke kant twee schroeven vast. 1 2 3 1 Zelftappende schroef (5 mm × 8 mm) 2 Bevestigingsklem 3 Dashboard of console Het toestel verwijderen 1 Verwijder de sierlijst. 1 ...
Page 67 - Discs en de player
USB-opslagapparaat Melding Oorzaak Maatregel NO DEVICE Als Plug en Playis uitgeschakeld,kan er geenUSB-opslagappa-raat worden aan-gesloten. ! Zet Plug en Play aan. ! Sluit een compa- tibel USB-opslag-apparaat aan. FRMT READ Na het begin vanhet afspelenduurt het somseven totdat er ge-luid klinkt. Wac...
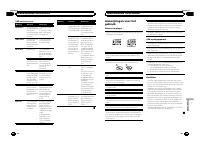
Page 68 - Voorbeeld van een boomstructuur; Plaats de bestanden in een map.; Lijst van Russische tekens
Compatibiliteit metgecomprimeerde audio(disc, USB) WMA Bestandsextensie: .wma Bitsnelheid: 48 kbps tot 320 kbps (CBR), 48 kbps tot384 kbps (VBR) Bemonsteringsfrequentie: 32 kHz, 44,1 kHz, 48 kHz Windows Media Audio Professional, Lossless, Voice/DRM Stream/Stream met video: Niet compatibel MP3 Bestan...
Page 69 - Technische gegevens; Algemeen
Technische gegevens Algemeen Spanningsbron ......................... 14,4 V gelijkstroom (10,8 tot15,1 V toelaatbaar) Aarding ......................................... Negatief Maximaal stroomverbruik ... 10,0 A Afmetingen (B × H × D): DIN Chassis ..................... 178 mm × 50 mm × 165mm Voorkan...
Page 70 - Благодарим Вас; за покупку этого изде; Держите; Сведения об этом устройстве; RDS; ЛАЗЕРНЫЙ ПРОДУКТ КЛАСС 1; ВНИМАНИЕ; Демонстрационный режим; Важно; ACC; Перед началом эксплуатации
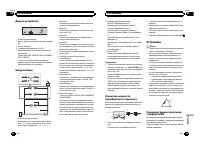
Благодарим Вас за покупку этого изде - лия компании PIONEER. Для обеспечения правильности эксплуата - ции внимательно прочитайте данное руко - водство перед началом использованияизделия . Особенно важно , чтобы Вы про - чли и соблюдали инструкции , помеченные в данном руководстве заголовками ПРЕД - ...
Page 71 - Основное устройство; USB; Индикация на дисплее; Основные операции; Управление данным устройством
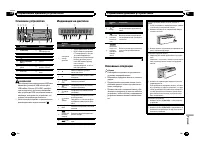
Основное устройство 1 2 4 5 6 3 7 8 a b c d 9 Элемент Элемент 1 S (SRC / OFF) 8 ( назад / пока - зать / прокрутка ) 2 h ( извлечение ) 9 a / b / c / d 3 ( список ) a TA / NEWS 4 MULTI-CONTROL ( M.C. ) b 1 до 6 5 Щель для загрузкидиска c Вход AUX ( стерео - разъем 3,5 мм ) 6 USB порт d Кнопка снятия ...
Page 72 - Примечание; Переключение режима; PTY; Список; Настройка функций; FUNCTION
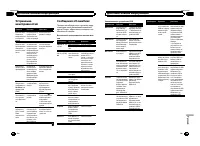
Выбор источника сигнала 1 Нажимайте кнопку S (SRC / OFF) для выбора из следующих функций : TUNER ( тюнер ) — CD ( встроенный проигрыва - тель компакт - дисков ) — USB (USB) — AUX ( вспомогательное устройство (AUX)) Регулировка громкости 1 Поворачивайте M.C. , чтобы отрегулировать громкость . ВНИМАНИ...
Page 73 - запоминающие устройства; дорожек из списка
# В диапазонах MW/LW можно выбрать толь - ко BSM или LOCAL . BSM ( запоминание лучших станций ) Функция BSM ( запоминание лучших станций ) по - зволяет автоматически сохранять в памяти ус - тройства шесть станций с самым мощнымсигналом в порядке мощности сигнала . 1 Нажмите M.C. , чтобы включить фун...
Page 75 - Начальные настройки; Затем выполните следующие действия
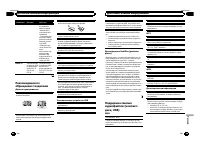
Начальные настройки Важно PW SAVE ( режим энергосбережения ) отклю - чается при отсоединении аккумуляторной ба - тареи автомобиля ; при подсоединении батареи его потребуется включить снова . При выключенном режиме PW SAVE ( режим энер - госбережения ) возможно , что , в зависимости от метода подключ...
Page 76 - Приглушение звука; Только для; Установка
Примечание Невозможно выбрать AUX, если не включена вспомогательная настройка . Подробную ин - формацию см . в разделе AUX ( вспомогатель - ный вход ) на стр . 148. Приглушение звука Только для DEH-2300UB, DEH-2300UBB и DEH-2320UB . Звук приглушается автоматически : ! при получении входящего вызова ...
Page 77 - ISO; DIN
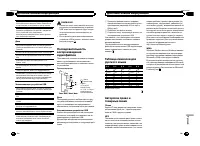
Данное устройство 1 3 4 5 2 1 Гнездо шнура питания 2 Выход заднего канала или выход сабвуфе - ра 3 Гнездо антенны 4 Плавкий предохранитель (10 A) 5 Вход проводного пульта дистанционногоуправления Только для DEH-2300UB, DEH-2300UBB и DEH-2320UB . Служит для подключения проводногоадаптера пульта диста...
Page 78 - Снятие передней панели в
Переднее крепление стандарта DIN 1 Вставьте монтажную обойму в пере - днюю панель . При установке в недостаточно глубокомгнезде используйте монтажную обойму , входящую в комплект поставки устройства . При наличии достаточного пространства заустройством применяется монтажная обо - йма , поставляемая ...
Page 79 - Сообщения об ошибках; Прежде чем обратиться к торговому пред; Встроенный проигрыватель компакт; Дополнительная информация; Дополнительная информация
Устранениенеисправностей Признак Причина Действие Дисплей авто - матическивозвращаетсяв исходныйрежим . В течение 30 се - кунд не быловыполнено ни - каких операций . Выполните опе - рацию с начала . Диапазон по - вторного вос - произведениясамопроиз - вольно измен - яется . В зависимостиот выбранног...
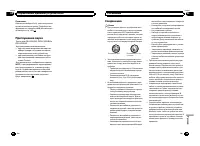
Page 81 - Pioneer; Диск
Это устройство может неверно воспроизводитьнекоторые файлы формата WMA в зависимости от приложений , использованных для их записи . При начале воспроизведения аудиофайлов , со - держащих изображения , и файлов с запоминаю - щего устройства USB, содержащего разветвленные иерархии папок , может происх...
Page 82 - Технические характеристики
Технические характеристики Общие Источник питания ................. 14,4 В постоянного тока ( допустимый диапазон от 10,8 В до 15,1 В ) Система заземления .......... Заземление отрицатель - ного полюса Максимальный потребляемый ток ..................................................... 10,0 А Размеры...
Page 84 - Япония; Импортер ООО “ПИОНЕР РУС”; PIONEER EUROPE NV; 先鋒股份有限公司
PIONEER CORPORATION 1-1, Shin-ogura, Saiwai-ku, Kawasaki-shi,Kanagawa 212-0031, JAPAN Корпорация Пайонир 1-1, Син-Огура, Сайвай-ку, г. Кавасаки,префектура Канагава,212-0031, Япония Импортер ООО “ПИОНЕР РУС” 125040, Россия, г. Москва, ул. Правды, д.26 Тел.: +7(495) 956-89-01 PIONEER ELECTRONICS (USA)...


 Pioneer AVH-P3100DVD
Manual
Pioneer AVH-P3100DVD
Manual
 Pioneer AVH-P3200BT
Manual
Pioneer AVH-P3200BT
Manual
 Pioneer AVH-P3300BT
Manual
Pioneer AVH-P3300BT
Manual
 Pioneer AVH-P4000DVD
Manual
Pioneer AVH-P4000DVD
Manual
 Pioneer AVH-P4100DVD
Manual
Pioneer AVH-P4100DVD
Manual
 Pioneer AVH-P5000DVD
Manual
Pioneer AVH-P5000DVD
Manual
 Pioneer AVH-P5100DVD
Manual
Pioneer AVH-P5100DVD
Manual
 Pioneer AVH-P5200BT
Manual
Pioneer AVH-P5200BT
Manual
 Pioneer AVH-P6000DVD
Manual
Pioneer AVH-P6000DVD
Manual
 Pioneer AVH-P6500DVD
Manual
Pioneer AVH-P6500DVD
Manual
 Pioneer AVH-P6800DVD
Manual
Pioneer AVH-P6800DVD
Manual
 Pioneer AVH-P7500DVD
Manual
Pioneer AVH-P7500DVD
Manual
 Pioneer AVH-P7800DVD
Manual
Pioneer AVH-P7800DVD
Manual
 Pioneer AVH-X1500DVD
Manual
Pioneer AVH-X1500DVD
Manual
 Pioneer AVH-X1800DVD
Manual
Pioneer AVH-X1800DVD
Manual
 Pioneer AVH-X2500BT
Manual
Pioneer AVH-X2500BT
Manual
 Pioneer AVH-X2800BT
Manual
Pioneer AVH-X2800BT
Manual
 Pioneer AVH-X4800DVD
Manual
Pioneer AVH-X4800DVD
Manual
 Pioneer AVH-X5800BT
Manual
Pioneer AVH-X5800BT
Manual
 Pioneer AVH-X7500BT
Manual
Pioneer AVH-X7500BT
Manual