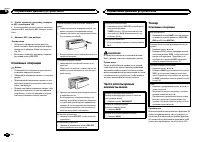
Page 2 - CAUTION; Avoid exposure to moisture.
Thank you for purchasing this PIONEER product To ensure proper use, please read through thismanual before using this product. It is especiallyimportant that you read and observe WARN- ING s and CAUTION s in this manual. Please keep the manual in a safe and accessible place forfuture reference. If yo...
Page 3 - Notes; Basic operations; Important; Note; Operating this unit
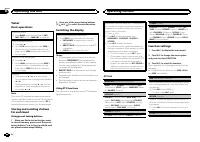
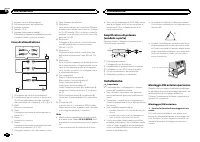
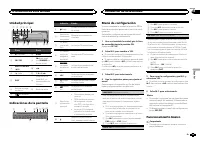
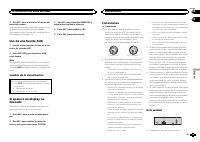
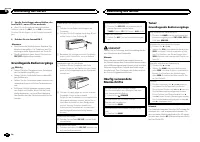
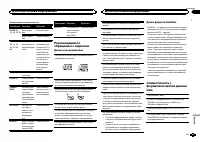
1 After installation of this unit, turn the ignition switch to ON.SET UP appears. 2 Turn M.C. to switch to YES. # If you do not operate for 30 seconds, the set up menu will not be displayed. # If you prefer not to set up at this time, turn M.C. to switch to NO . Press to select. If you select NO , y...
Page 4 - Tuner; Using preset tuning buttons; Switching the display; Using PTY functions; Function settings
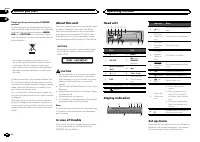
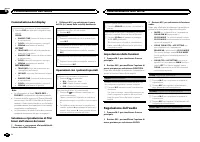
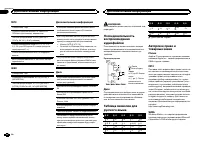
Tuner Basic operations Selecting a band 1 Press BAND until the desired band ( FM1 , FM2 , FM3 for FM or MW/LW ) is displayed. Switching preset stations 1 Press c or d . ! Select PCH (preset channel) under SEEK to use this function. For details about the set-tings, refer to SEEK (left/right key setti...
Page 5 - Operations using special buttons; Audio adjustments; English
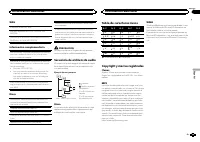
Local seek tuning lets you tune in to only thoseradio stations with sufficiently strong signals forgood reception. 1 Press M.C. to select the desired setting. FM: OFF — LV1 — LV2 — LV3 — LV4 MW/LW: OFF — LV1 — LV2 The highest level setting allows reception ofonly the strongest stations, while lower ...
Page 6 - System menu
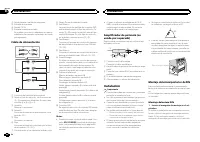
! SUB.W , SUB.W CTRL and HPF SETTING are not available when REAR/REAR is selected in SP-P/O MODE . For details, refer to SP-P/O MODE (rear output and preout set- ting) on the next page. ! SUB.W CTRL and HPF SETTING are not avail- able when SUB.W is selected in OFF . For de- tails, refer to SUB.W (su...
Page 7 - Switching the dimmer setting; You can adjust the brightness of illumination.; Initial menu
LANGUAGE (multi-language) This unit can display the text information from acompressed audio file even for information em-bedded in English or Russian. ! If the embedded language and the selectedlanguage setting are not the same, text infor-mation may not display properly. ! Some characters may not b...
Page 8 - Using an AUX source; Insert the stereo mini plug into the AUX; If an unwanted display appears; and press to select SYSTEM.; Connections; This unit; Power cord input; Installation
For details, refer to System menu on page 6. Using an AUX source 1 Insert the stereo mini plug into the AUX input jack. 2 Press SRC/OFF to select AUX as the source. Note AUX cannot be selected unless the auxiliary set-ting is turned on. For more details, refer to AUX (auxiliar y input) on the previo...
Page 9 - Power cord; Insert the mounting sleeve into the dash-
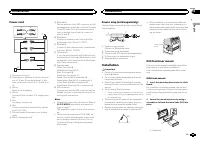
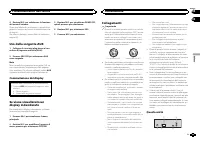
Power cord 1 3 3 2 4 4 5 5 6 6 b 8 9 7 a e d c 1 To power cord input 2 Depending on the kind of vehicle, the func-tion of 3 and 5 may be different. In this case, be sure to connect 4 to 5 and 6 to 3 . 3 YellowBack-up (or accessory) 4 YellowConnect to the constant 12 V supply termi-nal. 5 RedAccessor...
Page 10 - Removing the unit; Remove the trim ring.; Troubleshooting; Error messages; Additional information
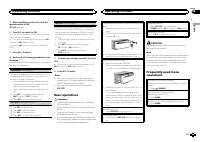
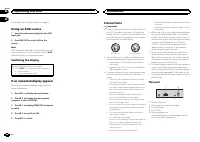
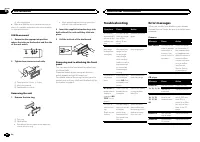
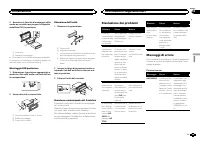
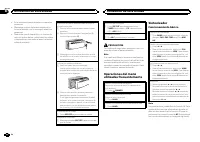
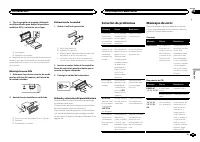
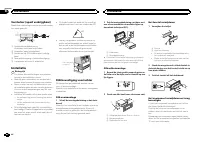
2 Mounting sleeve # Make sure that the unit is installed securely in place. An unstable installation may cause skippingor other malfunctions. DIN Rear-mount 1 Determine the appropriate position where the holes on the bracket and the sideof the unit match. 2 Tighten two screws on each side. 1 2 3 1 T...
Page 11 - Handling guidelines; Discs and player
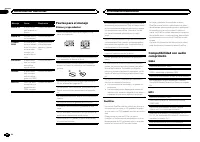
Message Cause Action FORMATREAD Sometimesthere is a delaybetween thestart of playbackand when youstart to hear anysound. Wait until themessage disap-pears and youhear sound. NO AUDIO The inserteddisc does notcontain anyplayable files. Replace the disc. SKIPPED The inserteddisc containsDRM protectedf...
Page 12 - Disc; General; Audio; CD player
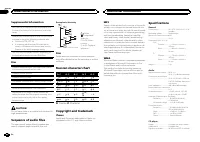
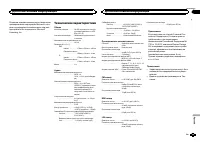
Supplemental information Only the first 32 characters can be displayed as afile name (including the file extension) or a foldername. Russian text to be displayed on this unit should beencoded in one of the following character sets: ! Unicode (UTF-8, UTF-16) ! A character set other than Unicode that ...
Page 14 - Quelques mots sur cet appareil; APPAREIL À LASER DE CLASSE 1; PRÉCAUTION; Remarque; En cas d; Avant de commencer
Nous vous remercions d ’ avoir acheté cet ap- pareil PIONEER. Pour garantir une utilisation correcte, lisez bience mode d ’ emploi avant d ’ utiliser cet appareil. Il est particulièrement important que vous lisiez etrespectiez les indications ATTENTION et PRÉ- CAUTION de ce mode d ’ emploi. Conser v...
Page 15 - Lorsque vous mettez le contact d; Remarques
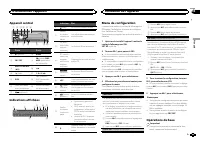
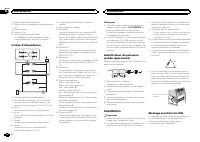
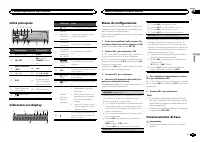
Appareil central b c 5 8 1 2 3 4 6 a 9 d 7 Partie Partie 1 h (éjection) 8 BAND 2 SRC / OFF 9 (retour)/ DIM- MER (atténuateur de luminosité) 3 MULTI-CONTROL ( M.C. ) a c / d 4 (liste) b 1 / à 6 / 5 DISP c Jack d ’ entrée AUX (jack stéréo3,5 mm) 6 Fente de charge-ment des disques d Touche de retraitde...
Page 16 - Syntoniseur; Opérations de base; Utilisation des touches de présélection; Changement de l; Utilisation des fonctions PTY; Utilisation de l
! Évitez de heurter la face avant. ! Conservez la face avant à l ’ abri des tempéra- tures élevées et de la lumière directe du so-leil. ! Pour éviter d ’ endommager le périphérique ou l ’ intérieur du véhicule, retirez tous les câ- bles et périphériques connectés à la faceavant, avant d ’ enlever ce...
Page 17 - Liste des codes PTY; Réglages des fonctions; option de; Français
Recherche d ’ une station RDS en utilisant le code PTYVous pouvez rechercher une station qui diffuse untype général de programme mentionné dans laliste de la section suivante. Reportez-vous à cettepage. 1 Appuyez sur (liste). 2 Tournez M.C. pour sélectionner le type de pro- gramme. NEWS/INFO — POPUL...
Page 18 - Réglages sonores
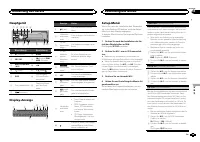
Changement de l ’ affichage Sélection des informations textuelles souhaitées 1 Appuyez sur DISP pour parcourir les options disponibles : CD-DA ! ELAPSED TIME (numéro de plage et temps de lecture) ! CLOCK (nom de la source et horloge) ! SPEANA (analyseur de spectre) CD-TEXT ! TRACK INFO (titre de la ...
Page 19 - Menu système
1 Appuyez sur M.C. pour afficher le mode de ré- glage. 2 Tournez M.C. pour sélectionner l ’ égaliseur. POWERFUL — NATURAL — VOCAL — CUS- TOM1 — CUSTOM2 — FLAT — SUPER BASS La bande et le niveau de l ’ égalisateur peuvent être personnalisés lorsque CUSTOM1 ou CUS- TOM2 est sélectionné. Si CUSTOM1 ou ...
Page 20 - Vous pouvez régler la luminosité d
1 Appuyez sur M.C. pour afficher le mode de ré- glage. 2 Appuyez sur M.C. pour sélectionner le seg- ment de l ’ affichage de l ’ horloge que vous sou- haitez régler.Heure — Minute 3 Tournez M.C. pour régler l ’ horloge. 12H/24H (notation temporelle) 1 Appuyez sur M.C. pour sélectionner le réglage so...
Page 21 - Cet appareil
3 Tournez M.C. pour changer l ’ option de menu et appuyez pour sélectionner SYSTEM. 4 Tournez M.C. pour sélectionner la fonc- tion du menu système. Une fois sélectionnées, les fonctions du menusystème suivantes peuvent être ajustées.Pour les détails, reportez-vous à la page 19, Menu système . Utilis...
Page 22 - Montage avant/arrière DIN
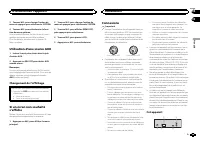
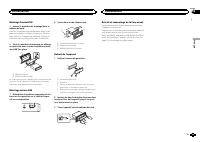
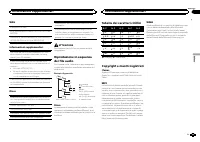
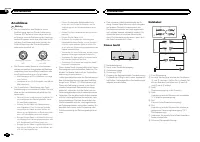
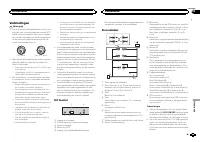
1 Entrée cordon d ’ alimentation 2 Sortie arrière ou haut-parleur d ’ extrêmes gra- ves 3 Entrée antenne 4 Fusible (10 A) 5 Entrée télécommande câbléeUn adaptateur de télécommande câblée(vendu séparément) peut être connecté. Cordon d ’ alimentation 1 3 3 2 4 4 5 5 6 6 b 8 9 7 a e d c 1 Vers l ’ entr...
Page 23 - Retrait de la face
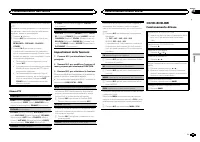
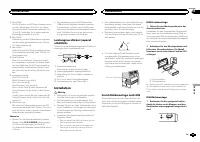
Montage frontal DIN 1 Insérez le manchon de montage dans le tableau de bord. Lors de l ’ installation de cet appareil dans un es- pace peu profond, utilisez le manchon de mon-tage fourni. Si l ’ espace est suffisant, utilisez le manchon de montage fourni avec le véhicule. 2 Fixez le manchon de monta...
Page 24 - entretien agréé par Pioneer le plus; Disques et lecteur
Dépannage Symptôme Causes possi-bles Action correc-tive L ’ écran re- vient automa-tiquement àl ’ affichage or- dinaire. Vous n ’ avez exé- cuté aucuneopération pen-dant 30 secon-des. Réexécutez l ’ opé- ration. L ’ étendue de répétition delecturechange demanière inat-tendue. En fonction del ’ étend...
Page 25 - Séquence des fichiers audio; utilisateur ne peut pas affecter; La séquence de sélection des dossiers ou d; Informations complémentaires
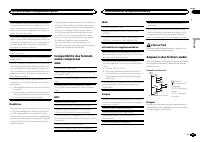
La condensation peut perturber temporairementle fonctionnement du lecteur. Laissez celui-ci s ’ a- dapter à la température plus élevée pendant uneheure environ. Essuyez également les disques hu-mides avec un chiffon doux. La lecture de certains disques peut être impos-sible en raison des caractérist...
Page 26 - iTunes; ne comporte pas de licence ni n; WMA; autres
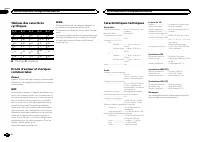
Tableau des caractèrescyrilliques D : C D : C D : C D : C D : C : А : Б : В : Г : Д : Е , Ё : Ж : З : И , Й : К : Л : М : Н : О : П : Р : С : Т : У : Ф : Х : Ц : Ч : Ш , Щ : Ъ : Ы : Ь : Э : Ю : Я D : Affichage C : Caractère Droits d ’ auteur et marques commerciales iTunes Apple et iTunes sont des ma...
Page 28 - Informazioni sull; PRODOTTO LASER DI CLASSE 1; ATTENZIONE; In caso di problemi; Prima di iniziare
Grazie per aver acquistato questo prodotto PIONEER Leggere attentamente questo manuale prima diutilizzare il prodotto, per assicurarne il correttoutilizzo. È particolarmente importante leggere eosservare le precauzioni contrassegnate da AV- VERTENZA e ATTENZIONE contenute in questo manuale. Conser v...
Page 30 - Sintonizzatore; Funzionamento di base; Nota; Uso dei tasti di preselezione sintonia; Commutazione del display; Uso delle funzioni PTY; Funzionamento dell
! Evitare di sottoporre il frontalino a urti ecces-sivi. ! Mantenere il frontalino lontano dalla luce so-lare diretta e dalle alte temperature. ! Per evitare danni ai dispositivi o agli internidel veicolo, accertarsi di scollegare gli even-tuali cavi e i dispositivi collegati al frontalino,prima di ...
Page 31 - Elenco PTY; Impostazioni delle funzioni; opzione di; Italiano
Ricerca di una stazione RDS tramite le informazio-ni PTYÈ possibile ricercare programmi di trasmissioni ditipo generale, come quelli elencati nella sezioneseguente. Vedere in questa pagina. 1 Premere (elenco). 2 Ruotare M.C. per selezionare un tipo di pro- gramma. NEWS/INFO — POPULAR — CLASSICS — OT...
Page 32 - elenco dei nomi
Commutazione del display Selezione delle informazioni di testo desiderate 1 Premere DISP per alternare le seguenti impo- stazioni: CD-DA ! ELAPSED TIME (numero di brano e tempo di riproduzione) ! CLOCK (nome della sorgente e orologio) ! SPEANA (analizzatore di spettro) CD-TEXT ! TRACK INFO (titolo d...
Page 33 - Menu di sistema; Importante
1 Premere M.C. per visualizzare la modalità di impostazione. 2 Ruotare M.C. per selezionare l ’ equalizzatore. POWERFUL — NATURAL — VOCAL — CU- STOM1 — CUSTOM2 — FLAT — SUPER BASS La banda di equalizzazione e il livello dell ’ equa- lizzatore possono essere personalizzati se è se-lezionata l ’ impos...
Page 34 - È possibile regolare il livello della luminosità.
1 Premere M.C. per visualizzare la modalità di impostazione. 2 Premere M.C. per selezionare il segmento del display dell ’ orologio che si desidera impostare. Ora — Minuto 3 Ruotare M.C. per regolare l ’ orologio. 12H/24H (nota temporale) 1 Premere M.C. per selezionare l ’ impostazione desiderata. 1...
Page 35 - Uso della sorgente AUX; Collegare il cavo mini plug stereo al con-; Collegamenti; Questa unità; Installazione
4 Ruotare M.C. per selezionare la funzione del menu di sistema. Dopo aver effettuato la selezione, è possibile re-golare le funzioni del menu di sistema descrittedi seguito.Per ulteriori dettagli, vedere Menu di sistema a pagina 33. Uso della sorgente AUX 1 Collegare il cavo mini plug stereo al con-...
Page 36 - Cavo di alimentazione; Montaggio DIN anteriore/posteriore; Montaggio DIN anteriore; Inserire la fascetta di montaggio nel cru-
1 Ingresso cavo di alimentazione 2 Uscita posteriore o del subwoofer 3 Ingresso antenna 4 Fusibile (10 A) 5 Ingresso telecomando cablatoÈ possibile collegare un adattatore per tele-comando cablato (venduto a parte). Cavo di alimentazione 1 3 3 2 4 4 5 5 6 6 b 8 9 7 a e d c 1 All ’ ingresso del cavo ...
Page 37 - alto tirandolo verso l; Risoluzione dei problemi; Messaggi di errore; Informazioni supplementari
2 Assicurare la fascetta di montaggio utiliz- zando un cacciavite per piegare le linguettemetalliche (90°) in posizione. 1 2 1 Cruscotto 2 Fascetta di montaggio # Accertarsi che l ’ unità sia saldamente installata in posizione. Un ’ installazione instabile potrebbe cau- sare salti audio o altri malf...
Page 38 - Linee guida per l; Dischi e lettori; Compatibilità audio compressa
Lettore CD Messaggio Causa Azione ERROR-07,11, 12, 17, 30 Il disco è spor-co. Pulire il disco. Il disco è graf-fiato. Sostituire il disco. ERROR-07,10, 11, 12,15, 17, 30,A0 Si è verificatoun errore elettri-co o meccani-co. Spegnere e ac-cendere il motoreoppure passare auna sorgente di-versa e poi di...
Page 39 - utente non può assegnare i; Tabella dei caratteri cirillici
WAV Estensione file: .wav Bit di quantizzazione lineare: 8 e 16 (LPCM), 4 (MSADPCM) Frequenza di campionamento: da 16 kHz a 48 kHz(LPCM), 22,05 kHz e 44,1 kHz (MS ADPCM) Informazioni supplementari Per i nomi dei file (incluse le estensioni) o i nomidelle cartelle, è possibile visualizzare esclusiva-...
Page 40 - Dati tecnici
Dati tecnici Generali Alimentazione .................. 14,4 V di c.c. (variazioni con- sentite da 10,8 V a 15,1 V) Messa a terra ................... NegativaConsumo massimo .......... 10,0 ADimensioni (L × A × P): DIN Unità principale ..................... 178 mm × 50 mm × 165 mm Pannello anteriore ...
Page 42 - Gracias; Acerca de esta unidad; PRECAUCIÓN; Evite la exposición a la humedad.; En caso de problemas; Antes de comenzar
Gracias por haber adquirido este producto PIONEER Lea con detenimiento este manual antes de utili-zar el producto por primera vez para que puedadarle el mejor uso posible. Es muy importanteque lea y cumpla con la información que apare-ce bajo los mensajes de ADVERTENCIA y PRECAUCIÓN de este manual. ...
Page 43 - Aparecerá; Notas
Unidad principal b c 5 8 1 2 3 4 6 a 9 d 7 Parte Parte 1 h (expulsar) 8 BAND 2 SRC / OFF 9 (parte poste- rior)/ DIMMER (re- ductor de luz) 3 MULTI-CONTROL ( M.C. ) a c / d 4 (lista) b 1 / a 6 / 5 DISP c Conector de en-trada AUX (co-nector estéreo de3,5 mm) 6 Ranura de cargade discos d Botón de solta...
Page 44 - Sintonizador; Funcionamiento básico; Utilización de esta unidad
! Evite someter el panel delantero a impactosexcesivos. ! Mantenga el panel delantero alejado de laluz solar directa y no lo exponga a altas tem-peraturas. ! Para evitar que el dispositivo o el interior delvehículo sufran daños, retire todos los cableso dispositivos conectados al panel delanteroante...
Page 45 - Cambio de la visualización; Uso de las funciones PTY; Ajustes de funciones; Español
Almacenamiento y recuperaciónde emisoras para cada banda Uso de los botones de ajuste depresintonías 1 Cuando encuentre la emisora que desee almacenar en la memoria, pulse uno de losbotones de ajuste de presintonías (1/ a 6/ ) y manténgalo pulsado hasta que el nú- mero de presintonía deje de parpade...
Page 46 - Operaciones con botones especiales; menú y pulse para seleccionar FUNCTION.
CD/CD-R/CD-RW Funcionamiento básico Reproducción de un CD/CD-R/CD-RW 1 Inserte el disco en la ranura de carga de dis-cos con el lado de la etiqueta hacia arriba. Expulsión de un CD/CD-R/CD-RW 1 Pulse h . Selección de una carpeta 1 Pulse 1 / o 2 / . Selección de una pista 1 Pulse c o d . Avance rápid...
Page 47 - Ajustes de audio; menú y pulse para seleccionar AUDIO.; Menú del sistema
S.RTRV (recuperador de sonido) Mejora automáticamente el audio comprimido yrestaura el sonido óptimo. 1 Pulse M.C. para seleccionar el ajuste deseado. Para obtener más información, consulte Mejo- ra del audio comprimido y restauración del soni-do óptimo (Sound Retriever) en la página anterior. Ajust...
Page 48 - Puede ajustar el brillo de la iluminación.; Menú inicial
1 Pulse M.C. para acceder al menú princi- pal. 2 Gire M.C. para cambiar la opción de menú y pulse para seleccionar SYSTEM. 3 Gire M.C. para seleccionar la función del menú del sistema. Una vez seleccionado, se pueden ajustar las si-guientes funciones del menú de sistema. LANGUAGE (idiomas múltiples)...
Page 49 - Uso de una fuente AUX; Conexiones; Esta unidad; Entrada del cable de alimentación; Instalación
4 Gire M.C. para seleccionar la función del menú del sistema. Una vez seleccionado, se pueden ajustar las si-guientes funciones del menú de sistema.Para obtener más información, consulte Menú del sistema en la página 47. Uso de una fuente AUX 1 Inserte el miniconector estéreo en el co- nector de ent...
Page 50 - Cable de alimentación; Montaje delantero/posterior de DIN; Montaje delantero DIN; Inserte el manguito de montaje en el sal-
2 Salida trasera o salida de subgraves 3 Entrada de la antena 4 Fusible (10 A) 5 Entrada remota conectadaEs posible conectar un adaptador de mandoa distancia físicamente conectado (se vendepor separado). Cable de alimentación 1 3 3 2 4 4 5 5 6 6 b 8 9 7 a e d c 1 A la toma del cable de alimentación ...
Page 51 - Colocación del panel delantero; Solución de problemas; Mensajes de error; Información adicional
2 Fije el manguito de montaje utilizando un destornillador para doblar las pestañasmetálicas (90°) y colocarlas en su lugar. 1 2 1 Salpicadero 2 Manguito de montaje # Asegúrese de que la unidad esté firmemente ins- talada en su lugar. Una instalación inestable puedecausar saltos en el audio o un mal...
Page 52 - Pautas para el manejo; Discos y reproductor; DualDisc
Mensaje Causa Resolución ERROR-15 El disco inser-tado aparece enblanco. Sustituya el disco. ERROR-23 Formato de CDno compatible. Sustituya el disco. FORMATREAD A veces se pro-duce un retrasoentre el comien-zo de la repro-ducción y laemisión del so-nido. Espere hasta queel mensaje desa-parezca y oiga...
Page 53 - Secuencia de archivos de audio; Tabla de caracteres rusos
WAV Extensión de archivo: .wav Bits de cuantificación: 8 y 16 (LPCM), 4 (MSADPCM) Frecuencia de muestreo: 16 kHz a 48 kHz (LPCM),22,05 kHz y 44,1 kHz (MS ADPCM) Información complementaria Solo se pueden visualizar los primeros 32 caracte-res como nombre de archivo (incluida la exten-sión) o nombre d...
Page 54 - Especificaciones
Especificaciones Generales Fuente de alimentación .... 14,4 V cc (10,8 V a 15,1 V per- misible) Sistema de derivación a tierra ................................... Tipo negativo Consumo máximo de corriente ................................... 10,0 A Dimensiones (An × Al × Pr): DIN Bastidor ..............
Page 56 - Zu diesem Gerät; LASER KLASSE 1; VORSICHT; Im Störungsfall; Bevor Sie beginnen
Vielen Dank , dass Sie sich für dieses PIONEER-Produkt entschieden haben. Bitte lesen Sie diese Anleitung vor der Verwen-dung dieses Produkts zur Gewährleistung seinerordnungsgemäßen Verwendung durch. Lesenund befolgen Sie dabei insbesondere die Hin-weise WARNUNG und VORSICHT . Bewahren Sie die Anle...
Page 57 - Hauptgerät; Drehen Sie nach der Installation des Ge-; Deutsch; Bedienung des Geräts
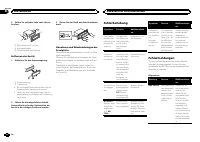
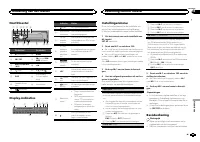
Hauptgerät b c 5 8 1 2 3 4 6 a 9 d 7 Bezeichnung Bezeichnung 1 h (Auswurf) 8 BAND 2 SRC / OFF 9 (Zurück)/ DIM- MER (Dimmer) 3 MULTI-CONTROL ( M.C. ) a c / d 4 (Liste) b 1 / bis 6 / 5 DISP c AUX-Eingang(3,5-mm-Stereo-anschluss) 6 Disc-Ladeschacht d Taste zum Entrie-geln der Front-platte 7 (Equalizer)...
Page 58 - Wichtig; Hinweis; Hinweis
5 Um die Einstellungen abzuschließen, dre- hen Sie M.C., um zu YES zu wechseln. # Wenn Sie die Einstellung erneut vornehmen möchten, drehen Sie M.C. , um zu NO zu wechseln. Drücken Sie den Regler, um die Auswahl zu bestäti-gen. 6 Drücken Sie zur Auswahl M.C. Hinweise ! Sie können die Menüoptionen üb...
Page 59 - Verwendung der Stationstasten; Zum Speichern eines abgestimmten Sen-; Umschalten der Anzeige; Hinweise; Funktionseinstellungen
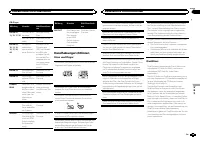
Speichern und Abrufen vonRadiostationen für jedes Band Verwendung der Stationstasten 1 Zum Speichern eines abgestimmten Sen- ders drücken Sie eine der Stationstasten (1/ bis 6/ ) und halten diese gedrückt, bis die Stationsnummer nicht mehr blinkt. 2 Drücken Sie eine der Stationstasten (1/ bis 6/ ) z...
Page 62 - Systemmenü; ON; Grundmenü
Systemmenü Wichtig Die Funktion PW SAVE (Energiesparmodus) wird deaktiviert, wenn die Fahrzeugbatterie ab-geklemmt wird und muss neu aktiviert werden,sobald die Batterie wieder angeschlossen wird.Wenn PW SAVE (Energiesparmodus) deaktiviert ist, kann das Gerät je nach Anschlussart Batte-rieleistung i...
Page 63 - temmenü
SP-P/O MODE (Heckausgang- und Preout-Einstel- lungen) Der Hecklautsprecher-Leitungsausgang undCinch-Ausgang dieses Geräts können zum An-schluss eines Vollbereichslautsprechers oder Sub-woofers verwendet werden. Wählen Sie für IhrenAnschluss eine geeignete Option. 1 Drücken Sie auf M.C. , um den Eins...
Page 64 - Anschlüsse; Dieses Gerät
Anschlüsse Wichtig ! Bei der Installation des Geräts in einemKraftfahrzeug, das am Zündschalter keinePosition ACC aufweist, kann es je nach An-schlusstyp zu einer Entleerung der Fahrzeug-batterie kommen, wenn das rote Kabel nichtmit dem Anschluss verbunden wurde, derfür die Erkennung des Zündschlüss...
Page 65 - Führen Sie den Montagerahmen in das; Bestimmen Sie die geeignete Position,
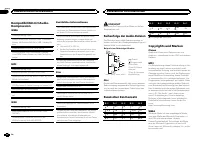
9 Blau/WeißDie Pin-Position des ISO-Anschlusses variiertje nach Fahrzeugtyp. Wird Pin 5 zur Steue-rung der Antenne verwendet, verbinden Sie 9 und b . Verbinden Sie in jedem anderen Fahrzeugtyp niemals 9 und b . a Blau/WeißVerbindung mit der Systemsteuerungsklem-me des Leistungsverstärkers (max. 300 ...
Page 66 - Ziehen Sie auf jeder Seite zwei Schrau-; Entfernen des Geräts; Entfernen Sie den Einpassungsring.; Führen Sie die mitgelieferten Extrak-; Fehlerbehebung; Fehlermeldungen; Zusätzliche Informationen
2 Ziehen Sie auf jeder Seite zwei Schrau- ben fest. 1 2 3 1 Blechschraube (5 × 8 mm) 2 Montageklammer 3 Armaturenbrett oder Konsole Entfernen des Geräts 1 Entfernen Sie den Einpassungsring. 1 Einpassungsring 2 Aussparung ! Bei entriegelter Bedienfläche lässt sich derEinpassungsring einfacher erreich...
Page 67 - Handhabungsrichtlinien; Discs und Player
CD-Player Meldung Ursache Abhilfemaßnah-me ERROR-07,11, 12, 17, 30 Die Disc ist ver-schmutzt. Reinigen Sie dieDisc. Die Disc ist ver-kratzt. Wechseln Sie dieDisc aus. ERROR-07,10, 11, 12,15, 17, 30,A0 Es liegt einelektrischeroder mechani-scher Fehler vor. Schalten Sie dieZündung aus(OFF) und wiedere...
Page 68 - Reihenfolge der Audio-Dateien; Russischer Zeichensatz; mand
Kompatibilität mit Audio-Kompression WMA Dateierweiterung: .wma Bitrate: 48 Kbit/s bis 320 Kbit/s (CBR - KonstanteBitrate), 48 Kbit/s bis 384 Kbit/s (VBR - Variable Bit-rate) Abtastfrequenz: 32 kHz; 44,1 kHz; 48 kHz Windows Media Audio Professional, Lossless,Voice/DRM Stream/Stream mit Video: Nicht ...
Page 69 - Technische Daten; Allgemein
Technische Daten Allgemein Stromversorgung ............. 14,4 V Gleichspannung (Tole- ranz 10,8 V bis 15,1 V) Erdungssystem ................ NegativMaximale Leistungsaufnahme ................................... 10,0 A Abmessungen (B × H × T): DIN Einbaugröße ...... 178 mm × 50 mm × 165 mm Frontfläch...
Page 70 - Informatie over dit toestel; KLASSE 1 LASERPRODUCT; LET OP; Opmerking; Bij problemen; Vóór u begint
Hartelijk dank voor uw keuze voor dit Pioneer-product. Lees deze handleiding voordat u het product ingebruik neemt zodat u het goed leert gebruiken.Lees vooral de gedeelten die met WAARSCHU- WING en LET OP gemarkeerd zijn aandachtig. Bewaar deze handleiding na het lezen op een vei-lige, voor de hand...
Page 71 - Hoofdtoestel; Instellingenmenu; Zet het contact aan na de installatie van; stelling te voltooien.; Basisbediening; Belangrijk; Bediening van het toestel
Hoofdtoestel b c 5 8 1 2 3 4 6 a 9 d 7 Onderdeel Onderdeel 1 h (uitwerpen) 8 BAND 2 SRC / OFF 9 (terug)/ DIM- MER (dimmer) 3 MULTI-CONTROL ( M.C. ) a c / d 4 (lijst) b 1 / tot 6 / 5 DISP c AUX-ingang(3,5 mm-stereo-plug) 6 Laadsleuf voordisc d Verwijderen 7 (equalizer) Display-indicaties 2 1 3 7 5 9 ...
Page 72 - Veelgebruikte menufuncties; De voorkeuzetoetsen gebruiken; Stem af op de zender die u in het geheu-; Een ander display kiezen; Opmerkingen
! Stel het voorpaneel niet bloot aan direct zon-licht en hoge temperaturen. ! Maak eerst alle kabels en apparaten (indienaanwezig) van het voorpaneel los voordat uhet verwijdert om beschadiging aan het toe-stel en het voertuiginterieur te voorkomen. Het voorpaneel tegen diefstal verwijderen 1 Druk o...
Page 73 - Nederlands
RDS-zenders zoeken via PTY-informatieU kunt naar bepaalde soorten uitzendingen zoe-ken, zoals de uitzendingen die in het volgende ge-deelte worden genoemd: deze bladzijde. 1 Druk op (lijst). 2 Draai aan M.C. om een programmatype te kie- zen. NEWS/INFO — POPULAR — CLASSICS — OTHERS 3 Druk op M.C. om ...
Page 74 - Bediening met speciale toetsen; FUNCTION en druk erop.; U kunt de volgende audiofuncties aanpassen.
Opmerkingen ! De tekstinformatie onder TRACK INFO en FILE INFO wordt automatisch bijgewerkt. ! Afhankelijk van het mediabestandstype ende versie van iTunes waarmee MP3-bestan-den op de disc zijn opgenomen, kan het voor-komen dat incompatibele tekst bij eenaudiobestand niet goed wordt weergegeven. ! ...
Page 75 - Systeemmenu
SUB.W (subwoofer aan/uit) Dit toestel is voorzien van een in- en uitschakel-bare subwooferuitgang. 1 Druk op M.C. en selecteer de gewenste instel- ling. NOR (normale fase) — REV (tegengestelde fase) — OFF (subwoofer uit) SUB.W CTRL (subwoofer aanpassen) De subwoofer geeft alleen frequenties beneden ...
Page 76 - De dimmer in- of uitschakelen; Beginmenu
De dimmer in- of uitschakelen U kunt de helderheid van de verlichting aanpas- sen. 1 Druk op M.C. om het hoofdmenu weer te geven. 2 Draai aan M.C., geef ILLUMI weer en druk erop. 3 Druk op M.C. en selecteer de gewenste instelling.OFF (uit) — ON (aan) ! U kunt de dimmer ook instellen door/ DIMMER eve...
Page 77 - Verbindingen; Dit toestel; Installatie
Verbindingen Belangrijk ! Als dit toestel wordt geïnstalleerd in een voer-tuig met een contactschakelaar zonder ACC-stand (accessoirestand), kan de accu leeglo-pen als de rode kabel niet wordt aangeslotenop de aansluiting die de bediening van decontactschakelaar herkent. O N S T A R T O F F ACC -sta...
Page 78 - Het toestel verwijderen; Het voorpaneel tegen diefstal ver wij-
Versterker (apart verkrijgbaar) Maak deze verbindingen als de optionele verster-ker wordt gebruikt. 1 3 2 4 5 5 1 SysteemafstandsbedieningVerbinden met blauw-witte kabel. 2 Versterker (apart verkrijgbaar) 3 Aansluiten op RCA-kabels (apart verkrijg-baar) 4 Naar achteruitgang of subwooferuitga...
Page 79 - Problemen verhelpen; Foutmeldingen; Aanwijzingen voor het gebruik; Discs en de player; Aanvullende informatie
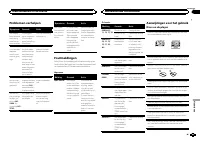
Problemen verhelpen Symptoom Oorzaak Actie Het displaykeert automa-tisch terugnaar het ge-wone display. U hebt gedu-rende ongeveer30 secondengeen handelinguitgevoerd. Voer de handelingopnieuw uit. Het bereikvoor herhaaldafspelenwordt onver-wachts gewij-zigd. Afhankelijk vanhet herhaalbe-reik kan het...
Page 80 - Volgorde van audiobestanden; Lijst van Russische tekens
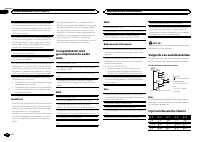
Condens en vocht kunnen de werking van de spe-ler tijdelijk negatief beïnvloeden. Laat de speler ineen warmere omgeving ongeveer een uur op tem-peratuur komen. Veeg vochtige schijven met eenzachte doek schoon. Sommige discs kunnen niet worden afgespeeld af-hankelijk van het type disc, de indeling er...
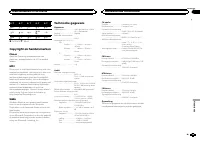
Page 81 - Copyright en handelsmerken; Technische gegevens
S: T S: T S: T S: T S: T : Р : С : Т : У : Ф : Х : Ц : Ч : Ш , Щ : Ъ : Ы : Ь : Э : Ю : Я S : Scherm T : Teken Copyright en handelsmerken iTunes Apple en iTunes zijn handelsmerken vanApple Inc., geregistreerd in de V.S. en anderelanden. MP3 Dit product is uitsluitend bedoeld voor niet-com-mercieel pr...
Page 82 - Сведения об этом устройстве; RDS; ЛАЗЕРНЫЙ ПРОДУКТ КЛАСС 1; ВНИМАНИЕ; Pioneer CarStereo-Pass; Перед началом эксплуатации
Благодарим Вас за покупку этого изделия компании PIONEER. Для обеспечения правильности эксплуата - ции внимательно прочитайте данное руко - водство перед началом использованияизделия . Особенно важно , чтобы Вы прочли и соблюдали инструкции , помеченные в дан - ном руководстве заголовками ПРЕДУПРЕ -...
Page 83 - Управление данным устройством
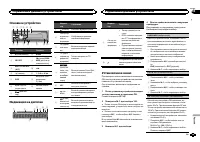
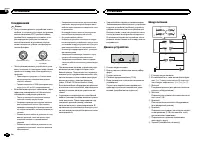
Основное устройство b c 5 8 1 2 3 4 6 a 9 d 7 Элемент Элемент 1 h ( извлечение ) 8 BAND 2 SRC / OFF 9 ( назад )/ DIM- MER ( регулятор освещенности ) 3 MULTI-CONTROL ( M.C. ) a c / d 4 ( список ) b С 1 / по 6 / 5 DISP c Вход AUX ( сте - реоразъем 3,5 мм ) 6 Щель для за - грузки диска d Кнопка снятияп...
Page 84 - YES; Меню системы; SRC; Тюнер; Основные операции; SEEK; AF
5 Чтобы закончить настройку , поверни - те M.C. и выберите YES . # Если понадобится вновь изменить настройку , поверните M.C. и выберите NO . Нажмите для вы - бора . 6 Нажмите M.C. для выбора . Примечания ! Настроить параметры меню можно вменю системы . Более подробную инфор - мацию см . в разделе М...
Page 85 - Переключение дисплея; FREQUENCY; Использование функций; Список; Настройка функций; FUNCTION
Сохранение и вызов из памятирадиостанций для каждогодиапазона Использование кнопокпредварительной настройки 1 Чтобы сохранить в памяти нужную ра - диостанцию , нажмите одну из кнопок предварительной настройки ( с 1 / по 6 / ) и удерживайте ее , пока номер предва - рительной настройки не прекратит ми...
Page 86 - TRACK INFO; дорожек из списка
1 Нажмите M.C. , чтобы включить или выклю - чить функцию НОВОСТИ . SEEK ( настройка левой и правой кнопок ) Правой и левой кнопкам на устройстве можноназначить определенную функцию . Выберите MAN ( ручная настройка ) для ручной настройки или PCH ( предустановленный канал ) для переключения между зар...
Page 87 - Регулировки параметров звука; AUDIO
Настройка функций 1 Нажмите M.C. , чтобы открыть главное меню . 2 Поворачивайте M.C. для прокрутки пунктов меню ; нажмите , чтобы выбрать FUNCTION . Выбранные функции , которые можно на - страивать , перечислены ниже . S.RTRV (sound retriever, технология преобраз - ования звука ) Автоматически улучш...
Page 89 - Стартовое меню; Меню систе
! Вы также можете выбрать другую на - стройку регулятора освещенности , удер - живая нажатой кнопку / DIMMER . Стартовое меню 1 Нажмите и удерживайте кнопку SRC / OFF , пока устройство не выключится . 2 Нажмите кнопку SRC / OFF и удерживай - те ее , пока не откроется стартовое меню . 3 Поворачивайте...
Page 90 - Соединения; Важно; Данное устройство; Установка
Соединения Важно ! При установке данного устройства в авто - мобиле , в котором отсутствует положение ключа зажигания АСС , красный кабель должен быть подключен к клемме , кото - рая определяет рабочее положениеключа зажигания ; в противном случае может возникнуть утечка тока аккумуля - торной батар...
Page 91 - настройка выхода заднего канала и; Усилительмощности; RCA; Переднее; Переднее крепление стандарта
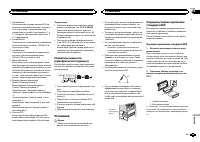
9 Синий / белый Расположение штекера разъема ISO на различных автомобилях может отличать - ся . Если штекер 5 предназначен для управления антенной , подсоедините 9 к b . На других автомобилях подключать 9 к b запрещается . a Синий / белый Подключите к клемме панели управленияусилителя мощности ( мак...
Page 92 - Устранение неисправностей; Сообщения об ошибках; Дополнительная информация
Заднее крепление стандарта DIN 1 Совместите отверстия на кронштейне и боковых панелях устройства . 2 Затяните по два винта с каждой сторо - ны . 1 2 3 1 Самонарезающий винт (5 мм × 8 мм ) 2 Монтажная рамка 3 Приборная панель или консоль Демонтаж устройства 1 Снимите рамку . 1 Декоративная рамка 2 Яз...
Page 93 - Диски и проигрыватель
Проигрыватель компакт - дисков Сообщение Причина Действие ERROR-07,11, 12, 17, 30 Диск загряз - нен . Очистите диск . Диск поцара - пан . Замените диск . ERROR-07,10, 11, 12,15, 17, 30,A0 Электрическаяили механиче - ская неисправ - ность . Установите ключзажигания в по - ложение OFF, а затем – в пол...
Page 94 - Диск; Apple; Windows Media
MP3 Расширение : .mp3 Скорость передачи данных : от 8 кбит / с до 320 кбит / с ( постоянная ), переменная Частота дискретизации : от 8 кГц до 48 кГц (32 кГц , 44,1 кГц , 48 кГц пиковая ) Совместимая версия тегов ID3: 1.0, 1.1, 2.2, 2.3, 2.4 ( теги ID3 версии 2.x имеют приоритет перед версией 1.x.) С...
Page 95 - Microsoft; Технические характеристики; Pioneer Europe
В данном изделии используются технологии , принадлежащие корпорации Microsoft, кото - рые не разрешается использовать или рас - пространять без лицензии от Microsoft Licensing, Inc. Технические характеристики Общие Источник питания ........... 14,4 В постоянного тока ( до - пустимый диапазон от 10,8...


 Pioneer AVH-P3100DVD
Manual
Pioneer AVH-P3100DVD
Manual
 Pioneer AVH-P3200BT
Manual
Pioneer AVH-P3200BT
Manual
 Pioneer AVH-P3300BT
Manual
Pioneer AVH-P3300BT
Manual
 Pioneer AVH-P4000DVD
Manual
Pioneer AVH-P4000DVD
Manual
 Pioneer AVH-P4100DVD
Manual
Pioneer AVH-P4100DVD
Manual
 Pioneer AVH-P5000DVD
Manual
Pioneer AVH-P5000DVD
Manual
 Pioneer AVH-P5100DVD
Manual
Pioneer AVH-P5100DVD
Manual
 Pioneer AVH-P5200BT
Manual
Pioneer AVH-P5200BT
Manual
 Pioneer AVH-P6000DVD
Manual
Pioneer AVH-P6000DVD
Manual
 Pioneer AVH-P6500DVD
Manual
Pioneer AVH-P6500DVD
Manual
 Pioneer AVH-P6800DVD
Manual
Pioneer AVH-P6800DVD
Manual
 Pioneer AVH-P7500DVD
Manual
Pioneer AVH-P7500DVD
Manual
 Pioneer AVH-P7800DVD
Manual
Pioneer AVH-P7800DVD
Manual
 Pioneer AVH-X1500DVD
Manual
Pioneer AVH-X1500DVD
Manual
 Pioneer AVH-X1800DVD
Manual
Pioneer AVH-X1800DVD
Manual
 Pioneer AVH-X2500BT
Manual
Pioneer AVH-X2500BT
Manual
 Pioneer AVH-X2800BT
Manual
Pioneer AVH-X2800BT
Manual
 Pioneer AVH-X4800DVD
Manual
Pioneer AVH-X4800DVD
Manual
 Pioneer AVH-X5800BT
Manual
Pioneer AVH-X5800BT
Manual
 Pioneer AVH-X7500BT
Manual
Pioneer AVH-X7500BT
Manual