Page 2 - CAUTION; Avoid exposure to moisture.
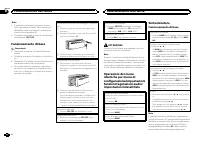
Thank you for purchasing this PIONEER product To ensure proper use, please read through thismanual before using this product. It is especiallyimportant that you read and observe WARN- ING s and CAUTION s in this manual. Please keep the manual in a safe and accessible place forfuture reference. If yo...
Page 3 - c d e; Do not use unauthorized products.; After installation of this unit, turn the
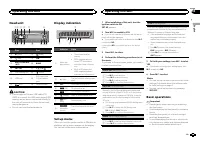
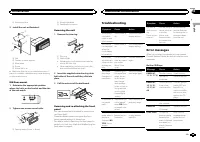
Head unit b c d e a 8 7 12 3 4 5 6 9 Part Part 1 h (eject) 8 (back) 2 (list) 9 c / d 3 MULTI-CONTROL ( M.C. ) a BAND 4 SRC / OFF b 1 / to 6 / 5 Disc loading slot c (clock) 6 USB port d AUX input jack(3.5 mm stereojack) 7 (EQ) e Detach button CAUTION ! Use an optional Pioneer USB cable (CD-U50E) to c...
Page 4 - Tuner; Basic operations; Note; Using preset tuning buttons; When you find a station that you want; Switching the RDS display; Press; Using PTY functions; Operating this unit
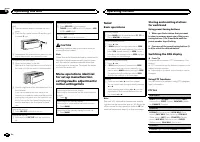
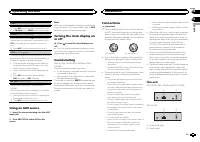
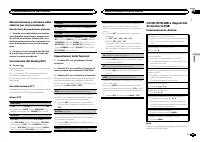
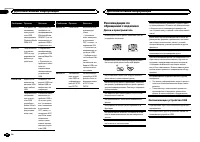
Removing the front panel to protect your unit fromtheft 1 Press the detach button to release the frontpanel. 2 Push the front panel upward ( M ) and then pull it toward ( N ) you. 3 Always keep the detached front panel in a pro-tection device such as a protection case. Re-attaching the front panel 1...
Page 5 - Function settings; and press to select FUNCTION.; Displaying text information; English
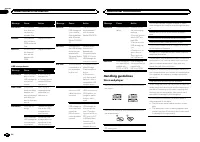
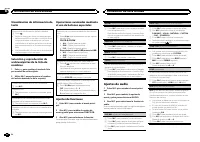
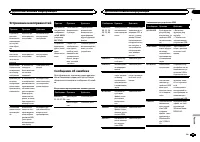
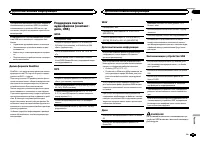
OTHERS EDUCATE (Education), DRAMA (Drama), CUL- TURE (Culture), SCIENCE (Science), VARIED (Var- ied), CHILDREN (Children ’ s), SOCIAL (Social affairs), RELIGION (Religion), PHONE IN (Phone in), TOURING (Travel), LEISURE (Leisure), DOCU- MENT (Documentaries) Function settings 1 Press M.C. to display ...
Page 6 - Audio adjustments; Important
Function settings 1 Press M.C. to display the main menu. 2 Turn M.C. to change the menu option and press to select FUNCTION. 3 Turn M.C. to select the function. After selecting, perform the following proce-dures to set the function. REPEAT (repeat play) 1 Press M.C. to select a repeat play range. Fo...
Page 7 - Using an AUX source; Sound muting; This unit; Installation
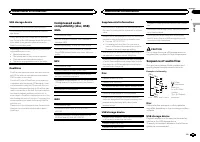
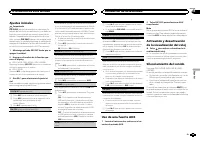
DEMO (demo display setting) 1 Press M.C. to turn the demo display on or off. ! If PW SAVE is on, DEMO cannot be selected. SCROLL (scroll mode setting) When ever scroll is set to ON , recorded text infor- mation scrolls continuously in the display. Set to OFF if you prefer the information to scroll j...
Page 8 - Power cord; Insert the mounting sleeve into the dash-
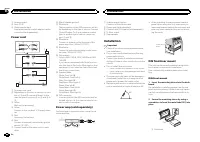
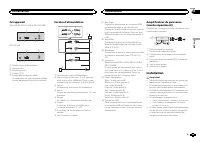
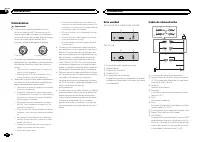
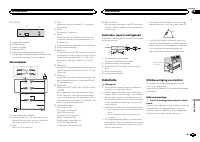
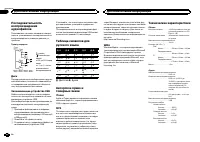
3 Antenna input 4 Fuse (10 A) 5 Wired remote inputHard-wired remote control adaptor can beconnected (sold separately). Power cord 1 3 3 2 4 4 5 5 6 6 b 8 9 7 a e d c 1 To power cord input 2 Depending on the kind of vehicle, the func-tion of 3 and 5 may be different. In this case, be sure to connect ...
Page 9 - Removing the unit; Removing the front panel to; Troubleshooting; Error messages; Additional information
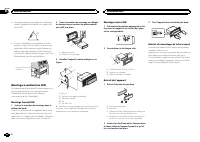
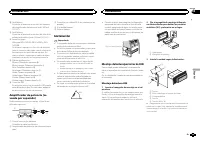
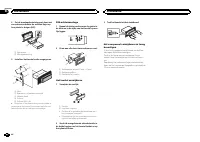
2 Mounting sleeve 3 Install the unit as illustrated. 1 2 3 4 5 1 Nut 2 Firewall or metal support 3 Metal strap 4 Screw 5 Screw (M4 × 8) # Make sure that the unit is installed securely in place. An unstable installation may cause skippingor other malfunctions. DIN Rear-mount 1 Determine the appropria...
Page 10 - Handling guidelines; Discs and player
Message Cause Action NO AUDIO The inserteddisc does notcontain anyplayable files. Replace the disc. SKIPPED The inserteddisc containsDRM protectedfiles. Replace the disc. PROTECT All the files onthe inserteddisc are em-bedded withDRM. Replace the disc. USB storage device Message Cause Action NO DEVI...
Page 11 - Sequence of audio files
USB storage device Connections via USB hub are not supported. Do not connect anything other than a USB stor-age device. Firmly secure the USB storage device when driv-ing. Do not let the USB storage device fall onto thefloor, where it may become jammed under thebrake or accelerator pedal. Depending ...
Page 12 - Put those files into a folder.; Russian character chart; iTunes; Specifications
1 Create a file name that includes numbersthat specify the playback sequence (e.g.,001xxx.mp3 and 099yyy.mp3). 2 Put those files into a folder. 3 Save the folder containing files on the USBstorage device. However, depending on the system environment,you may not be able to specify the playback se-que...
Page 14 - Nous vous remercions; APPAREIL À LASER DE CLASSE 1; PRÉCAUTION; DEMO
Nous vous remercions d ’ avoir acheté cet ap- pareil PIONEER Pour garantir une utilisation correcte, lisez bience mode d ’ emploi avant d ’ utiliser cet appareil. Il est particulièrement important que vous lisiez etrespectiez les indications ATTENTION et PRÉ- CAUTION de ce mode d ’ emploi. Conser ve...
Page 15 - Après avoir installé l
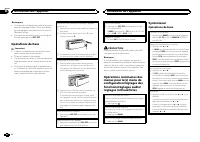
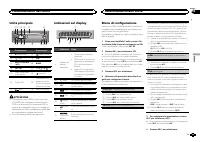
Appareil central b c d e a 8 7 12 3 4 5 6 9 Partie Partie 1 h (éjection) 8 (retour) 2 (liste) 9 c / d 3 MULTI-CONTROL ( M.C. ) a BAND 4 SRC / OFF b 1 / à 6 / 5 Fente de charge-ment des disques c (horloge) 6 Port USB d Jack d ’ entrée AUX (jack stéréo3,5 mm) 7 (EQ) e Touche de retraitde la face avant...
Page 16 - Remarque; Opérations de base
Remarques ! Vous pouvez configurer les options de menudans les réglages initiaux. Pour des détailssur les réglages, reportez-vous à la page 19, Réglages initiaux . ! Vous pouvez annuler le menu de configura-tion en appuyant sur SRC / OFF . Opérations de base Important ! Lorsque vous enlevez ou remon...
Page 17 - Utilisation des touches de présélection; Changement de l; Utilisation des fonctions PTY; Réglages des fonctions; Français; Utilisation de l
Remarque La fonction AF (recherche des autres fréquencespossibles) de cet appareil peut être mise en ser-vice ou hors service. La fonction AF doit êtrehors service pendant une opération d ’ accord normal (reportez-vous à cette page, AF (recher- che des autres fréquences possibles) ). Enregistrement ...
Page 18 - Utilisation avancée à l; Réglages sonores
Avance ou retour rapide 1 Appuyez de façon continue sur c ou d . ! Lors de la lecture d ’ un disque d ’ audio compressé, aucun son n ’ est émis pendant l ’ a- vance ou le retour rapide. Retour au dossier racine 1 Appuyez sur BAND de façon prolongée. Commutation entre les modes audio compresséet CD-D...
Page 22 - Montage avant/arrière DIN; Montage frontal DIN; Retrait de la face
! Des performances optimales sont obtenuesquand l ’ appareil est installé à un angle infé- rieur à 60°. 60° ! Lors de l ’ installation, pour assurer une dis- persion correcte de la chaleur quand cet ap-pareil est utilisé, assurez-vous de laisser unespace important derrière la face arrière etenroulez...
Page 23 - Dépannage; Messages d; entretien agréé par Pioneer le plus; Informations complémentaires
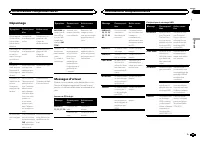
Dépannage Symptôme Causes possi-bles Action correc-tive L ’ éclairage de l ’ écran est ac- tivé et désac-tivé de façonaléatoire. Le mode dé-monstration estactivé. Désactivez le ré-glage de l ’ affi- chage dedémonstration. L ’ affichage de l ’ horloge est en servicemais l ’ horloge ne s ’ affiche pas...
Page 24 - Conseils sur la manipulation; Disques et lecteur
Message Causes possi-bles Action correc-tive PROTECT Tous les fichiersdu périphériquede stockageUSB intègrentla protectionWindows MediaDRM 9/10. Transférez des fi-chiers audio n ’ in- tégrant pas laprotectionWindows MediaDRM 9/10 vers lepériphérique destockage USB etprocédez à laconnexion. N/A USB L...
Page 25 - Séquence des fichiers audio; utilisateur ne peut pas affecter; La séquence de sélection des dossiers ou d
DualDiscs Les DualDiscs sont des disques à deux faces avecun CD enregistrable pour l ’ audio sur une face et un DVD enregistrable pour la vidéo sur l ’ autre. Comme la face CD des DualDiscs n ’ est pas physi- quement compatible avec le standard CD général,la lecture de la face CD sur cet appareil pe...
Page 26 - ne comporte pas de licence ni n; WMA; autres
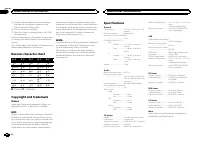
Tableau des caractèrescyrilliques D : C D : C D : C D : C D : C : А : Б : В : Г : Д : Е , Ё : Ж : З : И , Й : К : Л : М : Н : О : П : Р : С : Т : У : Ф : Х : Ц : Ч : Ш , Щ : Ъ : Ы : Ь : Э : Ю : Я D : Affichage C : Caractère Droits d ’ auteur et marques commerciales iTunes Apple et iTunes sont des ma...
Page 28 - PRODOTTO LASER DI CLASSE 1; ATTENZIONE
Grazie per aver acquistato questo prodotto PIONEER Leggere attentamente questo manuale prima diutilizzare il prodotto, per assicurarne il correttoutilizzo. È particolarmente importante leggere eosservare le precauzioni contrassegnate da AV- VERTENZA e ATTENZIONE in questo ma- nuale. Conser vare ques...
Page 29 - Italiano
Unità principale b c d e a 8 7 12 3 4 5 6 9 Componente Componente 1 h (espulsione) 8 (tasto indietro) 2 (lista) 9 c / d 3 MULTI-CONTROL ( M.C. ) a BAND 4 SRC / OFF b Da 1 / a 6 / 5 Vano d ’ inserimen- to dei dischi c (orologio) 6 Porta USB d Connettore di in-gresso ausiliario(AUX) (connettorestereo ...
Page 30 - Funzionamento di base; Nota
Note ! È possibile configurare le opzioni di menunelle impostazioni iniziali. Per informazionidettagliate sulle impostazioni, vedere Impo- stazioni iniziali a pagina 33. ! È possibile annullare il menu di configurazio-ne premendo SRC / OFF . Funzionamento di base Importante ! Rimuovere e inserire il...
Page 31 - Uso dei tasti di preselezione sintonia; Quando viene individuata una stazione; Scorrimento del display RDS; Premere; Uso delle funzioni PTY; Impostazioni delle funzioni; opzione di; Funzionamento dell
Memorizzazione e richiamo dellestazioni per ciascuna banda Uso dei tasti di preselezione sintonia 1 Quando viene individuata una stazione che si desidera memorizzare, premere unodei tasti di preselezione sintonia (da 1 a 6),mantenendolo premuto fino a quando il nu-mero di preselezione non cessa di l...
Page 32 - elenco dei nomi
Visualizzazione delleinformazioni di testo Selezione delle informazioni di testo desiderate 1 Premere . ! A seconda della versione di iTunes utilizzataper scrivere i file MP3 o del tipo di file multime-diali, il testo memorizzato su un file audio po-trebbe essere incompatibile e non esserevisualizza...
Page 35 - Importante; Installazione; Installazione
Questa unità DEH-142UB, DEH-140UB e DEH-140UBB 1 3 4 5 2 DEH-141UB 1 3 4 2 1 Ingresso cavo di alimentazione 2 Uscita posteriore 3 Ingresso antenna 4 Fusibile (10 A) 5 Ingresso remoto cablatoÈ possibile collegare un adattatore per tele-comando cablato (venduto a parte). Cavo di alimentazione 1 3 3 2 ...
Page 36 - Montaggio DIN anteriore/posteriore; Montaggio DIN anteriore; Rimozione del fronta-
! Durante l ’ installazione, per assicurare la cor- retta dissipazione del calore quando si utiliz-za l ’ unità, accertarsi di lasciare ampio spazio dietro il pannello posteriore e avvolgere even-tuali cavi allentati in modo che non ostrui-scano le aperture. 5cm cm Lasciare ampio spazio 5 cm 5 cm Mo...
Page 37 - Informazioni supplementari
Risoluzione dei problemi Sintomo Causa Azione Il display siaccende e sispegne conpause variabi-li. La modalità di-mostrazione èattiva. Disattivare la mo-dalità dimostra-zione. Se il displaydell ’ orologio è attivato, l ’ oro- logio nonviene visualiz-zato. La modalità di-mostrazione èattiva. Disattiv...
Page 38 - Linee guida per l; Dischi e lettori
Messaggio Causa Azione N/A USB Il dispositivoUSB collegatonon è supporta-to da questaunità. ! Collegare un di- spositivo USBcompatibile conlo standard MSC(Mass StorageClass). ! Scollegare il di- spositivo e sosti-tuirlo con undispositivo di me-moria USB com-patibile. CHECK USB Il connettoreUSB o il ...
Page 39 - utente non può assegnare i
Durante la guida fissare saldamente il dispositivodi memoria USB. Non lasciar cadere il dispositivodi memoria USB sul fondo della vettura, dove po-trebbe incastrarsi sotto il pedale del freno o del-l ’ acceleratore. A seconda del dispositivo di memoria USB, po-trebbero verificarsi i problemi seguent...
Page 40 - Inserire tali file in una cartella.; Tabella dei caratteri cirillici; Dati tecnici
Disco La sequenza di selezione delle cartelle o altreoperazioni potrebbero risultare differenti, a se-conda del software utilizzato per la codifica o lascrittura. Dispositivo di memoria USB La sequenza di riproduzione è la stessa della se-quenza di registrazione sul dispositivo di memo-ria USB.Per s...
Page 42 - Gracias; PRODUCTO LASER CLASE 1; PRECAUCIÓN; Evite la exposición a la humedad.
Gracias por haber adquirido este producto PIONEER Lea con detenimiento este manual antes de utili-zar el producto por primera vez para que puedadarle el mejor uso posible. Es muy importanteque lea y cumpla con la información que apare-ce bajo los mensajes de ADVERTENCIA y PRECAUCIÓN en este manual. ...
Page 43 - Unidad principal; No utilice productos no autorizados.; Indicaciones del display; Menú de configuración; Una vez instalada la unidad, gire la llave; Utilización de esta unidad
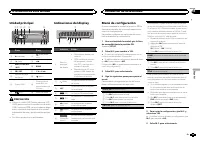
Unidad principal b c d e a 8 7 12 3 4 5 6 9 Parte Parte 1 h (expulsar) 8 (parte poste- rior) 2 (lista) 9 c / d 3 MULTI-CONTROL ( M.C. ) a BAND 4 SRC / OFF b 1 / a 6 / 5 Ranura de cargade discos c (reloj) 6 Puerto USB d Conector de en-trada AUX (co-nector estéreo de3,5 mm) 7 (EQ) e Botón de soltar PR...
Page 44 - Sintonizador; Funcionamiento básico
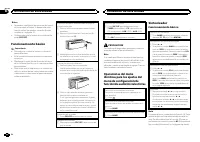
Notas ! Se pueden configurar las opciones del menúen los ajustes iniciales. Si desea más infor-mación sobre los ajustes, consulte Ajustes iniciales en la página 47. ! Si desea cancelar el menú de configuración,pulse SRC / OFF . Funcionamiento básico Importante ! Proceda con cuidado al retirar o colo...
Page 45 - Cambio de la visualización RDS; Pulse; Uso de las funciones PTY; Ajustes de funciones; menú y pulse para seleccionar FUNCTION.
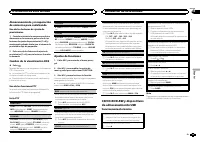
Almacenamiento y recuperaciónde emisoras para cada banda Uso de los botones de ajuste depresintonías 1 Cuando encuentre la emisora que desea almacenar en la memoria, pulse uno de losbotones de ajuste de presintonías (1 a 6) ymanténgalo pulsado hasta que el número depresintonía deje de parpadear. 2 P...
Page 46 - Ajustes de audio; menú y pulse para seleccionar AUDIO.
Visualización de información detexto Selección de la información de texto deseada 1 Pulse . ! Según la versión de iTunes utilizada para gra-bar archivos MP3 en un disco u otro tipo de ar-chivos de medios, es posible que los textoscontenidos en el archivo de audio no se mues-tren correctamente si su ...
Page 47 - Ajustes iniciales; Uso de una fuente AUX; Silenciamiento del sonido; El sonido se silencia automáticamente cuando:
Ajustes iniciales Importante PW SAVE (ahorro de energía) se cancela si la batería del vehículo se desconecta, y se debe ac-tivar de nuevo cuando se vuelva a conectar labatería. Dependiendo de los métodos de cone-xión, cuando PW SAVE (ahorro de energía) está desactivado, la unidad puede seguir obteni...
Page 48 - Conexiones; Esta unidad; Instalación
Conexiones Importante ! Cuando esta unidad se instale en un ve-hículo sin posición ACC (accesorio) en lallave de encendido, el cable rojo se debe co-nectar al terminal que pueda detectar la ope-ración de la llave de encendido. De locontrario, puede descargarse la batería. O N S T A R T O F F Posició...
Page 49 - Montaje delantero/posterior de DIN; Montaje delantero DIN; Inserte el manguito de montaje en el sal-
a Azul/blancoConectar al terminal de control del sistemadel amplificador de potencia (máx. 300 mA12 V CC). b Azul/blancoConectar al terminal de control del relé de laantena automática (máx. 300 mA 12 V CC). c Amarillo/negro Sólo para DEH-142UB, DEH-140UB y DEH-140UBB . Si utiliza un equipo con funci...
Page 50 - Montaje trasero DIN; Determine la posición correcta, de modo; Extracción de la unidad; Retire el anillo de guarnición.; Inserte en ambos lados de la unidad las; Retirada y colocación del panel delantero; Colocación del panel delantero; Solución de problemas; Mensajes de error; Información adicional
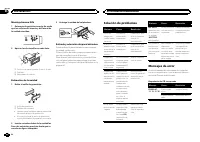
Montaje trasero DIN 1 Determine la posición correcta, de modo que los orificios del soporte y del lateral dela unidad coincidan. 2 Apriete los dos tornillos en cada lado. 1 2 3 1 Tornillo con rosca cortante (5 mm × 8 mm) 2 Carcasa 3 Salpicadero o consola Extracción de la unidad 1 Retire el anillo de...
Page 51 - Español
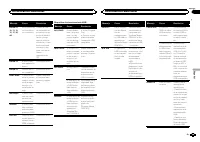
Mensaje Causa Resolución ERROR-07,10, 11, 12,15, 17, 30,A0 Se ha producidoun error eléctri-co o mecánico. Cambie la llavede encendido delautomóvil a la po-sición de desacti-vación y luegopase de nuevo aactivación, o cam-bie a una fuentediferente, y des-pués vuelva a ac-tivar elreproductor deCD. ERRO...
Page 52 - Pautas para el manejo; Discos y reproductor; DualDisc; WAV
Mensaje Causa Resolución ERROR-23 El dispositivo dealmacenamien-to USB no estáformateado conFAT16 ni FAT32. El dispositivo dealmacenamientoUSB debe forma-tearse con FAT16o FAT32. Pautas para el manejo Discos y reproductor Utilice únicamente discos que tengan uno deestos dos logotipos: Utilice sólo d...
Page 53 - Secuencia de archivos de audio; Disco; Coloque esos archivos en una carpeta.; Tabla de caracteres rusos
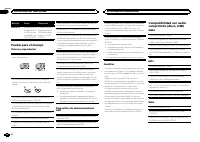
Información complementaria Sólo se pueden visualizar los primeros 32 caracte-res como nombre de archivo (incluida la exten-sión) o nombre de carpeta. Los textos en ruso que se visualizarán en esta uni-dad se deben codificar con los siguientes conjun-tos de caracteres: ! Unicode (UTF-8, UTF-16) ! Los...
Page 54 - Especificaciones
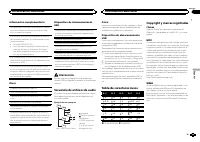
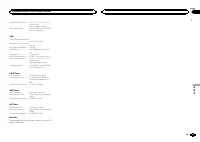
Especificaciones Generales Fuente de alimentación .... 14,4 V CC (10,8 V a 15,1 V per- misible) Sistema de derivación a tierra ................................... Tipo negativo Consumo máximo de corriente ................................... 10,0 A Dimensiones (An × Al × Pr): DIN Bastidor ..............
Page 56 - Zu diesem Gerät; LASER KLASSE 1; VORSICHT; Zu dieser Anleitung; Im Störungsfall; Bevor Sie beginnen
Vielen Dank , dass Sie sich für dieses PIONEER-Produkt entschieden haben Bitte lesen Sie diese Anleitung vor der Verwen-dung dieses Produkts zur Gewährleistung seinerordnungsgemäßen Verwendung durch. Lesenund befolgen Sie dabei insbesondere die Hin-weise WARNUNG und VORSICHT . Bewahren Sie die Anlei...
Page 57 - Hauptgerät; Drehen Sie nach der Installation des Ge-; Bedienung des Geräts
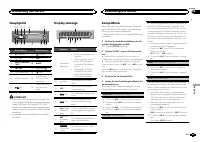
Hauptgerät b c d e a 8 7 12 3 4 5 6 9 Bezeichnung Bezeichnung 1 h (Auswurf) 8 (zurück) 2 (Liste) 9 c / d 3 MULTI-CONTROL ( M.C. ) a BAND 4 SRC / OFF b 1 / bis 6 / 5 Disc-Ladeschacht c (Uhr) 6 USB-Anschluss d AUX-Eingang(3,5-mm-Stereo-anschluss) 7 (EQ) e Taste zum Entrie-geln der Front-platte VORSICH...
Page 58 - Wichtig; Hinweis; Hinweis
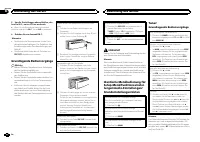
5 Um die Einstellungen abzuschließen, dre- hen Sie M.C., um zu YES zu wechseln. # Wenn Sie die Einstellung erneut vornehmen möchten, drehen Sie M.C. , um zu NO zu wechseln. 6 Drücken Sie zur Auswahl M.C. Hinweise ! Sie können die Menüoptionen in den Grun-deinstellungen festlegen. Für Details zu denE...
Page 59 - Verwendung der Stationstasten; Zum Speichern eines abgestimmten Sen-; Umschalten der RDS-Anzeige; Drücken Sie; Funktionseinstellungen; Deutsch
Speichern und Abrufen vonRadiostationen für jedes Band Verwendung der Stationstasten 1 Zum Speichern eines abgestimmten Sen- ders drücken Sie eine der Stationstasten (1bis 6) und halten diese gedrückt, bis dieStationsnummer nicht mehr blinkt. 2 Drücken Sie eine der Stationstasten (1 bis 6) zur Auswa...
Page 60 - Anzeigen von Textinformationen
Hinweis Trennen Sie USB-Speichermedien bei Nichtver-wendung von diesem Gerät. Anzeigen von Textinformationen Wählen der gewünschten Textinformationen 1 Drücken Sie . ! Abhängig vom Mediadateityp bzw. der für dasSchreiben der MP3-Dateien auf eine Disc ver-wendeten Version von iTunes werden die mitden...
Page 61 - Grundeinstellungen
Die Lautheit-Funktion kompensiert die verminderteWahrnehmung von niedrigen und hohen Frequen-zen bei geringer Lautstärke. 1 Drücken Sie M.C. , um die gewünschte Einstel- lung zu wählen. OFF (Aus) — LOW (Niedrig) — HI (Hoch) SLA (Programmquellen-Pegeleinstellung) Mit der Programmquellen-Pegeleinstell...
Page 62 - Abschalten des Tons; Der Ton wird abgeschaltet, im Display erscheint; Anschlüsse
Ein- oder Ausschalten derZeitanzeige % Drücken Sie , um die Zeitanzeige im Display ein- oder auszuschalten. # Bei der Durchführung anderer Arbeitsschritte wird die Uhrzeit vorübergehend ausgeblendet, nach25 Sekunden erscheint die Zeitanzeige jedoch wiederim Display. Abschalten des Tons Nur für DEH-1...
Page 64 - Entfernen des Geräts; Entfernen der Frontplatte zum Schutz vor
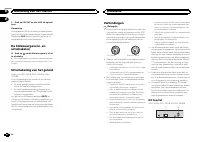
! Optimale Leistung kann durch eine Installa-tion des Geräts in einem Winkel unter 60° er-zielt werden. 60° ! Um beim Gebrauch des Geräts eine ord-nungsgemäße Wärmezerstreuung zu ge-währleisten, ist bei der Installation genügendFreiraum hinter der Rückseite vorzusehen.Lose Kabel sind aufzuwickeln, d...
Page 65 - Zusätzliche Informationen
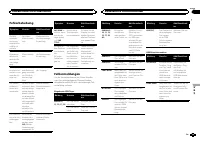
Fehlerbehebung Symptom Ursache Abhilfemaßnah-me Die Bild-schirmbe-leuchtungschaltet sichzufällig einund aus. Der Demo-Modus ist akti-viert. Deaktivieren Siedie Demoanzeige-Einstellung. Obwohl dieZeitanzeigeaktiviert ist,wird die Uhrnicht ange-zeigt. Der Demo-Modus ist akti-viert. Deaktivieren Siedie...
Page 66 - Handhabungsrichtlinien; Discs und Player
Meldung Ursache Abhilfemaßnah-me NO AUDIO Es sind keineMusiktitel vor-handen. Übertragen Siedie Audio-Dateienauf das USB-Spei-chermedium undschließen Sie dasGerät dann an. Es wurde einUSB-Speicher-medium mit ak-tivierter Sicher-heitsfunktionangeschlossen. Halten Sie sichan die Anweisun-gen in der Be...
Page 67 - DualDiscs
Kondensation kann eine vorübergehende Störungder Player-Leistung zur Folge haben. Warten Sie indiesem Fall etwa eine Stunde ab, bis sich derPlayer an die höheren Temperaturen angepassthat. Zudem sollten feuchte Discs mit einem wei-chen Tuch trockengerieben werden. Unter Umständen ist eine Disc-Wiede...
Page 68 - Disc; mand; Allgemein
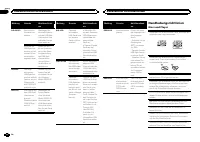
USB-Speichermedium Abspielbare Ordnerstruktur: bis zu acht Ebenen(der Einfachheit halber sollte die Ordnerstrukturjedoch aus weniger als zwei Ebenen bestehen). Abspielbare Ordner: bis zu 500 Abspielbare Dateien: bis zu 15 000 Wiedergabe von urheberrechtlich geschützten Da-teien: Nicht kompatibel Par...
Page 69 - USB
WMA-Decodiermodus ...... Vers. 7, 7.1, 8, 9, 10, 11, 12 (2- Kanal-Audio)(Windows Media Player) WAV-Signalformat ............ Lineare PCM und MS ADPCM (nicht komprimiert) USB USB-Standard-Spezifikation ................................... USB 2.0 Full Speed Maximale Stromversorgung ......................
Page 70 - Hartelijk dank; Informatie over dit toestel; LET OP; Demostand; Bij problemen; Vóór u begint
Hartelijk dank voor uw vertrouwen in ons bij de aankoop van dit Pioneer-product Lees deze handleiding voordat u het product ingebruik neemt zodat u het goed leert gebruiken.Lees vooral de gedeelten die met WAARSCHU- WING en LET OP gemarkeerd zijn aandachtig. Bewaar deze handleiding na het lezen op e...
Page 71 - Hoofdtoestel; Instellingenmenu; Zet het contact aan na de installatie van; Bediening van het toestel
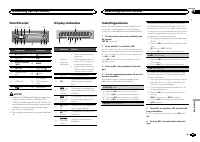
Hoofdtoestel b c d e a 8 7 12 3 4 5 6 9 Onderdeel Onderdeel 1 h (uitwerpen) 8 (achteruit) 2 (lijst) 9 c / d 3 MULTI-CONTROL ( M.C. ) a BAND 4 SRC / OFF b 1 / tot 6 / 5 Laadsleuf voordisc c (klok) 6 USB-poort d AUX-ingang(3,5mm-stereo-plug) 7 (EQ) e Verwijderen LET OP ! Verbind uw USB-speler/USB-gehe...
Page 72 - Belangrijk; Opmerking; Basisbediening
Opmerkingen ! U kunt de menu-opties instellen in de begin-instellingen. Raadpleeg Begininstellingen op bladzijde 75 voor meer informatie over de in-stellingen. ! U kunt het instellingenmenu weer annulerendoor op SRC / OFF te drukken. Basisbediening Belangrijk ! Wees voorzichtig bij het verwijderen e...
Page 73 - De voorkeuzetoetsen gebruiken; Stem af op de zender die u in het geheu-; Nederlands
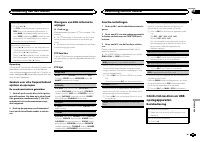
Handmatig afstemmen (stap voor stap) 1 Druk op c of d . ! Als PCH (voorkeuzezender) is geselecteerd in SEEK kunt u niet handmatig afstemmen. U moet MAN (handmatig afstemmen) selecte- ren in SEEK . Raadpleeg SEEK (instelling linker/ rechter toets) op deze bladzijde voor meer in- formatie over de inst...
Page 74 - Tekstinformatie weergeven; Druk op
Songs op een USB-opslagapparaat afspelen 1 Open het deksel van de USB-poort. 2 Sluit een USB-opslagapparaat aan via eenUSB-kabel.Er wordt automatisch een song afgespeeld. Stoppen met afspelen van songs op een USB-op-slagapparaat 1 U kunt een USB-opslagapparaat op elk ge-wenst moment verwijderen.Het ...
Page 75 - Begininstellingen
TONE CTRL (equalizerinstelling) ! Aangepaste equalizerinstellingen worden op-geslagen in CUSTOM . 1 Druk op M.C. om de instellingenmodus weer te geven. 2 Selecteer BASS (lage tonen), MID (middento- nen) of TREBLE (hoge tonen) met M.C. 3 Draai aan M.C. om het niveau te regelen. Instelbereik: +6 tot –...
Page 76 - Uitschakeling van het geluid; Het geluid wordt uitgeschakeld en; Verbindingen; Dit toestel; Installatie
2 Druk op SRC/OFF en kies AUX als signaal- bron. Opmerking De signaalbron AUX kan alleen worden geselec-teerd als de externe aansluiting is ingeschakeld.Raadpleeg AUX (externe aansluiting) op de vo- rige bladzijde voor meer informatie. De klokweergave in- enuitschakelen % Druk op om de klokweergave ...
Page 77 - Stroomkabel; Schuif de montagebehuizing in het dash-
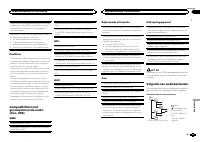
DEH-141UB 1 3 4 2 1 Ingang stroomkabel 2 Achteruitgang 3 Antenne-ingang 4 Zekering (10 A) 5 Ingang voor draadafstandsbedieningEen bedrade afstandsbedieningsadapter kanaangesloten worden (los verkrijgbaar). Stroomkabel 1 3 3 2 4 4 5 5 6 6 b 8 9 7 a e d c 1 Naar ingang stroomkabel 2 De functie van 3 e...
Page 78 - Het toestel verwijderen; Het voorpaneel tegen diefstal ver wij-
2 Zet de montagebehuizing vast door met een schroevendraaier de metalen lipjes ophun plaats te buigen (90°). 1 2 1 Dashboard 2 Montagebehuizing 3 Installeer het toestel zoals aangegeven. 1 2 3 4 5 1 Moer 2 Brandmuur of metalen steunvlak 3 Metalen band 4 Schroef 5 Schroef (M4 × 8) # Controleer of het...
Page 79 - Problemen verhelpen; Foutmeldingen; Aanvullende informatie
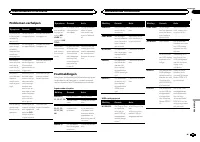
Problemen verhelpen Symptoom Oorzaak Actie De displayver-lichting gaatwillekeurigaan en uit. De demostandis ingeschakeld. Schakel de demo-weergave uit. De klokweer-gave is inge-schakeldmaar de klokwordt nietweergegeven. De demostandis ingeschakeld. Schakel de demo-weergave uit. Het displaykeert auto...
Page 80 - Aanwijzingen voor het gebruik; Discs en de player
Melding Oorzaak Actie N/A USB Het aangeslotenUSB-apparaatwordt door dittoestel niet on-dersteund. ! Gebruik een op- slagapparaat datcompatibel is metUSB Mass Sto-rage Class. ! Ontkoppel het apparaat en sluiteen compatibelUSB-opslagappa-raat aan. CHECK USB Er is kortsluitingopgetreden inde USB-aanslu...
Page 81 - Volgorde van audiobestanden
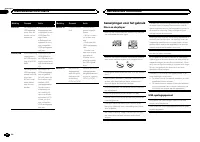
Maak het USB-opslagapparaat stevig vast voordatu gaat rijden. Zorg dat het niet op de grond valtomdat het dan onder het rem- of gaspedaal te-recht kan komen. Afhankelijk van het USB-opslagapparaat kunnende volgende problemen voorkomen: ! De bediening kan anders verlopen. ! Het opslagapparaat wordt n...
Page 82 - Plaats de bestanden in een map.; Lijst van Russische tekens; Technische gegevens; Algemeen
Disc De mapvolgorde en andere instellingen zijn af-hankelijk van de software die voor het coderenen schrijven is gebruikt. USB-opslagapparaat De afspeelvolgorde is gelijk aan de volgordewaarin de bestanden zijn opgenomen op hetUSB-opslagapparaat.Ga als volgt te werk als u wilt dat bestanden ineen be...
Page 84 - Благодарим Вас; PIONEER; Держите данное; Сведения об этом устройстве; RDS; ЛАЗЕРНЫЙ ПРОДУКТ КЛАСС 1; ВНИМАНИЕ; Pioneer CarStereo-Pass; Сведения об этом руководстве; ACC; Перед началом эксплуатации
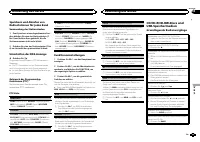
Благодарим Вас за покупку этого изделия компании PIONEER Для обеспечения правильности эксплуата - ции внимательно прочитайте данное руко - водство перед началом использованияизделия . Особенно важно , чтобы Вы прочли и соблюдали инструкции , помеченные в дан - ном руководстве заголовками ПРЕДУПРЕ - ...
Page 85 - Основное устройство; Индикация на дисплее; ON; Управление устройством
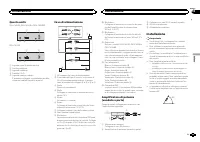
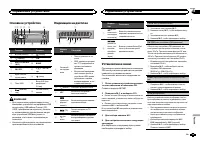
Основное устройство b c d e a 8 7 12 3 4 5 6 9 Элемент Элемент 1 h ( извлечение ) 8 ( назад ) 2 ( список ) 9 c / d 3 MULTI-CONTROL ( M.C. ) a BAND 4 SRC / OFF b 1 / С 1 по 6 6 / 5 Щель для за - грузки диска c ( часы ) 6 Порт USB d Вход AUX ( сте - реоразъем 3,5 мм ) 7 ( эквалай - зер ) e Кнопка снят...
Page 86 - YES; На; SRC; Основные операции; SEEK
5 Чтобы завершить настройку , поверни - те M.C. и выберите YES . # Если нужно изменить настройки , поверните M.C. и выберите NO . 6 Для выбора нажмите M.C. Примечания ! Настроить параметры меню можно вовремя начальной настройки . Более под - робную информацию см . в разделе На - чальные настройки на...
Page 87 - Кнопки предварительной настройки; Переключение режима; PTY; Использование функций; Настройка функций; FUNCTION; запоминающие устройства
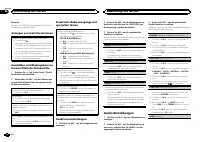
Сохранение и вызов из памятирадиостанций для каждогодиапазона Кнопки предварительной настройки 1 Чтобы сохранить в памяти нужную ра - диостанцию , нажмите одну из кнопок предварительной настройки ( с 1 по 6 ) и удерживайте ее , пока номер предвари - тельной настройки не прекратит мигать . 2 Для выбо...
Page 88 - дорожек из списка
Ускоренная перемотка вперед или назад 1 Нажмите и удерживайте кнопку c или d . ! При воспроизведении сжатых аудиофай - лов звук не воспроизводится , если включе - на ускоренная перемотка вперед илиназад . Возврат в корневую папку 1 Нажмите и удерживайте BAND . Переключение между сжатыми аудиофайлами...
Page 89 - Регулировки параметров звука; AUDIO; Начальные настройки; PW SAVE
Регулировки параметров звука 1 Нажмите M.C. , чтобы открыть главное меню . 2 Вращайте M.C. для прокрутки пунктов меню . Для выбора пункта нажмите AUDIO . 3 Для выбора аудиофункции вращайте M.C. Затем выполните следующие действия , чтобы подтвердить настройку аудиофунк - ции . FAD/BAL ( регулировка у...
Page 90 - AUX; Приглушение звука; Только для; MUTE; Соединения; Установка
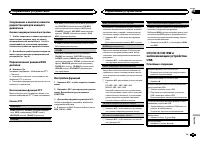
DEMO ( настройка демонстрационного режи - ма ) 1 Нажмите M.C. , чтобы включить или выклю - чить демонстрационный режим . ! Если включен режим PW SAVE , режим DEMO выбрать нельзя . SCROLL ( настройка режима прокрутки ) Если для функции постоянной прокрутки уста - новлено значение ON , то текстовая ин...
Page 91 - ISO; Audio Mute; Усилитель мощности; RCA; Важно
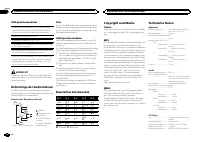
! Черный кабель является заземляющим . Заземляющие кабели данного устройстваи других устройств ( особенно устройств , предназначенных для эксплуатации прибольших токах , таких как усилитель мощ - ности ) должны монтироваться отдельно . В противном случае их случайное отсое - динение может привести к...
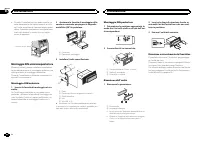
Page 92 - Переднее; Переднее крепление стандарта
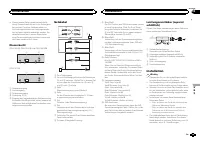
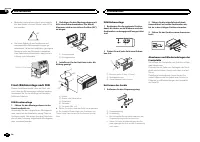
! Перегрев полупроводникового лазераприведет к его выходу из строя . Разме - стите все кабели в удалении от нагреваю - щихся деталей , таких как решетка обогревателя . ! Оптимальной является установка устрой - ства под углом менее 60°. 60° ! При установке необходимо обеспечитьэффективный отвод тепла...
Page 93 - Pioneer; Дополнительная информация
Устранение неисправностей Признак Причина Действие Подсветкадисплеявключаетсяи выключает - ся случай - ным образ - ом . Включен де - монстрацион - ный режим . Выключите де - монстрацион - ный режим . Отображе - ние часоввключено , но часы не вы - водятся . Включен де - монстрацион - ный режим . Выкл...
Page 94 - Диски и проигрыватель
Сообщение Причина Действие PROTECT Все файлы назапоминаю - щем устрой - стве USB закодированы Windows MediaDRM 9/10. Перенесите ау - диофайлы , не закодированные Windows MediaDRM 9/10, на за - поминающее ус - тройство USB и подключите его . N/A USB Подключенноеустройство USB не под - держиваетсяданн...
Page 95 - компакт; Не оставляйте диски или запоминающее ус
При движении автомобиля надежно закрепитезапоминающее устройство USB. Не роняйте запоминающее устройство USB на пол , где оно может застрять под педалью тормоза илиакселератора . В зависимости от типа запоминающего устрой - ства USB могут возникнуть следующие про - блемы . ! Управление функциями мож...
Page 96 - Диск; Технические характеристики; Общие; Аудио
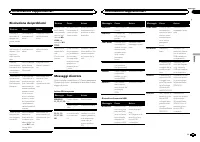
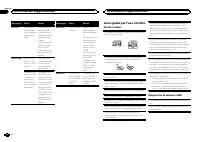
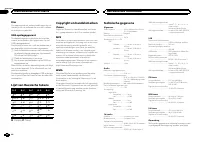
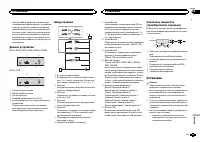
Последовательностьвоспроизведенияаудиофайлов Пользователь не может назначать номерапапок и устанавливать последовательностьвоспроизведения с помощью данного ус - тройства . Пример иерархии 12 34 56 01 02 03 04 05 : папка : сжатый ауди - офайлот 01 до 05: Номер папкиот 1 до 6 : после - довательностьв...
Page 99 - Русский


 Pioneer AVH-P3100DVD
Manual
Pioneer AVH-P3100DVD
Manual
 Pioneer AVH-P3200BT
Manual
Pioneer AVH-P3200BT
Manual
 Pioneer AVH-P3300BT
Manual
Pioneer AVH-P3300BT
Manual
 Pioneer AVH-P4000DVD
Manual
Pioneer AVH-P4000DVD
Manual
 Pioneer AVH-P4100DVD
Manual
Pioneer AVH-P4100DVD
Manual
 Pioneer AVH-P5000DVD
Manual
Pioneer AVH-P5000DVD
Manual
 Pioneer AVH-P5100DVD
Manual
Pioneer AVH-P5100DVD
Manual
 Pioneer AVH-P5200BT
Manual
Pioneer AVH-P5200BT
Manual
 Pioneer AVH-P6000DVD
Manual
Pioneer AVH-P6000DVD
Manual
 Pioneer AVH-P6500DVD
Manual
Pioneer AVH-P6500DVD
Manual
 Pioneer AVH-P6800DVD
Manual
Pioneer AVH-P6800DVD
Manual
 Pioneer AVH-P7500DVD
Manual
Pioneer AVH-P7500DVD
Manual
 Pioneer AVH-P7800DVD
Manual
Pioneer AVH-P7800DVD
Manual
 Pioneer AVH-X1500DVD
Manual
Pioneer AVH-X1500DVD
Manual
 Pioneer AVH-X1800DVD
Manual
Pioneer AVH-X1800DVD
Manual
 Pioneer AVH-X2500BT
Manual
Pioneer AVH-X2500BT
Manual
 Pioneer AVH-X2800BT
Manual
Pioneer AVH-X2800BT
Manual
 Pioneer AVH-X4800DVD
Manual
Pioneer AVH-X4800DVD
Manual
 Pioneer AVH-X5800BT
Manual
Pioneer AVH-X5800BT
Manual
 Pioneer AVH-X7500BT
Manual
Pioneer AVH-X7500BT
Manual